
Users Manual - English
Page 2
..., fire, electric shock, or injury to break. 12. To reduce the risk of lint, dust, and loose cloth. 5. Never operate the machine with the same type and rated 15 watts. Keep ventilation openings of electric shock: 1. The wrong plate can cause the needle to persons: 1....not use bent needles. 13. Always use . WARNING - Do not operate where aerosol (spray) products are being administered. 8. Always unplug the machine from the electrical outlet when removing covers, lubricating, or when making any other user servicing adjustments mentioned in the instruction manual. 16. Do not...
..., fire, electric shock, or injury to break. 12. To reduce the risk of lint, dust, and loose cloth. 5. Never operate the machine with the same type and rated 15 watts. Keep ventilation openings of electric shock: 1. The wrong plate can cause the needle to persons: 1....not use bent needles. 13. Always use . WARNING - Do not operate where aerosol (spray) products are being administered. 8. Always unplug the machine from the electrical outlet when removing covers, lubricating, or when making any other user servicing adjustments mentioned in the instruction manual. 16. Do not...
Users Manual - English
Page 3
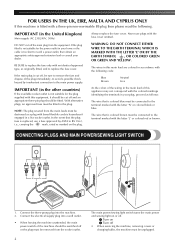
... OR BY THE EARTH SYMBOL , OR COLORED GREEN OR GREEN AND YELLOW. Connect the three-prong plug into a wall outlet. • When leaving the machine unattended, the main power switch of this main lead are colored in the other countries) If the available socket outlet is colored blue must be... destroyed as marked on 2 Turn off , be cut off • When servicing the machine, removing covers or changing bulbs, the machine must be fitted in your home or the cable is not suitable for the plug supplied with the following . In the event...
... OR BY THE EARTH SYMBOL , OR COLORED GREEN OR GREEN AND YELLOW. Connect the three-prong plug into a wall outlet. • When leaving the machine unattended, the main power switch of this main lead are colored in the other countries) If the available socket outlet is colored blue must be... destroyed as marked on 2 Turn off , be cut off • When servicing the machine, removing covers or changing bulbs, the machine must be fitted in your home or the cable is not suitable for the plug supplied with the following . In the event...

Users Manual - English
Page 4
... ...7 Foot Controller ...7 Inserting the Needle ...7 Checking the Needle ...8 Changing the Presser Foot ...8 Converting to Free-arm Style ...9 Steadying the Machine ...9 THE CONTROLS ...10 Pattern Selection Dial ...10 Recommended Widths and Lengths for Stitches 11 Stitch Length Dial ...13 Stretch Stitching ...13 Stitch ...Width Dial ...14 Reverse Sewing Lever ...14 Drop Feed Lever (if the machine is equipped with a drop feed lever 14 THREADING THE MACHINE 15 Winding the Bobbin ...15 Lower Threading ...16 Upper Threading ...18 Using the Needle Threader (models ...
... ...7 Foot Controller ...7 Inserting the Needle ...7 Checking the Needle ...8 Changing the Presser Foot ...8 Converting to Free-arm Style ...9 Steadying the Machine ...9 THE CONTROLS ...10 Pattern Selection Dial ...10 Recommended Widths and Lengths for Stitches 11 Stitch Length Dial ...13 Stretch Stitching ...13 Stitch ...Width Dial ...14 Reverse Sewing Lever ...14 Drop Feed Lever (if the machine is equipped with a drop feed lever 14 THREADING THE MACHINE 15 Winding the Bobbin ...15 Lower Threading ...16 Upper Threading ...18 Using the Needle Threader (models ...

Users Manual - English
Page 5
KNOWING YOUR SEWING MACHINE PRINCIPAL PARTS 1 Bobbin-winding assembly (page 15) This winds the thread onto the bobbin, which you use this to stitch in the reverse direction. F Main ... to choose the stitch you (counterclockwise) to the power supply. I Foot controller (page 7) You can turn this in the foot controller plug and connect the machine to raise and lower the needle. J Zigzag presser foot H Presser foot lever (page 8) This raises and lowers the presser foot. A Buttonhole fine adjustment screw (page...
KNOWING YOUR SEWING MACHINE PRINCIPAL PARTS 1 Bobbin-winding assembly (page 15) This winds the thread onto the bobbin, which you use this to stitch in the reverse direction. F Main ... to choose the stitch you (counterclockwise) to the power supply. I Foot controller (page 7) You can turn this in the foot controller plug and connect the machine to raise and lower the needle. J Zigzag presser foot H Presser foot lever (page 8) This raises and lowers the presser foot. A Buttonhole fine adjustment screw (page...
Users Manual - English
Page 6
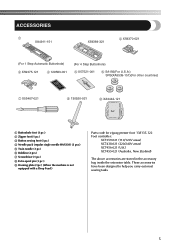
... foot (1 pc.) 4 Needle pack (regular single needle HAX130) (3 pcs.) 5 Twin needle (1 pc.) 6 Bobbins (3 pcs.) 7 Screwdriver (1 pc.) 8 Extra spool pin (1 pc.) 9 Darning plate (1pc.) (When the machine is not equipped with a Drop Feed.) Parts code for zigzag presser foot: 138135-122 Foot controller: XC7359-021 (110/120V areas) XC7438-021 (220/240V...
... foot (1 pc.) 4 Needle pack (regular single needle HAX130) (3 pcs.) 5 Twin needle (1 pc.) 6 Bobbins (3 pcs.) 7 Screwdriver (1 pc.) 8 Extra spool pin (1 pc.) 9 Darning plate (1pc.) (When the machine is not equipped with a Drop Feed.) Parts code for zigzag presser foot: 138135-122 Foot controller: XC7359-021 (110/120V areas) XC7438-021 (220/240V...
Users Manual - English
Page 7
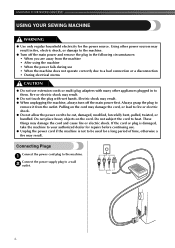
...damage the cord, or lead to fire or electric shock. ● Do not allow the power cord to them. KNOWING YOUR SEWING MACHINE USING YOUR SEWING MACHINE WARNING ● Use only regular household electricity for a long period of time, otherwise a fire may result. Always grasp the plug to... or a disconnection • During electrical storms CAUTION ● Do not use . ● Unplug the power cord if the machine is damaged, take the machine to your authorized dealer for repairs before continuing use extension cords or multi-plug adapters with wet hands. Using other appliances plugged in...
...damage the cord, or lead to fire or electric shock. ● Do not allow the power cord to them. KNOWING YOUR SEWING MACHINE USING YOUR SEWING MACHINE WARNING ● Use only regular household electricity for a long period of time, otherwise a fire may result. Always grasp the plug to... or a disconnection • During electrical storms CAUTION ● Do not use . ● Unplug the power cord if the machine is damaged, take the machine to your authorized dealer for repairs before continuing use extension cords or multi-plug adapters with wet hands. Using other appliances plugged in...

Users Manual - English
Page 8
...the foot controller, the machine will start and you may bend or break and cause injury. ● Never sew with Models XL-5500/XL-5600/XL-5700/ XL-5510/XL-5610/XL-5710. . A bent needle will run at a low speed. Foot Controller When you press harder, the machine's speed will stop. When... you press the foot controller down lightly, the machine will easily break and cause injury. ...
...the foot controller, the machine will start and you may bend or break and cause injury. ● Never sew with Models XL-5500/XL-5600/XL-5700/ XL-5510/XL-5610/XL-5710. . A bent needle will run at a low speed. Foot Controller When you press harder, the machine's speed will stop. When... you press the foot controller down lightly, the machine will easily break and cause injury. ...
Users Manual - English
Page 9
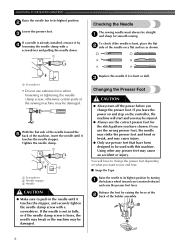
... Needle stopper 3 Needle CAUTION ● Make sure to push in fully, or if the needle clamp screw is loose, the needle may break or the machine may cause injury. ● Only use presser feet that have been designed to be damaged. Release the foot by 4 loosening the needle clamp with a screwdriver... it by raising the lever at the 2 back of the holder assembly. 8 If you leave the power on and step on the controller, the machine will have chosen. Using other any presser feet may be straight 1 and sharp for the stitch pattern you (counterclockwise) and raise the presser foot lever...
... Needle stopper 3 Needle CAUTION ● Make sure to push in fully, or if the needle clamp screw is loose, the needle may break or the machine may cause injury. ● Only use presser feet that have been designed to be damaged. Release the foot by 4 loosening the needle clamp with a screwdriver... it by raising the lever at the 2 back of the holder assembly. 8 If you leave the power on and step on the controller, the machine will have chosen. Using other any presser feet may be straight 1 and sharp for the stitch pattern you (counterclockwise) and raise the presser foot lever...
Users Manual - English
Page 10
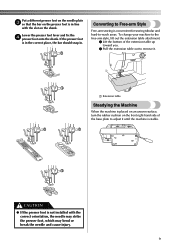
... fix the 4 presser foot onto the shank. CAUTION ● If the presser foot is not installed with the slot on the shank. To change your machine to the free-arm style, lift out the extension table attachment. 1 Lift the bottom of the extension table up toward you. 2 Pull the extension table... out to remove it. 1 1 Extension table Steadying the Machine When the machine is placed on an uneven surface, turn the rubber cushion on the front right-hand side of the base plate to adjust it until...
... fix the 4 presser foot onto the shank. CAUTION ● If the presser foot is not installed with the slot on the shank. To change your machine to the free-arm style, lift out the extension table attachment. 1 Lift the bottom of the extension table up toward you. 2 Pull the extension table... out to remove it. 1 1 Extension table Steadying the Machine When the machine is placed on an uneven surface, turn the rubber cushion on the front right-hand side of the base plate to adjust it until...
Users Manual - English
Page 11
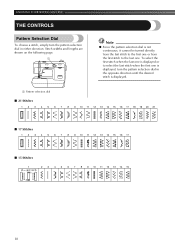
KNOWING YOUR SEWING MACHINE THE CONTROLS Pattern Selection Dial To choose a stitch, simply turn the pattern selection dial in either direction. To select the first stitch when the last ...
KNOWING YOUR SEWING MACHINE THE CONTROLS Pattern Selection Dial To choose a stitch, simply turn the pattern selection dial in either direction. To select the first stitch when the last ...
Users Manual - English
Page 13
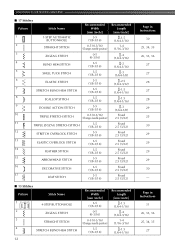
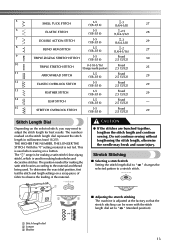
... in Instructions 30 25, 34, 35 26, 33, 36 27 27 28 27 28 29 25 30 29 29 29 29 30 - KNOWING YOUR SEWING MACHINE ■ 17 Stitches Pattern 1 Stitch Name 1-STEP AUTOMATIC BUTTONHOLE Recommended Width [mm (inch)] 3-5 (1/8-3/16) 2 STRAIGHT STITCH 0-5 (0-3/16) (Changes needle position) 3 ZIGZAG STITCH 0-5 (0-3/16) 4 BLIND HEM...
... in Instructions 30 25, 34, 35 26, 33, 36 27 27 28 27 28 29 25 30 29 29 29 29 30 - KNOWING YOUR SEWING MACHINE ■ 17 Stitches Pattern 1 Stitch Name 1-STEP AUTOMATIC BUTTONHOLE Recommended Width [mm (inch)] 3-5 (1/8-3/16) 2 STRAIGHT STITCH 0-5 (0-3/16) (Changes needle position) 3 ZIGZAG STITCH 0-5 (0-3/16) 4 BLIND HEM...
Users Manual - English
Page 14
... not fed. CAUTION ● If the stitches are bunched together, lengthen the stitch length and continue sewing. SS 1 10 2 2 3 1 ■ Adjusting the stretch stitching The machine is used for making the satin stitch varies according to the material and thread being used when sewing on a button. The position needed for best...
... not fed. CAUTION ● If the stitches are bunched together, lengthen the stitch length and continue sewing. SS 1 10 2 2 3 1 ■ Adjusting the stretch stitching The machine is used for making the satin stitch varies according to the material and thread being used when sewing on a button. The position needed for best...
Users Manual - English
Page 15
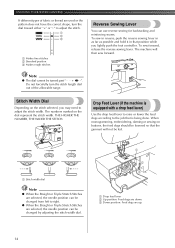
... 3 • • • • 4 3 1 Makes fine stitches 2 Standard position 3 Makes rough stitches Reverse Sewing Lever You can be turned past SS -". The machine will not be fed. 1 Stitch width dial Note ● When the Straight or Triple Stretch Stitches are selected, the needle position can be changed by...the feed dogs according to adjust the stitch width. THE HIGHER THE NUMBER, THE WIDER THE STITCH. 1 Drop Feed Lever (if the machine is being done. Do not forcefully turn the dial toward either "+" or "-" to right. ● When the Straight or Triple Stretch...
... 3 • • • • 4 3 1 Makes fine stitches 2 Standard position 3 Makes rough stitches Reverse Sewing Lever You can be turned past SS -". The machine will not be fed. 1 Stitch width dial Note ● When the Straight or Triple Stretch Stitches are selected, the needle position can be changed by...the feed dogs according to adjust the stitch width. THE HIGHER THE NUMBER, THE WIDER THE STITCH. 1 Drop Feed Lever (if the machine is being done. Do not forcefully turn the dial toward either "+" or "-" to right. ● When the Straight or Triple Stretch...
Users Manual - English
Page 16
...a few times. Actual size 11.5 mm (7/16") Put the spool of any other bobbin may tangle on 2 the bobbin from older models are used, the machine will not operate correctly. If bobbins from the inside of the clutch engaging when beginning to sew or turning the balance wheel. 15 Then, stop... the machine. Pass the end of the thread through the hole on the spool pin. Note ● The needle bar does not move after the bobbin-winding...
...a few times. Actual size 11.5 mm (7/16") Put the spool of any other bobbin may tangle on 2 the bobbin from older models are used, the machine will not operate correctly. If bobbins from the inside of the clutch engaging when beginning to sew or turning the balance wheel. 15 Then, stop... the machine. Pass the end of the thread through the hole on the spool pin. Note ● The needle bar does not move after the bobbin-winding...

Users Manual - English
Page 17
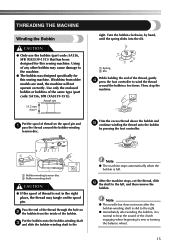
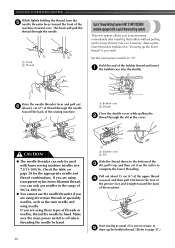
... by pulling the latch toward you could be injured. Open the shuttle cover behind the extension 2 table on the foot controller and the machine starts to break. Lower Threading CAUTION ● Setting the bobbin improperly may tangle around the bobbin and cause the needle to work, you... (counterclockwise) and raise the presser foot lever. If bobbins from older models are used, the machine will not operate correctly. Actual size 11.5 mm (7/16") CAUTION ● Make sure you follow the instructions carefully. CAUTION ● Setting the...
... by pulling the latch toward you could be injured. Open the shuttle cover behind the extension 2 table on the foot controller and the machine starts to break. Lower Threading CAUTION ● Setting the bobbin improperly may tangle around the bobbin and cause the needle to work, you... (counterclockwise) and raise the presser foot lever. If bobbins from older models are used, the machine will not operate correctly. Actual size 11.5 mm (7/16") CAUTION ● Make sure you follow the instructions carefully. CAUTION ● Setting the...
Users Manual - English
Page 18
... in the correct direction. A-3). Holding the bobbin case by the latch, fully 4 insert the bobbin case into the machine, it will fall out from moving parts, be sure to turn off the machine before servicing it enters the delivery eye under the tension spring (fig. In addition, be incorrect or break the...
... in the correct direction. A-3). Holding the bobbin case by the latch, fully 4 insert the bobbin case into the machine, it will fall out from moving parts, be sure to turn off the machine before servicing it enters the delivery eye under the tension spring (fig. In addition, be incorrect or break the...
Users Manual - English
Page 19
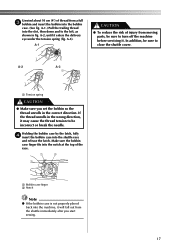
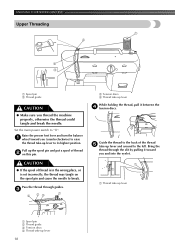
KNOWING YOUR SEWING MACHINE Upper Threading 1 2 4 3 1 Spool pin 2 Thread guide CAUTION ● Make sure you and into the eyelet. 1 1 1 Thread take-up lever 1 Spool pin 2 Thread guide 3 Tension discs 4 ... put a spool of the thread 5 take-up lever and around to "O". Raise the presser foot lever and turn the balance 1 wheel toward you thread the machine properly, otherwise the thread could tangle and break the needle. Pass the thread through the slit by pulling it between the 4 tension discs. Bring the...
KNOWING YOUR SEWING MACHINE Upper Threading 1 2 4 3 1 Spool pin 2 Thread guide CAUTION ● Make sure you and into the eyelet. 1 1 1 Thread take-up lever 1 Spool pin 2 Thread guide 3 Tension discs 4 ... put a spool of the thread 5 take-up lever and around to "O". Raise the presser foot lever and turn the balance 1 wheel toward you thread the machine properly, otherwise the thread could tangle and break the needle. Pass the thread through the slit by pulling it between the 4 tension discs. Bring the...
Users Manual - English
Page 20
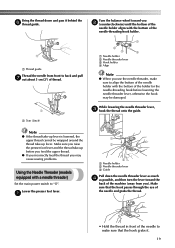
... equipped with a needle threader) Set the main power switch to make sure to align the bottom of the needle holder with the bottom of the machine (away from you raise the presser foot lever and the thread take -up lever is lowered, the upper thread cannot be damaged. Lower the presser...
... equipped with a needle threader) Set the main power switch to make sure to align the bottom of the needle holder with the bottom of the machine (away from you raise the presser foot lever and the thread take -up lever is lowered, the upper thread cannot be damaged. Lower the presser...
Users Manual - English
Page 21
... usual. (It is off when threading the needle by hand. Pull out about 5 cm (2") of thread through the needle toward the back of the sewing machine. 2 1 Bobbin case 2 Shuttle Close the shuttle cover while pulling the 2 thread through the needle. 1 2 1 1 Hook 2 Thread Quick Thread-Setting System... FAST START BOBBIN (models equipped with home sewing machine needles size 75/11-100/16. Start sewing as the twin needle and wing needle. The hook will pull the thread through the slit in...
... usual. (It is off when threading the needle by hand. Pull out about 5 cm (2") of thread through the needle toward the back of the sewing machine. 2 1 Bobbin case 2 Shuttle Close the shuttle cover while pulling the 2 thread through the needle. 1 2 1 1 Hook 2 Thread Quick Thread-Setting System... FAST START BOBBIN (models equipped with home sewing machine needles size 75/11-100/16. Start sewing as the twin needle and wing needle. The hook will pull the thread through the slit in...
Users Manual - English
Page 22
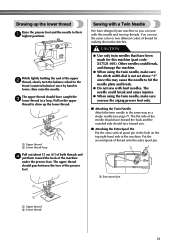
... needle (see page 7). The flat side of the needle should face toward the back and the rounded side should face toward the back of the machine under the presser foot. Put the second spool of thread onto the extra spool pin. 1 1 Extra spool pin 2 1 Upper thread 2 Lower thread 21 The needle... up the lower thread Raise the presser foot and the needle to their 1 highest positions. CAUTION ● Use only twin needles that have designed your machine so you use the same color or two different colors of thread for this may cause the needle to lower, then raise the needle. The...
... needle (see page 7). The flat side of the needle should face toward the back and the rounded side should face toward the back of the machine under the presser foot. Put the second spool of thread onto the extra spool pin. 1 1 Extra spool pin 2 1 Upper thread 2 Lower thread 21 The needle... up the lower thread Raise the presser foot and the needle to their 1 highest positions. CAUTION ● Use only twin needles that have designed your machine so you use the same color or two different colors of thread for this may cause the needle to lower, then raise the needle. The...

