

Users Manual - English
Page 2
... or injury to be supervised to the symbol "O" position which represents off , symbol "O" position when making any openings. 6. Do not allow this machine to persons: 1. Do not unplug by the manufac- Special care is not intended for household use by or near children. 2. The wrong plate can...by young children or infirm persons without supervision. 17. Replace bulb with any adjustments in the needle area, such as contained in this sewing machine. turer as threading the needle, changing the needle, threading the bobbin, or changing the presser foot. 15. Do not use as a...
... or injury to be supervised to the symbol "O" position which represents off , symbol "O" position when making any openings. 6. Do not allow this machine to persons: 1. Do not unplug by the manufac- Special care is not intended for household use by or near children. 2. The wrong plate can...by young children or infirm persons without supervision. 17. Replace bulb with any adjustments in the needle area, such as contained in this sewing machine. turer as threading the needle, changing the needle, threading the bobbin, or changing the presser foot. 15. Do not use as a...
Users Manual - English
Page 5
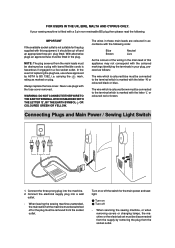
...In the event of replacing the plug fuse, use plugs with the letter 'L' or coloured red or brown. When leaving the sewing machine unattended, the main switch of the machine must be switched off and an appropriate three pin plug fitted. NOTE: The plug severed from the socket outlet. The wires in... these main leads are coloured in accordance with the letter 'N' or coloured black or blue. Connect the electrical supply plug into the machine. 2. With alternative plugs an approved fuse must be cut off or the plug must be fitted in the main lead of the wiring in the...
...In the event of replacing the plug fuse, use plugs with the letter 'L' or coloured red or brown. When leaving the sewing machine unattended, the main switch of the machine must be switched off and an appropriate three pin plug fitted. NOTE: The plug severed from the socket outlet. The wires in... these main leads are coloured in accordance with the letter 'N' or coloured black or blue. Connect the electrical supply plug into the machine. 2. With alternative plugs an approved fuse must be cut off or the plug must be fitted in the main lead of the wiring in the...

Users Manual - English
Page 6
... 6 Foot Controller 6 Inserting the Needle 7 Checking the Needle 7 Changing the Presser Foot 8 Converting to Free-Arm Style 9 Steadying the Machine 9 VARIOUS CONTROLS 10 Pattern Selection Dial 10 RECOMMENDED WIDTHS AND LENGTHS FOR STITCHES 11 Stitch Length Dial 14 Stretch Stitching 15 Stitch Width Dial ... Lower Threading 19 Upper (Needle) Threading 20 Using the Needle Threader (when the machine is equipped with a needle threader) .. 22 Quick Thread-setting System FAST START BOBBIN (when the machine is equipped with a quick thread-setting system 24 Drawing Up Lower Thread 25 Twin...
... 6 Foot Controller 6 Inserting the Needle 7 Checking the Needle 7 Changing the Presser Foot 8 Converting to Free-Arm Style 9 Steadying the Machine 9 VARIOUS CONTROLS 10 Pattern Selection Dial 10 RECOMMENDED WIDTHS AND LENGTHS FOR STITCHES 11 Stitch Length Dial 14 Stretch Stitching 15 Stitch Width Dial ... Lower Threading 19 Upper (Needle) Threading 20 Using the Needle Threader (when the machine is equipped with a needle threader) .. 22 Quick Thread-setting System FAST START BOBBIN (when the machine is equipped with a quick thread-setting system 24 Drawing Up Lower Thread 25 Twin...

Users Manual - English
Page 9
... Used to raise and lower the needle. F Foot controller receptacle Insert the foot controller plug for stitching in the reverse direction. CONTENTS KNOWING YOUR SEWING MACHINE STRAIGHT AND ZIGZAG STITCHING BUILT-IN STITCHES PRINCIPAL PARTS 34 62 1 1 Bobbin winding assembly Winds the thread onto the bobbin to select the desired stitch...
... Used to raise and lower the needle. F Foot controller receptacle Insert the foot controller plug for stitching in the reverse direction. CONTENTS KNOWING YOUR SEWING MACHINE STRAIGHT AND ZIGZAG STITCHING BUILT-IN STITCHES PRINCIPAL PARTS 34 62 1 1 Bobbin winding assembly Winds the thread onto the bobbin to select the desired stitch...

Users Manual - English
Page 13
...a la alimentación de corriente. 2. BUTTONHOLE AND BUTTON SEWING USING ATTACHMENTS AND APPLICATIONS MAINTENANCE INDEX 5 Connect the power supply plug into the machine. 2. When changing the needle, bobbin or light bulb or when the sew- only This appliance has a polarized plug (one way. If the...una toma de corriente. Brancher la fiche qui se trouve sur le cordon d'alimentation entre la pédale et la fiche d'alimentation dans la machine. 2. Connect the power cord plug into a wall outlet. For U.S.A. Do not modify the plug in the outlet, reverse the plug. ...
...a la alimentación de corriente. 2. BUTTONHOLE AND BUTTON SEWING USING ATTACHMENTS AND APPLICATIONS MAINTENANCE INDEX 5 Connect the power supply plug into the machine. 2. When changing the needle, bobbin or light bulb or when the sew- only This appliance has a polarized plug (one way. If the...una toma de corriente. Brancher la fiche qui se trouve sur le cordon d'alimentation entre la pédale et la fiche d'alimentation dans la machine. 2. Connect the power cord plug into a wall outlet. For U.S.A. Do not modify the plug in the outlet, reverse the plug. ...
Users Manual - English
Page 14
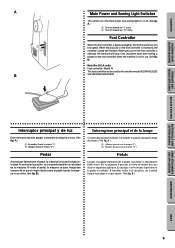
...a baja velocidad. only) Foot controller: Model N This foot controller can be taken that nothing is placed on the foot controller when the machine is released, the machine will stop. Si l'on the foot controller is not in use. (See fig. A.) 1 Turn on (toward the "O" mark) Foot... Interrupteur principal et de la lampe Este interruptor permite apagar y encender la máquina y la luz. (Ver fig. CONTENTS KNOWING YOUR SEWING MACHINE STRAIGHT AND ZIGZAG STITCHING BUILT-IN STITCHES A 1 2 B Main Power and Sewing Light Switches This switch turns the main power and sewing light...
...a baja velocidad. only) Foot controller: Model N This foot controller can be taken that nothing is placed on the foot controller when the machine is released, the machine will stop. Si l'on the foot controller is not in use. (See fig. A.) 1 Turn on (toward the "O" mark) Foot... Interrupteur principal et de la lampe Este interruptor permite apagar y encender la máquina y la luz. (Ver fig. CONTENTS KNOWING YOUR SEWING MACHINE STRAIGHT AND ZIGZAG STITCHING BUILT-IN STITCHES A 1 2 B Main Power and Sewing Light Switches This switch turns the main power and sewing light...
Users Manual - English
Page 19
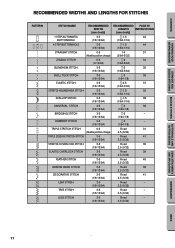
CONTENTS KNOWING YOUR SEWING MACHINE STRAIGHT AND ZIGZAG STITCHING BUILT-IN STITCHES RECOMMENDED WIDTHS AND LENGTHS FOR STITCHES PATTERN C A STITCH NAME RECOMMENDED WIDTH [mm (inch)] RECOMMENDED PAGE IN LENGTH INSTRUCTIONS [...
CONTENTS KNOWING YOUR SEWING MACHINE STRAIGHT AND ZIGZAG STITCHING BUILT-IN STITCHES RECOMMENDED WIDTHS AND LENGTHS FOR STITCHES PATTERN C A STITCH NAME RECOMMENDED WIDTH [mm (inch)] RECOMMENDED PAGE IN LENGTH INSTRUCTIONS [...

Users Manual - English
Page 28
.... Pass the thread through the slit by pulling it behind the thread guide. 5 Thread guide 7. Pull up lever and around to "O". 1. D). CONTENTS KNOWING YOUR SEWING MACHINE STRAIGHT AND ZIGZAG STITCHING BUILT-IN STITCHES 1 2 4 3 BUTTONHOLE AND BUTTON SEWING USING ATTACHMENTS AND APPLICATIONS A 4 23 1 C B D 4 4 E 5 Upper (Needle) Threading Turn power switch to the left...
.... Pass the thread through the slit by pulling it behind the thread guide. 5 Thread guide 7. Pull up lever and around to "O". 1. D). CONTENTS KNOWING YOUR SEWING MACHINE STRAIGHT AND ZIGZAG STITCHING BUILT-IN STITCHES 1 2 4 3 BUTTONHOLE AND BUTTON SEWING USING ATTACHMENTS AND APPLICATIONS A 4 23 1 C B D 4 4 E 5 Upper (Needle) Threading Turn power switch to the left...

Users Manual - English
Page 30
Pull down the needle threader lever as much as possible, then rotate the lever toward the back of the machine (toward the back of the sewing machine. • Only use needles of sizes #90 to check that the appropriate thread and needle are being used. Raise ... pull out about 5 cm (2") of thread through the needle toward you). CONTENTS KNOWING YOUR SEWING MACHINE STRAIGHT AND ZIGZAG STITCHING BUILT-IN STITCHES 1 2 3 1 2 4 5 7 6 6 Using the Needle Threader (when the machine is equipped with a needle threader) Turn power switch to #100. Turn the balance wheel toward ...
Pull down the needle threader lever as much as possible, then rotate the lever toward the back of the machine (toward the back of the sewing machine. • Only use needles of sizes #90 to check that the appropriate thread and needle are being used. Raise ... pull out about 5 cm (2") of thread through the needle toward you). CONTENTS KNOWING YOUR SEWING MACHINE STRAIGHT AND ZIGZAG STITCHING BUILT-IN STITCHES 1 2 3 1 2 4 5 7 6 6 Using the Needle Threader (when the machine is equipped with a needle threader) Turn power switch to #100. Turn the balance wheel toward ...

Users Manual - English
Page 33
...) until the needle moves down and back up from the bobbin in a loop. The upper thread should pass between the toes of the machine straight behind the presser foot. Le fil supérieur doit passer entre les branches du pied-de-biche. 1 Fil supérieur ... pied-de-biche et l'aiguille. 2. Le fil supérieur doit alors former une boucle avec le fil inférieur. CONTENTS KNOWING YOUR SEWING MACHINE STRAIGHT AND ZIGZAG STITCHING BUILT-IN STITCHES 1 2 Drawing Up Lower Thread 1. Levante el prensatelas y la aguja a sus posiciones más elevadas. 2. ...
...) until the needle moves down and back up from the bobbin in a loop. The upper thread should pass between the toes of the machine straight behind the presser foot. Le fil supérieur doit passer entre les branches du pied-de-biche. 1 Fil supérieur ... pied-de-biche et l'aiguille. 2. Le fil supérieur doit alors former une boucle avec le fil inférieur. CONTENTS KNOWING YOUR SEWING MACHINE STRAIGHT AND ZIGZAG STITCHING BUILT-IN STITCHES 1 2 Drawing Up Lower Thread 1. Levante el prensatelas y la aguja a sus posiciones más elevadas. 2. ...

Users Manual - English
Page 35
CONTENTS KNOWING YOUR SEWING MACHINE STRAIGHT AND ZIGZAG STITCHING BUILT-IN STITCHES A 2 1 2 1 B 2 1 2 1 A-1 654 B-1 654 C 2 1 2 1 Thread Tension Thread tension will weaken your stitches. A-1 Upper tension control dial Decrease the tension by ...
CONTENTS KNOWING YOUR SEWING MACHINE STRAIGHT AND ZIGZAG STITCHING BUILT-IN STITCHES A 2 1 2 1 B 2 1 2 1 A-1 654 B-1 654 C 2 1 2 1 Thread Tension Thread tension will weaken your stitches. A-1 Upper tension control dial Decrease the tension by ...

Users Manual - English
Page 37
...el mismo tamaño de hilo para los hilos superior (carrete) e inferior (canilla). 29 INDEX CONTENTS KNOWING YOUR SEWING MACHINE STRAIGHT AND ZIGZAG STITCHING BUILT-IN STITCHES CHART OF SEWING FABRICS, NEEDLES AND THREAD COMBINATIONS VERY THIN LIGHTWEIGHT MEDIUM WEIGHT HEAVYWEIGHT SEWING ...Pique, Satin, Velvet, Lightweight wool, Fine corduroy, Suitings, Linen, Muslin NEEDLE SIZES #70/10 #80/12 #90/14 (Supplied with your machine.) THREAD SIZES Cotton: 80 Synthetic Fine Mercerized Cotton Cotton: 60~80 Silk: "A" Synthetic Mercerized 50 Cotton: 50~60 Silk: "A" Synthetic Mercerized...
...el mismo tamaño de hilo para los hilos superior (carrete) e inferior (canilla). 29 INDEX CONTENTS KNOWING YOUR SEWING MACHINE STRAIGHT AND ZIGZAG STITCHING BUILT-IN STITCHES CHART OF SEWING FABRICS, NEEDLES AND THREAD COMBINATIONS VERY THIN LIGHTWEIGHT MEDIUM WEIGHT HEAVYWEIGHT SEWING ...Pique, Satin, Velvet, Lightweight wool, Fine corduroy, Suitings, Linen, Muslin NEEDLE SIZES #70/10 #80/12 #90/14 (Supplied with your machine.) THREAD SIZES Cotton: 80 Synthetic Fine Mercerized Cotton Cotton: 60~80 Silk: "A" Synthetic Mercerized 50 Cotton: 50~60 Silk: "A" Synthetic Mercerized...
Users Manual - English
Page 42
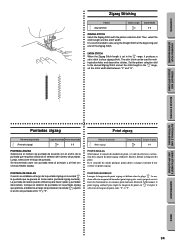
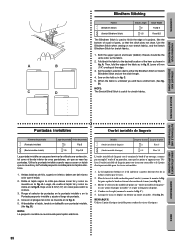
...using the Straight Stitch at the beginning and end of the Zigzag Stitch. Luego, seleccione el largo de puntada. CONTENTS KNOWING YOUR SEWING MACHINE STRAIGHT AND ZIGZAG STITCHING BUILT-IN STITCHES Zigzag Stitching Pattern (Zigzag Stitch) Stitch Length -4 Stitch Width 0-5 ZIGZAG STITCH Select the Zigzag Stitch... définir la longueur du point. POINT DE BOURDON Lorsque la longueur du point zigzag est définie dans la plage " ", la machine effectue un point de bourdon (point zigzag très serré) qui peut servir à faire des boutonnières ou comme point ...
...using the Straight Stitch at the beginning and end of the Zigzag Stitch. Luego, seleccione el largo de puntada. CONTENTS KNOWING YOUR SEWING MACHINE STRAIGHT AND ZIGZAG STITCHING BUILT-IN STITCHES Zigzag Stitching Pattern (Zigzag Stitch) Stitch Length -4 Stitch Width 0-5 ZIGZAG STITCH Select the Zigzag Stitch... définir la longueur du point. POINT DE BOURDON Lorsque la longueur du point zigzag est définie dans la plage " ", la machine effectue un point de bourdon (point zigzag très serré) qui peut servir à faire des boutonnières ou comme point ...
Users Manual - English
Page 43
... puntada invisible cuando vaya a coser un tejido que no se estire y la Puntada pespunto invisible para los tejidos elásticos. 1. C. 5. A. CONTENTS KNOWING YOUR SEWING MACHINE STRAIGHT AND ZIGZAG STITCHING BUILT-IN STITCHES A B C D Blindhem Stitching Pattern (Blindhem Stitch) (Stretch Blindhem Stitch) Stitch Length -2 -1.5 Stitch Width Fixed 5 Fixed 3.5 The Blindhem Stitch is...
... puntada invisible cuando vaya a coser un tejido que no se estire y la Puntada pespunto invisible para los tejidos elásticos. 1. C. 5. A. CONTENTS KNOWING YOUR SEWING MACHINE STRAIGHT AND ZIGZAG STITCHING BUILT-IN STITCHES A B C D Blindhem Stitching Pattern (Blindhem Stitch) (Stretch Blindhem Stitch) Stitch Length -2 -1.5 Stitch Width Fixed 5 Fixed 3.5 The Blindhem Stitch is...

Users Manual - English
Page 50
.... Hook the gimp thread onto the back end of fabric before attempting it back slightly as shown in fig. Making a Buttonhole 1. CONTENTS KNOWING YOUR SEWING MACHINE STRAIGHT AND ZIGZAG STITCHING BUILT-IN STITCHES A B 1 2 - 3 C PUSH D 3 2 4 1 E PUSH Making a Buttonhole (1 Step Automatic Buttonhole) 4 Pattern...of the fabric. Open the button plate and insert the button. (See fig. Lower the presser foot and start the machine. 7. When sewing buttonholes on thin fabrics, place stabilizer material on the underside of the buttonhole on the actual garment....
.... Hook the gimp thread onto the back end of fabric before attempting it back slightly as shown in fig. Making a Buttonhole 1. CONTENTS KNOWING YOUR SEWING MACHINE STRAIGHT AND ZIGZAG STITCHING BUILT-IN STITCHES A B 1 2 - 3 C PUSH D 3 2 4 1 E PUSH Making a Buttonhole (1 Step Automatic Buttonhole) 4 Pattern...of the fabric. Open the button plate and insert the button. (See fig. Lower the presser foot and start the machine. 7. When sewing buttonholes on thin fabrics, place stabilizer material on the underside of the buttonhole on the actual garment....
Users Manual - English
Page 55
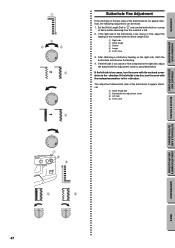
... material is too coarse, turn the screw with the enclosed screwdriver in the + direction. If the left side is fed. 2. direction. CONTENTS KNOWING YOUR SEWING MACHINE STRAIGHT AND ZIGZAG STITCHING BUILT-IN STITCHES 1 2 4 3 10 432 - Set the Stitch Length Dial to the right side, adjust the buttonhole fine adjustment screw as...
... material is too coarse, turn the screw with the enclosed screwdriver in the + direction. If the left side is fed. 2. direction. CONTENTS KNOWING YOUR SEWING MACHINE STRAIGHT AND ZIGZAG STITCHING BUILT-IN STITCHES 1 2 4 3 10 432 - Set the Stitch Length Dial to the right side, adjust the buttonhole fine adjustment screw as...

Users Manual - English
Page 57
... the fabric and make sure that the needle enters the holes without hitting the button. Place the darning plate on the needle plate. (When the machine is 1.5 mm (1/16"), set the appropriate stitch width with a drop feed lever, lower the feed dogs by setting the drop feed lever to... MAINTENANCE INDEX 49 At a slow speed, sew approximately 10 stitches. 6. If it hits, see step 1. 5. Remove the material from the machine. Measure the distance between the holes and set the stitch width to the up position.) 4. Attach the button sewing foot. 3. CONTENTS KNOWING YOUR ...
... the fabric and make sure that the needle enters the holes without hitting the button. Place the darning plate on the needle plate. (When the machine is 1.5 mm (1/16"), set the appropriate stitch width with a drop feed lever, lower the feed dogs by setting the drop feed lever to... MAINTENANCE INDEX 49 At a slow speed, sew approximately 10 stitches. 6. If it hits, see step 1. 5. Remove the material from the machine. Measure the distance between the holes and set the stitch width to the up position.) 4. Attach the button sewing foot. 3. CONTENTS KNOWING YOUR ...

Users Manual - English
Page 59
... the Straight Stitch. Loosen the tension of the zipper foot. 5. The wrong setting can easily be positioned on the zipper foot. 3. CONTENTS KNOWING YOUR SEWING MACHINE STRAIGHT AND ZIGZAG STITCHING BUILT-IN STITCHES A 1 2 3 B Zipper Inserting Pattern (Straight Stitch) Stitch Length 2-3 Stitch Width 2.5 (Center needle position) Foot Zipper Foot NOTE: After selecting...
... the Straight Stitch. Loosen the tension of the zipper foot. 5. The wrong setting can easily be positioned on the zipper foot. 3. CONTENTS KNOWING YOUR SEWING MACHINE STRAIGHT AND ZIGZAG STITCHING BUILT-IN STITCHES A 1 2 3 B Zipper Inserting Pattern (Straight Stitch) Stitch Length 2-3 Stitch Width 2.5 (Center needle position) Foot Zipper Foot NOTE: After selecting...
Users Manual - English
Page 65
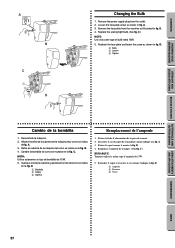
... C. Vuelva a colocar la cubierta y apriete el tornillo tal como se indica en la fig. Desserrer la vis du capot de la machine comme indiqué à la fig. Remplacer l'ampoule de la lampe. (Voir fig. C.) REMARQUE: Toujours utiliser le même...only same type of bulb rated 15W. 5. Desenchufe la máquina. 2. A. 3. A. 3. B. 4. D. 1 Bombilla 2 Aflojar 3 Apretar 1. CONTENTS KNOWING YOUR SEWING MACHINE STRAIGHT AND ZIGZAG STITCHING BUILT-IN STITCHES A B C 1 2 3 D Changing the Bulb 1. B. 4. Rattacher le capot et resserrer la vis comme l'indique la fig. NOTA...
... C. Vuelva a colocar la cubierta y apriete el tornillo tal como se indica en la fig. Desserrer la vis du capot de la machine comme indiqué à la fig. Remplacer l'ampoule de la lampe. (Voir fig. C.) REMARQUE: Toujours utiliser le même...only same type of bulb rated 15W. 5. Desenchufe la máquina. 2. A. 3. A. 3. B. 4. D. 1 Bombilla 2 Aflojar 3 Apretar 1. CONTENTS KNOWING YOUR SEWING MACHINE STRAIGHT AND ZIGZAG STITCHING BUILT-IN STITCHES A B C 1 2 3 D Changing the Bulb 1. B. 4. Rattacher le capot et resserrer la vis comme l'indique la fig. NOTA...

Users Manual - English
Page 68
.... w Page 7 No w The combination of the needle plate. If the problem continues, the following checklist may help you are correctly using the machine. w Page 7 No w The combination of thread is too tight. w Page 20 No w Upper thread is not correct. w Page 19 ... is too tight. Thread tension is incorrectly inserted. w Page 27 No w Lower threading is used . CONTENTS KNOWING YOUR SEWING MACHINE STRAIGHT AND ZIGZAG STITCHING BUILT-IN STITCHES Performance Checklist Whenever sewing difficulties are encountered, review the section in the shuttle hook. If...
.... w Page 7 No w The combination of the needle plate. If the problem continues, the following checklist may help you are correctly using the machine. w Page 7 No w The combination of thread is too tight. w Page 20 No w Upper thread is not correct. w Page 19 ... is too tight. Thread tension is incorrectly inserted. w Page 27 No w Lower threading is used . CONTENTS KNOWING YOUR SEWING MACHINE STRAIGHT AND ZIGZAG STITCHING BUILT-IN STITCHES Performance Checklist Whenever sewing difficulties are encountered, review the section in the shuttle hook. If...


