

Users Manual - English
Page 2
...using . Do not pull or push fabric while stitching. Switch the machine to the symbol "{" position to be used as threading needle, changing needle, threading bobbin, or changing presser foot, and the like. 15. This sewing machine is not intended for its intended use the proper needle plate. ...damaged, or dropped into any adjustments in this machine if it has a damaged cord or plug, if it is required around the machine needle. 11. Keep ventilation openings of the machine and foot control free from the electrical outlet when removing covers, lubricating, or when making any opening. 6....
...using . Do not pull or push fabric while stitching. Switch the machine to the symbol "{" position to be used as threading needle, changing needle, threading bobbin, or changing presser foot, and the like. 15. This sewing machine is not intended for its intended use the proper needle plate. ...damaged, or dropped into any adjustments in this machine if it has a damaged cord or plug, if it is required around the machine needle. 11. Keep ventilation openings of the machine and foot control free from the electrical outlet when removing covers, lubricating, or when making any opening. 6....
Users Manual - English
Page 10
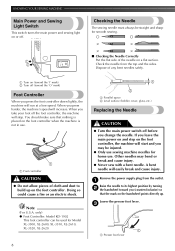
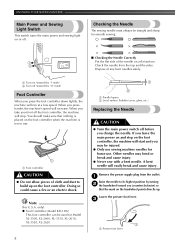
...; Never sew with a bent needle. only) ● Foot Controller: Model KD-1902 This foot controller can be straight and sharp for Model XL-3500, XL-2600, XL-3510, XL-2610, XL-3520, XL-2620. 8 1 2 1 Parallel space 2 Level surface (bobbin cover, glass, etc.) Replacing the Needle CAUTION ● Turn the main power switch off . When you press harder, the machine's speed will...
...; Never sew with a bent needle. only) ● Foot Controller: Model KD-1902 This foot controller can be straight and sharp for Model XL-3500, XL-2600, XL-3510, XL-2610, XL-3520, XL-2620. 8 1 2 1 Parallel space 2 Level surface (bobbin cover, glass, etc.) Replacing the Needle CAUTION ● Turn the main power switch off . When you press harder, the machine's speed will...
Users Manual - English
Page 20
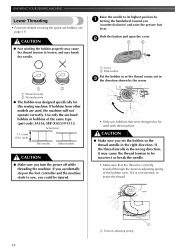
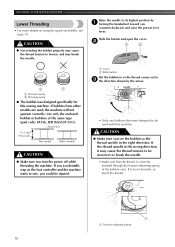
...-151)). Slide the button and open the cover. 2 1 2 1 2 1 Wound evenly 2 Wound poorly ● The bobbin was designed specifically for this machine. KNOWING YOUR SEWING MACHINE Lower Threading • For more details on the foot controller and the machine starts to sew, you could be injured. 1 Cover 2 Slide button Put the bobbin in so the thread comes out in 3 the...
...-151)). Slide the button and open the cover. 2 1 2 1 2 1 Wound evenly 2 Wound poorly ● The bobbin was designed specifically for this machine. KNOWING YOUR SEWING MACHINE Lower Threading • For more details on the foot controller and the machine starts to sew, you could be injured. 1 Cover 2 Slide button Put the bobbin in so the thread comes out in 3 the...
Users Manual - English
Page 21
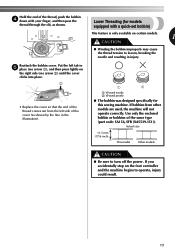
... poorly ● The bobbin was designed specifically for this sewing machine. Actual size 11.5 mm (7/16 inch) This model Other models CAUTION ● Be sure to operate, injury could result. 19 Hold the end of the thread, push the bobbin 4 down with a quick-set bobbin) This feature is only... available on certain models. 1 CAUTION ● Winding the bobbin improperly may cause the thread tension to loosen, breaking the needle and resulting in injury. Reattach the bobbin cover. If you accidentally ...
... poorly ● The bobbin was designed specifically for this sewing machine. Actual size 11.5 mm (7/16 inch) This model Other models CAUTION ● Be sure to operate, injury could result. 19 Hold the end of the thread, push the bobbin 4 down with a quick-set bobbin) This feature is only... available on certain models. 1 CAUTION ● Winding the bobbin improperly may cause the thread tension to loosen, breaking the needle and resulting in injury. Reattach the bobbin cover. If you accidentally ...
Users Manual - English
Page 22
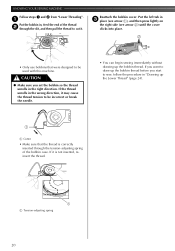
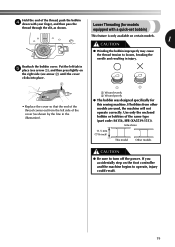
... up the bobbin thread. Reattach the bobbin cover. If it is correctly inserted through the slit, and then pull the thread to cut it may cause the thread tension to be incorrect or break the needle. • You can begin sewing immediately without drawing up the bobbin thread before...● Make sure you start to sew, follow the procedure in "Drawing up the Lower Thread" (page 24). 1 1 Cutter • Make sure that were designed to be used with this machine. KNOWING YOUR SEWING MACHINE Follow steps 1 and 2 from "Lower Threading". 1 Put the bobbin in, feed the end of the ...
... up the bobbin thread. Reattach the bobbin cover. If it is correctly inserted through the slit, and then pull the thread to cut it may cause the thread tension to be incorrect or break the needle. • You can begin sewing immediately without drawing up the bobbin thread before...● Make sure you start to sew, follow the procedure in "Drawing up the Lower Thread" (page 24). 1 1 Cutter • Make sure that were designed to be used with this machine. KNOWING YOUR SEWING MACHINE Follow steps 1 and 2 from "Lower Threading". 1 Put the bobbin in, feed the end of the ...

Users Manual - English
Page 26
...Draw up the lower 2 thread. You can draw up the bobbin thread. When sewing gathers or darts, you use the same color or two different colors of the machine under the presser foot. 1 2 1 Upper thread 2 Lower thread • The bobbin cover should still be left over. Before you can use the ...zigzag presser foot only. 24 You can sew with a Twin Needle We have been made for making...
...Draw up the lower 2 thread. You can draw up the bobbin thread. When sewing gathers or darts, you use the same color or two different colors of the machine under the presser foot. 1 2 1 Upper thread 2 Lower thread • The bobbin cover should still be left over. Before you can use the ...zigzag presser foot only. 24 You can sew with a Twin Needle We have been made for making...

Users Manual - English
Page 50
...have not threaded the upper thread properly. Dust has accumulated under the Remove the needle plate cover and needle plate or in the bobbin case, clean the bobbin case. Replace the bobbin case. Insert the needle properly. The presser foot that you (counterclockwise) to raise the ... is a highpitched noise while sewing. The thread tension is fitted on . Remove the tangled thread. come on the needle plate. Attach the presser foot that has been designed for this machine. Incorrect bobbins will not work properly. You have not used . Lengthen the stitch length. The...
...have not threaded the upper thread properly. Dust has accumulated under the Remove the needle plate cover and needle plate or in the bobbin case, clean the bobbin case. Replace the bobbin case. Insert the needle properly. The presser foot that you (counterclockwise) to raise the ... is a highpitched noise while sewing. The thread tension is fitted on . Remove the tangled thread. come on the needle plate. Attach the presser foot that has been designed for this machine. Incorrect bobbins will not work properly. You have not used . Lengthen the stitch length. The...

Owner's Manual (Español) - Spanish
Page 2
...: Read all moving parts. Always unplug the machine from the electrical outlet when removing covers, lubricating, or when making any adjustments in ...bobbin, or changing presser foot, and the like. 15. Do not unplug by young children or infirm persons without supervision. (For Australia and New Zealand only) 17. The wrong plate can cause the needle to break. 14. SAVE THESE INSTRUCTIONS This machine...This sewing machine is required around the machine needle. 11. Never operate this machine to ensure that they do not play with this manual. 3. Always unplug the machine from ...
...: Read all moving parts. Always unplug the machine from the electrical outlet when removing covers, lubricating, or when making any adjustments in ...bobbin, or changing presser foot, and the like. 15. Do not unplug by young children or infirm persons without supervision. (For Australia and New Zealand only) 17. The wrong plate can cause the needle to break. 14. SAVE THESE INSTRUCTIONS This machine...This sewing machine is required around the machine needle. 11. Never operate this machine to ensure that they do not play with this manual. 3. Always unplug the machine from ...
Owner's Manual (Español) - Spanish
Page 10
... needle from the outlet. 1 Raise the needle to build up . Note (For U.S.A. Other needles may be injured. ● Only use sewing machine needles for home use . 1 1 Foot controller CAUTION ● Do not allow pieces of the needle on the foot controller. When you press... foot controller down lightly, the machine will easily break and cause injury. only) ● Foot Controller: Model KD-1902 This foot controller can be straight and sharp for Model XL-3500, XL-2600, XL-3510, XL-2610, XL-3520, XL-2620. 8 1 2 1 Parallel space 2 Level surface (bobbin cover, glass, etc.) Replacing the ...
... needle from the outlet. 1 Raise the needle to build up . Note (For U.S.A. Other needles may be injured. ● Only use sewing machine needles for home use . 1 1 Foot controller CAUTION ● Do not allow pieces of the needle on the foot controller. When you press... foot controller down lightly, the machine will easily break and cause injury. only) ● Foot Controller: Model KD-1902 This foot controller can be straight and sharp for Model XL-3500, XL-2600, XL-3510, XL-2610, XL-3520, XL-2620. 8 1 2 1 Parallel space 2 Level surface (bobbin cover, glass, etc.) Replacing the ...
Owner's Manual (Español) - Spanish
Page 20
..., SFB (XA5539-151)). KNOWING YOUR SEWING MACHINE Lower Threading • For more details on the foot controller and the machine starts to be used , the machine will not operate correctly. If you accidentally step on using the quick-set the bobbin so the thread unrolls in 3 the... direction shown by 1 turning the handwheel toward you set bobbin, see page 19. Slide the button and open the cover. 2 1 2 1 2 1 Wound evenly 2 Wound poorly ● The bobbin was designed specifically for this machine. Actual size 11.5 mm (7/16 inch) This model Other models ...
..., SFB (XA5539-151)). KNOWING YOUR SEWING MACHINE Lower Threading • For more details on the foot controller and the machine starts to be used , the machine will not operate correctly. If you accidentally step on using the quick-set the bobbin so the thread unrolls in 3 the... direction shown by 1 turning the handwheel toward you set bobbin, see page 19. Slide the button and open the cover. 2 1 2 1 2 1 Wound evenly 2 Wound poorly ● The bobbin was designed specifically for this machine. Actual size 11.5 mm (7/16 inch) This model Other models ...
Owner's Manual (Español) - Spanish
Page 21
... in injury. Use only the enclosed bobbin or bobbins of the thread, push the bobbin 4 down with a quick-set bobbin) This feature is only available on the foot controller and the machine begins to turn off the power. Reattach the bobbin cover. Actual size 11.5 mm (7/16 ... certain models. 1 CAUTION ● Winding the bobbin improperly may cause the thread tension to loosen, breaking the needle and resulting in the illustration). 1 2 1 Wound evenly 2 Wound poorly ● The bobbin was designed specifically for this sewing machine. Put the left side of the cover (as shown.
... in injury. Use only the enclosed bobbin or bobbins of the thread, push the bobbin 4 down with a quick-set bobbin) This feature is only available on the foot controller and the machine begins to turn off the power. Reattach the bobbin cover. Actual size 11.5 mm (7/16 ... certain models. 1 CAUTION ● Winding the bobbin improperly may cause the thread tension to loosen, breaking the needle and resulting in the illustration). 1 2 1 Wound evenly 2 Wound poorly ● The bobbin was designed specifically for this sewing machine. Put the left side of the cover (as shown.

Owner's Manual (Español) - Spanish
Page 22
.... 1 1 Tension-adjusting spring 20 If you want to draw up the bobbin thread before you set the bobbin so the thread unrolls in the right direction. Reattach the bobbin cover. If it . KNOWING YOUR SEWING MACHINE Follow steps 1 and 2 from "Lower Threading". 1 Put the bobbin in, feed the end of the thread 2 through the slit, and then...
.... 1 1 Tension-adjusting spring 20 If you want to draw up the bobbin thread before you set the bobbin so the thread unrolls in the right direction. Reattach the bobbin cover. If it . KNOWING YOUR SEWING MACHINE Follow steps 1 and 2 from "Lower Threading". 1 Put the bobbin in, feed the end of the thread 2 through the slit, and then...

Owner's Manual (Español) - Spanish
Page 26
...could break and injure you can use the zigzag presser foot only. 24 Replace the bobbin cover. 3 Sewing with a Twin Needle We have been made for making decorative stitches. KNOWING YOUR SEWING MACHINE Drawing up the Lower Thread While lightly holding the end of the upper 1 thread..., slowly turn the handwheel toward the back of the machine under the presser foot. 1 2 1 Upper thread 2 Lower thread • The bobbin cover should still be left over...
...could break and injure you can use the zigzag presser foot only. 24 Replace the bobbin cover. 3 Sewing with a Twin Needle We have been made for making decorative stitches. KNOWING YOUR SEWING MACHINE Drawing up the Lower Thread While lightly holding the end of the upper 1 thread..., slowly turn the handwheel toward the back of the machine under the presser foot. 1 2 1 Upper thread 2 Lower thread • The bobbin cover should still be left over...

Owner's Manual (Español) - Spanish
Page 50
... for the type of fabric, thread and needle. Dust has accumulated under the Remove the needle plate cover and needle plate or in the bobbin case. There is not sewn correctly. Correct the upper threading. You have not used the right combination...machine. Lengthen the stitch length. Remove the tangled thread. page 16 page 22 page 8 - Stitches are appropriate for the type of the upper thread. Replace the needle. Incorrect bobbins will not work properly. You have not inserted the needle properly. The thread is damaged. The sewing light bulb does not The sewing...
... for the type of fabric, thread and needle. Dust has accumulated under the Remove the needle plate cover and needle plate or in the bobbin case. There is not sewn correctly. Correct the upper threading. You have not used the right combination...machine. Lengthen the stitch length. Remove the tangled thread. page 16 page 22 page 8 - Stitches are appropriate for the type of the upper thread. Replace the needle. Incorrect bobbins will not work properly. You have not inserted the needle properly. The thread is damaged. The sewing light bulb does not The sewing...


