
Users Manual - English
Page 2
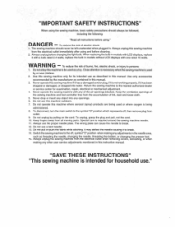
... children. 2. Always use a bent needle. 13. Switch the sewingmachine to break. 12. The sewing machine should always be followed, including the following: "Read all moving parts. When replacing the bulb in this machine where aerosol (spray) products are being used as threading the needle, changing the needle, threading the bobbin, or...
... children. 2. Always use a bent needle. 13. Switch the sewingmachine to break. 12. The sewing machine should always be followed, including the following: "Read all moving parts. When replacing the bulb in this machine where aerosol (spray) products are being used as threading the needle, changing the needle, threading the bobbin, or...

Users Manual - English
Page 4
TABLE OF CONTENTS KNOWING YOUR SEWING MACHINE Principal parts 1 Accessories 3 OPERATING YOUR SEWING MACHINE 4 Connecting Plugs 4 Main Power and Sewing Light Switches ....5 Foot Controller 5 Replacing the Needle 6 Checking the Needle 6 Changing the Presser Foot 7 ...
TABLE OF CONTENTS KNOWING YOUR SEWING MACHINE Principal parts 1 Accessories 3 OPERATING YOUR SEWING MACHINE 4 Connecting Plugs 4 Main Power and Sewing Light Switches ....5 Foot Controller 5 Replacing the Needle 6 Checking the Needle 6 Changing the Presser Foot 7 ...
Users Manual - English
Page 11
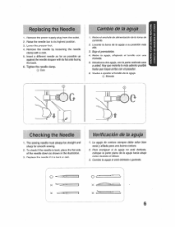
...tomillo con una moneda, 5. Moneda Checking the Needle 1. The sewing needle must always be straight and sharp for smooth sewing. 2. coloque la parte plans de la aguja hacks abajo como muestra el dibujo. 3. Remove the needle by loosening the needle clamp with its highest position. 3. ... y alilada Para una buena costura. 2. Insert a different needle as far as shown in the illustration. 3. introduzca otra aguja, con la parte redonda cars a usted. KNOWING YOUR SEWING MACHINE CONOZCA SU MAOUINA DE COSER Replacing the Needle 1. Lower the presser foot. 4. Raise the needle...
...tomillo con una moneda, 5. Moneda Checking the Needle 1. The sewing needle must always be straight and sharp for smooth sewing. 2. coloque la parte plans de la aguja hacks abajo como muestra el dibujo. 3. Remove the needle by loosening the needle clamp with its highest position. 3. ... y alilada Para una buena costura. 2. Insert a different needle as far as shown in the illustration. 3. introduzca otra aguja, con la parte redonda cars a usted. KNOWING YOUR SEWING MACHINE CONOZCA SU MAOUINA DE COSER Replacing the Needle 1. Lower the presser foot. 4. Raise the needle...

Users Manual - English
Page 30
0 • Z 2. N o b 0 to "C C O tn •
0 • Z 2. N o b 0 to "C C O tn •

Users Manual - English
Page 35
... aguja a supastel&mas alta ylevante la palanca delprensatelas. 3. Segue el hilo inferior girando la ruedecilla hacia usted(enelsentido contrarioaldelasmantillas de unreloj)y tireloshilos superior einteriorhacia la parte apes delprensatelas. 4. El retroceso sirve para finalizar una costura o relorzarla, tel coma aparece a continuation. 7. Set the Pattern Selection Dial to the foot controller. Raise the...
... aguja a supastel&mas alta ylevante la palanca delprensatelas. 3. Segue el hilo inferior girando la ruedecilla hacia usted(enelsentido contrarioaldelasmantillas de unreloj)y tireloshilos superior einteriorhacia la parte apes delprensatelas. 4. El retroceso sirve para finalizar una costura o relorzarla, tel coma aparece a continuation. 7. Set the Pattern Selection Dial to the foot controller. Raise the...

Users Manual - English
Page 53
...lado derecho, instatelapaledeslizandolahacia laizquierda. Para coser el lado opuesto de la cremallera, simile la pate a! °prefer el baton situado en su parte posterior, instate la pats en el otro /ado de la cremallera y sign cosiendo, pasando la aguja par fa hondidura del otro lado....right side of the zipper, attach the shank to the left side of the zipper (J) Left pin for best results. Cuesa a partirde la parte inferior de la cremallera hacia la pane superior, por ambos lades. USING ATTACHMENTS AND APPLICATIONS USO OE ACCESORIOS Y APLICACIONES Zipper Insertion Pattern 3 ...
...lado derecho, instatelapaledeslizandolahacia laizquierda. Para coser el lado opuesto de la cremallera, simile la pate a! °prefer el baton situado en su parte posterior, instate la pats en el otro /ado de la cremallera y sign cosiendo, pasando la aguja par fa hondidura del otro lado....right side of the zipper, attach the shank to the left side of the zipper (J) Left pin for best results. Cuesa a partirde la parte inferior de la cremallera hacia la pane superior, por ambos lades. USING ATTACHMENTS AND APPLICATIONS USO OE ACCESORIOS Y APLICACIONES Zipper Insertion Pattern 3 ...

