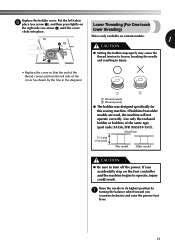
XL 2230 Parts Diagram - Brother International
XL 2230 Parts Diagram

View Results Below
Free Brother International XL-2230 manuals!
Problems with Brother International XL-2230?
Ask a Question
Free Brother International XL-2230 manuals!
Problems with Brother International XL-2230?
Ask a Question
Related Manual Pages

Similar Questions

Rare Part
I need a vertical adjuster # XC4932020 that fits a brother XL-2230
I need a vertical adjuster # XC4932020 that fits a brother XL-2230
(Posted by altonjones 2 years ago)

Missing Part
I was given a Ce5000prw. It's missing the attachment part of the table. What is the part number and ...
I was given a Ce5000prw. It's missing the attachment part of the table. What is the part number and ...
(Posted by 1connergirl 3 years ago)

Xa4331001 Panel Key Board . Need This Part New Or Used
where can I find part referenced above
where can I find part referenced above
(Posted by aholaway 7 years ago)

Where Can I Find A Part That Is Broken?
I've been using my Brother XR-7700 sewing machine for more than five years and it's been working fin...
I've been using my Brother XR-7700 sewing machine for more than five years and it's been working fin...
(Posted by tomomicorrigan 8 years ago)