
Users Manual - English
Page 1
how to use and enjoy your Sewing Machine 41
how to use and enjoy your Sewing Machine 41
Users Manual - English
Page 3
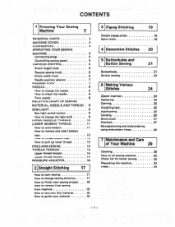
... Various Stitches 24 Zipper insertion 24 Gathering 24 Darning 25 Attaching lace 25 Appliqueing 26 Cording 26 Blind stitch 27 Overlock 27 Monogramming and embroidering using embroidery hoop 28 7 Maintenance and Care of Your Machine 29 Cleaning 29 How to pull up lower thread 13 FREE-ARM SEWING 13 THREAD TENSION...
... Various Stitches 24 Zipper insertion 24 Gathering 24 Darning 25 Attaching lace 25 Appliqueing 26 Cording 26 Blind stitch 27 Overlock 27 Monogramming and embroidering using embroidery hoop 28 7 Maintenance and Care of Your Machine 29 Cleaning 29 How to pull up lower thread 13 FREE-ARM SEWING 13 THREAD TENSION...
Users Manual - English
Page 7
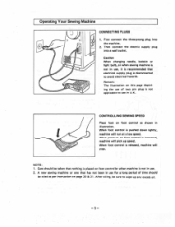
... time should be taken that electrical supply plug is released, machine will stop. When pressure on foot controller when machine is not applicable to use for a long period of two pin plug is not in U.K. First connect the three-prong plug into a wall outlet. Care should be ...increased, machine will run at a low speed. fit When foot control is disconnected to wipe up speed. After oiling, be oiled as shown in use, it is recommended that nothing is placed on foot control is pushed down lightly, machine will pick up any excess oil. -5- Operating Your Sewing...
... time should be taken that electrical supply plug is released, machine will stop. When pressure on foot controller when machine is not applicable to use for a long period of two pin plug is not in U.K. First connect the three-prong plug into a wall outlet. Care should be ...increased, machine will run at a low speed. fit When foot control is disconnected to wipe up speed. After oiling, be oiled as shown in use, it is recommended that nothing is placed on foot control is pushed down lightly, machine will pick up any excess oil. -5- Operating Your Sewing...
Users Manual - English
Page 8
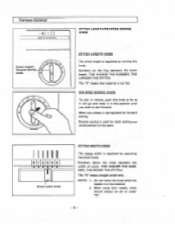
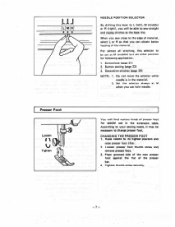
... turning this position until you release, it in the material. 2. When you wish to sew forward. Reverse sewing is used for forward sewing. The "0" means that material is in this knob. When using twin needle, knob should always be set at under .,3., -6- THE HIGHER THE NUMBER, THE LONGER THE STITCH. Numbers on...
... turning this position until you release, it in the material. 2. When you wish to sew forward. Reverse sewing is used for forward sewing. The "0" means that material is in this knob. When using twin needle, knob should always be set at under .,3., -6- THE HIGHER THE NUMBER, THE LONGER THE STITCH. Numbers on...
Users Manual - English
Page 9
... is in the extension table. Raise needle to change presser foot. When you sew close to the edge of material, select L or R so that you use in the material. 2. According to your sewing needs, it may be able to be set other position for special... use twin needle. For almost all stitching, this lever to L (left), M (middle) or R (right), you will find various kinds of presser foot for following application, 1. Place ...
... is in the extension table. Raise needle to change presser foot. When you sew close to the edge of material, select L or R so that you use in the material. 2. According to your sewing needs, it may be able to be set other position for special... use twin needle. For almost all stitching, this lever to L (left), M (middle) or R (right), you will find various kinds of presser foot for following application, 1. Place ...
Users Manual - English
Page 10
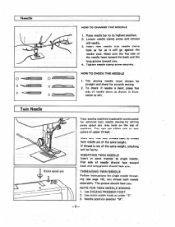
...faulty. To check if needle is specially constructed for single needle threading (see page 10), but thread each needle separately. Make sure that two threads used to its highest position. 2. The groove should face you . 4. Twin Needle tI 4 ) Extra spool pin Your sewing machine is bent, place...by setting extra spool pin into needle clamp hole as far as single needle. Use ZIGZAG PRESSER FOOT. 2. Use stitch width knob at left. Needle X t-r-- Loosen needle clamp screw and remove old needle. 3. You can use either one or two colors of upper thread. TO CHANGE THE NEEDLE 1. ...
...faulty. To check if needle is specially constructed for single needle threading (see page 10), but thread each needle separately. Make sure that two threads used to its highest position. 2. The groove should face you . 4. Twin Needle tI 4 ) Extra spool pin Your sewing machine is bent, place...by setting extra spool pin into needle clamp hole as far as single needle. Use ZIGZAG PRESSER FOOT. 2. Use stitch width knob at left. Needle X t-r-- Loosen needle clamp screw and remove old needle. 3. You can use either one or two colors of upper thread. TO CHANGE THE NEEDLE 1. ...

Users Manual - English
Page 11
... THE LIGHT BULB 13: 1. Remove face plate by turning it counterclockwise. NOTE: 1) Make sure to disconnect electric supply plug from above chart. 2. Use the same size thread for upper and lower threads. Tulle, Chiffon Cotton: 80-120 9 Synthetic Fine Mercerized Cotton LIGHTWEIGHT Organdy, Jersey, Voile, Taffeta,...12W 110/115V AREA 15W 220/240V AREA -9- Relative Chart of needle and thread from wall outlet before changing light bulb. 2) Always use CORRECT LIGHT BULB. Sew-light SEW LIGHT SWITCH BUTTON To switch the light on face plate. 3.Replace light bulb and fix face ...
... THE LIGHT BULB 13: 1. Remove face plate by turning it counterclockwise. NOTE: 1) Make sure to disconnect electric supply plug from above chart. 2. Use the same size thread for upper and lower threads. Tulle, Chiffon Cotton: 80-120 9 Synthetic Fine Mercerized Cotton LIGHTWEIGHT Organdy, Jersey, Voile, Taffeta,...12W 110/115V AREA 15W 220/240V AREA -9- Relative Chart of needle and thread from wall outlet before changing light bulb. 2) Always use CORRECT LIGHT BULB. Sew-light SEW LIGHT SWITCH BUTTON To switch the light on face plate. 3.Replace light bulb and fix face ...
Users Manual - English
Page 16
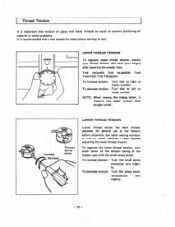
... tension: Turn dial to left to higher number. Increase Decrease Tension spring screw LOWER THREAD TENSION Lower thread tenion has been already adjusted for general use at the factory before starting to sew. ly. Thread Tension It is important that tension of upper and lower threads be made before shipment, but...
... tension: Turn dial to left to higher number. Increase Decrease Tension spring screw LOWER THREAD TENSION Lower thread tenion has been already adjusted for general use at the factory before starting to sew. ly. Thread Tension It is important that tension of upper and lower threads be made before shipment, but...
Users Manual - English
Page 18
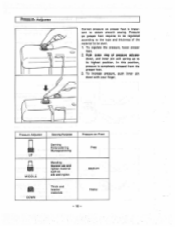
... pin will spring up to its highest position. Push outer ring of the material to obtain smooth sewing. UP i MIDDLE Darning Embroidering Monogramming Mending Normal use and lighter material such as silk and nylon Free Medium IN DOWN Thick and heavier materials Heavy - 16 - Pressure Adjuster Sewing Purpose Pressure on presser...
... pin will spring up to its highest position. Push outer ring of the material to obtain smooth sewing. UP i MIDDLE Darning Embroidering Monogramming Mending Normal use and lighter material such as silk and nylon Free Medium IN DOWN Thick and heavier materials Heavy - 16 - Pressure Adjuster Sewing Purpose Pressure on presser...
Users Manual - English
Page 19
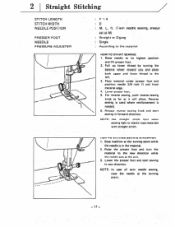
...to the material HOW TO START SEWING 1, Raise needle to the new direction while the needle acts as it will allow. Reverse sewing is used where reinforcement is in new direction. Stop machine at the turning point. - 17 - Place material under presser foot and position needle 3/8 inch... push reverse sewing knob as far as the axis. Release reverse sewing knob and start sewing • in the material. 2. V 3. NOTE: Use straight stitch foot when sewing light or elastic type materials with straight stitch. L. Pull up lower thread by turning the balance wheel toward you and...
...to the material HOW TO START SEWING 1, Raise needle to the new direction while the needle acts as it will allow. Reverse sewing is used where reinforcement is in new direction. Stop machine at the turning point. - 17 - Place material under presser foot and position needle 3/8 inch... push reverse sewing knob as far as the axis. Release reverse sewing knob and start sewing • in the material. 2. V 3. NOTE: Use straight stitch foot when sewing light or elastic type materials with straight stitch. L. Pull up lower thread by turning the balance wheel toward you and...

Users Manual - English
Page 20
HOW TO FINISH YOUR SEWING PROJECT (REVERSE STITCHING) Reverse stitching is used to reinforce stitches near the edge of the presser foot as shown in the illustration. Stop the machine. 2. Merely guide the material with gentle tension ...
HOW TO FINISH YOUR SEWING PROJECT (REVERSE STITCHING) Reverse stitching is used to reinforce stitches near the edge of the presser foot as shown in the illustration. Stop the machine. 2. Merely guide the material with gentle tension ...
Users Manual - English
Page 21
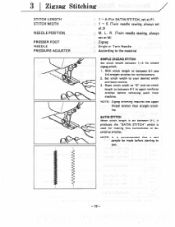
... length to between 0.1 to again reinforce stitches before starting to your desired width and begin sewing. 3. Set stitch width to sew. - 19 - NOTE: It is used for simple zigzag stitch. 1.
... length to between 0.1 to again reinforce stitches before starting to your desired width and begin sewing. 3. Set stitch width to sew. - 19 - NOTE: It is used for simple zigzag stitch. 1.
Users Manual - English
Page 22
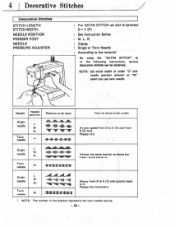
... 20 - Repeat the movement. • NOTE: The number in the following instructions, various decorative stitches can be sewn How to the material By using the "SATIN STITCH" as above but make round patterns. L. NOTE: Set stitch width at under "3" and needle position selector at "M" when you... use twin needle. gililli .IIIIP-401h"Nlifr 'IIIIIP"IIIIIII NIIIIII"Illilly :311:::::111:4.3:: At even speed from 0 to 5 (3) and from O to 5 (3) and quickly ...
... 20 - Repeat the movement. • NOTE: The number in the following instructions, various decorative stitches can be sewn How to the material By using the "SATIN STITCH" as above but make round patterns. L. NOTE: Set stitch width at under "3" and needle position selector at "M" when you... use twin needle. gililli .IIIIP-401h"Nlifr 'IIIIIP"IIIIIII NIIIIII"Illilly :311:::::111:4.3:: At even speed from 0 to 5 (3) and from O to 5 (3) and quickly ...
Users Manual - English
Page 24
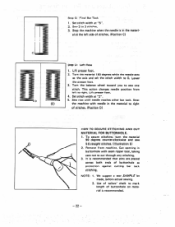
... recommended that pins are placed across both ends of buttonhole as the axis and set the stitch width to mark length of tailors' chalk to 0. Use of buttonhole on material is in the material to sew one stitch.
... recommended that pins are placed across both ends of buttonhole as the axis and set the stitch width to mark length of tailors' chalk to 0. Use of buttonhole on material is in the material to sew one stitch.
Users Manual - English
Page 26
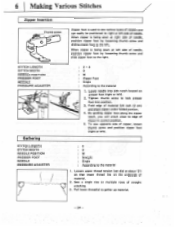
... Needle Gathering STITCH LENGTH STITCH WIDTH NEEDLE POSITION PRESSER FOOT NEEDLE PRESSURE ADJUSTER 2- 3 0 M Zipper Foot Single According to gather up material. - 24 - When zipper is used to sew various types of zippers and can easily be positioned to the right. Lower needle into position. 3. Fold edge of needle, position zipper foot...
... Needle Gathering STITCH LENGTH STITCH WIDTH NEEDLE POSITION PRESSER FOOT NEEDLE PRESSURE ADJUSTER 2- 3 0 M Zipper Foot Single According to gather up material. - 24 - When zipper is used to sew various types of zippers and can easily be positioned to the right. Lower needle into position. 3. Fold edge of needle, position zipper foot...
Users Manual - English
Page 27
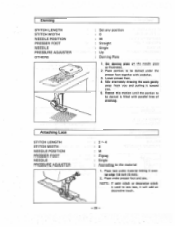
.... 3. Repeat this motion until the portion to be darned under the presser foot together with parallel lines of stitching. Place portion to be darned is used to the material 1. Lower presser foot. 4. Place lace under presser foot and sew. Darning STITCH LENGTH STITCH WIDTH NEEDLE POSITION PRESSER FOOT NEEDLE PRESSURE ADJUSTER...
.... 3. Repeat this motion until the portion to be darned under the presser foot together with parallel lines of stitching. Place portion to be darned is used to the material 1. Lower presser foot. 4. Place lace under presser foot and sew. Darning STITCH LENGTH STITCH WIDTH NEEDLE POSITION PRESSER FOOT NEEDLE PRESSURE ADJUSTER...

Users Manual - English
Page 28
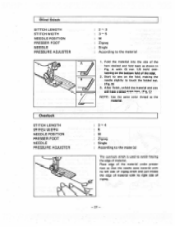
Baste cut design to the material 1. Sew carefully following design. 3. Cut away surplus material outside of cord being used, set stitch width. : M Zigzag Single : According to the material 1. Set stitch width knob. 2. Appliqueing STITCH LENGTH STITCH WIDTH NEEDLE POSITION PRESSER FOOT NEEDLE PRESSURE ADJUSTER F - 2 : 1- 3 : M : ... STITCH WIDTH NEEDLE POSITION PRESSER FOOT NEEDLE PRESSURE ADJUSTER : F^'2 In accordance with thickness of stitching. 4. Lower presser foot, making sure cord is centered and sew using zigzag stitch.
Baste cut design to the material 1. Sew carefully following design. 3. Cut away surplus material outside of cord being used, set stitch width. : M Zigzag Single : According to the material 1. Set stitch width knob. 2. Appliqueing STITCH LENGTH STITCH WIDTH NEEDLE POSITION PRESSER FOOT NEEDLE PRESSURE ADJUSTER F - 2 : 1- 3 : M : ... STITCH WIDTH NEEDLE POSITION PRESSER FOOT NEEDLE PRESSURE ADJUSTER : F^'2 In accordance with thickness of stitching. 4. Lower presser foot, making sure cord is centered and sew using zigzag stitch.
Users Manual - English
Page 29
... material with its right side of the hem desired and fold back as the material. 3. 4 5 M Zigzag Single According to the material The overlock stitch is used to touch the folded top. (Fig. A with its left side of zigzag stitch and just misses the edge of material with (5 mm 1/5 inch) overlapping on... the fold, making the needle slightly to avoid fraying the edge of the edge. 2. C) NOTE: Use the same color thread as shown in Fig. Start to the material 1. B) 3.
... material with its right side of the hem desired and fold back as the material. 3. 4 5 M Zigzag Single According to the material The overlock stitch is used to touch the folded top. (Fig. A with its left side of zigzag stitch and just misses the edge of material with (5 mm 1/5 inch) overlapping on... the fold, making the needle slightly to avoid fraying the edge of the edge. 2. C) NOTE: Use the same color thread as shown in Fig. Start to the material 1. B) 3.
Users Manual - English
Page 30
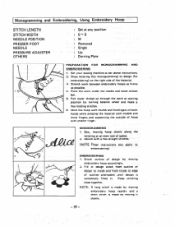
... hoop slowly along the lettering at any position : 0- 5 M : Removed : Single : Up : Darning Plate PREPARATION FOR MONOGRAMMING AND EMBROIDERING 1. Keep stitching close together. Monogramming and Embroidering, Using Embroidery Hoop STITCH LENGTH STITCH WIDTH NEEDLE POSITION PRESSER FOOT NEEDLE PRESSURE ADJUSTER OTHERS Set at an even rate of speed. 2. Set your sewing machine...
... hoop slowly along the lettering at any position : 0- 5 M : Removed : Single : Up : Darning Plate PREPARATION FOR MONOGRAMMING AND EMBROIDERING 1. Keep stitching close together. Monogramming and Embroidering, Using Embroidery Hoop STITCH LENGTH STITCH WIDTH NEEDLE POSITION PRESSER FOOT NEEDLE PRESSURE ADJUSTER OTHERS Set at an even rate of speed. 2. Set your sewing machine...
Users Manual - English
Page 31
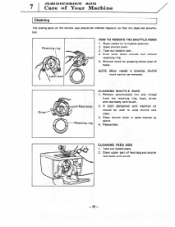
.... 3. Clean upper part of hook. Take out bobbin case. 4. 7 ittictlIILCIllidLIMCIle anti Care of Your Machine Cleaning The sliding parts of the shuttle race should be used to its highest position. 2.
.... 3. Clean upper part of hook. Take out bobbin case. 4. 7 ittictlIILCIllidLIMCIle anti Care of Your Machine Cleaning The sliding parts of the shuttle race should be used to its highest position. 2.


