
Users Manual - English
Page 3
...24 Darning 25 Attaching lace 25 Appliqueing 26 Cording 26 Blind stitch 27 Overlock 27 Monogramming and embroidering using embroidery hoop 28 7 Maintenance and Care of Your Machine 29 Cleaning 29 How to pull up lower thread 13 FREE-ARM SEWING 13 THREAD TENSION 14 Upper thread tension 14 Lower thread tension 14 PRESSURE ADJUSTER 16 2. Straight Stitching 17 How to start sewing 17 How to change the light bulb 9 UPPER (NEEDLE) THREAD 10 LOWER (BOBBIN) THREAD 11 How to wind bobbin 11 How to remove and insert bobbin case 12 How to thread bobbin case...
...24 Darning 25 Attaching lace 25 Appliqueing 26 Cording 26 Blind stitch 27 Overlock 27 Monogramming and embroidering using embroidery hoop 28 7 Maintenance and Care of Your Machine 29 Cleaning 29 How to pull up lower thread 13 FREE-ARM SEWING 13 THREAD TENSION 14 Upper thread tension 14 Lower thread tension 14 PRESSURE ADJUSTER 16 2. Straight Stitching 17 How to start sewing 17 How to change the light bulb 9 UPPER (NEEDLE) THREAD 10 LOWER (BOBBIN) THREAD 11 How to wind bobbin 11 How to remove and insert bobbin case 12 How to thread bobbin case...
Users Manual - English
Page 4
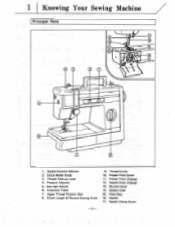
Thread Take-up Lever 4. Thread Cutter 10. Needle Clamp Screw -2- Pressure Adjuster 5. Needle Position Selector 2. Stitch Width Knob 3. Needle Plate (Zigzag) 13. Needle 17. Extension Table 7. Stitch Length & Reverse Sewing Knob 9. Upper Thread Tension Dial 8. Shuttle Hook 14. Sew-light Switch 6. Feed Dog 16. Presser Foot Screw 11. Bobbin Case 15. 1 Knowing Your Sewing Machine Principal Parts 10 11 15 12 0 0 0 2 5 IF I 1. Presser Foot (Zigzag) 12.
Thread Take-up Lever 4. Thread Cutter 10. Needle Clamp Screw -2- Pressure Adjuster 5. Needle Position Selector 2. Stitch Width Knob 3. Needle Plate (Zigzag) 13. Needle 17. Extension Table 7. Stitch Length & Reverse Sewing Knob 9. Upper Thread Tension Dial 8. Shuttle Hook 14. Sew-light Switch 6. Feed Dog 16. Presser Foot Screw 11. Bobbin Case 15. 1 Knowing Your Sewing Machine Principal Parts 10 11 15 12 0 0 0 2 5 IF I 1. Presser Foot (Zigzag) 12.
Users Manual - English
Page 5
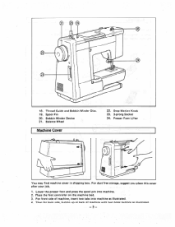
... Wheel Machine Cover 22. For front side of machine with two hook buttons as illustrated. 4. 24 5 18. Place the foot controller on the machine bed. 3. Spool Pin 20. Bobbin Winder Device 21. Lower the presser foot and press the spool pin into machine as illustrated. -3- Then for back side, button up at back of machine, insert two tabs into machine. 2. For dust free storage, suggest you place this cover after your job. 1. Thread Guide and Bobbin Winder Disc...
... Wheel Machine Cover 22. For front side of machine with two hook buttons as illustrated. 4. 24 5 18. Place the foot controller on the machine bed. 3. Spool Pin 20. Bobbin Winder Device 21. Lower the presser foot and press the spool pin into machine as illustrated. -3- Then for back side, button up at back of machine, insert two tabs into machine. 2. For dust free storage, suggest you place this cover after your job. 1. Thread Guide and Bobbin Winder Disc...
Users Manual - English
Page 7
... outlet. A new sewing machine or one that has not been in use for a long period of two pin plug is not in use of time should be taken that nothing is placed on foot control is pushed down lightly, machine will stop. NOTE: 1. After oiling, be oiled as shown in U.K. fit When foot control is disconnected to wipe up speed. Caution When changing needle, bobbin or light bulb, or when sewing machine is...
... outlet. A new sewing machine or one that has not been in use for a long period of two pin plug is not in use of time should be taken that nothing is placed on foot control is pushed down lightly, machine will stop. NOTE: 1. After oiling, be oiled as shown in U.K. fit When foot control is disconnected to wipe up speed. Caution When changing needle, bobbin or light bulb, or when sewing machine is...
Users Manual - English
Page 10
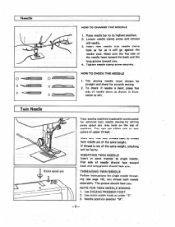
... of machine. Make sure the flat side of needle should face you. Flat side of the needle faces toward the back and the long groove toward back and long groove should face you . 4. Use ZIGZAG PRESSER FOOT. 2. Twin Needle tI 4 ) Extra spool pin Your sewing machine is bent, place flat side of upper thread. The groove should face toward you . Needle position selector "M". -8- Needle X t-r-- Loosen needle clamp screw and remove old needle. 3. Tighten needle clamp screw securely...
... of machine. Make sure the flat side of needle should face you. Flat side of the needle faces toward the back and the long groove toward back and long groove should face you . 4. Use ZIGZAG PRESSER FOOT. 2. Twin Needle tI 4 ) Extra spool pin Your sewing machine is bent, place flat side of upper thread. The groove should face toward you . Needle position selector "M". -8- Needle X t-r-- Loosen needle clamp screw and remove old needle. 3. Tighten needle clamp screw securely...
Users Manual - English
Page 14
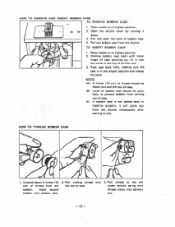
... needle to prevent bobbin from the bobbin. Unwind about 4 inches (10 cm) of case. 3. HOW TO THREAD BOBBIN CASE 0 - • 0 Tension spring , a o u, 1/4 • o.--.....--- .• 1. Pull trailing thread into delivery eye. - 12 - Insert wound bobbin into the notch at the top of case. (C) If bobbin case is in machine properly it will come out from the shuttle. HOW TO REMOVE AND INSERT BOBBIN CASE TO REMOVE BOBBIN CASE gun ro) 1-9: 1::--. 1. Open the shuttle cover by turning it into bobbin case. 2. Holding bobbin case...
... needle to prevent bobbin from the bobbin. Unwind about 4 inches (10 cm) of case. 3. HOW TO THREAD BOBBIN CASE 0 - • 0 Tension spring , a o u, 1/4 • o.--.....--- .• 1. Pull trailing thread into delivery eye. - 12 - Insert wound bobbin into the notch at the top of case. (C) If bobbin case is in machine properly it will come out from the shuttle. HOW TO REMOVE AND INSERT BOBBIN CASE TO REMOVE BOBBIN CASE gun ro) 1-9: 1::--. 1. Open the shuttle cover by turning it into bobbin case. 2. Holding bobbin case...
Users Manual - English
Page 15
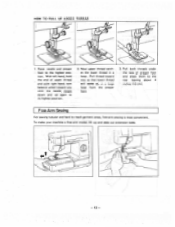
... and slide out extension table. -13 - Now upper thread catches the lower thread in a large loop from the presser foot. 3. To make your machine a free-arm model, lift -up again to the highest position. With left hand, hold the end of presser foot and place them to reach garment areas, free-arm sewing is most convenient. Raise needle and presser foot to its highest position. 2. Pull thread toward you so that lower thread will come up in...
... and slide out extension table. -13 - Now upper thread catches the lower thread in a large loop from the presser foot. 3. To make your machine a free-arm model, lift -up again to the highest position. With left hand, hold the end of presser foot and place them to reach garment areas, free-arm sewing is most convenient. Raise needle and presser foot to its highest position. 2. Pull thread toward you so that lower thread will come up in...
Users Manual - English
Page 16
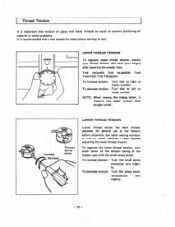
... already adjusted for general use at the factory before starting to sew. I. ly. terclockwise very slightly. - 14 - THE HIGHER THE NUMBER. To regulate the lower thread tension, turn thread tension dial with the small screw driver. NOTE: When sewing the zigzag stitch, it also requires adjusting the lower thread tension. To decrease tension: Turn dial to left to higher number. Thread Tension It is important that tension of upper and lower threads be equal to prevent puckering of the bobbin case...
... already adjusted for general use at the factory before starting to sew. I. ly. terclockwise very slightly. - 14 - THE HIGHER THE NUMBER. To regulate the lower thread tension, turn thread tension dial with the small screw driver. NOTE: When sewing the zigzag stitch, it also requires adjusting the lower thread tension. To decrease tension: Turn dial to left to higher number. Thread Tension It is important that tension of upper and lower threads be equal to prevent puckering of the bobbin case...
Users Manual - English
Page 17
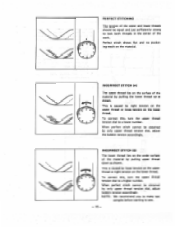
... upper thread tension dial to a higher number. This is caused by pulling the lower thread up as shown. e 0 INCORRECT STITCH (A) The upper thread lies on the surface of the material by tight tension on the upper thread or loose tension on the lower thread. This is caused by only upper thread tension dial, adjust bobbin tension accordingly. When perfect stitch cannot be obtained by loose tension on the upper thread or tight tension on the lower thread. To correct this , turn the upper thread tension dial...
... upper thread tension dial to a higher number. This is caused by pulling the lower thread up as shown. e 0 INCORRECT STITCH (A) The upper thread lies on the surface of the material by tight tension on the upper thread or loose tension on the lower thread. This is caused by only upper thread tension dial, adjust bobbin tension accordingly. When perfect stitch cannot be obtained by loose tension on the upper thread or tight tension on the lower thread. To correct this , turn the upper thread tension dial...
Users Manual - English
Page 19
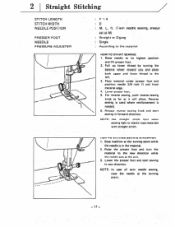
... NEEDLE POSITION PRESSER FOOT NEEDLE PRESSURE ADJUSTER F -4 0 M. NOTE: Use straight stitch foot when sewing light or elastic type materials with straight stitch. Reverse sewing is used where reinforcement is in forward direction. Release reverse sewing knob and start sewing • in new direction. Raise the presser foot and turn the material to the left. 3. L. Pull up lower thread by turning the balance wheel toward you and place both upper and lower thread to the new direction while the needle acts as it will allow. Lower presser foot. 5. HOW TO CHANGE SEWING...
... NEEDLE POSITION PRESSER FOOT NEEDLE PRESSURE ADJUSTER F -4 0 M. NOTE: Use straight stitch foot when sewing light or elastic type materials with straight stitch. Reverse sewing is used where reinforcement is in forward direction. Release reverse sewing knob and start sewing • in new direction. Raise the presser foot and turn the material to the left. 3. L. Pull up lower thread by turning the balance wheel toward you and place both upper and lower thread to the new direction while the needle acts as it will allow. Lower presser foot. 5. HOW TO CHANGE SEWING...

Users Manual - English
Page 20
... to eliminate skipped stitches and puckering on the thread cutter. 5. HOW TO SEW VERY THIN MATERIAL An underlay of the presser foot with your needle might either bend or break. If you support the material both threads on very thin material. HOW TO REMOVE FINAL SEWING FROM MACHINE 1. However, in front and back of thin paper will help to its highest position and make sure that...
... to eliminate skipped stitches and puckering on the thread cutter. 5. HOW TO SEW VERY THIN MATERIAL An underlay of the presser foot with your needle might either bend or break. If you support the material both threads on very thin material. HOW TO REMOVE FINAL SEWING FROM MACHINE 1. However, in front and back of thin paper will help to its highest position and make sure that...
Users Manual - English
Page 21
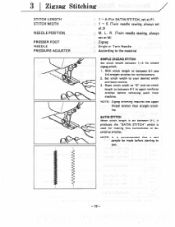
3 I Zigzag Stitching STITCH LENGTH STITCH WIDTH NEEDLE POSITION PRESSER FOOT NEEDLE PRESSURE ADJUSTER 1 - 4 (For SATIN STITCH, set at F) : 1 -•• 5 (Twin needle sewing, always set between 0-1, it produces the "SATIN STITCH" which is used for making fine buttonholes or decorative stitches. NOTE: It is set at M) : Zigzag : Single or Twin Needle : According to again reinforce stitches before starting to "0" and set at 3) : M. NOTE: Zigzag stitching requires less upper thread tension than straight stitching. L. Set stitch width to between 0.1 sew 5-6 straight ...
3 I Zigzag Stitching STITCH LENGTH STITCH WIDTH NEEDLE POSITION PRESSER FOOT NEEDLE PRESSURE ADJUSTER 1 - 4 (For SATIN STITCH, set at F) : 1 -•• 5 (Twin needle sewing, always set between 0-1, it produces the "SATIN STITCH" which is used for making fine buttonholes or decorative stitches. NOTE: It is set at M) : Zigzag : Single or Twin Needle : According to again reinforce stitches before starting to "0" and set at 3) : M. NOTE: Zigzag stitching requires less upper thread tension than straight stitching. L. Set stitch width to between 0.1 sew 5-6 straight ...
Users Manual - English
Page 24
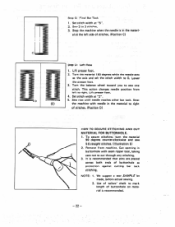
... actual sewing. 2. Set stitch width at "2". 5. This action changes needle position from machine. Stop (E) the machine with seam ripper tool, taking care not to cut through any stitching. 3. It is recommended that pins are placed across both ends of stitches. (Position C) Step D: Left Row 1. al at the left to 0. Lift presser foot. 4. Step C: Final Bar Tack 1. Sew row until needle reaches other bar tack. Remove from left side of buttonhole as...
... actual sewing. 2. Set stitch width at "2". 5. This action changes needle position from machine. Stop (E) the machine with seam ripper tool, taking care not to cut through any stitching. 3. It is recommended that pins are placed across both ends of stitches. (Position C) Step D: Left Row 1. al at the left to 0. Lift presser foot. 4. Step C: Final Bar Tack 1. Sew row until needle reaches other bar tack. Remove from left side of buttonhole as...
Users Manual - English
Page 25
Button Sewing STITCH LENGTH STITCH WIDTH NEEDLE POSITION PRESSER FOOT NEEDLE PRESSURE ADJUSTER : 0 : According to the distance of button and tie. Place button between the button and the material through to back of holes : L or R : Zigzag : Single : Middle 1. Stop machine and raise needle from machine. Remove from the material. 6. Cut upper and lower threads and with normal sewing needle, sew threads through the hole of button. 3. Pull upper thread between the presser foot and material. 2. Control zigzag width to form a thread shank. 3. Place a needle on the button as ...
Button Sewing STITCH LENGTH STITCH WIDTH NEEDLE POSITION PRESSER FOOT NEEDLE PRESSURE ADJUSTER : 0 : According to the distance of button and tie. Place button between the button and the material through to back of holes : L or R : Zigzag : Single : Middle 1. Stop machine and raise needle from machine. Remove from the material. 6. Cut upper and lower threads and with normal sewing needle, sew threads through the hole of button. 3. Pull upper thread between the presser foot and material. 2. Control zigzag width to form a thread shank. 3. Place a needle on the button as ...
Users Manual - English
Page 26
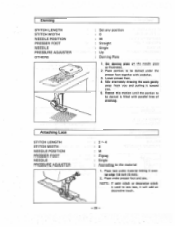
... tension (set dial at left side of material. 2. STITCH LENGTH SITTCH WIDTH NEEDLE POSITION PRESSER FOOT NEEDLE PRESSURE ADJUSTER Needle Gathering STITCH LENGTH STITCH WIDTH NEEDLE POSITION PRESSER FOOT NEEDLE PRESSURE ADJUSTER 2- 3 0 M Zipper Foot Single According to lock presser foot into side notch located on the underside of needle, position zipper foot by loosening thumb screw and sliding zipper foot to the left. Fold edge of zipper in correct position. 5. Pull lower thread(s) to the material 1. When zipper is being sewn at right side of needle. When zipper is used...
... tension (set dial at left side of material. 2. STITCH LENGTH SITTCH WIDTH NEEDLE POSITION PRESSER FOOT NEEDLE PRESSURE ADJUSTER Needle Gathering STITCH LENGTH STITCH WIDTH NEEDLE POSITION PRESSER FOOT NEEDLE PRESSURE ADJUSTER 2- 3 0 M Zipper Foot Single According to lock presser foot into side notch located on the underside of needle, position zipper foot by loosening thumb screw and sliding zipper foot to the left. Fold edge of zipper in correct position. 5. Pull lower thread(s) to the material 1. When zipper is being sewn at right side of needle. When zipper is used...
Users Manual - English
Page 27
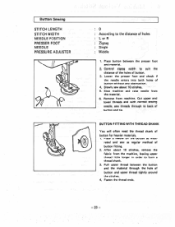
... the presser foot together with parallel lines of stitching. NOTE: If satin stitch or decorative stitch is filled with underlay. 3. Place lace under material letting it toward you and pulling it overlap edge 1/4 inch (5 mm). 2. Place portion to be darned under presser foot and sew. Darning STITCH LENGTH STITCH WIDTH NEEDLE POSITION PRESSER FOOT NEEDLE PRESSURE ADJUSTER OTHERS c---;:z.tztentSte-. : Set any position : 0 : M : Straight : Single : Up : Darning Plate 1. Repeat this motion until the portion to be darned is used to...
... the presser foot together with parallel lines of stitching. NOTE: If satin stitch or decorative stitch is filled with underlay. 3. Place lace under material letting it toward you and pulling it overlap edge 1/4 inch (5 mm). 2. Place portion to be darned under presser foot and sew. Darning STITCH LENGTH STITCH WIDTH NEEDLE POSITION PRESSER FOOT NEEDLE PRESSURE ADJUSTER OTHERS c---;:z.tztentSte-. : Set any position : 0 : M : Straight : Single : Up : Darning Plate 1. Repeat this motion until the portion to be darned is used to...

Users Manual - English
Page 28
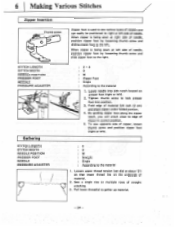
... of cord being used, set stitch width. : M Zigzag Single : According to the material 1. Guide cord by hand to the material 1. Sew carefully following design. 3. Cording STITCH LENGTH STITCH WIDTH NEEDLE POSITION PRESSER FOOT NEEDLE PRESSURE ADJUSTER : F^'2 In accordance with thickness of stitching. 4. Remove basting. NOTE: Make reinforment straight stitch at initial and final sewings. Set stitch width knob. 2. Lower presser foot, making sure cord is centered and sew using zigzag stitch. Appliqueing STITCH LENGTH STITCH WIDTH NEEDLE POSITION PRESSER FOOT NEEDLE PRESSURE ADJUSTER...
... of cord being used, set stitch width. : M Zigzag Single : According to the material 1. Guide cord by hand to the material 1. Sew carefully following design. 3. Cording STITCH LENGTH STITCH WIDTH NEEDLE POSITION PRESSER FOOT NEEDLE PRESSURE ADJUSTER : F^'2 In accordance with thickness of stitching. 4. Remove basting. NOTE: Make reinforment straight stitch at initial and final sewings. Set stitch width knob. 2. Lower presser foot, making sure cord is centered and sew using zigzag stitch. Appliqueing STITCH LENGTH STITCH WIDTH NEEDLE POSITION PRESSER FOOT NEEDLE PRESSURE ADJUSTER...
Users Manual - English
Page 30
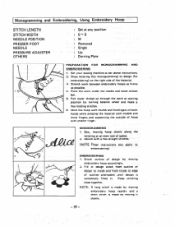
... any position : 0- 5 M : Removed : Single : Up : Darning Plate PREPARATION FOR MONOGRAMMING AND EMBROIDERING 1. Hold the hoop with thumb and forefingers of both hands while pressing the material with middle and third fingers and supporting the outside of hoop with a few holding stitches. 6. Monogramming and Embroidering, Using Embroidery Hoop STITCH LENGTH STITCH WIDTH NEEDLE POSITION PRESSER FOOT NEEDLE PRESSURE ADJUSTER OTHERS Set at an even rate of speed. 2. Sew, moving it slowly. - 28 - Pull lower thread up through the work under the needle and lower presser bar...
... any position : 0- 5 M : Removed : Single : Up : Darning Plate PREPARATION FOR MONOGRAMMING AND EMBROIDERING 1. Hold the hoop with thumb and forefingers of both hands while pressing the material with middle and third fingers and supporting the outside of hoop with a few holding stitches. 6. Monogramming and Embroidering, Using Embroidery Hoop STITCH LENGTH STITCH WIDTH NEEDLE POSITION PRESSER FOOT NEEDLE PRESSURE ADJUSTER OTHERS Set at an even rate of speed. 2. Sew, moving it slowly. - 28 - Pull lower thread up through the work under the needle and lower presser bar...
Users Manual - English
Page 34
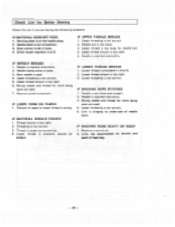
... the following problems: IF MATERIAL DOES NOT FEED. 1. Check List for Better Sewing Check this list if you are used. 4. Upper thread tension is not correct. 3. Threading is too tight. 5. Needle is out of feed dog. - 32 - Needle plate is not sharp and straight. 2. Stitch length regulator is not correct. 2. IF UPPER THREAD BREAKS 1. Upper threading is at 0. Upper thread is loose. 3. Needle clamp screw is too large for needle eye. 4. Bent needle is too tight. 6. Upper thread tension is used. 4. Tension of upper or lower thread is unevenly...
... the following problems: IF MATERIAL DOES NOT FEED. 1. Check List for Better Sewing Check this list if you are used. 4. Upper thread tension is not correct. 3. Threading is too tight. 5. Needle is out of feed dog. - 32 - Needle plate is not sharp and straight. 2. Stitch length regulator is not correct. 2. IF UPPER THREAD BREAKS 1. Upper threading is at 0. Upper thread is loose. 3. Needle clamp screw is too large for needle eye. 4. Bent needle is too tight. 6. Upper thread tension is used. 4. Tension of upper or lower thread is unevenly...
Users Manual - English
Page 36
... Accessories Appliqueing Attaching lace Blind stitch Bobbin case Button sewing Buttonholes Check list for better sewing Cleaning Connecting plugs Controlling sewing speed Cording Darning Decorative stitch Free-arm sewing Gathering Lower (bobbin) thread Machine cover Monogram and Embroidery Needle Needle position selector Oiling Overlock Presser foot Pressure adjuster Principal parts Relative chart of sewing material, needle, thread Repacking the machine Reverse sewing knob Reverse itItchI ng Satin stitching Sew-I ight Stitch length knob Stitch width knob Straight stitching Thread tension Twin...
... Accessories Appliqueing Attaching lace Blind stitch Bobbin case Button sewing Buttonholes Check list for better sewing Cleaning Connecting plugs Controlling sewing speed Cording Darning Decorative stitch Free-arm sewing Gathering Lower (bobbin) thread Machine cover Monogram and Embroidery Needle Needle position selector Oiling Overlock Presser foot Pressure adjuster Principal parts Relative chart of sewing material, needle, thread Repacking the machine Reverse sewing knob Reverse itItchI ng Satin stitching Sew-I ight Stitch length knob Stitch width knob Straight stitching Thread tension Twin...


