
Users Manual - English
Page 1
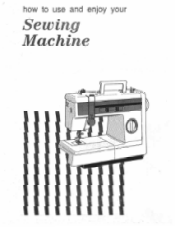
how to use and enjoy your Sewing Machine 41
how to use and enjoy your Sewing Machine 41
Users Manual - English
Page 2
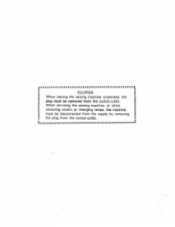
CAUTION When leaving the sewing machine unatended, the plug must be removed from the socket-outlet. When servicing the sewing machine, or when removing covers or changing lamps, the machine must be disconnected from the supply by removing the plug from the socket-outlet.
CAUTION When leaving the sewing machine unatended, the plug must be removed from the socket-outlet. When servicing the sewing machine, or when removing covers or changing lamps, the machine must be disconnected from the supply by removing the plug from the socket-outlet.
Users Manual - English
Page 3
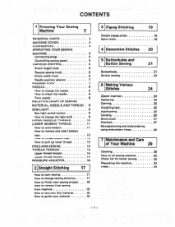
...needle 8 Twin needle 8 RELATIVE CHART OF SEWING MATERIAL, NEEDLE AND THREAD . 9 SEW-LIGHT 9 Sew light switch button 9 How to change sewing direction 17 How to finish your sewing project . . 18 How to remove final sewing from machine 18 How to sew very thin material 18 How to guide ...material 18 3 Zigzag Stitching Simple zigzag stitch Satin stitch 19 19 19 4 Decorative Stitches 20 5 Buttonholes and Button Sewing Buttonholes Button sewing 21 21 23 6 Making Various Stitches 24 Zipper insertion 24 Gathering 24 Darning 25 Attaching lace 25 Appliqueing 26 Cording...
...needle 8 Twin needle 8 RELATIVE CHART OF SEWING MATERIAL, NEEDLE AND THREAD . 9 SEW-LIGHT 9 Sew light switch button 9 How to change sewing direction 17 How to finish your sewing project . . 18 How to remove final sewing from machine 18 How to sew very thin material 18 How to guide ...material 18 3 Zigzag Stitching Simple zigzag stitch Satin stitch 19 19 19 4 Decorative Stitches 20 5 Buttonholes and Button Sewing Buttonholes Button sewing 21 21 23 6 Making Various Stitches 24 Zipper insertion 24 Gathering 24 Darning 25 Attaching lace 25 Appliqueing 26 Cording...
Users Manual - English
Page 4
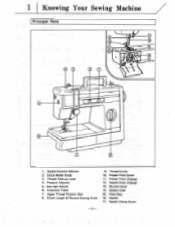
Pressure Adjuster 5. Stitch Length & Reverse Sewing Knob 9. Shuttle Hook 14. Needle Clamp Screw -2- Thread Take-up Lever 4. Presser Foot (Zigzag) 12. Needle Position Selector 2. Upper Thread Tension Dial 8. Thread Cutter 10. Sew-light Switch 6. Presser Foot Screw 11. Feed Dog 16. Stitch Width Knob 3. Needle Plate (Zigzag) 13. Bobbin Case 15. Extension Table 7. 1 Knowing Your Sewing Machine Principal Parts 10 11 15 12 0 0 0 2 5 IF I 1. Needle 17.
Pressure Adjuster 5. Stitch Length & Reverse Sewing Knob 9. Shuttle Hook 14. Needle Clamp Screw -2- Thread Take-up Lever 4. Presser Foot (Zigzag) 12. Needle Position Selector 2. Upper Thread Tension Dial 8. Thread Cutter 10. Sew-light Switch 6. Presser Foot Screw 11. Feed Dog 16. Stitch Width Knob 3. Needle Plate (Zigzag) 13. Bobbin Case 15. Extension Table 7. 1 Knowing Your Sewing Machine Principal Parts 10 11 15 12 0 0 0 2 5 IF I 1. Needle 17.
Users Manual - English
Page 6
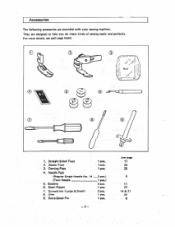
Straight Stitch Foot 2. Zipper Foot 3. Needle Pack (Regular Single Needle No. 14 (Twin Needle 5. Screwdriver (Large & Small) 8. See page 17 24 25 8 11 22 14 & 31 30 8 Bobbins 6. Oiler 9. Extra Spool Pin. 1 pce. 1 pce. 1 pce. 3 pcs.) 1 pce.) 3 pcs. 1 pce. 2 pcs. 1 pce. 1 pce. - 4 - Darning Plate 4. They are provided with your sewing machine. Seam Flipper 7. For more details, see each page listed. O0 %\ O O As -CFC - 1) 1. Accessories The following accessories are designed to help you do many kinds of sewing easily and perfectly.
Straight Stitch Foot 2. Zipper Foot 3. Needle Pack (Regular Single Needle No. 14 (Twin Needle 5. Screwdriver (Large & Small) 8. See page 17 24 25 8 11 22 14 & 31 30 8 Bobbins 6. Oiler 9. Extra Spool Pin. 1 pce. 1 pce. 1 pce. 3 pcs.) 1 pce.) 3 pcs. 1 pce. 2 pcs. 1 pce. 1 pce. - 4 - Darning Plate 4. They are provided with your sewing machine. Seam Flipper 7. For more details, see each page listed. O0 %\ O O As -CFC - 1) 1. Accessories The following accessories are designed to help you do many kinds of sewing easily and perfectly.
Users Manual - English
Page 7
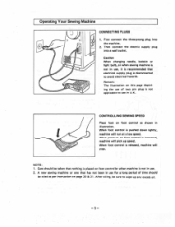
... machine is not applicable to use in U.K. When foot control is released, machine will stop. First connect the three-prong plug into a wall outlet. CONTROLLING SEWING SPEED Place foot on foot control as per instruction on foot control is disconnected to wipe up speed. NOTE: 1. A new... as shown in use for a long period of two pin plug is not in illustration. Caution When changing needle, bobbin or light bulb, or when sewing machine is not in use, it is recommended that has not been in use . 2. When pressure on page 30 Si 31. Then connect the electric...
... machine is not applicable to use in U.K. When foot control is released, machine will stop. First connect the three-prong plug into a wall outlet. CONTROLLING SEWING SPEED Place foot on foot control as per instruction on foot control is disconnected to wipe up speed. NOTE: 1. A new... as shown in use for a long period of two pin plug is not in illustration. Caution When changing needle, bobbin or light bulb, or when sewing machine is not in use, it is recommended that has not been in use . 2. When pressure on page 30 Si 31. Then connect the electric...
Users Manual - English
Page 8
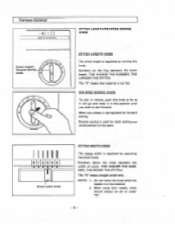
... STITCH LENGTH KNOB The stitch length is regulated by operating the stitch knob. %Numbers above the knob represent the width of the seam. REVERSE SEWING KNOB To sew in the material. 2. Win 0 12 34 5 Stitch width knob STITCH WIDTH KNOB The zigzag width is in reverse, push this knob as far as... it will go and keep it springs back for back tacking and reinforcement of stitch. When you wish to sew forward. The "0" means straight stitch only. Do not move the knob while the needle is regulated by turning this position until you release, it in...
... STITCH LENGTH KNOB The stitch length is regulated by operating the stitch knob. %Numbers above the knob represent the width of the seam. REVERSE SEWING KNOB To sew in the material. 2. Win 0 12 34 5 Stitch width knob STITCH WIDTH KNOB The zigzag width is in reverse, push this knob as far as... it will go and keep it springs back for back tacking and reinforcement of stitch. When you wish to sew forward. The "0" means straight stitch only. Do not move the knob while the needle is regulated by turning this position until you release, it in...
Users Manual - English
Page 9
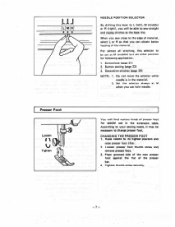
...the material. 2. Loosen presser foot thumb screw and remove presser foot. 3. CHANGING THE PRESSER FOOT 1. Raise needle to change presser foot. When you sew close to the edge of material, select L or R so that you will find various kinds of presser foot for following application, 1. Decorative stitches ...special use twin needle. Do not move the selector while needle is in the extension table. Button sewing (page 23) 3. According to your sewing needs, it may be able to sew straight and zigzag stitches as the base line. You will be necessary to its highest position and ...
...the material. 2. Loosen presser foot thumb screw and remove presser foot. 3. CHANGING THE PRESSER FOOT 1. Raise needle to change presser foot. When you sew close to the edge of material, select L or R so that you will find various kinds of presser foot for following application, 1. Decorative stitches ...special use twin needle. Do not move the selector while needle is in the extension table. Button sewing (page 23) 3. According to your sewing needs, it may be able to sew straight and zigzag stitches as the base line. You will be necessary to its highest position and ...
Users Manual - English
Page 10
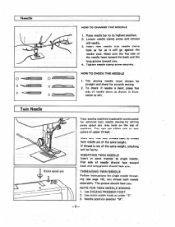
...If thread is not of the same weight, stitching will go against the needle stop. THREADING TWIN NEEDLE Follow instructions for optional twin needle sewing by setting extra spool pin into needle clamp hole as far as single needle. Needle position selector "M". -8- TO CHANGE THE NEEDLE 1..... Make sure the flat side of machine. Loosen needle clamp screw and remove old needle. 3. Twin Needle tI 4 ) Extra spool pin Your sewing machine is bent, place flat side of needle should face you . Tighten needle clamp screw securely. INSERTING TWIN NEEDLE Insert in illustration at under "3"....
...If thread is not of the same weight, stitching will go against the needle stop. THREADING TWIN NEEDLE Follow instructions for optional twin needle sewing by setting extra spool pin into needle clamp hole as far as single needle. Needle position selector "M". -8- TO CHANGE THE NEEDLE 1..... Make sure the flat side of machine. Loosen needle clamp screw and remove old needle. 3. Twin Needle tI 4 ) Extra spool pin Your sewing machine is bent, place flat side of needle should face you . Tighten needle clamp screw securely. INSERTING TWIN NEEDLE Insert in illustration at under "3"....

Users Manual - English
Page 11
Use the same size thread for upper and lower threads. Sew-light SEW LIGHT SWITCH BUTTON To switch the light on face plate. 3.Replace light bulb and fix face plate 2. NOTE: 1) Make sure to disconnect electric supply plug ... AREA 15W 220/240V AREA -9- Remove light bulb by loosing a screw on or off, push the sewlight switch button. Select correct size of Sewing Material, Needle and Thread SEWING MATERIALS NEEDLE SIZES THREAD SIZES VERY THIN Fine tricot, Fine lace, Thin linen, Silk. Relative Chart of needle and thread from wall outlet...
Use the same size thread for upper and lower threads. Sew-light SEW LIGHT SWITCH BUTTON To switch the light on face plate. 3.Replace light bulb and fix face plate 2. NOTE: 1) Make sure to disconnect electric supply plug ... AREA 15W 220/240V AREA -9- Remove light bulb by loosing a screw on or off, push the sewlight switch button. Select correct size of Sewing Material, Needle and Thread SEWING MATERIALS NEEDLE SIZES THREAD SIZES VERY THIN Fine tricot, Fine lace, Thin linen, Silk. Relative Chart of needle and thread from wall outlet...
Users Manual - English
Page 14
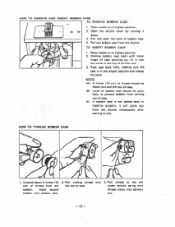
... the case is not placed back in the proper position and release the latch. Unwind about 4 inches (10 cm) of shuttle race. 3. Raise needle to sew. Pull trailing thread into the notch at the top of thread from the shuttle. downa.n0 Pull and open fully to prevent bobbin from the...
... the case is not placed back in the proper position and release the latch. Unwind about 4 inches (10 cm) of shuttle race. 3. Raise needle to sew. Pull trailing thread into the notch at the top of thread from the shuttle. downa.n0 Pull and open fully to prevent bobbin from the...
Users Manual - English
Page 15
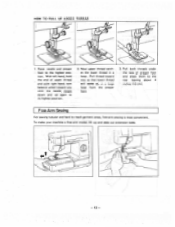
... with right hand, turn balance wheel toward you until the needle moves down and up again to reach garment areas, free-arm sewing is most convenient. Free-Arm Sewing For sewing tubular and hard to its highest position. 2. To make your machine a free-arm model, lift -up in a loop. Now upper thread catches...
... with right hand, turn balance wheel toward you until the needle moves down and up again to reach garment areas, free-arm sewing is most convenient. Free-Arm Sewing For sewing tubular and hard to its highest position. 2. To make your machine a free-arm model, lift -up in a loop. Now upper thread catches...
Users Manual - English
Page 16
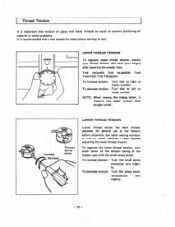
... screw on the tension spring of material or other problems. It is recommended that a test sample be made before shipment, but when sewing extremely thin or heavy material, it requires less upper tension than straight stitch. To decrease tension: Turn dial to left to higher number.... THE HIGHER THE NUMBER. To increase tension: Turn the small screw clockwise very slight. terclockwise very slightly. - 14 - NOTE: When sewing the zigzag stitch, it also requires adjusting the lower thread tension. ly. Thread Tension It is important that tension of upper and lower threads...
... screw on the tension spring of material or other problems. It is recommended that a test sample be made before shipment, but when sewing extremely thin or heavy material, it requires less upper tension than straight stitch. To decrease tension: Turn dial to left to higher number.... THE HIGHER THE NUMBER. To increase tension: Turn the small screw clockwise very slight. terclockwise very slightly. - 14 - NOTE: When sewing the zigzag stitch, it also requires adjusting the lower thread tension. ly. Thread Tension It is important that tension of upper and lower threads...
Users Manual - English
Page 17
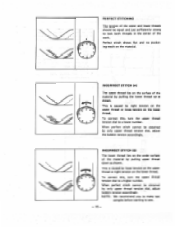
... both threads in the center of the material by pulling upper thread down as shown. To correct this , turn the upper thread tension dial to sew. - 15 - This is caused by tight tension on the upper thread or loose tension on the surface of the material by pulling the lower thread...
... both threads in the center of the material by pulling upper thread down as shown. To correct this , turn the upper thread tension dial to sew. - 15 - This is caused by tight tension on the upper thread or loose tension on the surface of the material by pulling the lower thread...
Users Manual - English
Page 18
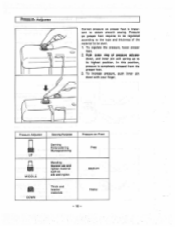
... be sewn. 1. Pressure Adjuster Correct pressure on presser foot is completely released from the presser foot. 3. Push outer ring of the material to obtain smooth sewing. Pressure Adjuster Sewing Purpose Pressure on Foot ;
... be sewn. 1. Pressure Adjuster Correct pressure on presser foot is completely released from the presser foot. 3. Push outer ring of the material to obtain smooth sewing. Pressure Adjuster Sewing Purpose Pressure on Foot ;
Users Manual - English
Page 19
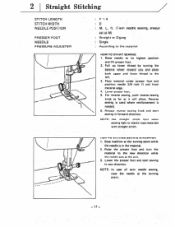
... 4. Stop machine at M) Straight or Zigzag Single According to the material HOW TO START SEWING 1, Raise needle to its highest position and lift presser foot. 2. L. Lower presser foot. 5. Reverse sewing is used where reinforcement is in the material. 2. Raise the presser foot and turn the... WIDTH NEEDLE POSITION PRESSER FOOT NEEDLE PRESSURE ADJUSTER F -4 0 M. NOTE: Use straight stitch foot when sewing light or elastic type materials with straight stitch. For reverse sewing, push reverse sewing knob as far as the axis. Pull up lower thread by turning the balance wheel toward you and ...
... 4. Stop machine at M) Straight or Zigzag Single According to the material HOW TO START SEWING 1, Raise needle to its highest position and lift presser foot. 2. L. Lower presser foot. 5. Reverse sewing is used where reinforcement is in the material. 2. Raise the presser foot and turn the... WIDTH NEEDLE POSITION PRESSER FOOT NEEDLE PRESSURE ADJUSTER F -4 0 M. NOTE: Use straight stitch foot when sewing light or elastic type materials with straight stitch. For reverse sewing, push reverse sewing knob as far as the axis. Pull up lower thread by turning the balance wheel toward you and ...

Users Manual - English
Page 20
... THIN MATERIAL An underlay of material or wherever reinforcement is at the highest position, and you are ready to sew again without any chance of thread pulling out of the presser foot as shown in front of the needle. HOW TO GUIDE YOUR MATERIAL Do ... and pull out the material gently to its highest position. 3. If you support the material both threads on very thin material. HOW TO REMOVE FINAL SEWING FROM MACHINE 1. Raise needle to the left side diagonally. 4. Let the machine do the work. Cut both in the lower illustration. - 18...
... THIN MATERIAL An underlay of material or wherever reinforcement is at the highest position, and you are ready to sew again without any chance of thread pulling out of the presser foot as shown in front of the needle. HOW TO GUIDE YOUR MATERIAL Do ... and pull out the material gently to its highest position. 3. If you support the material both threads on very thin material. HOW TO REMOVE FINAL SEWING FROM MACHINE 1. Raise needle to the left side diagonally. 4. Let the machine do the work. Cut both in the lower illustration. - 18...
Users Manual - English
Page 21
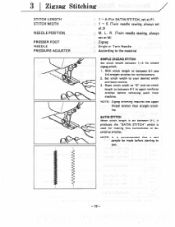
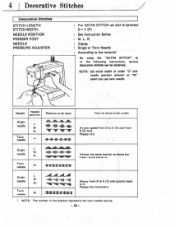
... STITCH WIDTH NEEDLE POSITION PRESSER FOOT NEEDLE PRESSURE ADJUSTER 1 - 4 (For SATIN STITCH, set at F) : 1 -•• 5 (Twin needle sewing, always set at M) : Zigzag : Single or Twin Needle : According to the mateiral SIMPLE ZIGZAG STITCH Set stitch length between 0.1 to again reinforce ...stitches before starting to sew. - 19 - Reset stitch width to "0" and set stitch length to between 1-4 for reinforcement. 2. SATIN STITCH When stitch length is set ...
... STITCH WIDTH NEEDLE POSITION PRESSER FOOT NEEDLE PRESSURE ADJUSTER 1 - 4 (For SATIN STITCH, set at F) : 1 -•• 5 (Twin needle sewing, always set at M) : Zigzag : Single or Twin Needle : According to the mateiral SIMPLE ZIGZAG STITCH Set stitch length between 0.1 to again reinforce ...stitches before starting to sew. - 19 - Reset stitch width to "0" and set stitch length to between 1-4 for reinforcement. 2. SATIN STITCH When stitch length is set ...
Users Manual - English
Page 22
.....sitiid M -.Will -IIIIII•noill - itIIIII"IIIIII"IIIIIn 'HMI i mirimurfaueliMir sz -str,:ictitte Almost the same manner as in the bracket represents the twin needle sewing. - 20 - " lilt R- ."1141-willr liir"1 M :4 -44:34141 1- L. R. Zigzag Single or Twin Needle According to move stitch width Single needle L M R Twin needle M iilillo..illills,,,ililli..iffillt...
.....sitiid M -.Will -IIIIII•noill - itIIIII"IIIIII"IIIIIn 'HMI i mirimurfaueliMir sz -str,:ictitte Almost the same manner as in the bracket represents the twin needle sewing. - 20 - " lilt R- ."1141-willr liir"1 M :4 -44:34141 1- L. R. Zigzag Single or Twin Needle According to move stitch width Single needle L M R Twin needle M iilillo..illills,,,ililli..iffillt...
Users Manual - English
Page 23
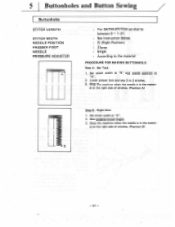
... needle is in the materi- Set stitch width at "5" and needle position at "2". 2. Sew predetermined length. 3. Set stitch width at "Rn. 2. Lower presser foot and sew 2 to the material PROCEDURE FOR MAKING BUTTONHOLE Step A: Bar Tack 1. 5 I Buttonholes and Button Sewing Buttonholes STITCH LENGTH STITCH WIDTH NEEDLE POSITION PRESSER FOOT NEEDLE PRESSURE ADJUSTER For...
... needle is in the materi- Set stitch width at "5" and needle position at "2". 2. Sew predetermined length. 3. Set stitch width at "Rn. 2. Lower presser foot and sew 2 to the material PROCEDURE FOR MAKING BUTTONHOLE Step A: Bar Tack 1. 5 I Buttonholes and Button Sewing Buttonholes STITCH LENGTH STITCH WIDTH NEEDLE POSITION PRESSER FOOT NEEDLE PRESSURE ADJUSTER For...


