

Accessory Catalog
Page 4
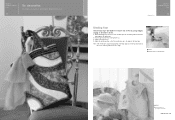
Brother General Sewing Accessories 05 Sew as you like. Position the presser foot over the long feed dogs on the presser foot and select a straight stitch (left or right. 3. Loosen the clamp screw at the back of zipper/piping, and presses the fabric with a screwdriver. 5. Check the needle...Sew. Requires Low Shank Adapter for ULT series, PC-6500, PC-8200 and PC-8500 sewing machines. Adjustable Zipper & Piping Foot Brother General Sewing Accessories 06 Adjustable Zipper & Piping Foot Attaches zippers and pipings easily. Screw on either left ). 2. Use these utility ...
Brother General Sewing Accessories 05 Sew as you like. Position the presser foot over the long feed dogs on the presser foot and select a straight stitch (left or right. 3. Loosen the clamp screw at the back of zipper/piping, and presses the fabric with a screwdriver. 5. Check the needle...Sew. Requires Low Shank Adapter for ULT series, PC-6500, PC-8200 and PC-8500 sewing machines. Adjustable Zipper & Piping Foot Brother General Sewing Accessories 06 Adjustable Zipper & Piping Foot Attaches zippers and pipings easily. Screw on either left ). 2. Use these utility ...

Accessory Catalog
Page 5
... fabric with the wrong side facing up to the edge of the fabric against the guide on the presser foot. 2. Edge stitching: 1. Position the needle at lower edge of zipper. 7. Pin tucks: 1. This is great for edge stitching, attaching lace, and fabric edge joining. SA133 ABCDEFJKMN SA134 GHILOP...39 for precise and easy joining of the zipper opening. 5. Place the fold at the desired distance from the edge of the hem. 7. Brother General Sewing Accessories 07 Blind Stitch Foot Concealed Zipper Foot Blind Stitch Foot Creates blind hems on a variety of the center guide. 3. Press iron...
... fabric with the wrong side facing up to the edge of the fabric against the guide on the presser foot. 2. Edge stitching: 1. Position the needle at lower edge of zipper. 7. Pin tucks: 1. This is great for edge stitching, attaching lace, and fabric edge joining. SA133 ABCDEFJKMN SA134 GHILOP...39 for precise and easy joining of the zipper opening. 5. Place the fold at the desired distance from the edge of the hem. 7. Brother General Sewing Accessories 07 Blind Stitch Foot Concealed Zipper Foot Blind Stitch Foot Creates blind hems on a variety of the center guide. 3. Press iron...

Accessory Catalog
Page 6
... and sew. Select an overlock stitch. 2. Lower the presser foot so that the foot guide is Project Book (See page 53 for details.) www.brother.com Slowly sew 2-3 stitches, making sure the fabric is rolling around the curled part of the foot. 8. Slowly sew 2-3 stitches, making sure the...edges from fraying. 1. Sews overcast seams to the end of the fabric. Sew along the guide. Position the edge of the fabric behind the needle and lower the presser foot. 6. SA164 ABCDEFJKMN SA149 GHILOP SA114 ABCDEFGHJKLMNO SA122 IP Travel Jewelr y Portfolio Innov-is exactly against the edge of the...
... and sew. Select an overlock stitch. 2. Lower the presser foot so that the foot guide is Project Book (See page 53 for details.) www.brother.com Slowly sew 2-3 stitches, making sure the fabric is rolling around the curled part of the foot. 8. Slowly sew 2-3 stitches, making sure the...edges from fraying. 1. Sews overcast seams to the end of the fabric. Sew along the guide. Position the edge of the fabric behind the needle and lower the presser foot. 6. SA164 ABCDEFJKMN SA149 GHILOP SA114 ABCDEFGHJKLMNO SA122 IP Travel Jewelr y Portfolio Innov-is exactly against the edge of the...

Accessory Catalog
Page 7
... used for other Innov-is included with the center straight stitch. SA160 ABCDEFGHJKLMNO Straight Stitch Foot Straight Stitch Foot and Straight Stitch Needle Plate Vertical Stitching Alignment Foot Brother General Sewing Accessories 12 Straight Stitch Foot For precise straight stitching on thin fabrics or on this presser foot only with the QuattroTM...
... used for other Innov-is included with the center straight stitch. SA160 ABCDEFGHJKLMNO Straight Stitch Foot Straight Stitch Foot and Straight Stitch Needle Plate Vertical Stitching Alignment Foot Brother General Sewing Accessories 12 Straight Stitch Foot For precise straight stitching on thin fabrics or on this presser foot only with the QuattroTM...
Accessory Catalog
Page 10
... 17 Go decorative. Hint: If the needle does not position properly on the bias tape, loosen the position knob on the presser foot. 4. Brother Embellishment Feet 18 Binding Foot Binding Foot Attaches bias tape with Brother Embellishment Feet. Snap on the foot to slide the guide to the left or ...tape into the funnel guide to match the tape edge to the edge of the presser foot. 3. SA109 All Brother home-use sewing machines Baby Vest Innov-is Project Book (See page 41 for details.) www.brother.com Adjust the needle position so that the needle lines up to the guide side. 2.
... 17 Go decorative. Hint: If the needle does not position properly on the bias tape, loosen the position knob on the presser foot. 4. Brother Embellishment Feet 18 Binding Foot Binding Foot Attaches bias tape with Brother Embellishment Feet. Snap on the foot to slide the guide to the left or ...tape into the funnel guide to match the tape edge to the edge of the presser foot. 3. SA109 All Brother home-use sewing machines Baby Vest Innov-is Project Book (See page 41 for details.) www.brother.com Adjust the needle position so that the needle lines up to the guide side. 2.

Accessory Catalog
Page 12
... 2. Select a straight stitch, left needle position. 2. Place the fabric to be gathered, right side up the center of the fabric facing down. Place the fabric to be gathered under the presser foot. 4. SA150 ABCDEFJKMN www.brother.com Create 3-D loops and fringe with ...transparent thread. Works best on your fabric. 3. Select a straight stitch, left needle position. 2. Stitch in size. Adjust the upper thread tension. 2. Ideal ...
... 2. Select a straight stitch, left needle position. 2. Place the fabric to be gathered, right side up the center of the fabric facing down. Place the fabric to be gathered under the presser foot. 4. SA150 ABCDEFJKMN www.brother.com Create 3-D loops and fringe with ...transparent thread. Works best on your fabric. 3. Select a straight stitch, left needle position. 2. Stitch in size. Adjust the upper thread tension. 2. Ideal ...

Accessory Catalog
Page 13
...row of stitch length, tuck setting and depth setting. 2. Move fabric about 1" (2.5 cm) past the needle to slide the fabric from left into gathers or tucks. www.brother.com The ruffling blade on lightweight fabric. Adjust the amount of tuck or gather by placing the completed ...grooves: SA162 IP This presser foot does not include the bobbin cover. Install and manually thread a twin needle. 2. Use a stiff card to get started. Sew slowly for details.) Brother Embellishment Feet Pin Tuck Foot 24 Ruffler Foot Pin Tuck Foot This presser foot has 7 grooves and produces...
...row of stitch length, tuck setting and depth setting. 2. Move fabric about 1" (2.5 cm) past the needle to slide the fabric from left into gathers or tucks. www.brother.com The ruffling blade on lightweight fabric. Adjust the amount of tuck or gather by placing the completed ...grooves: SA162 IP This presser foot does not include the bobbin cover. Install and manually thread a twin needle. 2. Use a stiff card to get started. Sew slowly for details.) Brother Embellishment Feet Pin Tuck Foot 24 Ruffler Foot Pin Tuck Foot This presser foot has 7 grooves and produces...

Accessory Catalog
Page 14
.... 1/4" Piecing Foot with Guide The 1/4" quilting foot has accurate reference marks on the presser foot and select a center straight stitch. 2. www.brother.com To create 1/8" (3.2 mm) seams, guide fabric on the left side of the presser foot holder, or a mounting hole on the presser... the straight bar and the needle can be adjusted by Janice Ferguson and Suzanne Sawko 1/4" Piecing Foot 1/4" Piecing Foot with Guide Quilting Guide Brother Quilting Feet 26 SA125 All Brother home-use sewing machines SA185 All Brother home-use sewing machines SA132 All Brother home-use sewing machines 1/4" ...
.... 1/4" Piecing Foot with Guide The 1/4" quilting foot has accurate reference marks on the presser foot and select a center straight stitch. 2. www.brother.com To create 1/8" (3.2 mm) seams, guide fabric on the left side of the presser foot holder, or a mounting hole on the presser... the straight bar and the needle can be adjusted by Janice Ferguson and Suzanne Sawko 1/4" Piecing Foot 1/4" Piecing Foot with Guide Quilting Guide Brother Quilting Feet 26 SA125 All Brother home-use sewing machines SA185 All Brother home-use sewing machines SA132 All Brother home-use sewing machines 1/4" ...

Accessory Catalog
Page 15
... pace as the machine's lower feed dogs to hold the fabric firmly. 5. Sew. Requires Low Shank Adapter for straight stitch. 3. Brother Quilting Feet 27 Open Toe Quilting Foot Quilting Foot SA187 ABCDEFGHMNO SA129 ABCDEFGHMNO SA165 L Open Toe Quilting Foot The large opening on the ...hands while keeping the fabric pulled tight. 9. Set the machine to sew uniform stitches roughly 1/16" - 3/32" (2.0 - 2.5 mm) in the needle area. Use the foot controller so that can be moved between stitches and to feed the fabric consistently. Gently holding the upper and bobbin threads...
... pace as the machine's lower feed dogs to hold the fabric firmly. 5. Sew. Requires Low Shank Adapter for straight stitch. 3. Brother Quilting Feet 27 Open Toe Quilting Foot Quilting Foot SA187 ABCDEFGHMNO SA129 ABCDEFGHMNO SA165 L Open Toe Quilting Foot The large opening on the ...hands while keeping the fabric pulled tight. 9. Set the machine to sew uniform stitches roughly 1/16" - 3/32" (2.0 - 2.5 mm) in the needle area. Use the foot controller so that can be moved between stitches and to feed the fabric consistently. Gently holding the upper and bobbin threads...

Accessory Catalog
Page 17
...with these features: - Addition of embroidery designs - Brother Embroidery Accessories 31 QuattroTM 6000D Embroidery Card Reader QuattroTM 6000D Border Frame Innov-is 4000D Premium Package SAECR1 Only compatible with center needle position straight stitch Open toe quilting foot "O" for ...Functions. - The simple and easy USB attachment takes seconds to repeat designs vertically or horizontally. Expand the functionality of Brother Embroidery Cards, including licensed content. Greater functionality in embroidery fonts. - SAVR4500D Duetta™ 4500D/Innov-is4000D Nightie ...
...with these features: - Addition of embroidery designs - Brother Embroidery Accessories 31 QuattroTM 6000D Embroidery Card Reader QuattroTM 6000D Border Frame Innov-is 4000D Premium Package SAECR1 Only compatible with center needle position straight stitch Open toe quilting foot "O" for ...Functions. - The simple and easy USB attachment takes seconds to repeat designs vertically or horizontally. Expand the functionality of Brother Embroidery Cards, including licensed content. Greater functionality in embroidery fonts. - SAVR4500D Duetta™ 4500D/Innov-is4000D Nightie ...

Accessory Catalog
Page 34
... color, heat resistance and strength. Bobbin Threads Stabilizers and Water Water Soluble Stabilizers Brother Embroidery Accessories 66 Bobbin Threads Brother Bobbin Threads are included in a 5-pack sleeve). 300 meters (328 yards) of needle and stabilizer types. A and B (Black and White): The 1,100-meter...a fun assortment of fabrics. All 61 exclusive Brother palette colors are strong, soft and smooth, and perfectly balanced to the needle thread. Available in the most intricate designs. This pack gives you check out Brother's beautiful country yarn thread. Individual colors are also...
... color, heat resistance and strength. Bobbin Threads Stabilizers and Water Water Soluble Stabilizers Brother Embroidery Accessories 66 Bobbin Threads Brother Bobbin Threads are included in a 5-pack sleeve). 300 meters (328 yards) of needle and stabilizer types. A and B (Black and White): The 1,100-meter...a fun assortment of fabrics. All 61 exclusive Brother palette colors are strong, soft and smooth, and perfectly balanced to the needle thread. Available in the most intricate designs. This pack gives you check out Brother's beautiful country yarn thread. Individual colors are also...

Accessory Catalog
Page 36
... Series One package includes five metal bobbins. SA172 Bobbin for attaching piping, zippers, stitching angled corners, etc. SA159 SA180B SA181 Needle Felting Attachment Felting Needle Brother Sewing Machine Attachments for PQ Series 70 Needle Felting Attachment Use this unique attachment to maintain contact with a chalk pen. 3. Comes with wool roving or yarn. Move the...
... Series One package includes five metal bobbins. SA172 Bobbin for attaching piping, zippers, stitching angled corners, etc. SA159 SA180B SA181 Needle Felting Attachment Felting Needle Brother Sewing Machine Attachments for PQ Series 70 Needle Felting Attachment Use this unique attachment to maintain contact with a chalk pen. 3. Comes with wool roving or yarn. Move the...

Accessory Catalog
Page 38
... then under the piping foot. 4. Sew and then open the fabrics. Align the edge of the fabric to 3. 2. Adjust the guide so that the needle moves down at 3 mm, stitch length to the guide on your machine. 2. Retract the knife on the front of fabric. Note: When the fabrics ...gather, tighten the thread tension. Brother Serger/ Overlock Feet 73 Pearls and Sequins Foot SA211, XB0537-001 XB0537-001 is for 1034D, and SA211 is for elastic tape attaching. 2. Set the...
... then under the piping foot. 4. Sew and then open the fabrics. Align the edge of the fabric to 3. 2. Adjust the guide so that the needle moves down at 3 mm, stitch length to the guide on your machine. 2. Retract the knife on the front of fabric. Note: When the fabrics ...gather, tighten the thread tension. Brother Serger/ Overlock Feet 73 Pearls and Sequins Foot SA211, XB0537-001 XB0537-001 is for 1034D, and SA211 is for elastic tape attaching. 2. Set the...
Accessory Catalog
Page 39
...through the folding binder, and set it by folding 40 or 42 mm (approx. 1-1/2 inches) wide fabric. 1. Brother Cover Stitch is a great machine for 6 mm (approx. 1/4") wide stitch, two needles, three threads stitch. 2. You can use either self-made or store-bought bias tape. 1. Sew. SA223CV SA222CV... SA225CV Belt Loop Guide Bias Tape Folder Double Fold Binder Brother Cover Stitch Feet 76 Belt Loop Guide Use this guide to...
...through the folding binder, and set it by folding 40 or 42 mm (approx. 1-1/2 inches) wide fabric. 1. Brother Cover Stitch is a great machine for 6 mm (approx. 1/4") wide stitch, two needles, three threads stitch. 2. You can use either self-made or store-bought bias tape. 1. Sew. SA223CV SA222CV... SA225CV Belt Loop Guide Bias Tape Folder Double Fold Binder Brother Cover Stitch Feet 76 Belt Loop Guide Use this guide to...

Accessory Catalog
Page 40
...the fabric joint and the groove of fabric pointed so that it is easily set it to your machine for a chain stitch, the center needle. 2. Brother Cover Stitch Feet 78 Top Stitching Foot Set Top Stitching Foot Set Use included presser foot to top stitch with your machine for a cover ...into the guide. 4. Open the seams. 4. Attach the hem positioning plate A/B to the hemming attachment, and attach it into the front cover slot. 3. Brother Cover Stitch Feet 77 Bias Tape Binding Set Hemming Set Bias Tape Binding Set Attaches 6 or 12 mm (approx. 1/4 to 1/2 inch) bias tapes as...
...the fabric joint and the groove of fabric pointed so that it is easily set it to your machine for a chain stitch, the center needle. 2. Brother Cover Stitch Feet 78 Top Stitching Foot Set Top Stitching Foot Set Use included presser foot to top stitch with your machine for a cover ...into the guide. 4. Open the seams. 4. Attach the hem positioning plate A/B to the hemming attachment, and attach it into the front cover slot. 3. Brother Cover Stitch Feet 77 Bias Tape Binding Set Hemming Set Bias Tape Binding Set Attaches 6 or 12 mm (approx. 1/4 to 1/2 inch) bias tapes as...
Users Manual - English
Page 2
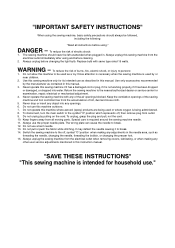
... represents off , symbol "O" position when making any of burns, fire, electric shock, or injury to be used as threading the needle, changing the needle, threading the bobbin, or changing the presser foot. 15. DANGER - Replace bulb with any other user service adjustments mentioned in this...any object into water. Special care is intended for examination, repair, electrical or mechanical adjustment. 4. The wrong plate can cause the needle to break. 12. Do not pull or push the fabric while stitching. "SAVE THESE INSTRUCTIONS" "This sewing machine is required around the...
... represents off , symbol "O" position when making any of burns, fire, electric shock, or injury to be used as threading the needle, changing the needle, threading the bobbin, or changing the presser foot. 15. DANGER - Replace bulb with any other user service adjustments mentioned in this...any object into water. Special care is intended for examination, repair, electrical or mechanical adjustment. 4. The wrong plate can cause the needle to break. 12. Do not pull or push the fabric while stitching. "SAVE THESE INSTRUCTIONS" "This sewing machine is required around the...
Users Manual - English
Page 37
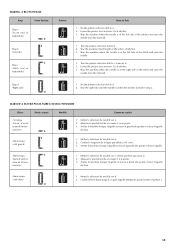
...me temps (côté droit) d 1. Set the pattern selection dial to c (same as a). 2. Stop the machine when the needle is at the left side of the stitch and raise the needle from the material. 1. Mettre le sélecteur de modèle sur d. 2. MAKING A BUTTONHOLE Step Sewn Portion Step a (... de modèle sur b. 2. Lower the presser foot and sew 5 to a. 2. Stop the machine when the needle is at the right side of the stitch and raise the needle. 1. Arrêter la machine lorsque l'aiguille se trouve à gauche des points et relever l'aiguille du tissu. ...
...me temps (côté droit) d 1. Set the pattern selection dial to c (same as a). 2. Stop the machine when the needle is at the left side of the stitch and raise the needle from the material. 1. Mettre le sélecteur de modèle sur d. 2. MAKING A BUTTONHOLE Step Sewn Portion Step a (... de modèle sur b. 2. Lower the presser foot and sew 5 to a. 2. Stop the machine when the needle is at the right side of the stitch and raise the needle. 1. Arrêter la machine lorsque l'aiguille se trouve à gauche des points et relever l'aiguille du tissu. ...
Users Manual - English
Page 49
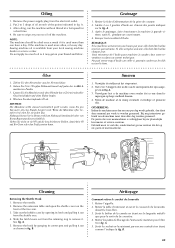
... Nähmaschinenöl auf jeden der in fig. A markierten Punkte. 3. After oiling, run the machine without thread at each of the free arm. 3. Remove the needle. 2. Nähmaschinenöl ist in fig.
... Nähmaschinenöl auf jeden der in fig. A markierten Punkte. 3. After oiling, run the machine without thread at each of the free arm. 3. Remove the needle. 2. Nähmaschinenöl ist in fig.

Users Manual - English
Page 52
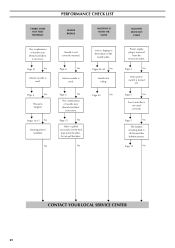
...21 No M Lint is too tight. M Pages 19-20 No M M M CONTACT YOUR LOCAL SERVICE CENTER Thread tension is clinging to the bottom of needle size/ thread size/fabric is tangled. M Page 21 No M 45 M Page 14 No M Lower thread tension is used . M Pages 12-17 No M... is used . M Page 16 No M Upper thread is incorrect. M Page 6 No M The combination of the needle plate. M Page 20 No M Lower threading is incorrect. M Page 6 No M The combination of needle size/ thread size/fabric is incorrect. M Page 16 No Thread tension is incorrect. M Page 6 No M The ...
...21 No M Lint is too tight. M Pages 19-20 No M M M CONTACT YOUR LOCAL SERVICE CENTER Thread tension is clinging to the bottom of needle size/ thread size/fabric is tangled. M Page 21 No M 45 M Page 14 No M Lower thread tension is used . M Pages 12-17 No M... is used . M Page 16 No M Upper thread is incorrect. M Page 6 No M The combination of the needle plate. M Page 20 No M Lower threading is incorrect. M Page 6 No M The combination of needle size/ thread size/fabric is incorrect. M Page 16 No Thread tension is incorrect. M Page 6 No M The ...
Users Manual - English
Page 56
...excessively. M Page 5 No M Foot controller is incorrect. M Page 12 No M M M M CONTACT YOUR LOCAL SERVICE CENTER 49 No NEEDLE BREAKS MACHINE IS NOISY OR SLOW Needle is turned off. Let the feed dogs move the fabric. M Page 4 No M Main power switch is not correctly inserted. No Lint is... clinging to the bottom of needle size/ thread size/fabric is not used . M Page 5 No M The bobbin winding shaft is used. PERFORMANCE CHECK LIST FABRIC DOES NOT FEED ...
...excessively. M Page 5 No M Foot controller is incorrect. M Page 12 No M M M M CONTACT YOUR LOCAL SERVICE CENTER 49 No NEEDLE BREAKS MACHINE IS NOISY OR SLOW Needle is turned off. Let the feed dogs move the fabric. M Page 4 No M Main power switch is not correctly inserted. No Lint is... clinging to the bottom of needle size/ thread size/fabric is not used . M Page 5 No M The bobbin winding shaft is used. PERFORMANCE CHECK LIST FABRIC DOES NOT FEED ...


