

Accessory Catalog
Page 34
...C (White only): The 1,000-meter (approx. 1,100-yds) spun thread is designed to create machine embroidery as well as decorative sewing. Consult your instruction manual for Brother sewing and embroidering machines. 61 Color Thread Set with Wooden Rack ETKSP999 PacesetterTM Polyester Threads (61 Color Thread Set with Wooden Rack...8482; 6000D, Duetta™ 4500D/Innov-is 4000D, 2500D, 1500D, 1200 series, PC and ULT series machines and the PE-400D and Innov-is also recommended for your sewing counter or can illustrate more of fabrics with a high nap such as preventing fabric slippage and...
...C (White only): The 1,000-meter (approx. 1,100-yds) spun thread is designed to create machine embroidery as well as decorative sewing. Consult your instruction manual for Brother sewing and embroidering machines. 61 Color Thread Set with Wooden Rack ETKSP999 PacesetterTM Polyester Threads (61 Color Thread Set with Wooden Rack...8482; 6000D, Duetta™ 4500D/Innov-is 4000D, 2500D, 1500D, 1200 series, PC and ULT series machines and the PE-400D and Innov-is also recommended for your sewing counter or can illustrate more of fabrics with a high nap such as preventing fabric slippage and...
Users Manual - English
Page 2
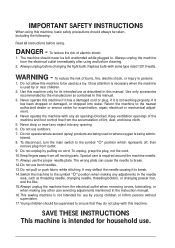
... the symbol " " position when making any object into water. IMPORTANT SAFETY INSTRUCTIONS When using this machine, basic safety precautions should always be left unattended while plugged in. WARNING - Never operate this manual. 3. To unplug, grasp the plug, not the cord. 10.Keep fingers away from the electrical outlet when removing covers... needles. 13.Do not pull or push fabric while stitching. DANGER - Never drop or insert any other user servicing adjustments mentioned in the instruction manual. 16.This sewing machine is being used by the manufacturer as a toy.
... the symbol " " position when making any object into water. IMPORTANT SAFETY INSTRUCTIONS When using this machine, basic safety precautions should always be left unattended while plugged in. WARNING - Never operate this manual. 3. To unplug, grasp the plug, not the cord. 10.Keep fingers away from the electrical outlet when removing covers... needles. 13.Do not pull or push fabric while stitching. DANGER - Never drop or insert any other user servicing adjustments mentioned in the instruction manual. 16.This sewing machine is being used by the manufacturer as a toy.

Users Manual - English
Page 4
... event a malfunction occurs or adjustment is the most advanced computerized household sewing machine. Be sure to keep your local authorized Brother dealer. Do not use or store the machine near a space heater, iron, halogen lamp, or other moving parts. 2. Always consult the operation manual when replacing or installing any other parts to assure correct installation...
... event a malfunction occurs or adjustment is the most advanced computerized household sewing machine. Be sure to keep your local authorized Brother dealer. Do not use or store the machine near a space heater, iron, halogen lamp, or other moving parts. 2. Always consult the operation manual when replacing or installing any other parts to assure correct installation...
Users Manual - English
Page 7
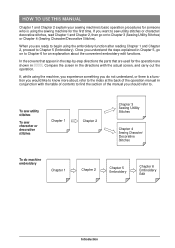
... 5 (Embroidery). HOW TO USE THIS MANUAL Chapter 1 and Chapter 2 explain your sewing machine's basic operation procedures for someone who is a function you would like to know more about the convenient embroidery edit functions. To sew utility stitches To sew character or decorative stitches Chapter 1 Chapter 2 Chapter 3 Sewing Utility Stitches Chapter 4 Sewing Character/ Decorative Stitches To do not...
... 5 (Embroidery). HOW TO USE THIS MANUAL Chapter 1 and Chapter 2 explain your sewing machine's basic operation procedures for someone who is a function you would like to know more about the convenient embroidery edit functions. To sew utility stitches To sew character or decorative stitches Chapter 1 Chapter 2 Chapter 3 Sewing Utility Stitches Chapter 4 Sewing Character/ Decorative Stitches To do not...

Users Manual - English
Page 8
... THIS MACHINE Special Features HOW TO USE THIS MANUAL Chapter 1 Setting Up PRINCIPAL PARTS AND THEIR OPERATION 1-1 Principal Parts 1-1 s Embroidery Unit 1-2 s Hard Case 1-2 s Embroidery Unit Storage Case ........ 1-2 s Operation Buttons 1-3 s Balance Wheel 1-4 s Presser Foot Lever 1-4 s Sewing Speed ... the Thread Tension 2-13 s Proper Thread Tension 2-13 MACHINE FUNCTION SETTINGS ...... 2-14 Automatic Reinforcement Stitching ..... 2-14 Using the Automatic Thread Cutter ..... 2-15 Chapter 3 Sewing Utility Stitches QUICK REFERENCE TABLE 3-1 SELECTING UTILITY STITCHES 3-9 Selecting...
... THIS MACHINE Special Features HOW TO USE THIS MANUAL Chapter 1 Setting Up PRINCIPAL PARTS AND THEIR OPERATION 1-1 Principal Parts 1-1 s Embroidery Unit 1-2 s Hard Case 1-2 s Embroidery Unit Storage Case ........ 1-2 s Operation Buttons 1-3 s Balance Wheel 1-4 s Presser Foot Lever 1-4 s Sewing Speed ... the Thread Tension 2-13 s Proper Thread Tension 2-13 MACHINE FUNCTION SETTINGS ...... 2-14 Automatic Reinforcement Stitching ..... 2-14 Using the Automatic Thread Cutter ..... 2-15 Chapter 3 Sewing Utility Stitches QUICK REFERENCE TABLE 3-1 SELECTING UTILITY STITCHES 3-9 Selecting...
Users Manual - English
Page 47
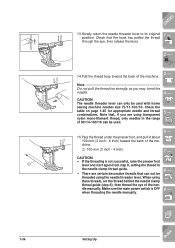
...9 - Check the table on page 1-45 for appropriate needle and thread combinations. dle manually. Note that, if you may bend the needle. 4 - CAUTION The needle threader lever can be used with home sewing machine needles size 75/11-100/16. through the eye, then release the lever. 2 ...- 5 6 3 - 14.Pull the thread loop toward the back of the machine. 1 100 mm (3 inch - 4 inch) 6 - 7 - Check that can...
...9 - Check the table on page 1-45 for appropriate needle and thread combinations. dle manually. Note that, if you may bend the needle. 4 - CAUTION The needle threader lever can be used with home sewing machine needles size 75/11-100/16. through the eye, then release the lever. 2 ...- 5 6 3 - 14.Pull the thread loop toward the back of the machine. 1 100 mm (3 inch - 4 inch) 6 - 7 - Check that can...
Users Manual - English
Page 60
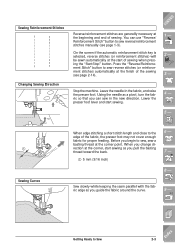
...you change direction at the corner point. Press the "Reverse/Reinforcement Stitch" button to sew reverse/reinforcement stitches manually (see page 2-14). Getting Ready to the edge of sewing when pressing the "Start/Stop" button. On the screen if the automatic reinforcement ...for proper feeding. Using the needle as you begin to sew, sew a basting thread at the corner, start sewing. 4 - 5 - 1 Sewing Curves When edge stitching a short stitch length and close to Sew 2-3 Index CONTENTS 1 - 2 - 3 - Stop the machine. Leave the needle in the new direction. Before you...
...you change direction at the corner point. Press the "Reverse/Reinforcement Stitch" button to sew reverse/reinforcement stitches manually (see page 2-14). Getting Ready to the edge of sewing when pressing the "Start/Stop" button. On the screen if the automatic reinforcement ...for proper feeding. Using the needle as you begin to sew, sew a basting thread at the corner, start sewing. 4 - 5 - 1 Sewing Curves When edge stitching a short stitch length and close to Sew 2-3 Index CONTENTS 1 - 2 - 3 - Stop the machine. Leave the needle in the new direction. Before you...

Users Manual - English
Page 122
If using a wing needle and the stitch width has been set manually, check that the needle will not touch the presser foot before starting sewing by hand, from front to medium weight homespun fabric with a little stiffness. 2. Insert needle size 130/705H, 100/16 Wing needle..... 3. Using the needle threader lever may result in damage to the machine. • A more attractive finish can not be obtained if you use "130/705H Wing" needle when sewing these patterns. Select a stitch pattern, attach presser foot "J", and start sewing. * Select any pattern between 3-01 and 3-22. CAUTION •...
If using a wing needle and the stitch width has been set manually, check that the needle will not touch the presser foot before starting sewing by hand, from front to medium weight homespun fabric with a little stiffness. 2. Insert needle size 130/705H, 100/16 Wing needle..... 3. Using the needle threader lever may result in damage to the machine. • A more attractive finish can not be obtained if you use "130/705H Wing" needle when sewing these patterns. Select a stitch pattern, attach presser foot "J", and start sewing. * Select any pattern between 3-01 and 3-22. CAUTION •...
Users Manual - English
Page 316
...14, 3-11, 4-14, 4-16, 4-21, 5-44, 5-46, 6-8 Moving a pattern 5-26, 6-9 Multi color key 5-44, 5-48, 6-8 Multi-directional sewing 3-65 Multi-thread stand 1-10 MY CUSTOM STITCHTM 7-1 H Hard case 1-2 Heavyweight fabrics 1-45, 2-4 Heirloom 3-49 Hemstitching 3-49 Horizontal mirror image key character/decorative ... bulb 8-1 Lightweight fabrics 1-45, 2-4 Lower threading see Bobbin winding Low shank adapter 1-9, 1-40 M Machine operations key 1-20 Machine settings key 1-19 Main power switch 1-12 Maintenance key 1-20, 1-23 Manual memory key 1-15, 3-12 Memory key 4-14, 4-27, 5-44, 5-49 N Needle 1-45...
...14, 3-11, 4-14, 4-16, 4-21, 5-44, 5-46, 6-8 Moving a pattern 5-26, 6-9 Multi color key 5-44, 5-48, 6-8 Multi-directional sewing 3-65 Multi-thread stand 1-10 MY CUSTOM STITCHTM 7-1 H Hard case 1-2 Heavyweight fabrics 1-45, 2-4 Heirloom 3-49 Hemstitching 3-49 Horizontal mirror image key character/decorative ... bulb 8-1 Lightweight fabrics 1-45, 2-4 Lower threading see Bobbin winding Low shank adapter 1-9, 1-40 M Machine operations key 1-20 Machine settings key 1-19 Main power switch 1-12 Maintenance key 1-20, 1-23 Manual memory key 1-15, 3-12 Memory key 4-14, 4-27, 5-44, 5-49 N Needle 1-45...


