
Instruction Manual - English and Spanish
Page 2
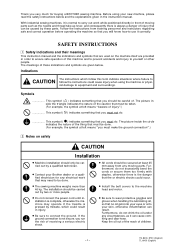
... in the instruction manual. Furthermore, do not excessively bend the cords or secure them too firmly with staples, otherwise there is always a danger of injury that no oil gets into your eyes or onto your Brother dealer or a qualified electrician for buying a BROTHER sewing machine. Furthermore, do not drink the oil under any electrical work while positioned directly in front of moving parts. Thank...
... in the instruction manual. Furthermore, do not excessively bend the cords or secure them too firmly with staples, otherwise there is always a danger of injury that no oil gets into your eyes or onto your Brother dealer or a qualified electrician for buying a BROTHER sewing machine. Furthermore, do not drink the oil under any electrical work while positioned directly in front of moving parts. Thank...
Instruction Manual - English and Spanish
Page 3
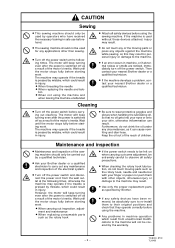
... proper replacement parts as a result of children. CAUTION Sewing ¡ This sewing machine should only be used for any circumstances, as the rotary hook, needle and needle bar with your nearest Brother dealer or a qualified technician. If the machine is pressed by mistake, which could result in injury. TN-8400, 8700 TL-8400 Wait until the motor stops fully before carrying out cleaning. The machine may operate...
... proper replacement parts as a result of children. CAUTION Sewing ¡ This sewing machine should only be used for any circumstances, as the rotary hook, needle and needle bar with your nearest Brother dealer or a qualified technician. If the machine is pressed by mistake, which could result in injury. TN-8400, 8700 TL-8400 Wait until the motor stops fully before carrying out cleaning. The machine may operate...
Instruction Manual - English and Spanish
Page 12
...stitches: quick-reference guide 34 7. Replacing the upper thread tension assembly 74 14. NAMES OF MAJOR PARTS 1 2. To stop the needle bars (right and left) .... 33 6-7-2. Number of the needles and feed timing ........ 63 12. Sewing 36 7-2. Adjusting the presser foot pressure 38 9. REPLACING GAUGE PARTS (CHANGING THE NEEDLE WIDTH 64 13. TN-8400, 8700 TL-8400 INSTALLATION 11 5-1. Installing the belt cover 17 5-7. Removing the bobbin or cap 23 6-3. INSTALLING OPTIONAL PARTS 69 13-1. xi - Installing the bobbin winder 16 5-6. Installing the needle...
...stitches: quick-reference guide 34 7. Replacing the upper thread tension assembly 74 14. NAMES OF MAJOR PARTS 1 2. To stop the needle bars (right and left) .... 33 6-7-2. Number of the needles and feed timing ........ 63 12. Sewing 36 7-2. Adjusting the presser foot pressure 38 9. REPLACING GAUGE PARTS (CHANGING THE NEEDLE WIDTH 64 13. TN-8400, 8700 TL-8400 INSTALLATION 11 5-1. Installing the belt cover 17 5-7. Removing the bobbin or cap 23 6-3. INSTALLING OPTIONAL PARTS 69 13-1. xi - Installing the bobbin winder 16 5-6. Installing the needle...
Instruction Manual - English and Spanish
Page 23
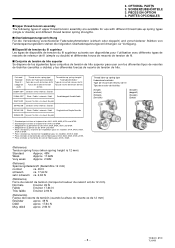
PARTES OPCIONALES s Upper thread tension assembly The following types of shipment for use with different thread take -up spring types (single or double) and different thread tension spring strengths. 3. SONDERZUBEHÖRTEILE 3. s Oberfadenspannungsvorrichtung Für die Verwendung verschiedener Fadenabnahmefedern (einfach oder doppelt) und verschiedener Stärken von Fandenspannungsfedern stehen die folgenden Oberfadenspannungsvorrichtungen zur Verfügung. PIECES EN OPTION 3. s Conjunto de tensión de hilo superior...
PARTES OPCIONALES s Upper thread tension assembly The following types of shipment for use with different thread take -up spring types (single or double) and different thread tension spring strengths. 3. SONDERZUBEHÖRTEILE 3. s Oberfadenspannungsvorrichtung Für die Verwendung verschiedener Fadenabnahmefedern (einfach oder doppelt) und verschiedener Stärken von Fandenspannungsfedern stehen die folgenden Oberfadenspannungsvorrichtungen zur Verfügung. PIECES EN OPTION 3. s Conjunto de tensión de hilo superior...
Instruction Manual - English and Spanish
Page 24
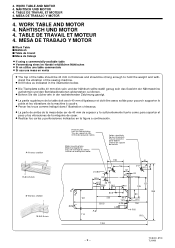
...; dans l'illustration ci-dessous. ¡ La parte de arriba de la mesa debe ser de 40 mm de espesor y lo suficientemente fuerte como para soportar el peso y las vibraciones de la máquina de coser. ¡ Realizar los cortes y perforaciones indicados en la figura a continuación. WORK TABLE AND MOTOR 4. 4. TABLE DE TRAVAIL ET MOTEUR 4. NÄHTISCH UND...
...; dans l'illustration ci-dessous. ¡ La parte de arriba de la mesa debe ser de 40 mm de espesor y lo suficientemente fuerte como para soportar el peso y las vibraciones de la máquina de coser. ¡ Realizar los cortes y perforaciones indicados en la figura a continuación. WORK TABLE AND MOTOR 4. 4. TABLE DE TRAVAIL ET MOTEUR 4. NÄHTISCH UND...
Instruction Manual - English and Spanish
Page 35
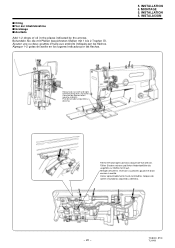
...drops of oil in the places indicated by the arrows. INSTALLATION 5. INSTALACION Rotary hook race (left and right) Greiferlaufring (links und rechts) Coursière de crochet rotatif (gauche et droite) Pista de lanzadera (izquierda y derecha) Fill the left and right sub-tanks about half-full with oil. TN...à moitié. MONTAGE 5. Ajouter une ou deux gouttes d'huile aux endroits indiqués par les flèches. INSTALLATION 5. Llenar aproximadamente hasta la mitad los tanques de aceite secundarios izquierdo y derecho. - 20 - Behandeln Sie die mit Pfeilen bezeichneten Stellen...
...drops of oil in the places indicated by the arrows. INSTALLATION 5. INSTALACION Rotary hook race (left and right) Greiferlaufring (links und rechts) Coursière de crochet rotatif (gauche et droite) Pista de lanzadera (izquierda y derecha) Fill the left and right sub-tanks about half-full with oil. TN...à moitié. MONTAGE 5. Ajouter une ou deux gouttes d'huile aux endroits indiqués par les flèches. INSTALLATION 5. Llenar aproximadamente hasta la mitad los tanques de aceite secundarios izquierdo y derecho. - 20 - Behandeln Sie die mit Pfeilen bezeichneten Stellen...
Instruction Manual - English and Spanish
Page 63
...; Ask your Brother dealer or a qualified electrician to carry out any maintenance and inspection of the electrical system. ¡ If any safety devices have been removed, be extremely careful to their original positions and check that they operate correctly before starting work. ¡ When carrying out inspection, adjustment and maintenance ¡ When replacing consumable parts such as a result of the motor's inertia...
...; Ask your Brother dealer or a qualified electrician to carry out any maintenance and inspection of the electrical system. ¡ If any safety devices have been removed, be extremely careful to their original positions and check that they operate correctly before starting work. ¡ When carrying out inspection, adjustment and maintenance ¡ When replacing consumable parts such as a result of the motor's inertia...

Instruction Manual - English and Spanish
Page 74
... the needle hole to remove it. 09. Tilt back the machine head, loosen the three screws !6, and then align the rotary hook tip !5 with the lower edge of the needle. 08. REGLAGES STANDARD 11. The rotary hook tip !5 must be aligned with the center of the needle bar supporter !3. 11. Remove the needle plate. 02. The distance from the upper edge of the needle at this time. 05...
... the needle hole to remove it. 09. Tilt back the machine head, loosen the three screws !6, and then align the rotary hook tip !5 with the lower edge of the needle. 08. REGLAGES STANDARD 11. The rotary hook tip !5 must be aligned with the center of the needle bar supporter !3. 11. Remove the needle plate. 02. The distance from the upper edge of the needle at this time. 05...
Instruction Manual - English and Spanish
Page 79
...232;ces spécifiées par Brother. ¡ El cambio de las piezas ...Replacement of the motor's inertia. The machine may operate if the treadle is switched off the power switch and disconnect the power cord before starting work...TN-8400, 8700 TL-8400 12. Como resultado de la inercia el motor continuará girando después de desconectar el interruptor principal. La machine risque de se mettre en marche si on ait coupé l'alimentation électrique. Wait until the motor stops fully before replacing the gauge parts. REPLACING GAUGE PARTS (CHANGING THE NEEDLE...
...232;ces spécifiées par Brother. ¡ El cambio de las piezas ...Replacement of the motor's inertia. The machine may operate if the treadle is switched off the power switch and disconnect the power cord before starting work...TN-8400, 8700 TL-8400 12. Como resultado de la inercia el motor continuará girando después de desconectar el interruptor principal. La machine risque de se mettre en marche si on ait coupé l'alimentation électrique. Wait until the motor stops fully before replacing the gauge parts. REPLACING GAUGE PARTS (CHANGING THE NEEDLE...
Instruction Manual - English and Spanish
Page 90
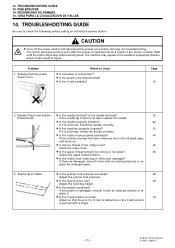
... upper thread tension too strong or too weak? 38 Adjust the upper thread tension. ¡ Is the rotary hook, feed dog or other part damaged? GUIA PARA LA LOCALIZACION DE FALLAS 14. Seams don't match. ¡ Is the presser foot pressure too weak? 38 Adjust the presser foot pressure. ¡ Is the feed dog too low? 48 Adjust the feed dog height. ¡ Is the bobbin scratched? If the bobbin is damaged, smooth it is below the lower...
... upper thread tension too strong or too weak? 38 Adjust the upper thread tension. ¡ Is the rotary hook, feed dog or other part damaged? GUIA PARA LA LOCALIZACION DE FALLAS 14. Seams don't match. ¡ Is the presser foot pressure too weak? 38 Adjust the presser foot pressure. ¡ Is the feed dog too low? 48 Adjust the feed dog height. ¡ Is the bobbin scratched? If the bobbin is damaged, smooth it is below the lower...
Instruction Manual - English and Spanish
Page 91
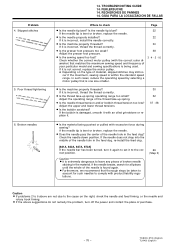
... needle down position. If the needle does not drop into the middle of broken needle sticking in the feed dog, re-install the feed dog. [841A, 842A, 847A, 872A] If the needle bar has been turned, turn off the power and contact the place of the needle hole in the feed dog? Poor thread tightening 6. FEHLERSUCHE 14. Adjust the presser foot pressure. ¡ Is the sewing speed too fast? Adjust the upper and lower thread tensions. ¡ Is the bobbin...
... needle down position. If the needle does not drop into the middle of broken needle sticking in the feed dog, re-install the feed dog. [841A, 842A, 847A, 872A] If the needle bar has been turned, turn off the power and contact the place of the needle hole in the feed dog? Poor thread tightening 6. FEHLERSUCHE 14. Adjust the presser foot pressure. ¡ Is the sewing speed too fast? Adjust the upper and lower thread tensions. ¡ Is the bobbin...
Instruction Manual - English and Spanish
Page 98
INSTRUCTION MANUAL BEDIENUNGSANLEITUNG MANUEL D'INSTRUCTIONS MANUAL DE INSTRUCCIONES BROTHER INDUSTRIES, LTD. 15-1, Naeshiro-cho, Mizuho-ku, Nagoya 467-8561, Japan. B (1) Phone: 81-52-824-2177 118-W42 S92W42-102 2002.03.
INSTRUCTION MANUAL BEDIENUNGSANLEITUNG MANUEL D'INSTRUCTIONS MANUAL DE INSTRUCCIONES BROTHER INDUSTRIES, LTD. 15-1, Naeshiro-cho, Mizuho-ku, Nagoya 467-8561, Japan. B (1) Phone: 81-52-824-2177 118-W42 S92W42-102 2002.03.


