
Users Guide
Page 1
Please visit us at http://support.brother.com/, where you keep this User's Guide. We suggest that you can get product support and answers to read this manual in a handy place for future reference. Version C US ENG USER'S GUIDE TD-2020 TD-2120N TD-2130N Before using this printer, be sure to frequently asked questions (FAQs).
Please visit us at http://support.brother.com/, where you keep this User's Guide. We suggest that you can get product support and answers to read this manual in a handy place for future reference. Version C US ENG USER'S GUIDE TD-2020 TD-2120N TD-2130N Before using this printer, be sure to frequently asked questions (FAQs).

Users Guide
Page 2
... the CD-ROM. User's Guide Software User's Guide Network User's Guide (TD-2120N/2130N only) Symbols Used in a handy place for purchasing the Brother TD-2020/2120N/2130N. NOTE If Adobe® Reader® is used throughout this document on the CD-ROM. Click...notes that provide information or directions that should be followed. The TD-2020/2120N/2130N (hereafter referred to as "the printer") is placed on using the printer. Be sure to when the pointer is a powered desktop thermal printer. For information on a link. This symbol indicates information or ...
... the CD-ROM. User's Guide Software User's Guide Network User's Guide (TD-2120N/2130N only) Symbols Used in a handy place for purchasing the Brother TD-2020/2120N/2130N. NOTE If Adobe® Reader® is used throughout this document on the CD-ROM. Click...notes that provide information or directions that should be followed. The TD-2020/2120N/2130N (hereafter referred to as "the printer") is placed on using the printer. Be sure to when the pointer is a powered desktop thermal printer. For information on a link. This symbol indicates information or ...
Users Guide
Page 3
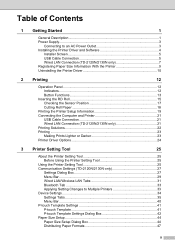
...Supply...3 Connecting to an AC Power Outlet 3 Installing the Printer Driver and Software 4 Installer Screen 5 USB Cable Connection 5 Wired LAN Connection (TD-2120N/2130N only 7 Registering Paper Size Information With the Printer 9 Uninstalling the Printer Driver 10 2 Printing 12 Operation Panel 12 Indicators ...12...23 Making Prints Lighter or Darker 23 Printer Driver Options 24 3 Printer Setting Tool 25 About the Printer Setting Tool 25 Before Using the Printer Setting Tool 25 Using the Printer Setting Tool 25 Communication Settings (TD-2120N/2130N only 27 Settings Dialog Box...
...Supply...3 Connecting to an AC Power Outlet 3 Installing the Printer Driver and Software 4 Installer Screen 5 USB Cable Connection 5 Wired LAN Connection (TD-2120N/2130N only 7 Registering Paper Size Information With the Printer 9 Uninstalling the Printer Driver 10 2 Printing 12 Operation Panel 12 Indicators ...12...23 Making Prints Lighter or Darker 23 Printer Driver Options 24 3 Printer Setting Tool 25 About the Printer Setting Tool 25 Before Using the Printer Setting Tool 25 Using the Printer Setting Tool 25 Communication Settings (TD-2120N/2130N only 27 Settings Dialog Box...

Users Guide
Page 4
... Storage Feature 48 Web Based (Web Browser) Management (TD-2120N/2130N only 49 Software Development Kit 50 5 Maintaining the Printer 51 Print Head Maintenance 51 Platen Roller Maintenance 51 Media Exit Maintenance 52 Label Peeler (Optional) Maintenance (TD-2120N/2130N only 52 6 Indicators 53 Indicators ...53 ... Serial Adapter (Optional:PA-SCA-001) 68 Connecting the Computer and Printer With the RJ25 to DB9M Serial Adapter ...68 Product Specifications 68 10 Using the Touch Panel Display (Optional:PA-TDU-001) (TD-2120N/2130N only) 69 General Description 69 LCD...69 Screen ...69...
... Storage Feature 48 Web Based (Web Browser) Management (TD-2120N/2130N only 49 Software Development Kit 50 5 Maintaining the Printer 51 Print Head Maintenance 51 Platen Roller Maintenance 51 Media Exit Maintenance 52 Label Peeler (Optional) Maintenance (TD-2120N/2130N only 52 6 Indicators 53 Indicators ...53 ... Serial Adapter (Optional:PA-SCA-001) 68 Connecting the Computer and Printer With the RJ25 to DB9M Serial Adapter ...68 Product Specifications 68 10 Using the Touch Panel Display (Optional:PA-TDU-001) (TD-2120N/2130N only) 69 General Description 69 LCD...69 Screen ...69...
Users Guide
Page 5
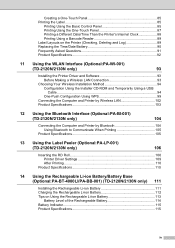
...Control Panel 85 Printing Using the One-Touch Panel 87 Printing a Different Date/Time Than the Printer's Internal Clock 88 Printing Using a Barcode Reader 89 Label Layouts on the Printer (Checking, Deleting and Log 89 Replacing the Time/Date Battery 90 Frequently Asked Questions 91 ...Product Specifications 92 11 Using the WLAN Interface (Optional:PA-WI-001) (TD-2120N/2130N only) 93 Installing the Printer Driver and Software 93 Before Making a Wireless LAN Connection 93 Choosing Your Wireless Installation Method 94 Configuration Using ...
...Control Panel 85 Printing Using the One-Touch Panel 87 Printing a Different Date/Time Than the Printer's Internal Clock 88 Printing Using a Barcode Reader 89 Label Layouts on the Printer (Checking, Deleting and Log 89 Replacing the Time/Date Battery 90 Frequently Asked Questions 91 ...Product Specifications 92 11 Using the WLAN Interface (Optional:PA-WI-001) (TD-2120N/2130N only) 93 Installing the Printer Driver and Software 93 Before Making a Wireless LAN Connection 93 Choosing Your Wireless Installation Method 94 Configuration Using ...

Users Guide
Page 7
... Roll compartment top cover 5 STATUS indicator 6 (Feed) button 7 (Print) button 8 Cover release lever 9 Tear bar When the printer is purchased, the tear bar cover is sharp. In order to avoid injuries when the printer is not being used, attach the cover to the tear bar. 12 CAUTION 13 The tear bar is... 12 Media guide 13 Media tip guide 14 Media guide adjustment lever 15 Platen roller 16 Reflective/black mark sensor 1 NOTE • Before using the printer, remove the cover over the tear bar. 9 10 11 • Do not dispose of the removed cover.
... Roll compartment top cover 5 STATUS indicator 6 (Feed) button 7 (Print) button 8 Cover release lever 9 Tear bar When the printer is purchased, the tear bar cover is sharp. In order to avoid injuries when the printer is not being used, attach the cover to the tear bar. 12 CAUTION 13 The tear bar is... 12 Media guide 13 Media tip guide 14 Media guide adjustment lever 15 Platen roller 16 Reflective/black mark sensor 1 NOTE • Before using the printer, remove the cover over the tear bar. 9 10 11 • Do not dispose of the removed cover.

Users Guide
Page 9
..., see Using the Rechargeable Li-ion Battery/Battery Base (Optional:PA-BT4000LI/PA-BB-001) (TD-2120N/2130N only) on . With the rechargeable Li-ion battery installed, this printer can be used in the same way when recharging the rechargeable Li-ion battery. The POWER indicator... Connect the AC power cord to the printer. Getting Started d Press the (Power) button of the printer to the printer, making it on page 111. Power Supply 1 This printer operates on either the AC adapter (included) or the rechargeable Li-ion battery (optional, TD-2120N/2130N only). Use the power supply...
..., see Using the Rechargeable Li-ion Battery/Battery Base (Optional:PA-BT4000LI/PA-BB-001) (TD-2120N/2130N only) on . With the rechargeable Li-ion battery installed, this printer can be used in the same way when recharging the rechargeable Li-ion battery. The POWER indicator... Connect the AC power cord to the printer. Getting Started d Press the (Power) button of the printer to the printer, making it on page 111. Power Supply 1 This printer operates on either the AC adapter (included) or the rechargeable Li-ion battery (optional, TD-2120N/2130N only). Use the power supply...

Users Guide
Page 10
...TD-2120N/2130N only) (if the WLAN interface is Adobe® Reader® before using any of the following procedures. If you are using Windows® 8, make sure the default web browser is subject to websites may not work . Chapter 1 Installing the Printer Driver and Software 1 The printer... driver and software can be attached to the printer. For details on with the corresponding screens for your operating system. In addition, the installation ...
...TD-2120N/2130N only) (if the WLAN interface is Adobe® Reader® before using any of the following procedures. If you are using Windows® 8, make sure the default web browser is subject to websites may not work . Chapter 1 Installing the Printer Driver and Software 1 The printer... driver and software can be attached to the printer. For details on with the corresponding screens for your operating system. In addition, the installation ...

Users Guide
Page 11
... your language. NOTE • The following installation procedures are for specifying printer settings, the printer driver must be individually selected for installation. 4 Advanced Applications Installs the BRAdmin Light utility (TD-2120N/2130N only), or displays the Brother Developer Center. 5 Brother Support Displays the support website (Brother Solutions Center). Getting Started Installer Screen 1 1 2 3 4 5 1 Standard Installation Installs P-touch...
... your language. NOTE • The following installation procedures are for specifying printer settings, the printer driver must be individually selected for installation. 4 Advanced Applications Installs the BRAdmin Light utility (TD-2120N/2130N only), or displays the Brother Developer Center. 5 Brother Support Displays the support website (Brother Solutions Center). Getting Started Installer Screen 1 1 2 3 4 5 1 Standard Installation Installs P-touch...

Users Guide
Page 12
...the Internet.) h The P-touch Update Software starts up. If an application appears under [File list], the application currently installed on the printer. If the check box is selected and [Install] is no application appears under [File list], there is a new version of the software and ...click [Yes], and then go to check for new software versions and update them , click [No], and then go to update. Chapter 1 e With TD-2120N/2130N: When the screen for new software versions or update them . Double-click the P-touch Update Software icon on the desktop. (Your computer must...
...the Internet.) h The P-touch Update Software starts up. If an application appears under [File list], the application currently installed on the printer. If the check box is selected and [Install] is no application appears under [File list], there is a new version of the software and ...click [Yes], and then go to check for new software versions and update them , click [No], and then go to update. Chapter 1 e With TD-2120N/2130N: When the screen for new software versions or update them . Double-click the P-touch Update Software icon on the desktop. (Your computer must...

Users Guide
Page 13
...then double-click [start the installation, and then follow the on the printer. Getting Started d Read the license agreement, and click [Agree] if you clicked [Cancel], installation continues. Wired LAN Connection (TD-2120N/2130N only) 1 a Connect the LAN cable to restart the ...computer, click [Restart]. b Insert the installer CD-ROM into your language. c Click [Standard Installation]. NOTE When you are asked to the printer, and then turn on -screen...
...then double-click [start the installation, and then follow the on the printer. Getting Started d Read the license agreement, and click [Agree] if you clicked [Cancel], installation continues. Wired LAN Connection (TD-2120N/2130N only) 1 a Connect the LAN cable to restart the ...computer, click [Restart]. b Insert the installer CD-ROM into your language. c Click [Standard Installation]. NOTE When you are asked to the printer, and then turn on -screen...

Users Guide
Page 14
... the on the desktop. (Your computer must be used . Allow or permit the installer to complete the installation correctly. 8 It may appear when the printer or its software is required to update.)] appears, click [Yes] or [No]. To check for new versions of the software and to update...to step k. To not check for new software versions and update them , click [No], and then go to step l. Chapter 1 h Select the printer from the list, and then click [Next]. j The P-touch Update Software can run the P-touch Update Software at a more convenient time to check for new...
... the on the desktop. (Your computer must be used . Allow or permit the installer to complete the installation correctly. 8 It may appear when the printer or its software is required to update.)] appears, click [Yes] or [No]. To check for new versions of the software and to update...to step k. To not check for new software versions and update them , click [No], and then go to step l. Chapter 1 h Select the printer from the list, and then click [Next]. j The P-touch Update Software can run the P-touch Update Software at a more convenient time to check for new...

Users Guide
Page 15
... restart the computer, click [Restart]. NOTE When you clicked [Cancel], installation continues. The installation is a new version of the installed "Printer Setting Tool", specify the size information (label width and length, label spacing, etc.) for the online user registration appears, click [OK]...; If you are asked to be used, and then add the paper format. Getting Started Registering Paper Size Information With the 1 Printer 1 Paper size information must be adjusted for proper operation. k The P-touch Update Software starts up. If an application appears...
... restart the computer, click [Restart]. NOTE When you clicked [Cancel], installation continues. The installation is a new version of the installed "Printer Setting Tool", specify the size information (label width and length, label spacing, etc.) for the online user registration appears, click [OK]...; If you are asked to be used, and then add the paper format. Getting Started Registering Paper Size Information With the 1 Printer 1 Paper size information must be adjusted for proper operation. k The P-touch Update Software starts up. If an application appears...

Users Guide
Page 16
...Select [Brother TD-XXXX], and then click [Remove...]. 10 b Click [Start] - [Control Panel] - [Printers and Other Hardware] [Printers and Faxes]. c Select [Brother TD-XXXX] and click [Delete this procedure only if printing from the TD-XXXX is turned on the menu bar. Perform this printer], or... the [Print Server Properties] window. b Click - [Devices and Printers]. e Click the [Drivers] tab, select [Brother TD-XXXX], and then click [Remove...]. d Select [Fax] or [Microsoft XPS Document Writer] in the [Devices and Printers] window, and then click [Print server properties], which appeared on ...
...Select [Brother TD-XXXX], and then click [Remove...]. 10 b Click [Start] - [Control Panel] - [Printers and Other Hardware] [Printers and Faxes]. c Select [Brother TD-XXXX] and click [Delete this procedure only if printing from the TD-XXXX is turned on the menu bar. Perform this printer], or... the [Print Server Properties] window. b Click - [Devices and Printers]. e Click the [Drivers] tab, select [Brother TD-XXXX], and then click [Remove...]. d Select [Fax] or [Microsoft XPS Document Writer] in the [Devices and Printers] window, and then click [Print server properties], which appeared on ...

Users Guide
Page 17
...password, and then click [Yes]. Follow the on , press and hold the (Power) button to turn it off. The printer driver has been uninstalled. c Select [Brother TD-XXXX] and click [Remove device], or right-click the icon and click [Remove device]. f Select [Remove driver and driver.... If a User Account Control message appears, type in [Apps] screen - [Hardware and Sound] - [Devices and Printers]. b Click [Control Panel] in the password, and then click [Yes].Select [Brother TD-XXXX], and then click [Remove...]. e Click the [Drivers] tab, and then click [Change Driver Settings]. g Close...
...password, and then click [Yes]. Follow the on , press and hold the (Power) button to turn it off. The printer driver has been uninstalled. c Select [Brother TD-XXXX] and click [Remove device], or right-click the icon and click [Remove device]. f Select [Remove driver and driver.... If a User Account Control message appears, type in [Apps] screen - [Hardware and Sound] - [Devices and Printers]. b Click [Control Panel] in the password, and then click [Yes].Select [Brother TD-XXXX], and then click [Remove...]. e Click the [Drivers] tab, and then click [Change Driver Settings]. g Close...

Users Guide
Page 18
For details, see Indicators on page 53. 12 2 Printing 2 Operation Panel 2 The operation panel consists of the following buttons and indicators. 1 5 1 POWER indicator 2 (Power) button 3 (Feed) button 2 34 4 (Print) button 5 STATUS indicator Indicators 2 The indicators light and blink to indicate the printer's status. Each indicator may light or blink in green, red or orange.
For details, see Indicators on page 53. 12 2 Printing 2 Operation Panel 2 The operation panel consists of the following buttons and indicators. 1 5 1 POWER indicator 2 (Power) button 3 (Feed) button 2 34 4 (Print) button 5 STATUS indicator Indicators 2 The indicators light and blink to indicate the printer's status. Each indicator may light or blink in green, red or orange.
Users Guide
Page 19
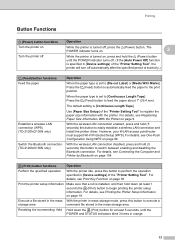
... the (Print) button for at least 1 second) the (Print) button to switch between enabling and disabling the Bluetooth connection. Print the printer setup information Make sure that a roll is set to [Continuous Length Tape]: Press the (Feed) button to execute a storage area command ... Use [Paper Size Setup] of inactivity.) (Feed) button functions Feed the paper Establish a wireless LAN connection (WPS) (TD-2120N/2130N only) Switch the Bluetooth connection (TD-2120N/2130N only) Operation When the paper type is installed, and then hold (5 seconds) this button to feed the paper...
... the (Print) button for at least 1 second) the (Print) button to switch between enabling and disabling the Bluetooth connection. Print the printer setup information Make sure that a roll is set to [Continuous Length Tape]: Press the (Feed) button to execute a storage area command ... Use [Paper Size Setup] of inactivity.) (Feed) button functions Feed the paper Establish a wireless LAN connection (WPS) (TD-2120N/2130N only) Switch the Bluetooth connection (TD-2120N/2130N only) Operation When the paper type is installed, and then hold (5 seconds) this button to feed the paper...

Users Guide
Page 20
For details, see Mass Storage Functions on page 48. 14 Chapter 2 Functions using multiple buttons Start up the printer in mass storage mode Operation While holding down the (Print) button, press and hold the (Power) button to start up the printer in mass storage mode.
For details, see Mass Storage Functions on page 48. 14 Chapter 2 Functions using multiple buttons Start up the printer in mass storage mode Operation While holding down the (Print) button, press and hold the (Power) button to start up the printer in mass storage mode.
Users Guide
Page 21
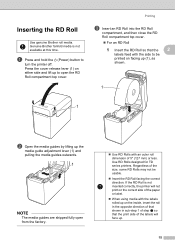
... 1 of the size, some RD Rolls may not be usable. Insert the RD Roll facing the correct direction. Use RD Rolls designed for TD series printers. Regardless of step c so that the 2 labels feed with the labels rolled up on facing up (1), as shown. 1 1 b Open the media... guides by lifting up . 15 Genuine Brother fanfold media is not inserted correctly, the printer will face up the media guide adjustment lever (1) and pulling the media guides outwards. 1 NOTE The media guides are shipped fully ...
... 1 of the size, some RD Rolls may not be usable. Insert the RD Roll facing the correct direction. Use RD Rolls designed for TD series printers. Regardless of step c so that the 2 labels feed with the labels rolled up on facing up (1), as shown. 1 1 b Open the media... guides by lifting up . 15 Genuine Brother fanfold media is not inserted correctly, the printer will face up the media guide adjustment lever (1) and pulling the media guides outwards. 1 NOTE The media guides are shipped fully ...

Users Guide
Page 23
... Sensor Position 2 Check the sensor position for the type of paper being used. With die-cut labels being used has been registered 2 with the printer, pressing the (Feed) button will position the label at least 0.16" (4 mm) of the black mark on the paper with 0.985" (25 mm) on... position. With receipt paper that has a black mark, the reflective/black mark sensor detects the mark and feeds the media to turn the printer on page 9. NOTE If the paper size information for the reflective/black mark sensor. 17 For details, see Registering Paper Size Information With the...
... Sensor Position 2 Check the sensor position for the type of paper being used. With die-cut labels being used has been registered 2 with the printer, pressing the (Feed) button will position the label at least 0.16" (4 mm) of the black mark on the paper with 0.985" (25 mm) on... position. With receipt paper that has a black mark, the reflective/black mark sensor detects the mark and feeds the media to turn the printer on page 9. NOTE If the paper size information for the reflective/black mark sensor. 17 For details, see Registering Paper Size Information With the...


