Users Guide
Page 3
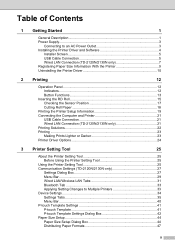
... Description 1 Power Supply...3 Connecting to an AC Power Outlet 3 Installing the Printer Driver and Software 4 Installer Screen 5 USB Cable Connection 5 Wired LAN Connection (TD-2120N/2130N only 7 Registering Paper Size Information With the Printer 9 Uninstalling the Printer Driver 10 2 Printing 12 Operation Panel 12 Indicators ...12 Button Functions 13 Inserting the RD Roll 15 Checking the Sensor Position 17 Cutting Roll Paper 18 Printing the Printer Setup Information 19 Connecting the Computer and Printer 21 USB Cable Connection 21...
... Description 1 Power Supply...3 Connecting to an AC Power Outlet 3 Installing the Printer Driver and Software 4 Installer Screen 5 USB Cable Connection 5 Wired LAN Connection (TD-2120N/2130N only 7 Registering Paper Size Information With the Printer 9 Uninstalling the Printer Driver 10 2 Printing 12 Operation Panel 12 Indicators ...12 Button Functions 13 Inserting the RD Roll 15 Checking the Sensor Position 17 Cutting Roll Paper 18 Printing the Printer Setup Information 19 Connecting the Computer and Printer 21 USB Cable Connection 21...
Users Guide
Page 5
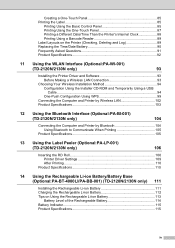
... Printer's Internal Clock 88 Printing Using a Barcode Reader 89 Label Layouts on the Printer (Checking, Deleting and Log 89 Replacing the Time/Date Battery 90 Frequently Asked Questions 91 Product Specifications 92 11 Using the WLAN Interface (Optional:PA-WI-001) (TD-2120N/2130N only) 93 Installing the Printer Driver and Software 93 Before Making a Wireless LAN Connection 93 Choosing Your Wireless Installation Method 94 Configuration Using the Installer CD-ROM and Temporarily Using a USB Cable...
... Printer's Internal Clock 88 Printing Using a Barcode Reader 89 Label Layouts on the Printer (Checking, Deleting and Log 89 Replacing the Time/Date Battery 90 Frequently Asked Questions 91 Product Specifications 92 11 Using the WLAN Interface (Optional:PA-WI-001) (TD-2120N/2130N only) 93 Installing the Printer Driver and Software 93 Before Making a Wireless LAN Connection 93 Choosing Your Wireless Installation Method 94 Configuration Using the Installer CD-ROM and Temporarily Using a USB Cable...

Users Guide
Page 17
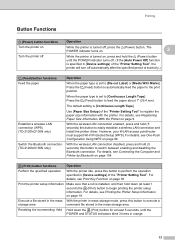
... [Drivers] tab, and then click [Change Driver Settings]. Follow the on , press and hold the (Power) button to the computer and is turned on -screen instructions. The printer driver has been uninstalled. b Click [Control Panel] in the password, and then click [Yes].Select [Brother TD-XXXX], and then click [Remove...]. g Close the [Print Server Properties] window. Getting Started 1 11 The printer driver has been uninstalled. If a User Account Control message appears, type in...
... [Drivers] tab, and then click [Change Driver Settings]. Follow the on , press and hold the (Power) button to the computer and is turned on -screen instructions. The printer driver has been uninstalled. b Click [Control Panel] in the password, and then click [Yes].Select [Brother TD-XXXX], and then click [Remove...]. g Close the [Print Server Properties] window. Getting Started 1 11 The printer driver has been uninstalled. If a User Account Control message appears, type in...
Users Guide
Page 19
.... Use [Paper Size Setup] of the "Printer Setting Tool" to feed the paper about 1" (25.4 mm). However, your WLAN access point/router must support Wi-Fi Protected Setup (WPS). Resetting the incrementing field Hold down (at least 5 seconds, until the POWER indicator turns off. (If the [Auto Power Off] function is specified in mass storage mode, press this button to easily establish a wireless LAN connection and install the printer driver. Print the printer setup...
.... Use [Paper Size Setup] of the "Printer Setting Tool" to feed the paper about 1" (25.4 mm). However, your WLAN access point/router must support Wi-Fi Protected Setup (WPS). Resetting the incrementing field Hold down (at least 5 seconds, until the POWER indicator turns off. (If the [Auto Power Off] function is specified in mass storage mode, press this button to easily establish a wireless LAN connection and install the printer driver. Print the printer setup...
Users Guide
Page 43
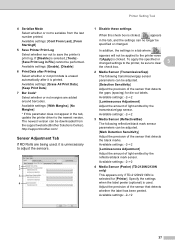
.../gap sensor. Printer Setting Tool 4 Serialize Mode Select whether or not to serialize from the support website (Brother Solutions Center). In addition, the settings in File] cannot be applied to the printer even if [Apply] is selected for die-cut labels. Available settings: [Enable], [Disable] 6 Print Data after Printing Select whether or not print data is erased automatically after it is used , it is clicked, appears in the tab, update the printer driver to clear 3 the check box. 2 Media...
.../gap sensor. Printer Setting Tool 4 Serialize Mode Select whether or not to serialize from the support website (Brother Solutions Center). In addition, the settings in File] cannot be applied to the printer even if [Apply] is selected for die-cut labels. Available settings: [Enable], [Disable] 6 Print Data after Printing Select whether or not print data is erased automatically after it is used , it is clicked, appears in the tab, update the printer driver to clear 3 the check box. 2 Media...
Users Guide
Page 48
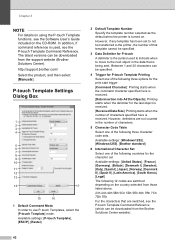
.... [Received Data Size]: Printing starts when the number of the following three character code sets. Available settings: [P-touch Template], [ESC/P], [Raster] 2 Default Template Number Specify the template number selected as the default when the printer is received. In addition, if command reference is the symbol used , see the Software User's Guide included on the CD-ROM. P-touch Template Settings Dialog Box 3 1 2 3 4 5 6 7 8 9 10 11 12 13 14 17 15 16 1 Default Command Mode In...
.... [Received Data Size]: Printing starts when the number of the following three character code sets. Available settings: [P-touch Template], [ESC/P], [Raster] 2 Default Template Number Specify the template number selected as the default when the printer is received. In addition, if command reference is the symbol used , see the Software User's Guide included on the CD-ROM. P-touch Template Settings Dialog Box 3 1 2 3 4 5 6 7 8 9 10 11 12 13 14 17 15 16 1 Default Command Mode In...
Users Guide
Page 61
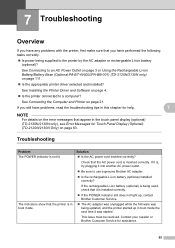
... troubleshooting tips in the touch panel display (optional) (TD-2120N/2130N only), see Error Messages for assistance. 55 Contact your reseller or Brother Customer Service for Touch Panel Display (Optional) (TD-2120N/2130N Only) on page 4. Is the printer connected to a computer? See Connecting the Computer and Printer on page 111. Is the appropriate printer driver selected and installed? Check that appear in this chapter for help...
... troubleshooting tips in the touch panel display (optional) (TD-2120N/2130N only), see Error Messages for assistance. 55 Contact your reseller or Brother Customer Service for Touch Panel Display (Optional) (TD-2120N/2130N Only) on page 4. Is the printer connected to a computer? See Connecting the Computer and Printer on page 111. Is the appropriate printer driver selected and installed? Check that appear in this chapter for help...

Users Guide
Page 95
... use P-touch Transfer Manager. For details, see the Software User's Guide included on the CD-ROM. Deleting a Label Layout 10 [Device settings] of the "Printer Setting Tool" can be downloaded from ) the directly entered date/time. • This function is available with firmware version 1.04 or later. On the menu bar, click [Tools] - [Delete Template and Database] to the printer, replace the text if necessary, then print labels. Using...
... use P-touch Transfer Manager. For details, see the Software User's Guide included on the CD-ROM. Deleting a Label Layout 10 [Device settings] of the "Printer Setting Tool" can be downloaded from ) the directly entered date/time. • This function is available with firmware version 1.04 or later. On the menu bar, click [Tools] - [Delete Template and Database] to the printer, replace the text if necessary, then print labels. Using...
Users Guide
Page 104
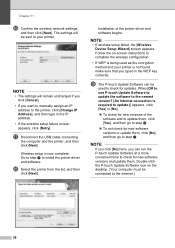
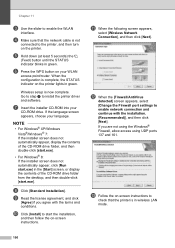
..., make sure that you typed in the IP address. • If the wireless setup failure screen appears, click [Retry]. NOTE If you click [No] here, you want to manually assign an IP address to step t. To not check for new versions of the printer driver and software begins. Chapter 11 p Confirm the wireless network settings, and then click [Next]. Installation of the software and to update them...
..., make sure that you typed in the IP address. • If the wireless setup failure screen appears, click [Retry]. NOTE If you click [No] here, you want to manually assign an IP address to step t. To not check for new versions of the printer driver and software begins. Chapter 11 p Confirm the wireless network settings, and then click [Next]. Installation of the software and to update them...
Users Guide
Page 106
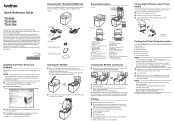
... then double-click [start the installation, and then follow the on your CD-ROM drive. g Insert the installer CD-ROM into your WLAN access point/router. l When the [Firewall/AntiVirus detected] screen appears, select [Change the Firewall port settings to the printer, and then turn on the printer lights in wireless LAN mode. 100 If you agree with the installation. (Recommended)], and then click [Next]. d Make sure...
... then double-click [start the installation, and then follow the on your CD-ROM drive. g Insert the installer CD-ROM into your WLAN access point/router. l When the [Firewall/AntiVirus detected] screen appears, select [Change the Firewall port settings to the printer, and then turn on the printer lights in wireless LAN mode. 100 If you agree with the installation. (Recommended)], and then click [Next]. d Make sure...

Users Guide
Page 112
...), see Printer Driver Settings on either side and lift up to load the correct paper. This is used, printed labels can be specified in the printer driver. 13 Using the Label Peeler (Optional:PA-LP-001) (TD-2120N/2130N only) 13 If the label peeler is useful when affixing a large amount of the media exit. a Press and hold the (Power) button to turn the printer off. For details, see its instruction manual.
...), see Printer Driver Settings on either side and lift up to load the correct paper. This is used, printed labels can be specified in the printer driver. 13 Using the Label Peeler (Optional:PA-LP-001) (TD-2120N/2130N only) 13 If the label peeler is useful when affixing a large amount of the media exit. a Press and hold the (Power) button to turn the printer off. For details, see its instruction manual.
Quick Reference Guide
Page 1
... TD‑2020/2120N/2130N (hereafter referred to turn the printer on the printer are using the printer. To download the latest manuals, please visit the Brother Solutions Center at least 1 second) the (Print) button until it up (1), as "the printer") is installed.) c Turn on your Brother reseller. • Printer • AC adapter • AC power cord • USB cable • CD‑ROM • Product Safety Guide • Quick Reference Guide Inserting the...
... TD‑2020/2120N/2130N (hereafter referred to turn the printer on the printer are using the printer. To download the latest manuals, please visit the Brother Solutions Center at least 1 second) the (Print) button until it up (1), as "the printer") is installed.) c Turn on your Brother reseller. • Printer • AC adapter • AC power cord • USB cable • CD‑ROM • Product Safety Guide • Quick Reference Guide Inserting the...
Quick Reference Guide
Page 2
.... Press the (Power) button once. If the error appears, even after the other users are aligned with the print head as required. Check that the correct media, for example, type (die-cut label or continuous length tape) and die-cut label size, is not located in the printer driver's dialog box or "Printer Setting Tool". „„ Is there dust or dirt on again. If not, install a new RD Roll. „...
.... Press the (Power) button once. If the error appears, even after the other users are aligned with the print head as required. Check that the correct media, for example, type (die-cut label or continuous length tape) and die-cut label size, is not located in the printer driver's dialog box or "Printer Setting Tool". „„ Is there dust or dirt on again. If not, install a new RD Roll. „...

Software Users Guide
Page 4
... Package file (.pdz) to Brother printer 56 7 Printing the list of label templates 59 8 Printing labels using P-touch Template 60 P-touch Template function...60 Preparation ...61 Specifying settings in the P-touch Template Settings tool 61 Specifying barcode reader settings 62 Connecting a barcode reader ...63 Preset template printing...64 Barcode printing (copying)...66 Database-assisted label printing...68 Numbering function (serialized number) printing 71 For a text label...71 For a barcode label...74 9 Updating P-touch Editor (all models) / Updating the Firmware (TD-2020/2120N...
... Package file (.pdz) to Brother printer 56 7 Printing the list of label templates 59 8 Printing labels using P-touch Template 60 P-touch Template function...60 Preparation ...61 Specifying settings in the P-touch Template Settings tool 61 Specifying barcode reader settings 62 Connecting a barcode reader ...63 Preset template printing...64 Barcode printing (copying)...66 Database-assisted label printing...68 Numbering function (serialized number) printing 71 For a text label...71 For a barcode label...74 9 Updating P-touch Editor (all models) / Updating the Firmware (TD-2020/2120N...
Software Users Guide
Page 25
..., see Windows® Help. 21 a For Windows® XP Click [Start], [Control Panel], open [Printers and Other Hardware], open [Devices and Printers]. How to Use P-touch Editor Printing directly from other regular printers, you may not be able to print even after installing the driver and application software, unless the application software allows the correct label size to be set. Setting the Printer Driver Refer to the procedures below for this machine to...
..., see Windows® Help. 21 a For Windows® XP Click [Start], [Control Panel], open [Printers and Other Hardware], open [Devices and Printers]. How to Use P-touch Editor Printing directly from other regular printers, you may not be able to print even after installing the driver and application software, unless the application software allows the correct label size to be set. Setting the Printer Driver Refer to the procedures below for this machine to...

Software Users Guide
Page 34
c In [Label Layout], make adjustments to the [Label Layout] box. When you want to change the way your keyboard. 30 You can enter spaces, line feeds, commas, and characters for each cell and print them on your text is added to the line spacing in the [Fields] box and click [Add], a new field is displayed/printed. You can directly copy text from Microsoft® Excel® to a label layout. Creating labels using Microsoft...
c In [Label Layout], make adjustments to the [Label Layout] box. When you want to change the way your keyboard. 30 You can enter spaces, line feeds, commas, and characters for each cell and print them on your text is added to the line spacing in the [Fields] box and click [Add], a new field is displayed/printed. You can directly copy text from Microsoft® Excel® to a label layout. Creating labels using Microsoft...

ESC/ P Command Reference
Page 55
... Hexadecimal: 0A Parameters None Description Feeds the paper by the amount specified by a line feed command (ESC 0, ESC 2, ESC 3, ESC A). The print position becomes the beginning of the next line. The default value is a line feed of 32 dots. A carriage return immediately after a line feed is ignored. Auto-canceling double-width characters specified with SO or ESC SO are...
... Hexadecimal: 0A Parameters None Description Feeds the paper by the amount specified by a line feed command (ESC 0, ESC 2, ESC 3, ESC A). The print position becomes the beginning of the next line. The default value is a line feed of 32 dots. A carriage return immediately after a line feed is ignored. Auto-canceling double-width characters specified with SO or ESC SO are...

P-touch Template Manual/ Command Reference
Page 5
... printer settings (cut options-specifying number of labels) ... 86 Retrieve character code set setting 87 Retrieve international character set setting 88 Retrieve prefix character 89 Retrieve line feed command setting text string 90 Retrieve number of copies setting 91 Retrieve number of Numbering copies setting 92 Retrieve FNC1 replacement setting 93 Retrieve print options 94 Retrieve recovery setting 95 Retrieve barcode margin setting 96 Retrieve rotated print setting 97 8. ii - ZPL II supported by TD-2020/2120N/2130N 101 Appendix A: Specifications 110 - CPCL supported...
... printer settings (cut options-specifying number of labels) ... 86 Retrieve character code set setting 87 Retrieve international character set setting 88 Retrieve prefix character 89 Retrieve line feed command setting text string 90 Retrieve number of copies setting 91 Retrieve number of Numbering copies setting 92 Retrieve FNC1 replacement setting 93 Retrieve print options 94 Retrieve recovery setting 95 Retrieve barcode margin setting 96 Retrieve rotated print setting 97 8. ii - ZPL II supported by TD-2020/2120N/2130N 101 Appendix A: Specifications 110 - CPCL supported...

P-touch Template Manual/ Command Reference
Page 106
... II supported by TD-2020/2120N/2130N P-touch Template 2.0 Command Reference ZPL II ^JU ^JZ ^KL ^LH ^LL ^LR ^LS ^LT ^MC ^MF ^MN ^MU ^PM ^PO ^PQ ^PW ~SD ^SF ^SN ~TA ~WC ^WD ^XA ^XF ^XG ^XZ Description Printer setting Select print setting after error occurs Set language Set home position of label Set label length Reverse field data color Set horizontal print position Set vertical print position Clear data after printing Feed setting Media setting Unit setting Mirror printing...
... II supported by TD-2020/2120N/2130N P-touch Template 2.0 Command Reference ZPL II ^JU ^JZ ^KL ^LH ^LL ^LR ^LS ^LT ^MC ^MF ^MN ^MU ^PM ^PO ^PQ ^PW ~SD ^SF ^SN ~TA ~WC ^WD ^XA ^XF ^XG ^XZ Description Printer setting Select print setting after error occurs Set language Set home position of label Set label length Reverse field data color Set horizontal print position Set vertical print position Clear data after printing Feed setting Media setting Unit setting Mirror printing...

P-touch Template Manual/ Command Reference
Page 115
... relative to present position Move right and down relative to present position Line print mode left margin Set text darkness/width Character spacing Page width Line print mode pagination Form-feed Non-destructive backspace Line print mode top-of-form Distance between top-of-form and index Conditional advance/retract Retract after cut Print after idle time Any linear barcode or graphics command are able to be used in Line Print Mode. - 109 - 9.
... relative to present position Move right and down relative to present position Line print mode left margin Set text darkness/width Character spacing Page width Line print mode pagination Form-feed Non-destructive backspace Line print mode top-of-form Distance between top-of-form and index Conditional advance/retract Retract after cut Print after idle time Any linear barcode or graphics command are able to be used in Line Print Mode. - 109 - 9.


