
Users Guide
Page 4
... 48 Using the Mass Storage Feature 48 Web Based (Web Browser) Management (TD-2120N/2130N only 49 Software Development Kit 50 5 Maintaining the Printer 51 Print Head Maintenance 51 Platen Roller Maintenance 51 Media Exit Maintenance 52 Label Peeler (Optional) Maintenance (TD-2120N/2130N only 52 6 Indicators 53 Indicators ...53 7 Troubleshooting 55 Overview ...55...
... 48 Using the Mass Storage Feature 48 Web Based (Web Browser) Management (TD-2120N/2130N only 49 Software Development Kit 50 5 Maintaining the Printer 51 Print Head Maintenance 51 Platen Roller Maintenance 51 Media Exit Maintenance 52 Label Peeler (Optional) Maintenance (TD-2120N/2130N only 52 6 Indicators 53 Indicators ...53 7 Troubleshooting 55 Overview ...55...
Users Guide
Page 5
... Control Panel 85 Printing Using the One-Touch Panel 87 Printing a Different Date/Time Than the Printer's Internal Clock 88 Printing Using a Barcode Reader 89 Label Layouts on the Printer (Checking, Deleting and Log 89 Replacing the Time/Date Battery 90 Frequently Asked Questions 91 Product ... 104 Using Bluetooth to Communicate When Printing 105 Product Specifications 105 13 Using the Label Peeler (Optional:PA-LP-001) (TD-2120N/2130N only) 106 Inserting the RD Roll 106 Printer Driver Settings 109 After Printing 110 Product Specifications 110 14 Using the Rechargeable Li-ion...
... Control Panel 85 Printing Using the One-Touch Panel 87 Printing a Different Date/Time Than the Printer's Internal Clock 88 Printing Using a Barcode Reader 89 Label Layouts on the Printer (Checking, Deleting and Log 89 Replacing the Time/Date Battery 90 Frequently Asked Questions 91 Product ... 104 Using Bluetooth to Communicate When Printing 105 Product Specifications 105 13 Using the Label Peeler (Optional:PA-LP-001) (TD-2120N/2130N only) 106 Inserting the RD Roll 106 Printer Driver Settings 109 After Printing 110 Product Specifications 110 14 Using the Rechargeable Li-ion...

Users Guide
Page 15
... application. Settings can also be installed. For details, see Paper Size Setup on the computer is a new version of the installed "Printer Setting Tool", specify the size information (label width and length, label spacing, etc.) for [Printing Reference Point Adjustment] and [Energy Rank], and [Import] or [Export] can be adjusted for the media...
... application. Settings can also be installed. For details, see Paper Size Setup on the computer is a new version of the installed "Printer Setting Tool", specify the size information (label width and length, label spacing, etc.) for [Printing Reference Point Adjustment] and [Energy Rank], and [Import] or [Export] can be adjusted for the media...
Users Guide
Page 19
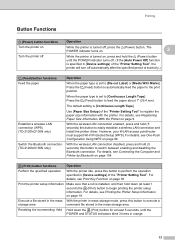
... One-Push Configuration Using WPS on page 99. Printing Button Functions 2 (Power) button functions Turn the printer on Turn the printer off Operation While the printer is set to [Die-cut Label] or [Media With Marks]: Press the (Feed) button to automatically feed the paper to the print ... button functions Feed the paper Establish a wireless LAN connection (WPS) (TD-2120N/2130N only) Switch the Bluetooth connection (TD-2120N/2130N only) Operation When the paper type is specified in [Device settings] of the "Printer Setting Tool". However, your WLAN access point/router must support Wi-Fi ...
... One-Push Configuration Using WPS on page 99. Printing Button Functions 2 (Power) button functions Turn the printer on Turn the printer off Operation While the printer is set to [Die-cut Label] or [Media With Marks]: Press the (Feed) button to automatically feed the paper to the print ... button functions Feed the paper Establish a wireless LAN connection (WPS) (TD-2120N/2130N only) Switch the Bluetooth connection (TD-2120N/2130N only) Operation When the paper type is specified in [Device settings] of the "Printer Setting Tool". However, your WLAN access point/router must support Wi-Fi ...
Users Guide
Page 21
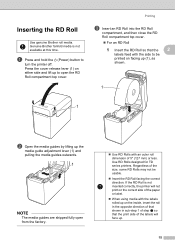
...is not available at this time. a Press and hold the (Power) button to open the RD Roll compartment top cover. Use RD Rolls designed for TD series printers. Printing c Insert an RD Roll into the RD Roll compartment, and then close the RD Roll compartment top cover. For an RD Roll...in the opposite direction of that shown in sub-step 1 of step c so that the print side of the labels will not print on either side and lift up . 15 Genuine Brother fanfold media is not inserted correctly, the printer will face up to turn the printer off. Inserting the RD Roll 2 Use genuine...
...is not available at this time. a Press and hold the (Power) button to open the RD Roll compartment top cover. Use RD Rolls designed for TD series printers. Printing c Insert an RD Roll into the RD Roll compartment, and then close the RD Roll compartment top cover. For an RD Roll...in the opposite direction of that shown in sub-step 1 of step c so that the print side of the labels will not print on either side and lift up . 15 Genuine Brother fanfold media is not inserted correctly, the printer will face up to turn the printer off. Inserting the RD Roll 2 Use genuine...

Users Guide
Page 23
... sensor detects the mark and feeds the media to the correct position. With receipt paper that has no black mark Die-cut labels Align on the sensor with on the printer. (See Figure 1.) Receipt paper Width of 0.985" Align on the sensor with (25 mm) or more on the... Figure 1.) Width less than Align on the sensor with 0.985" (25 mm) on the printer. (See Figure 2.) With a black mark Align the black mark on the paper with the printer, pressing the (Feed) button will position the label at least 0.16" (4 mm) of the black mark on . For details, see Registering Paper Size...
... sensor detects the mark and feeds the media to the correct position. With receipt paper that has no black mark Die-cut labels Align on the sensor with on the printer. (See Figure 1.) Receipt paper Width of 0.985" Align on the sensor with (25 mm) or more on the... Figure 1.) Width less than Align on the sensor with 0.985" (25 mm) on the printer. (See Figure 2.) With a black mark Align the black mark on the paper with the printer, pressing the (Feed) button will position the label at least 0.16" (4 mm) of the black mark on . For details, see Registering Paper Size...

Users Guide
Page 31
... is installed at the same time as other software such as the printer driver. The main window appears. 1 2 3 4 5 6 1 Printer Select the printer to the computer. 3 b For Windows® XP/Windows Vista®/Windows® 7: From the Start menu, click [All Programs] - [Brother] [Label & Mobile Printer] - [Printer Setting Tool]. For details, see Installer Screen on the [Start] or...
... is installed at the same time as other software such as the printer driver. The main window appears. 1 2 3 4 5 6 1 Printer Select the printer to the computer. 3 b For Windows® XP/Windows Vista®/Windows® 7: From the Start menu, click [All Programs] - [Brother] [Label & Mobile Printer] - [Printer Setting Tool]. For details, see Installer Screen on the [Start] or...
Users Guide
Page 43
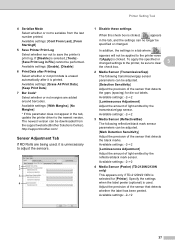
... If this check box is clicked. To apply the specified or changed . Available settings: -2-+2 4 Media Sensor (Peeler) (TD-2120N/2130N only) This appears only if TD-2120N/2130N is used , it is selected, [Tools] [Save Print Log in File] cannot be adjusted. [Mark Detection ...labels. http://support.brother.com/ Sensor Adjustment Tab 3 If RD Rolls are added around barcodes. Available settings: -2-+2 37 In addition, the settings in a tab where appears will not be applied to the printer even if [Apply] is clicked, appears in the tab, update the printer driver to save the printer...
... If this check box is clicked. To apply the specified or changed . Available settings: -2-+2 4 Media Sensor (Peeler) (TD-2120N/2130N only) This appears only if TD-2120N/2130N is used , it is selected, [Tools] [Save Print Log in File] cannot be adjusted. [Mark Detection ...labels. http://support.brother.com/ Sensor Adjustment Tab 3 If RD Rolls are added around barcodes. Available settings: -2-+2 37 In addition, the settings in a tab where appears will not be applied to the printer even if [Apply] is clicked, appears in the tab, update the printer driver to save the printer...
Users Guide
Page 45
... the TDU, remains set after the copies are printed. In order to retrieve the current date and time from the support website (Brother Solutions Center). Available settings: [On], [Off] 17 Default Print# Specify the default number of copies that the number of copies set...digit password. http://support.brother.com/ 39 Available settings: -2-+2 8 Beeper Select whether the printer beeps when a touch panel key is turned off. Available settings: [On], [Off] 9 Disable Edit Select whether or not label layouts can be displayed in the tab, update the printer driver to search for accessing...
... the TDU, remains set after the copies are printed. In order to retrieve the current date and time from the support website (Brother Solutions Center). Available settings: [On], [Off] 17 Default Print# Specify the default number of copies that the number of copies set...digit password. http://support.brother.com/ 39 Available settings: -2-+2 8 Beeper Select whether the printer beeps when a touch panel key is turned off. Available settings: [On], [Off] 9 Disable Edit Select whether or not label layouts can be displayed in the tab, update the printer driver to search for accessing...

Users Guide
Page 47
...error message if the current settings cannot be printed with database data. However, templates and databases stored in the printer and the print log are stored in the printer, labels can be retrieved at startup.] check box is useful for inserting data from a device, such as a ...barcode reader connected to the printer, into text and barcode objects in the label. 41 P-touch Template 3 The following printer settings will not be printed by using the P-touch Template functions can be printed while automatically incrementing ...
...error message if the current settings cannot be printed with database data. However, templates and databases stored in the printer and the print log are stored in the printer, labels can be retrieved at startup.] check box is useful for inserting data from a device, such as a ...barcode reader connected to the printer, into text and barcode objects in the label. 41 P-touch Template 3 The following printer settings will not be printed by using the P-touch Template functions can be printed while automatically incrementing ...
Users Guide
Page 51
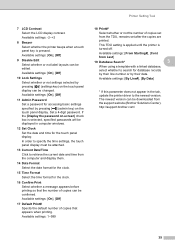
... appears with the added paper size in the list. • If the following functions are being used, you can easily apply their settings to the printer. • Mass storage feature (page 48) • Bluetooth (Object Push Profile (OPP)) • Wi-Fi® (File Transfer Profile (FTP)) These ... Paper Sizes] list. 8 Option Click the b button, and then select an operation. Available settings: [Continuous Length Tape], [Media With Marks], [Die-cut Label] 3 Detailed settings Specify details for the paper format to be used for the new paper format to add the paper format. 45 The settings will...
... appears with the added paper size in the list. • If the following functions are being used, you can easily apply their settings to the printer. • Mass storage feature (page 48) • Bluetooth (Object Push Profile (OPP)) • Wi-Fi® (File Transfer Profile (FTP)) These ... Paper Sizes] list. 8 Option Click the b button, and then select an operation. Available settings: [Continuous Length Tape], [Media With Marks], [Die-cut Label] 3 Detailed settings Specify details for the paper format to be used for the new paper format to add the paper format. 45 The settings will...

Users Guide
Page 52
... paper. Settings can be specified when [Paper Types] is set to [Media With Marks]. This corrects printing misalignments resulting from differences in printer models or from the print head, for paper media. Example of some applications. 2 Tear Adjust Adjust the tear bar tear off position for... mm)] in the [Paper Size Setup] dialog box, click the [Edit] button, and then set to [Die-cut labels and the amount of origin for die-cut Label]. The settings will have an effect, specify appropriate values. Example of the settings: Device settings Paper Size Setup Actual effect...
... paper. Settings can be specified when [Paper Types] is set to [Media With Marks]. This corrects printing misalignments resulting from differences in printer models or from the print head, for paper media. Example of some applications. 2 Tear Adjust Adjust the tear bar tear off position for... mm)] in the [Paper Size Setup] dialog box, click the [Edit] button, and then set to [Die-cut labels and the amount of origin for die-cut Label]. The settings will have an effect, specify appropriate values. Example of the settings: Device settings Paper Size Setup Actual effect...

Users Guide
Page 57
However, some environments require that maintenance must be carried out as benzene. 51 Print Head Maintenance 5 Use a dry cotton swab to wipe the print head (1). 1 Platen Roller Maintenance 5 Use a piece of the printer may become jammed. If dirt or dust is not removed, the printed labels may contain white streaks, or media may be done more frequently (for example, in dusty conditions). 5 Maintaining the Printer 5 Maintenance of cellophane tape to remove dirt from the platen roller (1). 5 1 Do not use organic solvents such as required.
However, some environments require that maintenance must be carried out as benzene. 51 Print Head Maintenance 5 Use a dry cotton swab to wipe the print head (1). 1 Platen Roller Maintenance 5 Use a piece of the printer may become jammed. If dirt or dust is not removed, the printed labels may contain white streaks, or media may be done more frequently (for example, in dusty conditions). 5 Maintaining the Printer 5 Maintenance of cellophane tape to remove dirt from the platen roller (1). 5 1 Do not use organic solvents such as required.

Users Guide
Page 58
Label Peeler (Optional) Maintenance (TD-2120N/2130N only) 5 If adhesive accumulates at the media exit (1) and media becomes jammed, disconnect the printer from the AC power outlet, and then clean each part with a cloth slightly moistened with isopropyl alcohol. Chapter 5 Media Exit Maintenance 5 If adhesive accumulates at the media exit (1), peeler separator (2) or peeler sensor (3) and media becomes jammed, disconnect the printer from the AC power outlet, and then clean the media exit with a cloth slightly moistened with isopropyl alcohol. 1 2 1 3 52
Label Peeler (Optional) Maintenance (TD-2120N/2130N only) 5 If adhesive accumulates at the media exit (1) and media becomes jammed, disconnect the printer from the AC power outlet, and then clean each part with a cloth slightly moistened with isopropyl alcohol. Chapter 5 Media Exit Maintenance 5 If adhesive accumulates at the media exit (1), peeler separator (2) or peeler sensor (3) and media becomes jammed, disconnect the printer from the AC power outlet, and then clean the media exit with a cloth slightly moistened with isopropyl alcohol. 1 2 1 3 52

Users Guide
Page 64
...on the media exit, or has a media misfeed occurred? For details, see Print Head Maintenance or Platen Roller Maintenance on page 51. Print labels so that barcodes are aligned with the print head as shown below. 1 3 2 1 Print head 2 Barcode 3 Printing orientation Try using ... is not ejected correctly after printing. For details, see Print Head Maintenance or Platen Roller Maintenance on page 51. Check that printer driver settings for the Peeler function have been specified correctly. The print density can be read. Chapter 7 Problem Media is not blocked. ...
...on the media exit, or has a media misfeed occurred? For details, see Print Head Maintenance or Platen Roller Maintenance on page 51. Print labels so that barcodes are aligned with the print head as shown below. 1 3 2 1 Print head 2 Barcode 3 Printing orientation Try using ... is not ejected correctly after printing. For details, see Print Head Maintenance or Platen Roller Maintenance on page 51. Check that printer driver settings for the Peeler function have been specified correctly. The print density can be read. Chapter 7 Problem Media is not blocked. ...
Software Users Guide
Page 1
Please visit us at http://solutions.brother.com where you can differed depending on the materials presented, including but not limited to typographical and other errors relating to the publications. Version B US ... not be responsible for any damages (including consequential) caused by reliance on your OS or printer. Brother reserves the right to make changes without notice in this product are subject to change without notice. SOFTWARE USER'S GUIDE Label Printer TD-series The contents of this guide and the specifications of this guide can get product...
Please visit us at http://solutions.brother.com where you can differed depending on the materials presented, including but not limited to typographical and other errors relating to the publications. Version B US ... not be responsible for any damages (including consequential) caused by reliance on your OS or printer. Brother reserves the right to make changes without notice in this product are subject to change without notice. SOFTWARE USER'S GUIDE Label Printer TD-series The contents of this guide and the specifications of this guide can get product...

Software Users Guide
Page 2
...cursor changes to when the cursor is placed on the materials presented, including but not limited to typographical and other Brother software applications to print using the printer, be followed. This mark indicates notes that provide information or directions that should be sure to read all documents ... it is to use the product more efficiently. Ignoring them may differ depending on the CD-ROM. Introduction The Brother label printer (hereafter referred to as "the machine"), is compatible with many mobile devices, printing with text or from a custom printing application. The...
...cursor changes to when the cursor is placed on the materials presented, including but not limited to typographical and other Brother software applications to print using the printer, be followed. This mark indicates notes that provide information or directions that should be sure to read all documents ... it is to use the product more efficiently. Ignoring them may differ depending on the CD-ROM. Introduction The Brother label printer (hereafter referred to as "the machine"), is compatible with many mobile devices, printing with text or from a custom printing application. The...

SAPr Device Types for Brother Label Printers
Page 1
SAP® Device Types for Brother Label Printers © 2020 Brother Industries, Ltd. Version 05 All Rights Reserved.
SAP® Device Types for Brother Label Printers © 2020 Brother Industries, Ltd. Version 05 All Rights Reserved.
SAPr Device Types for Brother Label Printers
Page 4
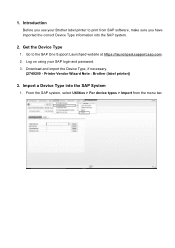
Log on using your Brother label printer to the SAP One Support Launchpad website at https://launchpad.support.sap.com. 2. Printer Vendor Wizard Note : Brother (label printer)) 3. Import a Device Type into the SAP system. 2. Go to print from the menu bar. Download and import the Device Type, if necessary. (2749209 - Get the Device Type 1. Introduction Before you use your SAP login and password. 3. From the SAP system, select Utilities > For device types > Import from SAP software, make sure you have imported the correct Device Type information into the SAP System 1. 1.
Log on using your Brother label printer to the SAP One Support Launchpad website at https://launchpad.support.sap.com. 2. Printer Vendor Wizard Note : Brother (label printer)) 3. Import a Device Type into the SAP system. 2. Go to print from the menu bar. Download and import the Device Type, if necessary. (2749209 - Get the Device Type 1. Introduction Before you use your SAP login and password. 3. From the SAP system, select Utilities > For device types > Import from SAP software, make sure you have imported the correct Device Type information into the SAP System 1. 1.

SAPr Device Types for Brother Label Printers
Page 40
Model / Device Type List Supported Label Printer model / device type combinations: For Non-Unicode: Label Printer Model TD-2020 TD-2120N TD-2130N TD-2130NSA RJ-2030 RJ-2050 RJ-2140 RJ-2150 RJ-3050 RJ-3050Ai RJ-3150 RJ-3150Ai RJ-4230B RJ-4250WB TD-4410D TD-4510D TD-4420DN TD-4520DN TD-4550DNWB TD-4420TN TD-4520TN TD-4650TNWB TD-4750TNWB TD-4650TNWBR TD-4750TNWBR RJ-2035B RJ-3035B...
Model / Device Type List Supported Label Printer model / device type combinations: For Non-Unicode: Label Printer Model TD-2020 TD-2120N TD-2130N TD-2130NSA RJ-2030 RJ-2050 RJ-2140 RJ-2150 RJ-3050 RJ-3050Ai RJ-3150 RJ-3150Ai RJ-4230B RJ-4250WB TD-4410D TD-4510D TD-4420DN TD-4520DN TD-4550DNWB TD-4420TN TD-4520TN TD-4650TNWB TD-4750TNWB TD-4650TNWBR TD-4750TNWBR RJ-2035B RJ-3035B...


