Users Manual - English
Page 5
SEWING BASICS 27 SEWING ...27 General sewing procedure ...27 Selecting a stitch ...28 Starting to sew ...29 Adjusting thread tension ...31 USEFUL SEWING TIPS ...32 Trial sewing ...32 Changing the sewing direction ...32 Sewing curves ...32 Sewing thick fabrics ...32 Sewing hook-and-loop fastener ......
SEWING BASICS 27 SEWING ...27 General sewing procedure ...27 Selecting a stitch ...28 Starting to sew ...29 Adjusting thread tension ...31 USEFUL SEWING TIPS ...32 Trial sewing ...32 Changing the sewing direction ...32 Sewing curves ...32 Sewing thick fabrics ...32 Sewing hook-and-loop fastener ......
Users Manual - English
Page 7
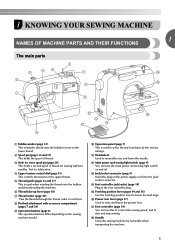
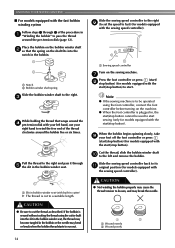
... to raise and lower the presser foot. b Spool pin (pages 12 and 17) This holds the spool of the upper thread. d Upper tension-control dial (page 31) This controls the tension of thread. j Operation panel (page 7) This is used to select the stitch and specify the various settings. p Presser foot lever (page...
... to raise and lower the presser foot. b Spool pin (pages 12 and 17) This holds the spool of the upper thread. d Upper tension-control dial (page 31) This controls the tension of thread. j Operation panel (page 7) This is used to select the stitch and specify the various settings. p Presser foot lever (page...
Users Manual - English
Page 14
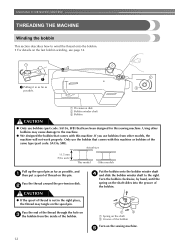
... model Other models Pull up the spool pin as far as possible. Pass the end of the bobbin. Pass the thread around the pre-tension disk. e 12 a Pre-tension disk b Bobbin winder shaft c Bobbin CAUTION ● Only use the bobbin that have been designed for this machine. Only use bobbins (part code...
... model Other models Pull up the spool pin as far as possible. Pass the end of the bobbin. Pass the thread around the pre-tension disk. e 12 a Pre-tension disk b Bobbin winder shaft c Bobbin CAUTION ● Only use the bobbin that have been designed for this machine. Only use bobbins (part code...

Users Manual - English
Page 15
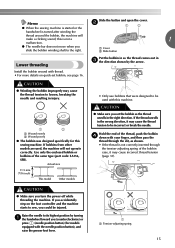
... turned after winding the thread around the bobbin, the machine will make a clicking sound; CAUTION ● Not winding the bobbin properly may cause the thread tension to start. this is wound, when the thread runs low it may break the needle. 1 2 a Wound evenly b Wound poorly a Sewing speed controller 13 If you...
... turned after winding the thread around the bobbin, the machine will make a clicking sound; CAUTION ● Not winding the bobbin properly may cause the thread tension to start. this is wound, when the thread runs low it may break the needle. 1 2 a Wound evenly b Wound poorly a Sewing speed controller 13 If you...
Users Manual - English
Page 16
...the thread may break the needle. 1 2 a Wound evenly b Wound poorly 14 CAUTION ● Not winding the bobbin properly may cause the thread tension to loosen, and may become tangled in the bobbin. c While holding the thread that the spring on the bobbin winder shaft b so that wraps around... the d pre-tension disk with the sewing speed controller). If the bobbin is wound without cutting the thread using the foot controller, connect the foot controller before ...
...the thread may break the needle. 1 2 a Wound evenly b Wound poorly 14 CAUTION ● Not winding the bobbin properly may cause the thread tension to loosen, and may become tangled in the bobbin. c While holding the thread that the spring on the bobbin winder shaft b so that wraps around... the d pre-tension disk with the sewing speed controller). If the bobbin is wound without cutting the thread using the foot controller, connect the foot controller before ...
Users Manual - English
Page 17
...the machine. this sewing machine. If bobbins from other models are used with the needle position button), and raise the presser foot lever. 1 a Tension-adjusting spring 15 CAUTION ● Make sure you set bobbin, see page 16. If you could be injured. Install the bobbin wound with your ... threading Put the bobbin in so the thread comes out in the right direction. CAUTION ● Winding the bobbin improperly may cause the thread tension to be incorrect or break the needle. Actual size 11.5 mm (7/16 inch) This model Other models • Only use bobbins that were...
...the machine. this sewing machine. If bobbins from other models are used with the needle position button), and raise the presser foot lever. 1 a Tension-adjusting spring 15 CAUTION ● Make sure you set bobbin, see page 16. If you could be injured. Install the bobbin wound with your ... threading Put the bobbin in so the thread comes out in the right direction. CAUTION ● Winding the bobbin improperly may cause the thread tension to be incorrect or break the needle. Actual size 11.5 mm (7/16 inch) This model Other models • Only use bobbins that were...
Users Manual - English
Page 18
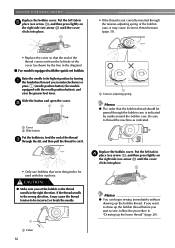
... be incorrect or break the needle. 1 a Cutter 16 Replace the bobbin cover. Put the left tab in , feed the end of the thread c through the tension-adjusting spring of the thread comes out from the left tab in the wrong direction, it may cause incorrect thread... be passed through the bobbin case is not correctly inserted through the slit, and then pull the thread to cut it may cause the thread tension to thread the machine as shown by the line in the right direction. Slide the button and open the cover. If the thread unrolls in...
... be incorrect or break the needle. 1 a Cutter 16 Replace the bobbin cover. Put the left tab in , feed the end of the thread c through the tension-adjusting spring of the thread comes out from the left tab in the wrong direction, it may cause incorrect thread... be passed through the bobbin case is not correctly inserted through the slit, and then pull the thread to cut it may cause the thread tension to thread the machine as shown by the line in the right direction. Slide the button and open the cover. If the thread unrolls in...

Users Manual - English
Page 28
... screw 26 a Presser foot lever X The presser foot is attached. Use the screwdriver to check that the g presser foot is not correctly installed, the thread tension will be incorrect. a left hand.
... screw 26 a Presser foot lever X The presser foot is attached. Use the screwdriver to check that the g presser foot is not correctly installed, the thread tension will be incorrect. a left hand.
Users Manual - English
Page 33
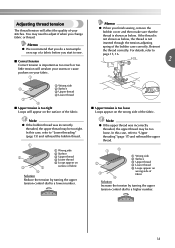
...1 2 3 a Wrong side b Surface c Upper thread d Lower thread e Loops appear on the wrong side of fabric Solution Increase the tension by turning the upper tension-control dial to a lower number. 54 3 Note ● If the upper thread was incorrectly threaded, the upper thread may need to sew... stitches. For details, refer to page 15, 16. 2 a Wrong side 2 b Surface c Upper thread d Lower thread 3 4 ■ Upper tension is too tight Loops will weaken your fabric. 1 Memo ● When you finish sewing, remove the bobbin cover and then make sure that you change...
...1 2 3 a Wrong side b Surface c Upper thread d Lower thread e Loops appear on the wrong side of fabric Solution Increase the tension by turning the upper tension-control dial to a lower number. 54 3 Note ● If the upper thread was incorrectly threaded, the upper thread may need to sew... stitches. For details, refer to page 15, 16. 2 a Wrong side 2 b Surface c Upper thread d Lower thread 3 4 ■ Upper tension is too tight Loops will weaken your fabric. 1 Memo ● When you finish sewing, remove the bobbin cover and then make sure that you change...
Users Manual - English
Page 34
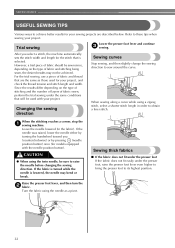
... either by turning the handwheel toward you select a stitch, the machine automatically sets the stitch width and length for your project, and check the thread tension and stitch length and width. CAUTION ● When using the twin needle, be sure to sew around the curve. If the fabric is turned while...
... either by turning the handwheel toward you select a stitch, the machine automatically sets the stitch width and length for your project, and check the thread tension and stitch length and width. CAUTION ● When using the twin needle, be sure to sew around the curve. If the fabric is turned while...

Users Manual - English
Page 63
... a hot iron before it is called "scalloping". a Select the straight stitch, and then adjust the b stitch length to 4.0 mm (3/16 inch) and loosen the thread tension. • For details, refer to sew directly on the collars of the fabric. e Stitch between the straight stitches. It is used on the edge of... "N". Attach zigzag foot "J". Pull the bobbin threads to decorate the edges of the fabric, making c sure not to "Selecting a stitch" (page 28) and "Adjusting thread tension" 3 (page 31). f 61
... a hot iron before it is called "scalloping". a Select the straight stitch, and then adjust the b stitch length to 4.0 mm (3/16 inch) and loosen the thread tension. • For details, refer to sew directly on the collars of the fabric. e Stitch between the straight stitches. It is used on the edge of... "N". Attach zigzag foot "J". Pull the bobbin threads to decorate the edges of the fabric, making c sure not to "Selecting a stitch" (page 28) and "Adjusting thread tension" 3 (page 31). f 61
Users Manual - English
Page 64
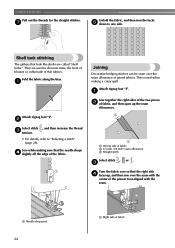
... side of joined fabrics. Attach zigzag foot "J". Sew while making a crazy quilt. Fold the fabric along the bias. b Select stitch , and then increase the thread c tension. • For details, refer to one side. c Turn the fabric over so that the right side d faces up the seam allowances. 2 1 1 3 a Wrong side of the...
... side of joined fabrics. Attach zigzag foot "J". Sew while making a crazy quilt. Fold the fabric along the bias. b Select stitch , and then increase the thread c tension. • For details, refer to one side. c Turn the fabric over so that the right side d faces up the seam allowances. 2 1 1 3 a Wrong side of the...
Users Manual - English
Page 74
...properly. The needle clamp screw is scratched. Loosen the upper thread tension. for the type of fabric, thread and needle. The needle is tangled, for example, you need additional help, the Brother Solutions Center offers the latest FAQs and troubleshooting tips. The area ... the upper thread properly. (for example, in . Replace the needle. The thread is bent or blunt. Loosen the upper thread tension. APPENDIX TROUBLESHOOTING If the machine stops operating correctly, check the following possible problems before requesting service. You have not fitted the spool...
...properly. The needle clamp screw is scratched. Loosen the upper thread tension. for the type of fabric, thread and needle. The needle is tangled, for example, you need additional help, the Brother Solutions Center offers the latest FAQs and troubleshooting tips. The area ... the upper thread properly. (for example, in . Replace the needle. The thread is bent or blunt. Loosen the upper thread tension. APPENDIX TROUBLESHOOTING If the machine stops operating correctly, check the following possible problems before requesting service. You have not fitted the spool...
Users Manual - English
Page 75
...inserted the needle properly. You have not used a bobbin that has been designed for this machine. page 21 page 26 The thread tension is incorrectly installed. The bobbin thread is incorrect. Fit the spool properly. Insert the needle properly. You have not threaded the ... holder properly. Only use a bobbin that has been designed for this machine. Reset the bobbin thread correctly. page 12 The thread tension is tangled. page 31 You have not used the right combina- Correctly install the bobbin thread. Contact your retailer or the nearest...
...inserted the needle properly. You have not used a bobbin that has been designed for this machine. page 21 page 26 The thread tension is incorrectly installed. The bobbin thread is incorrect. Fit the spool properly. Insert the needle properly. You have not threaded the ... holder properly. Only use a bobbin that has been designed for this machine. Reset the bobbin thread correctly. page 12 The thread tension is tangled. page 31 You have not used the right combina- Correctly install the bobbin thread. Contact your retailer or the nearest...

Users Manual - English
Page 76
...page 21 page 22 page 70 page 70 page 17 - The sewing lamp is incorrect. page 28 page 21 page 70 - 74 The thread tension is damaged. Contact your retailer or the nearest authorized service center. Slide the feed dog position lever to sew. Remove the tangle thread. The...fabric, thread and needle. The needle is too fine. The stitch is bent or blunt. APPENDIX Symptom The fabric is incorrect. The thread tension is wrinkled. You have not used bobbin that are appropriate for the type of stitch that you are using is not correct for the ...
...page 21 page 22 page 70 page 70 page 17 - The sewing lamp is incorrect. page 28 page 21 page 70 - 74 The thread tension is damaged. Contact your retailer or the nearest authorized service center. Slide the feed dog position lever to sew. Remove the tangle thread. The...fabric, thread and needle. The needle is too fine. The stitch is bent or blunt. APPENDIX Symptom The fabric is incorrect. The thread tension is wrinkled. You have not used bobbin that are appropriate for the type of stitch that you are using is not correct for the ...

Users Manual - English
Page 78
... 7 optional accessories 8 overcasting stitches 42 P patchwork stitching 54 piecing 54 pocket corners 57 presser foot 6, 25 presser foot holder 6, 26 presser foot lever 6, 17 pre-tension disk 12 Q quick-set bobbin 6, 16 quilting 55 quilting foot 56 quilting guide 55 R reinforcement stitching 57 reverse/reinforcement stitch button 6 S scallop stitching 61 seam...
... 7 optional accessories 8 overcasting stitches 42 P patchwork stitching 54 piecing 54 pocket corners 57 presser foot 6, 25 presser foot holder 6, 26 presser foot lever 6, 17 pre-tension disk 12 Q quick-set bobbin 6, 16 quilting 55 quilting foot 56 quilting guide 55 R reinforcement stitching 57 reverse/reinforcement stitch button 6 S scallop stitching 61 seam...

Users Manual - English
Page 79
T thick fabrics 32 thin fabrics 34 thread cutter 30 thread guide 17 thread tension 31 trial sewing 32 triple stretch stitch 43 troubleshooting 72 twin needle 24 U upper tension-control dial 31 upper threading 17 utility stitch indicator 7, 28 utility stitch key 7, 28 W walking foot 55 wing needle 63 Z zigzag stitch 32, 42, 53 zipper foot 51 zipper Insertion 51 77
T thick fabrics 32 thin fabrics 34 thread cutter 30 thread guide 17 thread tension 31 trial sewing 32 triple stretch stitch 43 troubleshooting 72 twin needle 24 U upper tension-control dial 31 upper threading 17 utility stitch indicator 7, 28 utility stitch key 7, 28 W walking foot 55 wing needle 63 Z zigzag stitch 32, 42, 53 zipper foot 51 zipper Insertion 51 77


