Users Manual - English
Page 1
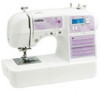
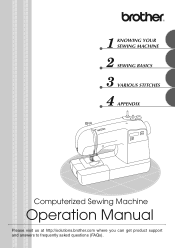
KNOWING YOUR SEWING MACHINE SEWING BASICS VARIOUS STITCHES APPENDIX Please visit us at http://solutions.brother.com where you can get product support and answers to frequently asked questions (FAQs).
KNOWING YOUR SEWING MACHINE SEWING BASICS VARIOUS STITCHES APPENDIX Please visit us at http://solutions.brother.com where you can get product support and answers to frequently asked questions (FAQs).
Users Manual - English
Page 2
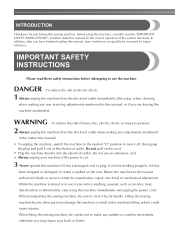
...reference. In addition, after using, when cleaning, when making any adjustments mentioned in the instruction manual: • To unplug the machine, switch the machine to the symbol "O" position to turn it off, then grasp the plug and pull it out of electric shock: 1 Always unplug ...center for the correct operation of the various functions. IMPORTANT SAFETY INSTRUCTIONS Please read the "IMPORTANT SAFETY INSTRUCTIONS", and then study this machine if it has a damaged cord or plug, if it is cut. 3 Never operate this manual for examination, repair, electrical or mechanical...
...reference. In addition, after using, when cleaning, when making any adjustments mentioned in the instruction manual: • To unplug the machine, switch the machine to the symbol "O" position to turn it off, then grasp the plug and pull it out of electric shock: 1 Always unplug ...center for the correct operation of the various functions. IMPORTANT SAFETY INSTRUCTIONS Please read the "IMPORTANT SAFETY INSTRUCTIONS", and then study this machine if it has a damaged cord or plug, if it is cut. 3 Never operate this manual for examination, repair, electrical or mechanical...
Users Manual - English
Page 3
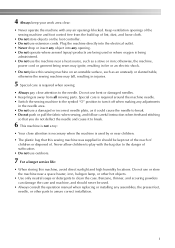
... lint, dust, and loose cloth. • Do not store objects on an unstable surface, such as an unsteady or slanted table, otherwise the sewing machine may fall, resulting in should never be kept out of the reach of children or disposed of suffocation. • Do not use a damaged or incorrect... needle plate, as a stove or iron; otherwise, the machine, power cord or garment being administered. • Do not use or store the machine near a heat source, such as it could cause the needle to break. • Do not push or pull the...
... lint, dust, and loose cloth. • Do not store objects on an unstable surface, such as an unsteady or slanted table, otherwise the sewing machine may fall, resulting in should never be kept out of the reach of children or disposed of suffocation. • Do not use a damaged or incorrect... needle plate, as a stove or iron; otherwise, the machine, power cord or garment being administered. • Do not use or store the machine near a heat source, such as it could cause the needle to break. • Do not push or pull the...
Users Manual - English
Page 4
... for its intended use . Children should contact your local authorized Brother dealer. For additional product information, visit our web site at www.brother.com SAVE THESE INSTRUCTIONS This machine is intended for use by persons (including children) with reduced physical, sensory or mental capabilities, ...of the operation manual to obtain the correct lead. 2 If the problem persists, please consult your authorized dealer to inspect and adjust the machine yourself. carrying the mark, rating as marked on plug. • Always replace the fuse cover. 8 For repair or adjustment: •...
... for its intended use . Children should contact your local authorized Brother dealer. For additional product information, visit our web site at www.brother.com SAVE THESE INSTRUCTIONS This machine is intended for use by persons (including children) with reduced physical, sensory or mental capabilities, ...of the operation manual to obtain the correct lead. 2 If the problem persists, please consult your authorized dealer to inspect and adjust the machine yourself. carrying the mark, rating as marked on plug. • Always replace the fuse cover. 8 For repair or adjustment: •...
Users Manual - English
Page 5
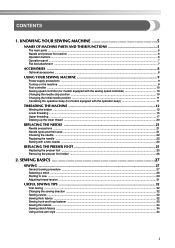
... section ...6 Operation buttons ...6 Operation panel ...7 Flat bed attachment ...7 ACCESSORIES ...8 Optional accessories ...8 USING YOUR SEWING MACHINE 9 Power supply precautions ...9 Turning on the machine ...9 Foot controller ...10 Sewing speed controller (for models equipped with the sewing speed controller 10 Changing the needle stop... the initial needle position ...11 Cancelling the operation beep (for models equipped with the operation beep 11 THREADING THE MACHINE 12 Winding the bobbin ...12 Lower threading ...15 Upper threading ...17 Drawing up the lower thread ...20 REPLACING ...
... section ...6 Operation buttons ...6 Operation panel ...7 Flat bed attachment ...7 ACCESSORIES ...8 Optional accessories ...8 USING YOUR SEWING MACHINE 9 Power supply precautions ...9 Turning on the machine ...9 Foot controller ...10 Sewing speed controller (for models equipped with the sewing speed controller 10 Changing the needle stop... the initial needle position ...11 Cancelling the operation beep (for models equipped with the operation beep 11 THREADING THE MACHINE 12 Winding the bobbin ...12 Lower threading ...15 Upper threading ...17 Drawing up the lower thread ...20 REPLACING ...
Users Manual - English
Page 6
APPENDIX ...70 MAINTENANCE ...70 Cleaning the machine surface ...70 Cleaning the bobbin case ...70 TROUBLESHOOTING ...72 ERROR MESSAGES ...75 Operation beep (for models equipped with the operation beep 75 INDEX ...76 4 VARIOUS ...
APPENDIX ...70 MAINTENANCE ...70 Cleaning the machine surface ...70 Cleaning the bobbin case ...70 TROUBLESHOOTING ...72 ERROR MESSAGES ...75 Operation beep (for models equipped with the operation beep 75 INDEX ...76 4 VARIOUS ...
Users Manual - English
Page 7
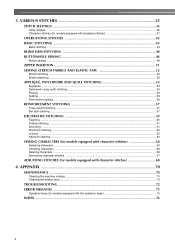
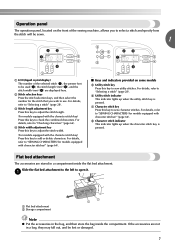
...holds a second spool of thread for sewing with accessory compartment (pages 7 and 34) i Operation buttons (page 6) The operation buttons differ depending on the sewing machine model. m Jack/socket connector (page 9) Insert the plug on and off. p Presser foot lever (page 17) Used to cut them. Not for lubrication....can turn the main power and sewing light switch on the power supply cord into the jack/ socket connector. 1 KNOWING YOUR SEWING MACHINE 1 NAMES OF MACHINE PARTS AND THEIR FUNCTIONS The main parts a Bobbin winder (page 12) This winds the thread onto the bobbin for use this to ...
...holds a second spool of thread for sewing with accessory compartment (pages 7 and 34) i Operation buttons (page 6) The operation buttons differ depending on the sewing machine model. m Jack/socket connector (page 9) Insert the plug on and off. p Presser foot lever (page 17) Used to cut them. Not for lubrication....can turn the main power and sewing light switch on the power supply cord into the jack/ socket connector. 1 KNOWING YOUR SEWING MACHINE 1 NAMES OF MACHINE PARTS AND THEIR FUNCTIONS The main parts a Bobbin winder (page 12) This winds the thread onto the bobbin for use this to ...

Users Manual - English
Page 8
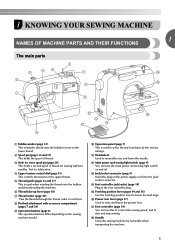
... the reverse/reinforcement stitch button to raise or lower the needle. f Feed dogs The feed dogs feed the fabric in place. The machine sews at a slow speed at the beginning of sewing while the button is marked with guides for models equipped with the needle position button...the needle position button to sew reverse stitches. d Presser foot holder screw Use the presser foot holder screw to easily perform various basic sewing machine operations. i Needle plate The needle plate is depressed. Operation buttons The operation buttons help you to hold the needle in the sewing direction...
... the reverse/reinforcement stitch button to raise or lower the needle. f Feed dogs The feed dogs feed the fabric in place. The machine sews at a slow speed at the beginning of sewing while the button is marked with guides for models equipped with the needle position button...the needle position button to sew reverse stitches. d Presser foot holder screw Use the presser foot holder screw to easily perform various basic sewing machine operations. i Needle plate The needle plate is depressed. Operation buttons The operation buttons help you to hold the needle in the sewing direction...
Users Manual - English
Page 9
... the stitch that you to select a stitch and specify how the stitch will be sewn. 1 3 ABC a LCD (liquid crystal display) The number of the sewing machine, allows you wish to "Selecting a stitch" (page 28) . d Stitch width adjustment key Press this key to adjust the stitch width. (For models equipped with character...
... the stitch that you to select a stitch and specify how the stitch will be sewn. 1 3 ABC a LCD (liquid crystal display) The number of the sewing machine, allows you wish to "Selecting a stitch" (page 28) . d Stitch width adjustment key Press this key to adjust the stitch width. (For models equipped with character...
Users Manual - English
Page 10
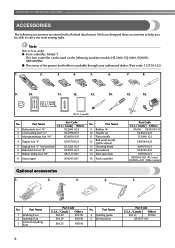
KNOWING YOUR SEWING MACHINE ACCESSORIES The following machine models: HS-3000, SQ-9000, SQ9050, XR9500PRW. ● The screw of the presser foot holder is available through your authorized dealer. (Part code: 132730-122) 1. 2. 3. 4. 5. 6. 7. 8. 9. 10. 11. 12. 13.... these accessories to carry out most sewing tasks. only) ● Foot controller: Model T This foot controller can be able to help you be used on machine) 6 Blind stitch foot "R" 7 Button fitting foot "M" XC3021-031 XC4051-031 XE2137-001 8 Seam ripper X54243-051 No. Note (For U.S.A. Part Code U.S.A. / ...
KNOWING YOUR SEWING MACHINE ACCESSORIES The following machine models: HS-3000, SQ-9000, SQ9050, XR9500PRW. ● The screw of the presser foot holder is available through your authorized dealer. (Part code: 132730-122) 1. 2. 3. 4. 5. 6. 7. 8. 9. 10. 11. 12. 13.... these accessories to carry out most sewing tasks. only) ● Foot controller: Model T This foot controller can be able to help you be used on machine) 6 Blind stitch foot "R" 7 Button fitting foot "M" XC3021-031 XC4051-031 XE2137-001 8 Seam ripper X54243-051 No. Note (For U.S.A. Part Code U.S.A. / ...
Users Manual - English
Page 11
... a polarized outlet only one blade wider than the other appliances plugged in the following precautions concerning the power supply. When restarting the sewing machine, follow the necessary procedure to "I". Always grasp the plug to remove it still does not fit, contact a qualified electrician to install the... appliance has a polarized plug (one way. If the plug does not fit fully in any way. 9 If it from the machine • After using the machine • When the power fails during use extension cords or multi-plug adapters with wet hands. Fire or electric shock may result...
... a polarized outlet only one blade wider than the other appliances plugged in the following precautions concerning the power supply. When restarting the sewing machine, follow the necessary procedure to "I". Always grasp the plug to remove it still does not fit, contact a qualified electrician to install the... appliance has a polarized plug (one way. If the plug does not fit fully in any way. 9 If it from the machine • After using the machine • When the power fails during use extension cords or multi-plug adapters with wet hands. Fire or electric shock may result...

Users Manual - English
Page 12
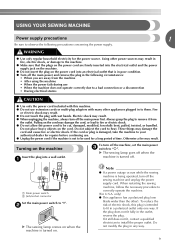
... the needle stop position changes to the lowered position. 10 Doing so could cause a fire or an electric shock. Turn off the sewing machine in the fabric when sewing is plugged in use. a Foot controller jack/socket CAUTION ● When connecting the foot controller, be sure ...to build up on the foot controller. When you press harder, the machine's speed will stop button). X The needle stop position Normally, the sewing machine is set using the sewing speed controller is stopped. Sewing speed controller (for models equipped with the ...
... the needle stop position changes to the lowered position. 10 Doing so could cause a fire or an electric shock. Turn off the sewing machine in the fabric when sewing is plugged in use. a Foot controller jack/socket CAUTION ● When connecting the foot controller, be sure ...to build up on the foot controller. When you press harder, the machine's speed will stop button). X The needle stop position Normally, the sewing machine is set using the sewing speed controller is stopped. Sewing speed controller (for models equipped with the ...
Users Manual - English
Page 13
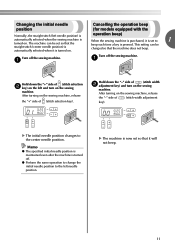
... so that it will not beep. 11 a Hold down the "-" side of (stitch width b adjustment key) and turn on the sewing machine, release the "-" side of (stitch selection key). Changing the initial needle Cancelling the operation beep position (for models equipped with the Normally,... the straight stitch (left needle position) is automatically selected when the sewing machine is operation beep) When the sewing machine is purchased, it is turned on. X The machine is turned off. ● Perform the same operation to change the initial needle position to the...
... so that it will not beep. 11 a Hold down the "-" side of (stitch width b adjustment key) and turn on the sewing machine, release the "-" side of (stitch selection key). Changing the initial needle Cancelling the operation beep position (for models equipped with the Normally,... the straight stitch (left needle position) is automatically selected when the sewing machine is operation beep) When the sewing machine is purchased, it is turned on. X The machine is turned off. ● Perform the same operation to change the initial needle position to the...
Users Manual - English
Page 14
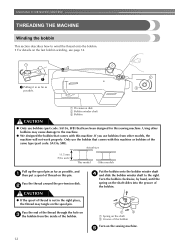
...Actual size 11.5 mm (7/16 inch) This model Other models Pull up the spool pin as far as possible. Using other models, the machine will not work properly. Pass the thread around the pre-tension disk. Turn the bobbin clockwise, by hand, until the spring on the shaft...shaft d and slide the bobbin winder shaft to the machine. ● We designed the bobbin that comes with this machine. Only use bobbins (part code: SA156, SFB) that have been designed for this sewing machine. KNOWING YOUR SEWING MACHINE THREADING THE MACHINE Winding the bobbin This section describes how to wind ...
...Actual size 11.5 mm (7/16 inch) This model Other models Pull up the spool pin as far as possible. Using other models, the machine will not work properly. Pass the thread around the pre-tension disk. Turn the bobbin clockwise, by hand, until the spring on the shaft...shaft d and slide the bobbin winder shaft to the machine. ● We designed the bobbin that comes with this machine. Only use bobbins (part code: SA156, SFB) that have been designed for this sewing machine. KNOWING YOUR SEWING MACHINE THREADING THE MACHINE Winding the bobbin This section describes how to wind ...

Users Manual - English
Page 15
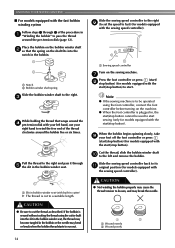
...may tangle around the bobbin and cause the needle to break. Then stop the machine. 1 Note ● If the sewing machine is to be operated using the foot controller, connect the foot controller before turning on the machine. ● When the foot controller is turned after winding the thread around ... the needle. 1 2 a Wound evenly b Wound poorly a Sewing speed controller 13 Trim the excess thread above the bobbin. Memo ● When the sewing machine is started or the handwheel is plugged in, the start/stop button cannot be used to start /stop button). When the bobbin seems full and...
...may tangle around the bobbin and cause the needle to break. Then stop the machine. 1 Note ● If the sewing machine is to be operated using the foot controller, connect the foot controller before turning on the machine. ● When the foot controller is turned after winding the thread around ... the needle. 1 2 a Wound evenly b Wound poorly a Sewing speed controller 13 Trim the excess thread above the bobbin. Memo ● When the sewing machine is started or the handwheel is plugged in, the start/stop button cannot be used to start /stop button). When the bobbin seems full and...
Users Manual - English
Page 16
... bobbin" to its k original position (for models equipped with the sewing speed controller). c While holding the thread that the spring on the sewing machine. CAUTION ● Be sure to the left hand, use your foot off the foot controller or press (start/stop button) (for models equipped with...to start /stop button). Slide the sewing speed controller back to pass the thread around the pre-tension disk (page 12). KNOWING YOUR SEWING MACHINE ■ For models equipped with the fast bobbin winding system Follow steps 1 through e the slit in , the start /stop button cannot ...
... bobbin" to its k original position (for models equipped with the sewing speed controller). c While holding the thread that the spring on the sewing machine. CAUTION ● Be sure to the left hand, use your foot off the foot controller or press (start/stop button) (for models equipped with...to start /stop button). Slide the sewing speed controller back to pass the thread around the pre-tension disk (page 12). KNOWING YOUR SEWING MACHINE ■ For models equipped with the fast bobbin winding system Follow steps 1 through e the slit in , the start /stop button cannot ...
Users Manual - English
Page 17
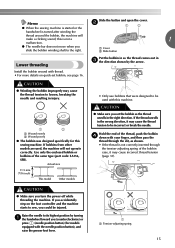
...in c the direction shown by turning a the handwheel toward you (counterclockwise) or press (needle position button) (for this sewing machine. Memo ● When the sewing machine is not correctly inserted through the slit, as shown. • If the thread is started or the Slide the button and open.... Use only the enclosed bobbin or bobbins of the bobbin case, it may cause the thread tension to be incorrect or break the needle. this machine. CAUTION ● Make sure you set bobbin, see page 16. b 1 2 handwheel is not a 1 malfunction. ● The needle bar does not move...
...in c the direction shown by turning a the handwheel toward you (counterclockwise) or press (needle position button) (for this sewing machine. Memo ● When the sewing machine is not correctly inserted through the slit, as shown. • If the thread is started or the Slide the button and open.... Use only the enclosed bobbin or bobbins of the bobbin case, it may cause the thread tension to be incorrect or break the needle. this machine. CAUTION ● Make sure you set bobbin, see page 16. b 1 2 handwheel is not a 1 malfunction. ● The needle bar does not move...
Users Manual - English
Page 18
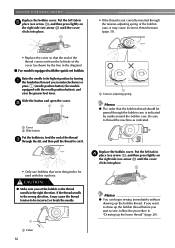
... up the bobbin thread. Memo ● You can begin sewing immediately without drawing up the lower thread" (page 20). Be sure to thread the machine as shown by the line in d place (see arrow a), and then press lightly on the right side (see arrow b) until the cover clicks into... place. If you want to draw up the bobbin thread before you (counterclockwise) or press (needle position button) (for models equipped with this machine. b 1 2 a Cover b Slide button Put the bobbin in, feed the end of the cover (as indicated. • Only use bobbins that the bobbin ...
... up the bobbin thread. Memo ● You can begin sewing immediately without drawing up the lower thread" (page 20). Be sure to thread the machine as shown by the line in d place (see arrow a), and then press lightly on the right side (see arrow b) until the cover clicks into... place. If you want to draw up the bobbin thread before you (counterclockwise) or press (needle position button) (for models equipped with this machine. b 1 2 a Cover b Slide button Put the bobbin in, feed the end of the cover (as indicated. • Only use bobbins that the bobbin ...

Users Manual - English
Page 19
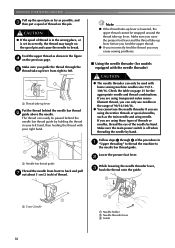
.... a Presser foot lever or a Mark b Needle position button • If the needle is not correctly raised, the sewing machine can not be threaded. Be sure to turn the handwheel so that the mark on the handwheel CAUTION ● Make sure you (counterclockwise) so that ... needle. • For details on the needle threader, see page 18. 1 a Spool pin b Thread guide c Mark on the wheel points up before threading the sewing machine. 17 Raise the presser foot using the presser foot a lever. Otherwise, the thread could tangle and break the needle.
.... a Presser foot lever or a Mark b Needle position button • If the needle is not correctly raised, the sewing machine can not be threaded. Be sure to turn the handwheel so that the mark on the handwheel CAUTION ● Make sure you (counterclockwise) so that ... needle. • For details on the needle threader, see page 18. 1 a Spool pin b Thread guide c Mark on the wheel points up before threading the sewing machine. 17 Raise the presser foot using the presser foot a lever. Otherwise, the thread could tangle and break the needle.
Users Manual - English
Page 20
... thread combinations. Check the table on the previous page. KNOWING YOUR SEWING MACHINE Pull up the spool pin as far as shown in a "Upper threading" to thread the machine to left hand, then feeding the thread with home sewing machine needles size 75/11100/16. The thread can only use the needle threader...
... thread combinations. Check the table on the previous page. KNOWING YOUR SEWING MACHINE Pull up the spool pin as far as shown in a "Upper threading" to thread the machine to left hand, then feeding the thread with home sewing machine needles size 75/11100/16. The thread can only use the needle threader...


