Operation Manual
Page 1
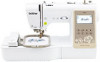
We recommend that you keep this document before using the machine. Operation Manual Embroidery and Sewing Machine Product Code: 888-M20 Be sure to read this document nearby for future reference.
We recommend that you keep this document before using the machine. Operation Manual Embroidery and Sewing Machine Product Code: 888-M20 Be sure to read this document nearby for future reference.

Operation Manual
Page 3
...parts. WARNING - In addition, after using, when cleaning, making any adjustments in fire or an electric shock. • Do not place this manual, store it where it can quickly be careful not to persons. 2 Always unplug the machine from the electrical outlet immediately after you have , ... adjustments mentioned in the country of the various functions. Do not pull on the rating label. Return the machine to the nearest authorized Brother dealer for examination, repair, electrical or mechanical adjustment. • While the machine is stored or in use the machine. Special care ...
...parts. WARNING - In addition, after using, when cleaning, making any adjustments in fire or an electric shock. • Do not place this manual, store it where it can quickly be careful not to persons. 2 Always unplug the machine from the electrical outlet immediately after you have , ... adjustments mentioned in the country of the various functions. Do not pull on the rating label. Return the machine to the nearest authorized Brother dealer for examination, repair, electrical or mechanical adjustment. • While the machine is stored or in use the machine. Special care ...

Operation Manual
Page 4
... For a longer service life: • When storing this manual. Children shall not play with the bag due to the danger of suffocation. • Do not use . If the problem persists, please consult your local authorized Brother dealer. Cleaning and user maintenance shall not be replaced by children... by a person responsible for their safety. The contents of this manual and specifications of this machine was supplied in the back of . For additional product information and updates, visit our website at www.brother.com SAVE THESE INSTRUCTIONS This machine is required, first follow the ...
... For a longer service life: • When storing this manual. Children shall not play with the bag due to the danger of suffocation. • Do not use . If the problem persists, please consult your local authorized Brother dealer. Cleaning and user maintenance shall not be replaced by children... by a person responsible for their safety. The contents of this manual and specifications of this machine was supplied in the back of . For additional product information and updates, visit our website at www.brother.com SAVE THESE INSTRUCTIONS This machine is required, first follow the ...

Operation Manual
Page 5
... Play are subject to BS 1362, i.e. Trademarks App Store is not suitable for the plug supplied with this equipment, you should contact your authorized Brother dealer to the manual download section on plug. • Always replace the fuse cover. To see the open -source software. Never use a fuse approved by ASTA to... product includes open source licensing remarks, please go to obtain the correct lead. carrying the mark, rating as marked on your model's home page of Brother Solutions Center at " http...
... Play are subject to BS 1362, i.e. Trademarks App Store is not suitable for the plug supplied with this equipment, you should contact your authorized Brother dealer to the manual download section on plug. • Always replace the fuse cover. To see the open -source software. Never use a fuse approved by ASTA to... product includes open source licensing remarks, please go to obtain the correct lead. carrying the mark, rating as marked on your model's home page of Brother Solutions Center at " http...
Operation Manual
Page 9
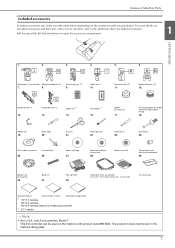
... product code 888-M20. Spool cap (large) 27. Buttonhole foot "A" 13. Needle set (medium) 10 cm (H) × 10 cm (W) (4 inches (H) × 4 inches (W)) Accessory bag Operation Manual Quick Reference Guide Embroidery Design Guide *1 75/11 2 needles, 90/14 2 needles, 90/14 2 needles: Ball point needle (gold colored) *2 2/11 needle Note • (For...
... product code 888-M20. Spool cap (large) 27. Buttonhole foot "A" 13. Needle set (medium) 10 cm (H) × 10 cm (W) (4 inches (H) × 4 inches (W)) Accessory bag Operation Manual Quick Reference Guide Embroidery Design Guide *1 75/11 2 needles, 90/14 2 needles, 90/14 2 needles: Ball point needle (gold colored) *2 2/11 needle Note • (For...
Operation Manual
Page 13
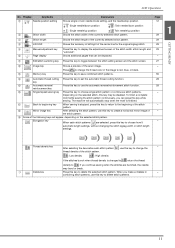
... the stitch width of the currently selected stitch pattern. 7 Stitch length 8 L/R Shift Shows the stitch length of the center line for the original zigzag stitch. 9 Manual adjustment key Press this key while sewing. Press this key may bend or break. B Image key C Memory key Shows a preview of the stitch pattern. GETTING...
... the stitch width of the currently selected stitch pattern. 7 Stitch length 8 L/R Shift Shows the stitch length of the center line for the original zigzag stitch. 9 Manual adjustment key Press this key while sewing. Press this key may bend or break. B Image key C Memory key Shows a preview of the stitch pattern. GETTING...

Operation Manual
Page 37
..., etc. Straight stitch (Middle) 1-04* General sewing, gather, pintuck, etc. (J) Stitch width (mm (inch)) Auto. Manual Stitch length (mm (inch)) Auto. Finally, hold the upper thread and bobbin thread at the beginning of the machine (page 20...64 - 3/16) VARIOUS STITCHES 3 35 Do not sew reverse stitches with straight or zigzag stitch patterns. Stitch name/Applications foot) Stitch width (mm (inch)) Auto. Manual Triple stretch stitch 1-05* General sewing for reinforcement and (J) decorative topstitching 0.0 (0) 2.5 (3/32) 0.0 - 7.0 0.4 - 5.0 (0 - 1/4) (1/64 - 3/16...
..., etc. Straight stitch (Middle) 1-04* General sewing, gather, pintuck, etc. (J) Stitch width (mm (inch)) Auto. Manual Stitch length (mm (inch)) Auto. Finally, hold the upper thread and bobbin thread at the beginning of the machine (page 20...64 - 3/16) VARIOUS STITCHES 3 35 Do not sew reverse stitches with straight or zigzag stitch patterns. Stitch name/Applications foot) Stitch width (mm (inch)) Auto. Manual Triple stretch stitch 1-05* General sewing for reinforcement and (J) decorative topstitching 0.0 (0) 2.5 (3/32) 0.0 - 7.0 0.4 - 5.0 (0 - 1/4) (1/64 - 3/16...

Operation Manual
Page 38
...5.0 (0 - 1/4) (1/64 - 3/16) 36 Stitch name/Applications foot) Stitch width (mm (inch)) Auto. Use a needle between 90/ 14 and 100/16. Manual (J) 1-29 Quilting appliqué stitch Quilting stitch for the bobbin thread. (J) Sew with a tight thread 0.0 (0) 2.5 (3/32) 0.0 - 7.0 0.4 - 5.0 ...(0 - 1/4) (1/64 - 3/16) tension so that the bobbin thread is visible from the right side of the fabric. Manual Stitch length (mm (inch)) Auto. Manual Stitch length (mm (inch)) Auto. Quilting appliqué zigzag stitch 3.5 (1/8) 1.4 (1/16) 1-28 Zigzag stitch for quilting 0.0 ...
...5.0 (0 - 1/4) (1/64 - 3/16) 36 Stitch name/Applications foot) Stitch width (mm (inch)) Auto. Use a needle between 90/ 14 and 100/16. Manual (J) 1-29 Quilting appliqué stitch Quilting stitch for the bobbin thread. (J) Sew with a tight thread 0.0 (0) 2.5 (3/32) 0.0 - 7.0 0.4 - 5.0 ...(0 - 1/4) (1/64 - 3/16) tension so that the bobbin thread is visible from the right side of the fabric. Manual Stitch length (mm (inch)) Auto. Manual Stitch length (mm (inch)) Auto. Quilting appliqué zigzag stitch 3.5 (1/8) 1.4 (1/16) 1-28 Zigzag stitch for quilting 0.0 ...

Operation Manual
Page 39
... (mm (inch)) Auto. Stitch name/Applications foot) Stitch width (mm (inch)) Auto. Manual Stitch length (mm (inch)) Auto. Stitch Chart Stitch (Presser No. Manual Serpentine stitch 2-17* Decorative stitching and (N) attaching elastic Hemstitching zigzag 3-01* Decorative hems, top (N) stitching 5.0 (3/16) 1.0 (1/...For making eyelets, holes on belts, etc. 7.0 6.0 5.0 7.0 6.0 5.0 (1/4 15/64 (1/4 15/64 (N) 3/16) 3/16) VARIOUS STITCHES 3 37 Manual Bound buttonhole stitch 5.0 (3/16) 2.0 (1/16) 4-07 The first step in making 0.0 - 6.0 0.2 - 4.0 (A) bound buttonholes (0 - 15/64) ...
... (mm (inch)) Auto. Stitch name/Applications foot) Stitch width (mm (inch)) Auto. Manual Stitch length (mm (inch)) Auto. Stitch Chart Stitch (Presser No. Manual Serpentine stitch 2-17* Decorative stitching and (N) attaching elastic Hemstitching zigzag 3-01* Decorative hems, top (N) stitching 5.0 (3/16) 1.0 (1/...For making eyelets, holes on belts, etc. 7.0 6.0 5.0 7.0 6.0 5.0 (1/4 15/64 (1/4 15/64 (N) 3/16) 3/16) VARIOUS STITCHES 3 37 Manual Bound buttonhole stitch 5.0 (3/16) 2.0 (1/16) 4-07 The first step in making 0.0 - 6.0 0.2 - 4.0 (A) bound buttonholes (0 - 15/64) ...
Operation Manual
Page 48
... set the stitch width 1.5 mm (1/16 inch) and sew using the walking foot* and the quilting guide*. * Items sold separately, please contact your authorized Brother dealer. The fabric pieces should be sewn using stitch . 1 6.5 mm (1/4 inch) 1 Lower the presser foot lever, and then tighten the d presser ...of the fabric. … For a seam allowance on page 35. a Remove the presser foot and the presser foot holder. Note • Thread the needle manually when using the walking foot, or attach the walking foot only after threading the needle using stitch . 1 6.5 mm (1/4 inch) 1 Memo • To...
... set the stitch width 1.5 mm (1/16 inch) and sew using the walking foot* and the quilting guide*. * Items sold separately, please contact your authorized Brother dealer. The fabric pieces should be sewn using stitch . 1 6.5 mm (1/4 inch) 1 Lower the presser foot lever, and then tighten the d presser ...of the fabric. … For a seam allowance on page 35. a Remove the presser foot and the presser foot holder. Note • Thread the needle manually when using the walking foot, or attach the walking foot only after threading the needle using stitch . 1 6.5 mm (1/4 inch) 1 Memo • To...

Operation Manual
Page 54
... can be damaged. Pass the thread through j of "Threading the upper thread" on page 35. Both upper threads should have the same thickness and quality. Manually thread the left needle with the twin needle. b Select a stitch, and then increase the thread tension. CAUTION • Only use the twin needle (2/11 needle...
... can be damaged. Pass the thread through j of "Threading the upper thread" on page 35. Both upper threads should have the same thickness and quality. Manually thread the left needle with the twin needle. b Select a stitch, and then increase the thread tension. CAUTION • Only use the twin needle (2/11 needle...

Operation Manual
Page 55
..., refer to "Replacing the presser foot" on page 23. In this case, use a twin needle. e Without passing the thread behind the needle bar thread guide, manually thread the right needle with the wing needle, the needle holes are enlarged, creating a lace-like decorative stitch. Press g to [ON...]. Manually pass the thread through the eye of the needle from the front to "Stitch Chart" on page 35 for stitches that the needle does not ...
..., refer to "Replacing the presser foot" on page 23. In this case, use a twin needle. e Without passing the thread behind the needle bar thread guide, manually thread the right needle with the wing needle, the needle holes are enlarged, creating a lace-like decorative stitch. Press g to [ON...]. Manually pass the thread through the eye of the needle from the front to "Stitch Chart" on page 35 for stitches that the needle does not ...
Operation Manual
Page 72
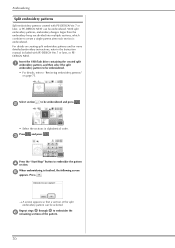
... of the split embroidery pattern can be selected. Press . → A screen appears so that a section of the pattern. 70 Repeat steps b through e to the Instruction manual included with PE-DESIGN Ver.7 or later, or PE-DESIGN NEXT can be embroidered. When embroidering is embroidered.
... of the split embroidery pattern can be selected. Press . → A screen appears so that a section of the pattern. 70 Repeat steps b through e to the Instruction manual included with PE-DESIGN Ver.7 or later, or PE-DESIGN NEXT can be embroidered. When embroidering is embroidered.
Operation Manual
Page 85
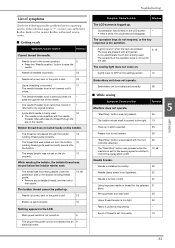
...position. 6 • Press the "Needle position" button to its original position. Embroidery unit is "*", contact your authorized Brother dealer or the nearest Brother authorized service center. ■ Getting ready Symptom, Cause/solution Reference Cannot thread the needle. Needle is installed incorrectly. 22... dull. 22 Upper threading is incorrect. 17 The needle threader lever is too sensitive. A glove is being used . Manually pass the thread through the bobbin 13 winding thread guide correctly. The "Start/Stop" button was incorrectly passed under the pretension...
...position. 6 • Press the "Needle position" button to its original position. Embroidery unit is "*", contact your authorized Brother dealer or the nearest Brother authorized service center. ■ Getting ready Symptom, Cause/solution Reference Cannot thread the needle. Needle is installed incorrectly. 22... dull. 22 Upper threading is incorrect. 17 The needle threader lever is too sensitive. A glove is being used . Manually pass the thread through the bobbin 13 winding thread guide correctly. The "Start/Stop" button was incorrectly passed under the pretension...

Quick Reference Guide
Page 4
...aprox. 7/16 polegada 7/16 дюйма) 1 ce ia 2 3 12 90 d f-h 4 5 6 7 3 8 Consulte las instrucciones detalladas en el Manual de instrucciones. Utilizzare solo la bobina o le bobine in numerical order. Verwenden Sie nur die im Lieferumfang enthaltene Spule oder Spulen vom selben Typ. Winding...della spolina Devanar/colocar la bobina Encher/Instalar a bobina Follow the steps below in dotazione dello stesso tipo. Consulte o Manual de Operações para obter instruções detalhadas Use only the included bobbin or bobbins of spoelen...
...aprox. 7/16 polegada 7/16 дюйма) 1 ce ia 2 3 12 90 d f-h 4 5 6 7 3 8 Consulte las instrucciones detalladas en el Manual de instrucciones. Utilizzare solo la bobina o le bobine in numerical order. Verwenden Sie nur die im Lieferumfang enthaltene Spule oder Spulen vom selben Typ. Winding...della spolina Devanar/colocar la bobina Encher/Instalar a bobina Follow the steps below in dotazione dello stesso tipo. Consulte o Manual de Operações para obter instruções detalhadas Use only the included bobbin or bobbins of spoelen...


