Operation Manual
Page 1
Operation Manual Embroidery and Sewing Machine Product Code: 888-M20 Be sure to read this document nearby for future reference. We recommend that you keep this document before using the machine.
Operation Manual Embroidery and Sewing Machine Product Code: 888-M20 Be sure to read this document nearby for future reference. We recommend that you keep this document before using the machine.

Operation Manual
Page 6
... and the needle position 73 Embroidering linked characters 73 Using the Memory Function 74 Saving embroidery patterns 75 Retrieving embroidery patterns 75 Chapter 5 APPENDIX 77 Care and Maintenance 77 Restrictions on oiling 77 Precautions on storing the machine 77 Cleaning the race 77 Touch panel is malfunctioning 78 Troubleshooting 78 Upper thread tightened...
... and the needle position 73 Embroidering linked characters 73 Using the Memory Function 74 Saving embroidery patterns 75 Retrieving embroidery patterns 75 Chapter 5 APPENDIX 77 Care and Maintenance 77 Restrictions on oiling 77 Precautions on storing the machine 77 Cleaning the race 77 Touch panel is malfunctioning 78 Troubleshooting 78 Upper thread tightened...
Operation Manual
Page 7
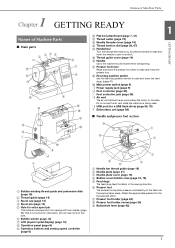
...M Air vent The air vent allows the air surrounding the motor to sew one stitch. N USB port (for a USB flash drive) (page 55, 75) O Embroidery unit (page 58) ■ Needle and presser foot section i a h b GETTING READY 1 s t u y 1 Bobbin winding thread guide and pretension disk (... extra spool pin This holds an extra spool pin for sewing with twin needle. (page 52) This is being used. Names of Machine Parts 1 Chapter GETTING READY Names of Machine Parts ■ Main parts b cde a f g m l h k j n x w v i o p q r 0 Flat bed attachment (page 7, 31) A Thread cutter (page ...
...M Air vent The air vent allows the air surrounding the motor to sew one stitch. N USB port (for a USB flash drive) (page 55, 75) O Embroidery unit (page 58) ■ Needle and presser foot section i a h b GETTING READY 1 s t u y 1 Bobbin winding thread guide and pretension disk (... extra spool pin This holds an extra spool pin for sewing with twin needle. (page 52) This is being used. Names of Machine Parts 1 Chapter GETTING READY Names of Machine Parts ■ Main parts b cde a f g m l h k j n x w v i o p q r 0 Flat bed attachment (page 7, 31) A Thread cutter (page ...

Operation Manual
Page 8
... Operate the keys by directly touching them with a thin point or a unique shape. 6 This key locks all key and button functions to prevent operation of Machine Parts ■ Operation buttons ■ Operation panel and operation keys b a a cd e 1 "Start/Stop" button Press the "Start/Stop" button to ... the sewing speed. Do not use a touch pen with your finger. Red: The machine cannot sew. Orange: The machine is winding the bobbin thread, or the bobbin winder shaft is 8 mm or more . 6 Embroidery key Press this key to embroider. 7 Utility stitch key Press this key to sew ...
... Operate the keys by directly touching them with a thin point or a unique shape. 6 This key locks all key and button functions to prevent operation of Machine Parts ■ Operation buttons ■ Operation panel and operation keys b a a cd e 1 "Start/Stop" button Press the "Start/Stop" button to ... the sewing speed. Do not use a touch pen with your finger. Red: The machine cannot sew. Orange: The machine is winding the bobbin thread, or the bobbin winder shaft is 8 mm or more . 6 Embroidery key Press this key to embroider. 7 Utility stitch key Press this key to sew ...
Operation Manual
Page 9
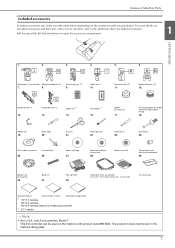
... colored) *2 2/11 needle Note • (For U.S.A. Seam ripper 20. Bobbin case (on machine) Monogramming foot "N" 7. 8. The product code is mentioned on machine) 28. Pre-wound bobbin (60 weight white embroidery bobbin thread) 18. Cleaning brush 22. Screwdriver 24. Spool cap (medium) (on the... machine rating plate. 7 Foot controller 32. Embroidery foot "Q" 14. Extra spool pin 26. only) Foot controller: Model T This foot controller can be used on the machine model you purchased. Twin needle *2 16. Blind stitch foot...
... colored) *2 2/11 needle Note • (For U.S.A. Seam ripper 20. Bobbin case (on machine) Monogramming foot "N" 7. 8. The product code is mentioned on machine) 28. Pre-wound bobbin (60 weight white embroidery bobbin thread) 18. Cleaning brush 22. Screwdriver 24. Spool cap (medium) (on the... machine rating plate. 7 Foot controller 32. Embroidery foot "Q" 14. Extra spool pin 26. only) Foot controller: Model T This foot controller can be used on the machine model you purchased. Twin needle *2 16. Blind stitch foot...
Operation Manual
Page 10
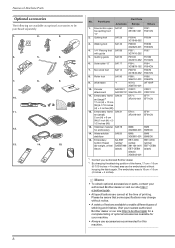
...Brother dealer. *2 By changing the attaching position of the frame, 17 cm × 10 cm (6-7/10 inches × 4 inches) area can be purchased separately. 1. 2. 3. O 4. 5. 6. 7. 8. 9. 10. 11. 12. 13. 14. 15. Quilting foot SA129 F005N: F005N XC1948-052 3. Stabilizer material SA519 for this machine. 8 Embroidery...) EBT-CEBN (black) (black): XG6643-001 *1 Contact your machine. • Always use accessories recommended for embroidery BM3: BM3 XG6683-001 BM3CN 14. Part Name Americas Europe Others 1. Embroidery frame SA434 set (small) 2 cm (H) × 6 cm...
...Brother dealer. *2 By changing the attaching position of the frame, 17 cm × 10 cm (6-7/10 inches × 4 inches) area can be purchased separately. 1. 2. 3. O 4. 5. 6. 7. 8. 9. 10. 11. 12. 13. 14. 15. Quilting foot SA129 F005N: F005N XC1948-052 3. Stabilizer material SA519 for this machine. 8 Embroidery...) EBT-CEBN (black) (black): XG6643-001 *1 Contact your machine. • Always use accessories recommended for embroidery BM3: BM3 XG6683-001 BM3CN 14. Part Name Americas Europe Others 1. Embroidery frame SA434 set (small) 2 cm (H) × 6 cm...

Operation Manual
Page 14
... on or off. F Select whether to [ON], the embroidery pattern can save the current settings screen image in for regular servicing. (Contact your authorized Brother dealer for your machine. 12 Press or , after you have selected in a ...folder labeled "bPocket". ■ Sewing settings 1 2 3 5 Select the embroidery frame to specify the size of stitches sewn on . ■ Embroidery settings 5 6 7 8 9 0 A B C J K L M D Select the needle stop position, opening screen when the machine is the internal machine...
... on or off. F Select whether to [ON], the embroidery pattern can save the current settings screen image in for regular servicing. (Contact your authorized Brother dealer for your machine. 12 Press or , after you have selected in a ...folder labeled "bPocket". ■ Sewing settings 1 2 3 5 Select the embroidery frame to specify the size of stitches sewn on . ■ Embroidery settings 5 6 7 8 9 0 A B C J K L M D Select the needle stop position, opening screen when the machine is the internal machine...

Operation Manual
Page 15
... Bobbin CAUTION • Only use the recommended 60 weight embroidery bobbin thread for this machine or bobbins of the same type (SA156/SFB: XA5539-151/SFB). Place the bobbin on the machine to previous screen. ■ If the machine does not respond when an operation key is being used ...for the upper threading. • When winding bobbin for embroidery, be . Adjust the [Input Sensitivity] by pressing / . Slide...
... Bobbin CAUTION • Only use the recommended 60 weight embroidery bobbin thread for this machine or bobbins of the same type (SA156/SFB: XA5539-151/SFB). Place the bobbin on the machine to previous screen. ■ If the machine does not respond when an operation key is being used ...for the upper threading. • When winding bobbin for embroidery, be . Adjust the [Input Sensitivity] by pressing / . Slide...

Operation Manual
Page 23
...16-3/32) Regular stitches 2.0-3.0 (1/16-1/8) Coarse stitches 2.5-4.0 (3/32-3/16) Setting appropriate for the fabric thickness Setting appropriate for embroidery. It may cause machine to "Sewing stretch fabrics" on page 32. Refer to the following table when choosing the thread and needle appropriate for the ...be used depends on page 22. • In principle, use thread of the fabric or thread. ■ Embroidery needles Use a 75/11 home sewing machine needle for the fabric thickness CAUTION • The appropriate fabric, thread and needle combinations are consumables. For details ...
...16-3/32) Regular stitches 2.0-3.0 (1/16-1/8) Coarse stitches 2.5-4.0 (3/32-3/16) Setting appropriate for the fabric thickness Setting appropriate for embroidery. It may cause machine to "Sewing stretch fabrics" on page 32. Refer to the following table when choosing the thread and needle appropriate for the ...be used depends on page 22. • In principle, use thread of the fabric or thread. ■ Embroidery needles Use a 75/11 home sewing machine needle for the fabric thickness CAUTION • The appropriate fabric, thread and needle combinations are consumables. For details ...

Operation Manual
Page 59
... adjust the size and 64 layout position of the foot. 4 Chapter EMBROIDERY Embroidering Preparation Embroidering Preparation Follow the steps below to prepare the machine for 22 needle embroidery. 3 Embroidery unit Attach the embroidery unit. 58 attachment 4 Bobbin thread For the bobbin thread, wind 13 setup embroidery bobbin thread and set it in place. 5 Fabric preparation Attach...
... adjust the size and 64 layout position of the foot. 4 Chapter EMBROIDERY Embroidering Preparation Embroidering Preparation Follow the steps below to prepare the machine for 22 needle embroidery. 3 Embroidery unit Attach the embroidery unit. 58 attachment 4 Bobbin thread For the bobbin thread, wind 13 setup embroidery bobbin thread and set it in place. 5 Fabric preparation Attach...

Operation Manual
Page 60
..., and then lightly push in place with the embroidery unit in the embroidery unit connector slot. Attaching the Embroidery Unit CAUTION • Before attaching the embroidery unit, be damaged, and it may cause malfunctions. 58 Turn off the machine. a Pull the flat bed attachment off to... into the connection port. • Do not push on the carriage when attaching the embroidery unit to the machine, otherwise damage to the embroidery unit may be embroidered correctly. The embroidery unit may result. • Do not touch the connector in place. Otherwise, injuries ...
..., and then lightly push in place with the embroidery unit in the embroidery unit connector slot. Attaching the Embroidery Unit CAUTION • Before attaching the embroidery unit, be damaged, and it may cause malfunctions. 58 Turn off the machine. a Pull the flat bed attachment off to... into the connection port. • Do not push on the carriage when attaching the embroidery unit to the machine, otherwise damage to the embroidery unit may be embroidered correctly. The embroidery unit may result. • Do not touch the connector in place. Otherwise, injuries ...

Operation Manual
Page 61
... important factors mentioned earlier. Embroidering Preparation Hold the release button on page 62. Turn off the machine before removing the embroidery unit. b There are many factors that go into a position where it can be selected when the embroidery unit is set [ON] within the settings screen, touch screen for use with 60 weight...
... important factors mentioned earlier. Embroidering Preparation Hold the release button on page 62. Turn off the machine before removing the embroidery unit. b There are many factors that go into a position where it can be selected when the embroidery unit is set [ON] within the settings screen, touch screen for use with 60 weight...

Operation Manual
Page 62
... a frame that cannot be ironed (such as terry cloth or corduroy, use a stabilizer material for embroidery when embroidering stretch fabrics, lightweight fabrics, fabrics with your machine. If stabilizer material cannot be ironed onto the fabric, attach it with a thickness of less than ...coarse weave, or fabrics which is larger than 2 mm (1/16 inch) may damage your authorized Brother dealer for best results. Embroidering Preparation Hooping the fabric in the embroidery frame CAUTION • Use fabrics with a basting stitch. The water soluble stabilizer material will help ...
... a frame that cannot be ironed (such as terry cloth or corduroy, use a stabilizer material for embroidery when embroidering stretch fabrics, lightweight fabrics, fabrics with your machine. If stabilizer material cannot be ironed onto the fabric, attach it with a thickness of less than ...coarse weave, or fabrics which is larger than 2 mm (1/16 inch) may damage your authorized Brother dealer for best results. Embroidering Preparation Hooping the fabric in the embroidery frame CAUTION • Use fabrics with a basting stitch. The water soluble stabilizer material will help ...
Operation Manual
Page 65
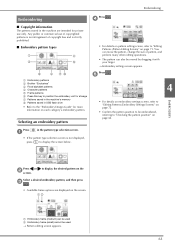
...size of copyright law and is strictly prohibited. ■ Embroidery pattern types a b c e f d gh 1 Embroidery patterns 2 Brother "Exclusives" 3 Floral alphabet patterns 4 Character patterns 5 ...Frame patterns 6 Press this key to "Checking the pattern position" on page 64. Embroidering Embroidering ■ Copyright information The patterns stored in the machine are displayed on the screen. ab 1 Embroidery frame (medium) can also be embroidered, referring to position the embroidery...
...size of copyright law and is strictly prohibited. ■ Embroidery pattern types a b c e f d gh 1 Embroidery patterns 2 Brother "Exclusives" 3 Floral alphabet patterns 4 Character patterns 5 ...Frame patterns 6 Press this key to "Checking the pattern position" on page 64. Embroidering Embroidering ■ Copyright information The patterns stored in the machine are displayed on the screen. ab 1 Embroidery frame (medium) can also be embroidered, referring to position the embroidery...

Operation Manual
Page 68
...is displayed. Memo • Colors on the display. Use or of the thread colors is displayed. • When [#123] is selected, the embroidery thread number is under the presser foot, raise the presser foot, then trim the excess thread. ■ Changing the thread color display You can ...Cut the excess thread jumps within the color. i 66 Trim the thread at the beginning of the stitching, it may vary slightly from the g machine. c → When the last color is embroidered, the message informing that the embroidering is left at the beginning. Press , and the display will...
...is displayed. Memo • Colors on the display. Use or of the thread colors is displayed. • When [#123] is selected, the embroidery thread number is under the presser foot, raise the presser foot, then trim the excess thread. ■ Changing the thread color display You can ...Cut the excess thread jumps within the color. i 66 Trim the thread at the beginning of the stitching, it may vary slightly from the g machine. c → When the last color is embroidered, the message informing that the embroidering is left at the beginning. Press , and the display will...
Operation Manual
Page 69
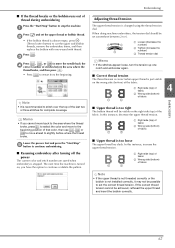
...press (Thread cutter button) to the beginning position of fabric ■ Upper thread is stopped. The next time the machine is changed using the thread tension dial. When doing machine embroidery, the tension dial should be achieved, rethread the upper thread and insert the bobbin correctly. 67 a Press b and ...is just visible on the wrong side (bottom) of the fabric. 1 Right side (top) of fabric 2 Wrong side (bottom) of fabric 4 EMBROIDERY ■ Upper thread is not installed correctly, it may not be visible on , you cannot move back to the area where the thread broke, ...
...press (Thread cutter button) to the beginning position of fabric ■ Upper thread is stopped. The next time the machine is changed using the thread tension dial. When doing machine embroidery, the tension dial should be achieved, rethread the upper thread and insert the bobbin correctly. 67 a Press b and ...is just visible on the wrong side (bottom) of the fabric. 1 Right side (top) of fabric 2 Wrong side (bottom) of fabric 4 EMBROIDERY ■ Upper thread is not installed correctly, it may not be visible on , you cannot move back to the area where the thread broke, ...

Operation Manual
Page 70
...temporary spray adhesive a to embroider the appliqué. a b 1 Outline of appliqué 2 Base material a b Remove the embroidery frame from the embroidery frame until all sewing is cut out along the sewn cutting line. ■ 2. Embroidering Embroidering the appliqué patterns When ...finished. ■ 3. Note • Do not remove the base fabric from the embroidery b unit. Thread the machine with basting stitches. • If thin fabric is attached, attach the b embroidery frame to the appliqué location. An iron can be correctly attached to the base...
...temporary spray adhesive a to embroider the appliqué. a b 1 Outline of appliqué 2 Base material a b Remove the embroidery frame from the embroidery frame until all sewing is cut out along the sewn cutting line. ■ 2. Embroidering Embroidering the appliqué patterns When ...finished. ■ 3. Note • Do not remove the base fabric from the embroidery b unit. Thread the machine with basting stitches. • If thin fabric is attached, attach the b embroidery frame to the appliqué location. An iron can be correctly attached to the base...

Operation Manual
Page 73
...of the entire combined pattern. To finish all the editing, press to continue to choose a new color. Key Name Explanation 1 Shows the embroidery frames that function with the selected pattern. Pattern size 3 Press this key to delete the selected Delete key pattern (the pattern outlined by ... (page 72) Font edit key 9 Press this key to call up the embroidery settings screen. (page 72) Edit End key 0 Press this key to the previous screen. Thread palette key Press or to the machine's memory or USB flash drive. Horizontal mirror image key C Press this key to...
...of the entire combined pattern. To finish all the editing, press to continue to choose a new color. Key Name Explanation 1 Shows the embroidery frames that function with the selected pattern. Pattern size 3 Press this key to delete the selected Delete key pattern (the pattern outlined by ... (page 72) Font edit key 9 Press this key to call up the embroidery settings screen. (page 72) Edit End key 0 Press this key to the previous screen. Thread palette key Press or to the machine's memory or USB flash drive. Horizontal mirror image key C Press this key to...

Operation Manual
Page 74
... Explanation 1 Press this key when you embroider. Since the machine stops at the end of each character separately. Press this...the center of a character pattern. Press to return the pattern to change the Array key configuration of the embroidery area.) (page 73) 72 If the line feed key was selected, it . Key Name Explanation 1... line, press . 3 Press this key to its original appearance. 8 When a combined pattern is pressed in character embroidery. Depending on the pattern Display No. After editing the pattern, press to continue to and . When selecting , and...
... Explanation 1 Press this key when you embroider. Since the machine stops at the end of each character separately. Press this...the center of a character pattern. Press to return the pattern to change the Array key configuration of the embroidery area.) (page 73) 72 If the line feed key was selected, it . Key Name Explanation 1... line, press . 3 Press this key to its original appearance. 8 When a combined pattern is pressed in character embroidery. Depending on the pattern Display No. After editing the pattern, press to continue to and . When selecting , and...

Operation Manual
Page 75
... to align the needle and the mark on the fabric, as a shown. b Press , and then press . Embroidery key 4 Press this key to save patterns to the Memory key machine's memory or USB flash drive. (page 75) 5 Press this key to check the position of the embroidering a ...73 Editing Patterns (Embroidery Settings Screen) Display No. After the characters are embroidered, and the threads f are cut, remove the embroidery frame, and then press for...
... to align the needle and the mark on the fabric, as a shown. b Press , and then press . Embroidery key 4 Press this key to save patterns to the Memory key machine's memory or USB flash drive. (page 75) 5 Press this key to check the position of the embroidering a ...73 Editing Patterns (Embroidery Settings Screen) Display No. After the characters are embroidered, and the threads f are cut, remove the embroidery frame, and then press for...


