
Users Manual - English
Page 4
... careful instruction when freehand stitching so that this manual. If the problem persists, please consult your local authorized Brother dealer. The contents of this manual and specifications of . Special care is required around the machine needle. • Switch the sewing machine to the symbol "O" position to turn it off when making any adjustments in the...
... careful instruction when freehand stitching so that this manual. If the problem persists, please consult your local authorized Brother dealer. The contents of this manual and specifications of . Special care is required around the machine needle. • Switch the sewing machine to the symbol "O" position to turn it off when making any adjustments in the...
Users Manual - English
Page 6
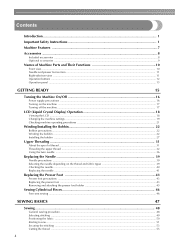
...GETTING READY 15 Turning the Machine On/Off 16 Power supply precautions ...16 Turning on the machine ...17 Turning off the machine ...17 LCD (Liquid Crystal Display) Operation 18 Viewing the LCD ...18 Changing the machine settings ...19 Checking machine operating procedures ...21 Winding...Checking the needle ...40 Replacing the needle ...41 Replacing the Presser Foot 43 Presser foot precautions ...43 Replacing the presser foot ...43 Removing and attaching the presser foot holder 45 Sewing Cylindrical Pieces 46 Free-arm sewing ...46 SEWING BASICS 47 Sewing...48 General sewing procedure ...
...GETTING READY 15 Turning the Machine On/Off 16 Power supply precautions ...16 Turning on the machine ...17 Turning off the machine ...17 LCD (Liquid Crystal Display) Operation 18 Viewing the LCD ...18 Changing the machine settings ...19 Checking machine operating procedures ...21 Winding...Checking the needle ...40 Replacing the needle ...41 Replacing the Presser Foot 43 Presser foot precautions ...43 Replacing the presser foot ...43 Removing and attaching the presser foot holder 45 Sewing Cylindrical Pieces 46 Free-arm sewing ...46 SEWING BASICS 47 Sewing...48 General sewing procedure ...
Users Manual - English
Page 9
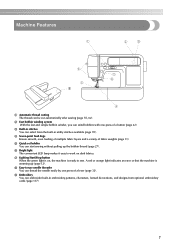
... variety of a button (page 22). h Easy-to sew. g Lighting Start/Stop button When the green light is on dark fabrics. A red or orange light indicates an error or that the machine is ready to -use needle threader You can wind bobbins with one press of a lever...work on , the machine is warming up the bobbin thread (page 27). i Embroidery You can select from the built-in embroidery patterns, characters, framed decorations, and designs from optional embroidery cards (page 117). 7 e Quick-set bobbin You can be cut automatically after sewing (page 55, 62). Machine Features 9 a ...
... variety of a button (page 22). h Easy-to sew. g Lighting Start/Stop button When the green light is on dark fabrics. A red or orange light indicates an error or that the machine is ready to -use needle threader You can wind bobbins with one press of a lever...work on , the machine is warming up the bobbin thread (page 27). i Embroidery You can select from the built-in embroidery patterns, characters, framed decorations, and designs from optional embroidery cards (page 117). 7 e Quick-set bobbin You can be cut automatically after sewing (page 55, 62). Machine Features 9 a ...
Users Manual - English
Page 10
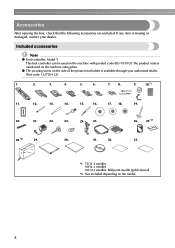
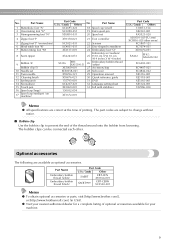
Included accessories Note z Foot controller: Model T This foot controller can be used on the machine with product code 885-V31/V33.The product code is mentioned on the model. 8 z The securing screw on the side of the presser foot holder .... 18. 19. 20. 21. 22. 23. 24. 25. 26. 27.*2 28.*2 29. 30. 31. 32. 33. *1 75/11 2 needles 90/14 2 needles 90/14 2 needles: Ball point needle (gold colored) *2 Not included depending on the machine rating plate. If any item is available through your dealer. Accessories After opening the box, check that the following...
Included accessories Note z Foot controller: Model T This foot controller can be used on the machine with product code 885-V31/V33.The product code is mentioned on the model. 8 z The securing screw on the side of the presser foot holder .... 18. 19. 20. 21. 22. 23. 24. 25. 26. 27.*2 28.*2 29. 30. 31. 32. 33. *1 75/11 2 needles 90/14 2 needles 90/14 2 needles: Ball point needle (gold colored) *2 Not included depending on the machine rating plate. If any item is available through your dealer. Accessories After opening the box, check that the following...
Users Manual - English
Page 11
... thread (white) Embroidery bobbin thread (black) Part Code U.S.A. / Canada Other SAEBT EBT-CEN X81164-001 SAEBT999 EBT-CEBN XC5520-001 Memo z To obtain optional accessories or parts, visit [http://www.brother.com/], or [http://www.brothermall.com] (in USA). The part codes are ...Spool net 4 Zipper foot "I" X59370-021 21 Foot controller 5 Zigzag foot "J" (on machine) 6 Blind stitch foot "R" 7 Button fitting foot "M" 8 Seam ripper 9 Bobbin (4) Bobbin clip (3) 10 Needle set 11 Twin needle 12 Cleaning brush 13 Eyelet punch 14 Screwdriver 15 Touch pen 16 Spool cap (large) ...
... thread (white) Embroidery bobbin thread (black) Part Code U.S.A. / Canada Other SAEBT EBT-CEN X81164-001 SAEBT999 EBT-CEBN XC5520-001 Memo z To obtain optional accessories or parts, visit [http://www.brother.com/], or [http://www.brothermall.com] (in USA). The part codes are ...Spool net 4 Zipper foot "I" X59370-021 21 Foot controller 5 Zigzag foot "J" (on machine) 6 Blind stitch foot "R" 7 Button fitting foot "M" 8 Seam ripper 9 Bobbin (4) Bobbin clip (3) 10 Needle set 11 Twin needle 12 Cleaning brush 13 Eyelet punch 14 Screwdriver 15 Touch pen 16 Spool cap (large) ...

Users Manual - English
Page 12
...thread on this panel to select stitches or embroidery patterns, or check how to thread the needle. c Spool pin (page 23, 32) Place a spool of the sewing machine and their functions are described below. Before using the sewing machine, carefully read these buttons to learn the ...names of the machine parts. f Operation panel (page 13) Use the keys on the spool pin. l Needle threader lever (page 35) Use the needle threader lever to use the sewing machine, etc. g Embroidery unit connector slot (...
...thread on this panel to select stitches or embroidery patterns, or check how to thread the needle. c Spool pin (page 23, 32) Place a spool of the sewing machine and their functions are described below. Before using the sewing machine, carefully read these buttons to learn the ...names of the machine parts. f Operation panel (page 13) Use the keys on the spool pin. l Needle threader lever (page 35) Use the needle threader lever to use the sewing machine, etc. g Embroidery unit connector slot (...

Users Manual - English
Page 13
... handle when transporting the machine. c Embroidery card slot (page 138) Insert the embroidery card. h Drop feed lever (page 88) Use the drop feed lever to be exchanged. Memo z Refer to use your machine. 11 g Feed dogs (page 88) The feed dogs feed the fabric in the sewing direction. d Needle plate (page 67) The needle plate is marked...
... handle when transporting the machine. c Embroidery card slot (page 138) Insert the embroidery card. h Drop feed lever (page 88) Use the drop feed lever to be exchanged. Memo z Refer to use your machine. 11 g Feed dogs (page 88) The feed dogs feed the fabric in the sewing direction. d Needle plate (page 67) The needle plate is marked...
Users Manual - English
Page 14
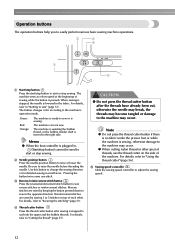
...the threads have already been cut both the upper and the bobbin threads. When sewing is stopped, the needle is stopped to cut , otherwise the needle may break, the threads may occur. The machine is winding the bobbin thread, or the bobbin winder shaft is ready to ...55). Green: Red: Orange: The machine is moved to raise or lower the needle. a Start/stop button Press the start/stop sewing. The machine sews at a slow speed at the beginning of the machine. The button changes color according to sew or is sewing, otherwise damage to sew reverse stitches or reinforcement stitches. c ...
...the threads have already been cut both the upper and the bobbin threads. When sewing is stopped, the needle is stopped to cut , otherwise the needle may break, the threads may occur. The machine is winding the bobbin thread, or the bobbin winder shaft is ready to ...55). Green: Red: Orange: The machine is moved to raise or lower the needle. a Start/stop button Press the start/stop sewing. The machine sews at a slow speed at the beginning of the machine. The button changes color according to sew or is sewing, otherwise damage to sew reverse stitches or reinforcement stitches. c ...

Users Manual - English
Page 15
... operation keys. d Next page key Displays the next page when there are items that are not displayed on using the sewing machine. g Embroidery key Press this key to sew embroidery. i Sewing machine help key Press to set the needle stop position, the buzzer sound, and more. f Utility stitch key Press this key to select a utility stitch. a LCD (liquid...
... operation keys. d Next page key Displays the next page when there are items that are not displayed on using the sewing machine. g Embroidery key Press this key to sew embroidery. i Sewing machine help key Press to set the needle stop position, the buzzer sound, and more. f Utility stitch key Press this key to select a utility stitch. a LCD (liquid...

Users Manual - English
Page 17
1 GETTING READY The various preparations required before starting to sew are described in this chapter. Turning the Machine On/Off 16 LCD (Liquid Crystal Display) Operation 18 Winding/Installing the Bobbin 22 Upper Threading ...31 Replacing the Needle 39 Replacing the Presser Foot 43 Sewing Cylindrical Pieces 46
1 GETTING READY The various preparations required before starting to sew are described in this chapter. Turning the Machine On/Off 16 LCD (Liquid Crystal Display) Operation 18 Winding/Installing the Bobbin 22 Upper Threading ...31 Replacing the Needle 39 Replacing the Presser Foot 43 Sewing Cylindrical Pieces 46
Users Manual - English
Page 19
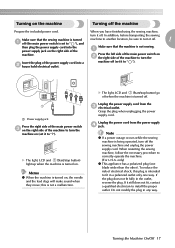
...When restarting the sewing machine, follow the necessary procedure to install the proper outlet. Grasp the plug when unplugging the power supply cord. To reduce the risk of electrical shock, this is turned on the right side of the power supply cord into the power supply jack on , the needle and the ...feed dogs will make sound when they move; If it to fit in a polarized outlet only one blade wider than the other). When you have finished using the sewing machine, turn it off . Note z If a power outage occurs ...
...When restarting the sewing machine, follow the necessary procedure to install the proper outlet. Grasp the plug when unplugging the power supply cord. To reduce the risk of electrical shock, this is turned on the right side of the power supply cord into the power supply jack on , the needle and the ...feed dogs will make sound when they move; If it to fit in a polarized outlet only one blade wider than the other). When you have finished using the sewing machine, turn it off . Note z If a power outage occurs ...

Users Manual - English
Page 20
... thread cutting k Automatic reverse/reinforcement l Single/twin needle sewing and needle stop position Memo z A different screen is displayed when the embroidery unit is displayed. 1 l k 2 0 9 3 8 4 7 5 6 a Selected stitch b Presser foot to be used c Stitches d Stitch settings and twin needle sewing e Stitch width f Stitch length g Number of the selected stitch h Number of the sewing machine. z Refer to "Operation panel" (page 13...
... thread cutting k Automatic reverse/reinforcement l Single/twin needle sewing and needle stop position Memo z A different screen is displayed when the embroidery unit is displayed. 1 l k 2 0 9 3 8 4 7 5 6 a Selected stitch b Presser foot to be used c Stitches d Stitch settings and twin needle sewing e Stitch width f Stitch length g Number of the selected stitch h Number of the sewing machine. z Refer to "Operation panel" (page 13...
Users Manual - English
Page 21
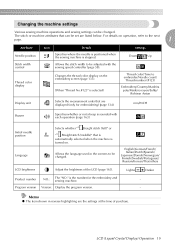
.../Sulky/ Robison Anton Display unit Selects the measurement units that are displayed (only for the embroidery and sewing machine. - Changing the machine settings Various sewing machine operations and sewing settings can be set are the settings at the time of the LCD (page 163). ...item shown in the screens to the next page. 1 Attribute Needle position Stitch width control Thread color display Icon Details Settings Specifies where the needle is positioned when the sewing machine is turned on the embroidery screen (page 133). mm/INCH Buzzer Specifies whether or not ...
.../Sulky/ Robison Anton Display unit Selects the measurement units that are displayed (only for the embroidery and sewing machine. - Changing the machine settings Various sewing machine operations and sewing settings can be set are the settings at the time of the LCD (page 163). ...item shown in the screens to the next page. 1 Attribute Needle position Stitch width control Thread color display Icon Details Settings Specifies where the needle is positioned when the sewing machine is turned on the embroidery screen (page 133). mm/INCH Buzzer Specifies whether or not ...

Users Manual - English
Page 22
... changed are complete, press d (Back key). X The LCD comes on the display Example: Changing the needle stop position X The setting screen appears. When settings are saved even if the power is the individual number for the sewing machine. z "VERSION" is the program version which is the initial setting. c Switch the screen using (Previous...
... changed are complete, press d (Back key). X The LCD comes on the display Example: Changing the needle stop position X The setting screen appears. When settings are saved even if the power is the individual number for the sewing machine. z "VERSION" is the program version which is the initial setting. c Switch the screen using (Previous...

Users Manual - English
Page 23
...Sewing machine help screen appears. X The sewing machine help key) on the sewing machine. X The initial stitch screen appears again. LCD (Liquid Crystal Display) Operation 21 Memo z For details on the LCD display for the selected topic appears. Simple explanations can be displayed. bobbin winding / setting bobbin thread / needle replacement / embroidery unit attachment / Example: Upper threading embroidery frame attachment / embroidery...installation d Needle replacement e Presser foot replacement f Embroidery foot attachment g Embroidery frame attachment h Embroidery unit attachment...
...Sewing machine help screen appears. X The sewing machine help key) on the sewing machine. X The initial stitch screen appears again. LCD (Liquid Crystal Display) Operation 21 Memo z For details on the LCD display for the selected topic appears. Simple explanations can be displayed. bobbin winding / setting bobbin thread / needle replacement / embroidery unit attachment / Example: Upper threading embroidery frame attachment / embroidery...installation d Needle replacement e Presser foot replacement f Embroidery foot attachment g Embroidery frame attachment h Embroidery unit attachment...
Users Manual - English
Page 27
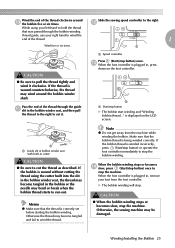
.... If the bobbin thread is plugged in the bobbin winder seat, the thread may become tangled and fail to stop the machine. Winding/Installing the Bobbin 25 Slide the sewing speed controller to hold the thread that the bobbin thread is displayed on the foot controller. a a Guide slit in bobbin...; Be sure to wind the end of the thread clockwise around the bobbin winder shaft. If the thread is plugged in the bobbin or the needle may wind around j the bobbin five or six times. is being winded correctly. a a Start/stop button) once. Pass the end of the thread...
.... If the bobbin thread is plugged in the bobbin winder seat, the thread may become tangled and fail to stop the machine. Winding/Installing the Bobbin 25 Slide the sewing speed controller to hold the thread that the bobbin thread is displayed on the foot controller. a a Guide slit in bobbin...; Be sure to wind the end of the thread clockwise around the bobbin winder shaft. If the thread is plugged in the bobbin or the needle may wind around j the bobbin five or six times. is being winded correctly. a a Start/stop button) once. Pass the end of the thread...
Users Manual - English
Page 28
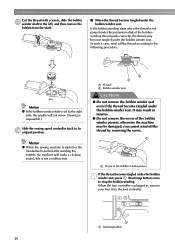
...the right side, the needle will make a clicking sound; this is impossible.) Slide the sewing speed controller back to its p original position. a a Screw of the bobbin winder presser If the thread become tangled under the bobbin winder seat. Memo z When the sewing machine is started or the ...and then remove the bobbin from the foot controller. If the bobbin winding starts when the thread is turned after winding the bobbin, the machine will not move. (Sewing is not a malfunction. In such a case, wind off the thread by removing the screw. b a a Thread b Bobbin winder ...
...the right side, the needle will make a clicking sound; this is impossible.) Slide the sewing speed controller back to its p original position. a a Screw of the bobbin winder presser If the thread become tangled under the bobbin winder seat. Memo z When the sewing machine is started or the ...and then remove the bobbin from the foot controller. If the bobbin winding starts when the thread is turned after winding the bobbin, the machine will not move. (Sewing is not a malfunction. In such a case, wind off the thread by removing the screw. b a a Thread b Bobbin winder ...
Users Manual - English
Page 29
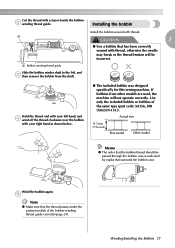
...Note z Make sure that has been correctly wound with your right hand as shown below. ● The included bobbin was designed specifically for this sewing machine. Actual size 11.5 mm (7/16 inch) This model Other model Memo z The order that the bobbin thread should be incorrect. Wind the ...bobbin again. Hold the thread end with thread, otherwise the needle may break or the thread tension will not operate correctly. Cut the thread with thread. Installing the bobbin Install the bobbin wound with...
...Note z Make sure that has been correctly wound with your right hand as shown below. ● The included bobbin was designed specifically for this sewing machine. Actual size 11.5 mm (7/16 inch) This model Other model Memo z The order that the bobbin thread should be incorrect. Wind the ...bobbin again. Hold the thread end with thread, otherwise the needle may break or the thread tension will not operate correctly. Cut the thread with thread. Installing the bobbin Install the bobbin wound with...
Users Manual - English
Page 30
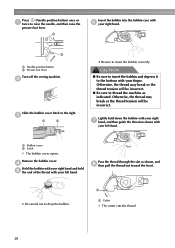
... hand, and then guide the thread as shown with your left hand. b a Needle position button b Presser foot lever Turn off the sewing machine. CAUTION ● Be sure to insert the bobbin and depress it to raise the needle, and then raise the presser foot lever. a Bobbin cover b Latch X The ...bobbin cover opens. GETTING READY Press (Needle position button) once or a twice to the ...
... hand, and then guide the thread as shown with your left hand. b a Needle position button b Presser foot lever Turn off the sewing machine. CAUTION ● Be sure to insert the bobbin and depress it to raise the needle, and then raise the presser foot lever. a Bobbin cover b Latch X The ...bobbin cover opens. GETTING READY Press (Needle position button) once or a twice to the ...
Users Manual - English
Page 31
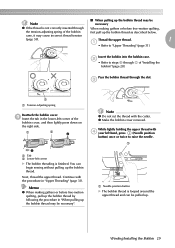
...thread the upper thread. z Make the bobbin cover removed. a b 2 1 a Tab b Lower-left hand, press (Needle position button) once or twice to raise the needle. a a Needle position button X The bobbin thread is finished. While lightly holding the upper thread with d your left corner X The bobbin ...threading is looped around the upper thread and can begin sewing without pulling up the bobbin thread....
...thread the upper thread. z Make the bobbin cover removed. a b 2 1 a Tab b Lower-left hand, press (Needle position button) once or twice to raise the needle. a a Needle position button X The bobbin thread is finished. While lightly holding the upper thread with d your left corner X The bobbin ...threading is looped around the upper thread and can begin sewing without pulling up the bobbin thread....


