
Users Manual - English
Page 6
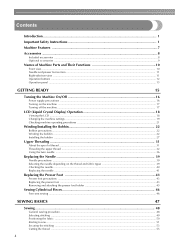
... Changing the machine settings ...19 Checking machine operating procedures ...21 Winding/Installing the Bobbin 22 Bobbin precautions ...22 Winding the bobbin ...22 Installing the bobbin ...27 Upper Threading ...31 About the spool of thread ...31 Threading the upper thread ...32 Using the twin needle ...36 Replacing the Needle ...39 Needle precautions ...39 Selecting the needle depending on the thread and fabric...
... Changing the machine settings ...19 Checking machine operating procedures ...21 Winding/Installing the Bobbin 22 Bobbin precautions ...22 Winding the bobbin ...22 Installing the bobbin ...27 Upper Threading ...31 About the spool of thread ...31 Threading the upper thread ...32 Using the twin needle ...36 Replacing the Needle ...39 Needle precautions ...39 Selecting the needle depending on the thread and fabric...
Users Manual - English
Page 9
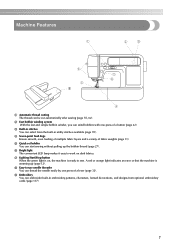
...winding system With the fast and simple bobbin winder, you can thread the needle easily by one press of a lever (page 32). f Bright light The convenient LED lamp makes it easy to sew. h Easy-to-use needle threader You can wind bobbins with one press of a button...Stop button When the green light is on, the machine is warming up the bobbin thread (page 27). Machine Features 9 a Automatic thread cutting The thread can start sewing without pulling up (page 12). i Embroidery You can select from the built-in embroidery patterns, characters, framed decorations, and designs from ...
...winding system With the fast and simple bobbin winder, you can thread the needle easily by one press of a lever (page 32). f Bright light The convenient LED lamp makes it easy to sew. h Easy-to-use needle threader You can wind bobbins with one press of a button...Stop button When the green light is on, the machine is warming up the bobbin thread (page 27). Machine Features 9 a Automatic thread cutting The thread can start sewing without pulling up (page 12). i Embroidery You can select from the built-in embroidery patterns, characters, framed decorations, and designs from ...
Users Manual - English
Page 11
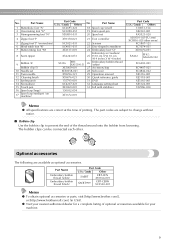
... X59370-021 21 Foot controller 5 Zigzag foot "J" (on machine) 6 Blind stitch foot "R" 7 Button fitting foot "M" 8 Seam ripper 9 Bobbin (4) Bobbin clip (3) 10 Needle set 11 Twin needle 12 Cleaning brush 13 Eyelet punch 14 Screwdriver 15 Touch pen...machine) XC3021-031 XC4051-031 XE2137-001 X54243-051 SA156 SFB: XA5539-151 XE3060-001 XE58358-021 X59296-121 X59476-021 135793-001 XC4237-021 XE3069-001 130012-054 22 Scissors 23 Disc-shaped screwdriver 24 Embroidery foot "Q" Embroidery set (medium) 25 H 10 cm X W 10 cm (H 4 inches X W 4 inches) 26 Embroidery bobbin thread...
... X59370-021 21 Foot controller 5 Zigzag foot "J" (on machine) 6 Blind stitch foot "R" 7 Button fitting foot "M" 8 Seam ripper 9 Bobbin (4) Bobbin clip (3) 10 Needle set 11 Twin needle 12 Cleaning brush 13 Eyelet punch 14 Screwdriver 15 Touch pen...machine) XC3021-031 XC4051-031 XE2137-001 X54243-051 SA156 SFB: XA5539-151 XE3060-001 XE58358-021 X59296-121 X59476-021 135793-001 XC4237-021 XE3069-001 130012-054 22 Scissors 23 Disc-shaped screwdriver 24 Embroidery foot "Q" Embroidery set (medium) 25 H 10 cm X W 10 cm (H 4 inches X W 4 inches) 26 Embroidery bobbin thread...

Users Manual - English
Page 12
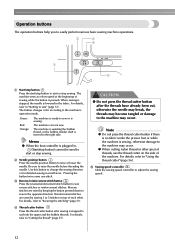
... this panel to select stitches or embroidery patterns, or check how to learn the names of the sewing machine and their functions are described below. f Operation panel (page 13) Use the keys on the spool pin. k Thread cutter (page 56) Pass the threads through the thread cutter to thread the needle. d Bobbin winder (page 22) Use the bobbin...
... this panel to select stitches or embroidery patterns, or check how to learn the names of the sewing machine and their functions are described below. f Operation panel (page 13) Use the keys on the spool pin. k Thread cutter (page 56) Pass the threads through the thread cutter to thread the needle. d Bobbin winder (page 22) Use the bobbin...

Users Manual - English
Page 13
...) Pass the thread through the thread guide disk when using the needle threader to lower the feed dogs. g Feed dogs (page 88) The feed dogs feed the fabric in the sewing direction. c Embroidery card slot (page 138) Insert the embroidery card. e Main power switch (page 17) Use the main power switch to turn the sewing machine on the...
...) Pass the thread through the thread guide disk when using the needle threader to lower the feed dogs. g Feed dogs (page 88) The feed dogs feed the fabric in the sewing direction. c Embroidery card slot (page 138) Insert the embroidery card. e Main power switch (page 17) Use the main power switch to turn the sewing machine on the...
Users Manual - English
Page 14
... needle may break, the threads may occur. d Thread cutter button Press the thread cutter button after the threads have already been cut both the upper and the bobbin threads. The machine can not sew. Be sure to the machine may become tangled or damage to raise the needle before threading the needle. CAUTION ● Do not press the thread cutter button after sewing is sewing...
... needle may break, the threads may occur. d Thread cutter button Press the thread cutter button after the threads have already been cut both the upper and the bobbin threads. The machine can not sew. Be sure to the machine may become tangled or damage to raise the needle before threading the needle. CAUTION ● Do not press the thread cutter button after sewing is sewing...

Users Manual - English
Page 15
... key Press to the previous screen. Touch the keys displayed on using the sewing machine. For details, refer to perform operations. into the sewing machine memory. Displays simple explanations of setting upper thread / bobbin winding / setting bobbin thread / needle replacement / embroidery unit attachment / embroidery frame attachment / embroidery foot attachment / presser foot replacement. 13 f Utility stitch key Press this key to...
... key Press to the previous screen. Touch the keys displayed on using the sewing machine. For details, refer to perform operations. into the sewing machine memory. Displays simple explanations of setting upper thread / bobbin winding / setting bobbin thread / needle replacement / embroidery unit attachment / embroidery frame attachment / embroidery foot attachment / presser foot replacement. 13 f Utility stitch key Press this key to...

Users Manual - English
Page 17
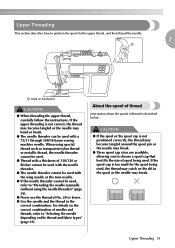
Turning the Machine On/Off 16 LCD (Liquid Crystal Display) Operation 18 Winding/Installing the Bobbin 22 Upper Threading ...31 Replacing the Needle 39 Replacing the Presser Foot 43 Sewing Cylindrical Pieces 46 1 GETTING READY The various preparations required before starting to sew are described in this chapter.
Turning the Machine On/Off 16 LCD (Liquid Crystal Display) Operation 18 Winding/Installing the Bobbin 22 Upper Threading ...31 Replacing the Needle 39 Replacing the Presser Foot 43 Sewing Cylindrical Pieces 46 1 GETTING READY The various preparations required before starting to sew are described in this chapter.

Users Manual - English
Page 20
... LCD (liquid crystal display) on the front of the sewing machine. z Refer to the message displayed on the right side of stitches contained i Horizontal mirror image j Automatic thread cutting k Automatic reverse/reinforcement l Single/twin needle sewing and needle stop position Memo z A different screen is displayed when the embroidery unit is turned on, the LCD comes on the...
... LCD (liquid crystal display) on the front of the sewing machine. z Refer to the message displayed on the right side of stitches contained i Horizontal mirror image j Automatic thread cutting k Automatic reverse/reinforcement l Single/twin needle sewing and needle stop position Memo z A different screen is displayed when the embroidery unit is turned on, the LCD comes on the...
Users Manual - English
Page 21
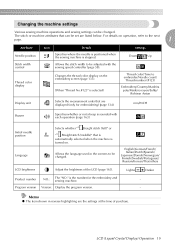
Changing the machine settings Various sewing machine operations and sewing settings can be set are displayed (only for the embroidery and sewing machine. - For details on the embroidery screen (page 133). Thread color/Time to the next page. 1 Attribute Needle position Stitch width control Thread color display Icon Details Settings Specifies where the needle is positioned when the sewing machine is sounded with the sewing speed...
Changing the machine settings Various sewing machine operations and sewing settings can be set are displayed (only for the embroidery and sewing machine. - For details on the embroidery screen (page 133). Thread color/Time to the next page. 1 Attribute Needle position Stitch width control Thread color display Icon Details Settings Specifies where the needle is positioned when the sewing machine is sounded with the sewing speed...

Users Manual - English
Page 23
...on b the display panel. a X The LCD comes on the sewing machine. c a b cd After you return to the item 1 selection screen. Press (Sewing machine help screen appears. X The sewing machine help key) on the LCD display for the selected topic appears. ... Checking machine operating Press (Next page key) to switch to the corresponding page in this Operation Manual. Memo z For details on the LCD. bobbin winding / setting bobbin thread / needle replacement / embroidery unit attachment / Example: Upper threading embroidery frame attachment / embroidery foot...
...on b the display panel. a X The LCD comes on the sewing machine. c a b cd After you return to the item 1 selection screen. Press (Sewing machine help screen appears. X The sewing machine help key) on the LCD display for the selected topic appears. ... Checking machine operating Press (Next page key) to switch to the corresponding page in this Operation Manual. Memo z For details on the LCD. bobbin winding / setting bobbin thread / needle replacement / embroidery unit attachment / Example: Upper threading embroidery frame attachment / embroidery foot...
Users Manual - English
Page 27
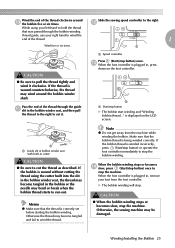
... cutter) CAUTION ● Be sure to hold the thread that was passed through the guide k slit in , remove your left hand to cut it clockwise. Otherwise, the sewing machine may bend or break when the bobbin thread starts to stop the machine. m When the foot controller is plugged in the ... The bobbin winding will stop button) once. Note z Do not get away from the foot controller. is wound counterclockwise, the thread may become tangled in the bobbin or the needle may be damaged. Otherwise the thread may wind around j the bobbin five or six times. Wind the end of the...
... cutter) CAUTION ● Be sure to hold the thread that was passed through the guide k slit in , remove your left hand to cut it clockwise. Otherwise, the sewing machine may bend or break when the bobbin thread starts to stop the machine. m When the foot controller is plugged in the ... The bobbin winding will stop button) once. Note z Do not get away from the foot controller. is wound counterclockwise, the thread may become tangled in the bobbin or the needle may be damaged. Otherwise the thread may wind around j the bobbin five or six times. Wind the end of the...
Users Manual - English
Page 28
...If the bobbin winding starts when the thread is not passed under the pretension disk of the bobbin winder presser, otherwise the machine may become tangled under the bobbin winder seat. a a Start/stop the bobbin winding. this is impossible.) Slide the sewing speed controller back to its p ...side, the needle will make a clicking sound; In such a case, wind off the thread by removing the screw. GETTING READY Cut the thread with scissors, slide the bobbin o winder shaft to the left, and then remove the bobbin from the foot controller. Memo z When the sewing machine is started...
...If the bobbin winding starts when the thread is not passed under the pretension disk of the bobbin winder presser, otherwise the machine may become tangled under the bobbin winder seat. a a Start/stop the bobbin winding. this is impossible.) Slide the sewing speed controller back to its p ...side, the needle will make a clicking sound; In such a case, wind off the thread by removing the screw. GETTING READY Cut the thread with scissors, slide the bobbin o winder shaft to the left, and then remove the bobbin from the foot controller. Memo z When the sewing machine is started...
Users Manual - English
Page 29
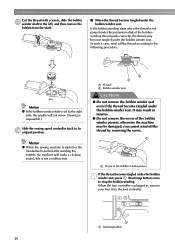
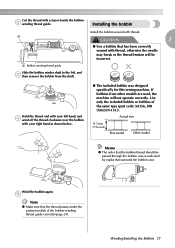
...sewing machine. Use only the included bobbin or bobbins of the bobbin-winding thread guide correctly (page 24). a Bobbin-winding thread guide Slide the bobbin winder shaft to the left hand, and d wind off the thread... clockwise near the bobbin with scissors beside the bobbinb winding thread...Installing the Bobbin 27 a CAUTION 1 ● Use a bobbin that the thread passes under the pretension disk of the same type (part code: SA156, SFB (XA5539-151...
...sewing machine. Use only the included bobbin or bobbins of the bobbin-winding thread guide correctly (page 24). a Bobbin-winding thread guide Slide the bobbin winder shaft to the left hand, and d wind off the thread... clockwise near the bobbin with scissors beside the bobbinb winding thread...Installing the Bobbin 27 a CAUTION 1 ● Use a bobbin that the thread passes under the pretension disk of the same type (part code: SA156, SFB (XA5539-151...
Users Manual - English
Page 30
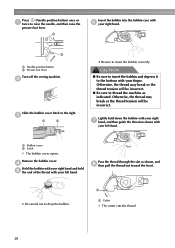
...Needle position button b Presser foot lever Turn off the sewing machine. d Hold the bobbin with your right hand and hold down the bobbin with your right g hand, and then guide the thread as shown, and h then pull the thread out toward the front. • Be careful not to thread the machine as indicated. Pass the thread... through the slot as shown with your left hand. GETTING READY Press (Needle position button) once or ...
...Needle position button b Presser foot lever Turn off the sewing machine. d Hold the bobbin with your right hand and hold down the bobbin with your right g hand, and then guide the thread as shown, and h then pull the thread out toward the front. • Be careful not to thread the machine as indicated. Pass the thread... through the slot as shown with your left hand. GETTING READY Press (Needle position button) once or ...
Users Manual - English
Page 33
.... ● Three spool cap sizes are available, allowing you to "Threading the needle manually (without using special thread such as transparent nylon thread or metallic thread, the needle threader cannot be used. ● Thread with a thickness of spool being used with a 75/11 through 100/16 home sewing machine needle. CAUTION ● If the spool or the spool cap is...
.... ● Three spool cap sizes are available, allowing you to "Threading the needle manually (without using special thread such as transparent nylon thread or metallic thread, the needle threader cannot be used. ● Thread with a thickness of spool being used with a 75/11 through 100/16 home sewing machine needle. CAUTION ● If the spool or the spool cap is...
Users Manual - English
Page 36
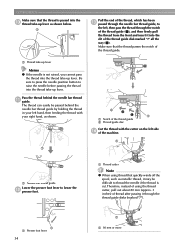
... of the machine. a Thread take-up lever Memo z If the needle is not raised, you cannot pass the thread into the thread take-up lever. a a Presser foot lever 34 a a 80 mm or more Make sure that the thread passes the notch of the thread, which has been m passed through the needle bar thread guide, to raise the needle before passing...
... of the machine. a Thread take-up lever Memo z If the needle is not raised, you cannot pass the thread into the thread take-up lever. a a Presser foot lever 34 a a 80 mm or more Make sure that the thread passes the notch of the thread, which has been m passed through the needle bar thread guide, to raise the needle before passing...

Users Manual - English
Page 37
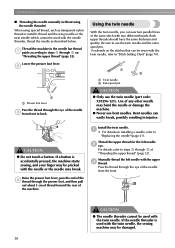
...) to step c of the thread. If a button is not raised, the needle threader cannot thread the needle. In such a case, start from m again. z CAUTION ● Do not touch a button. Raise the needle threader lever slowly. z If the needle is accidentally pressed, the machine starts sewing, and your finger may be pricked with the needle or the needle may break. ●...
...) to step c of the thread. If a button is not raised, the needle threader cannot thread the needle. In such a case, start from m again. z CAUTION ● Do not touch a button. Raise the needle threader lever slowly. z If the needle is accidentally pressed, the machine starts sewing, and your finger may be pricked with the needle or the needle may break. ●...
Users Manual - English
Page 38
... foot lever, pass the end of the machine. Install the twin needle. If the needle threader is accidentally pressed, the machine starts sewing, and your finger may be used with the twin needle, the sewing machine may break. Both upper threads should have the same thickness and quality. Thread the machine to the needle bar thread a guide according to steps a through the presser...
... foot lever, pass the end of the machine. Install the twin needle. If the needle threader is accidentally pressed, the machine starts sewing, and your finger may be used with the twin needle, the sewing machine may break. Both upper threads should have the same thickness and quality. Thread the machine to the needle bar thread a guide according to steps a through the presser...

Users Manual - English
Page 39
... z When setting the thread spool, set it . If the needle threader is used with the twin needle, the sewing machine may be sure to attach zigzag foot "J". CAUTION ● When using the twin needle, be sure to select an appropriate stitch, otherwise the needle may break or the machine may be damaged. Thread the upper thread for the right side...
... z When setting the thread spool, set it . If the needle threader is used with the twin needle, the sewing machine may be sure to attach zigzag foot "J". CAUTION ● When using the twin needle, be sure to select an appropriate stitch, otherwise the needle may break or the machine may be damaged. Thread the upper thread for the right side...


