

Users Manual - English
Page 3
...adjustments mentioned in the instruction manual • To unplug the machine, switch the machine to the symbol "O" position to make any air openings blocked. Lifting the sewing machine by its handle. This machine is intended for household use the machine. DANGER - Important Safety Instructions Please read the "Important Safety... or damaged, or water is spilled on the unit. WARNING - Before using , when cleaning, when making any other part may injure your back or knees. 4 Always keep your machine if the power is cut. 3 Never operate this embroidery and sewing machine.
...adjustments mentioned in the instruction manual • To unplug the machine, switch the machine to the symbol "O" position to make any air openings blocked. Lifting the sewing machine by its handle. This machine is intended for household use the machine. DANGER - Important Safety Instructions Please read the "Important Safety... or damaged, or water is spilled on the unit. WARNING - Before using , when cleaning, when making any other part may injure your back or knees. 4 Always keep your machine if the power is cut. 3 Never operate this embroidery and sewing machine.
Users Manual - English
Page 4
...iron, halogen lamp, or other parts to assure correct installation. 8 For repair or adjustment: • If the Light unit is damaged, it to break. 6 This machine is not a toy: • Your close attention is necessary when the machine is required when sewing: • Always pay close ...table, otherwise the sewing machine may ignite, resulting in fire or an electric shock. • Do not place this machine, avoid direct sunlight and high humidity locations. For additional product information and updates, visit our web site at www.brother.com 2 otherwise, the machine, power cord or...
...iron, halogen lamp, or other parts to assure correct installation. 8 For repair or adjustment: • If the Light unit is damaged, it to break. 6 This machine is not a toy: • Your close attention is necessary when the machine is required when sewing: • Always pay close ...table, otherwise the sewing machine may ignite, resulting in fire or an electric shock. • Do not place this machine, avoid direct sunlight and high humidity locations. For additional product information and updates, visit our web site at www.brother.com 2 otherwise, the machine, power cord or...
Users Manual - English
Page 6
... Machine Features ...7 Accessories ...8 Included accessories ...8 Optional accessories ...9 Names of Machine Parts and Their Functions 10 Front view...10 Needle and presser foot section ...11 Right-side/rear view ...11 Operation buttons ...12 Operation panel ...13 GETTING READY 15 Turning the Machine On...43 Removing and attaching the presser foot holder 45 Sewing Cylindrical Pieces 46 Free-arm sewing ...46 SEWING BASICS 47 Sewing...48 General sewing procedure ...48 Selecting stitching ...49 Positioning the fabric ...50 Starting to sew...51 Securing the stitching ...53 Cutting the thread...
... Machine Features ...7 Accessories ...8 Included accessories ...8 Optional accessories ...9 Names of Machine Parts and Their Functions 10 Front view...10 Needle and presser foot section ...11 Right-side/rear view ...11 Operation buttons ...12 Operation panel ...13 GETTING READY 15 Turning the Machine On...43 Removing and attaching the presser foot holder 45 Sewing Cylindrical Pieces 46 Free-arm sewing ...46 SEWING BASICS 47 Sewing...48 General sewing procedure ...48 Selecting stitching ...49 Positioning the fabric ...50 Starting to sew...51 Securing the stitching ...53 Cutting the thread...
Users Manual - English
Page 10
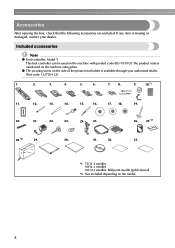
... on the model. 8 Included accessories Note z Foot controller: Model T This foot controller can be used on the machine with product code 885-V31/V33.The product code is missing or damaged, contact your authorized dealer. (Part code: 132730-122) 1. 2. 3. 4. 5. 6. 7. 8. 9. 10.*1 11. 12. 13. 14. 15. 16. 17. 18. 19. 20. 21. 22...
... on the model. 8 Included accessories Note z Foot controller: Model T This foot controller can be used on the machine with product code 885-V31/V33.The product code is missing or damaged, contact your authorized dealer. (Part code: 132730-122) 1. 2. 3. 4. 5. 6. 7. 8. 9. 10.*1 11. 12. 13. 14. 15. 16. 17. 18. 19. 20. 21. 22...
Users Manual - English
Page 11
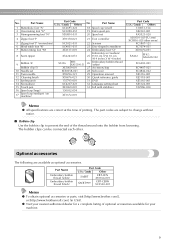
...12 Cleaning brush 13 Eyelet punch 14 Screwdriver 15 Touch pen 16 Spool cap (large) 17 Spool cap (medium) (on machine) XC3021-031 XC4051-031 XE2137-001 X54243-051 SA156 SFB: XA5539-151 XE3060-001 XE58358-021 X59296-121 X59476-021 135793-...accessories available for a complete listing of printing. Part Name Embroidery bobbin thread (white) Embroidery bobbin thread (black) Part Code U.S.A. / Canada Other SAEBT EBT-CEN X81164-001 SAEBT999 EBT-CEBN XC5520-001 Memo z To obtain optional accessories or parts, visit [http://www.brother.com/], or [http://www.brothermall.com] (...
...12 Cleaning brush 13 Eyelet punch 14 Screwdriver 15 Touch pen 16 Spool cap (large) 17 Spool cap (medium) (on machine) XC3021-031 XC4051-031 XE2137-001 X54243-051 SA156 SFB: XA5539-151 XE3060-001 XE58358-021 X59296-121 X59476-021 135793-...accessories available for a complete listing of printing. Part Name Embroidery bobbin thread (white) Embroidery bobbin thread (black) Part Code U.S.A. / Canada Other SAEBT EBT-CEN X81164-001 SAEBT999 EBT-CEBN XC5520-001 Memo z To obtain optional accessories or parts, visit [http://www.brother.com/], or [http://www.brothermall.com] (...

Users Manual - English
Page 12
... presser foot . j Flat bed attachment (page 46) Remove the flat bed attachment when sewing cylindrical pieces such as sleeve cuffs. c Spool pin (page 23, 32) Place a spool of the sewing machine and their functions are described below. Front view a Thread guide cover (page 24, 33... winding the bobbin thread. 10 Names of Machine Parts and Their Functions The names of the various parts of thread on this panel to select stitches or embroidery patterns, or check how to use the sewing machine, etc. Before using the sewing machine, carefully read these buttons to thread the needle...
... presser foot . j Flat bed attachment (page 46) Remove the flat bed attachment when sewing cylindrical pieces such as sleeve cuffs. c Spool pin (page 23, 32) Place a spool of the sewing machine and their functions are described below. Front view a Thread guide cover (page 24, 33... winding the bobbin thread. 10 Names of Machine Parts and Their Functions The names of the various parts of thread on this panel to select stitches or embroidery patterns, or check how to use the sewing machine, etc. Before using the sewing machine, carefully read these buttons to thread the needle...
Users Manual - English
Page 24
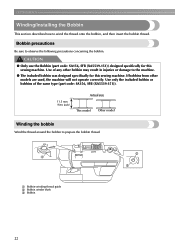
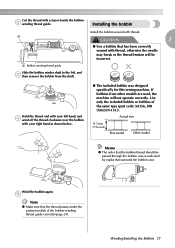
... describes how to prepare the bobbin thread. Use only the included bobbin or bobbins of any other models are used, the machine will not operate correctly. If bobbins from other bobbin may result in injuries or damage to observe the following precautions concerning the... bobbin. CAUTION ● Only use the Bobbin (part code: SA156, SFB (XA5539-151)) designed specifically for this sewing machine. Bobbin precautions Be sure to the machine. ● The included bobbin was designed specifically for this...
... describes how to prepare the bobbin thread. Use only the included bobbin or bobbins of any other models are used, the machine will not operate correctly. If bobbins from other bobbin may result in injuries or damage to observe the following precautions concerning the... bobbin. CAUTION ● Only use the Bobbin (part code: SA156, SFB (XA5539-151)) designed specifically for this sewing machine. Bobbin precautions Be sure to the machine. ● The included bobbin was designed specifically for this...
Users Manual - English
Page 29
... be passed through the bobbin case is indicated by marks that the thread passes under the pretension disk of the same type (part code: SA156, SFB (XA5539-151)). Wind the bobbin again. Winding/Installing the Bobbin 27 Actual size 11.5 mm (7/16 inch) This model Other model Memo z .... a CAUTION 1 ● Use a bobbin that has been correctly wound with your right hand as shown below. ● The included bobbin was designed specifically for this sewing machine. Use only the included bobbin or bobbins of the bobbin-winding thread guide correctly (page 24).
... be passed through the bobbin case is indicated by marks that the thread passes under the pretension disk of the same type (part code: SA156, SFB (XA5539-151)). Wind the bobbin again. Winding/Installing the Bobbin 27 Actual size 11.5 mm (7/16 inch) This model Other model Memo z .... a CAUTION 1 ● Use a bobbin that has been correctly wound with your right hand as shown below. ● The included bobbin was designed specifically for this sewing machine. Use only the included bobbin or bobbins of the bobbin-winding thread guide correctly (page 24).
Users Manual - English
Page 38
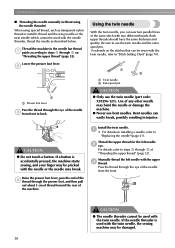
... twin needle (part code: X59296-121). Install the twin needle. b a a Presser foot lever Pass the thread through k on the stitches that can be damaged. 36 For details, refer to back. CAUTION ● The needle threader cannot be used with the twin needle. Bent needles can sew two parallel lines of the machine. Lower...
... twin needle (part code: X59296-121). Install the twin needle. b a a Presser foot lever Pass the thread through k on the stitches that can be damaged. 36 For details, refer to back. CAUTION ● The needle threader cannot be used with the twin needle. Bent needles can sew two parallel lines of the machine. Lower...
Users Manual - English
Page 43
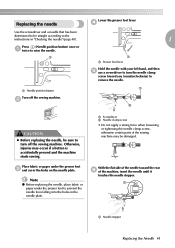
... the needle plate. a Lower the presser foot lever. a Needle position button Turn off the sewing machine. a Screwdriver b Needle clamp screw • Do not apply a strong force when loosening or tightening the needle clamp screw, otherwise certain parts of the machine, insert the needle until it touches the needle stopper. a a Needle stopper Replacing the Needle...
... the needle plate. a Lower the presser foot lever. a Needle position button Turn off the sewing machine. a Screwdriver b Needle clamp screw • Do not apply a strong force when loosening or tightening the needle clamp screw, otherwise certain parts of the machine, insert the needle until it touches the needle stopper. a a Needle stopper Replacing the Needle...
Users Manual - English
Page 48
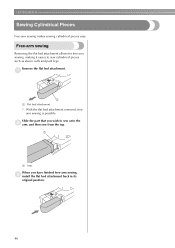
Free-arm sewing Removing the flat bed attachment allows for free-arm sewing, making it easier to sew onto the b arm, and then sew from the top. Slide the part that you have finished free-arm sewing, c install the flat bed attachment back in its original position. 46 a a a Flat bed attachment X With the flat bed attachment removed, freearm sewing is possible. a a Arm When you wish to sew cylindrical pieces such as sleeve cuffs and pant legs. Remove the flat bed attachment. GETTING READY Sewing Cylindrical Pieces Free-arm sewing makes sewing cylindrical pieces easy.
Free-arm sewing Removing the flat bed attachment allows for free-arm sewing, making it easier to sew onto the b arm, and then sew from the top. Slide the part that you have finished free-arm sewing, c install the flat bed attachment back in its original position. 46 a a a Flat bed attachment X With the flat bed attachment removed, freearm sewing is possible. a a Arm When you wish to sew cylindrical pieces such as sleeve cuffs and pant legs. Remove the flat bed attachment. GETTING READY Sewing Cylindrical Pieces Free-arm sewing makes sewing cylindrical pieces easy.
Users Manual - English
Page 50
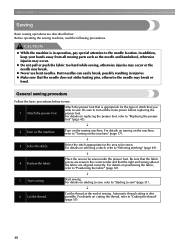
...(page 55). 48 For details on selecting a stitch, refer to be sewn under the presser foot. Before operating the sewing machine, read the following precautions. Turn on the sewing machine. Automatic thread cutting is appropriate for the area to "Selecting stitching" (page 49). ↓ 4 Position the fabric....be sewn. Select the stitch appropriate for the type of sewing. z Never use bent needles. Start sewing. z Make sure that you wish to the needle location. In addition, keep your hands away from all moving parts such as the needle and handwheel, otherwise injuries may ...
...(page 55). 48 For details on selecting a stitch, refer to be sewn under the presser foot. Before operating the sewing machine, read the following precautions. Turn on the sewing machine. Automatic thread cutting is appropriate for the area to "Selecting stitching" (page 49). ↓ 4 Position the fabric....be sewn. Select the stitch appropriate for the type of sewing. z Never use bent needles. Start sewing. z Make sure that you wish to the needle location. In addition, keep your hands away from all moving parts such as the needle and handwheel, otherwise injuries may ...
Users Manual - English
Page 83
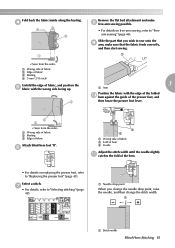
... and make sure that you change the needle drop point, raise the needle, and then change the stitch width. Slide the part that the fabric feeds correctly, and then start sewing. a a Stitch width Blind Hem Stitching 81 f R 3 a Arm Position the fabric with the wrong side facing up. 3 1 1 2 ...and then lower the presser foot lever. Select a stitch. g • For details, refer to sew onto the i arm, make h free-arm sewing possible. • For details on replacing the presser foot, refer to "Freearm sewing" (page 46). R 1 b c a Wrong side of fabric b Fold of hem c Guide...
... and make sure that you change the needle drop point, raise the needle, and then change the stitch width. Slide the part that the fabric feeds correctly, and then start sewing. a a Stitch width Blind Hem Stitching 81 f R 3 a Arm Position the fabric with the wrong side facing up. 3 1 1 2 ...and then lower the presser foot lever. Select a stitch. g • For details, refer to sew onto the i arm, make h free-arm sewing possible. • For details on replacing the presser foot, refer to "Freearm sewing" (page 46). R 1 b c a Wrong side of fabric b Fold of hem c Guide...
Users Manual - English
Page 86
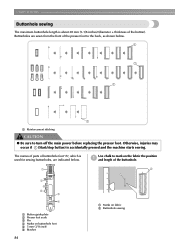
...parts of buttonhole foot "A", which is used for sewing buttonholes, are sewn from the front of the presser foot to the back, as shown below . Use chalk to turn off the main power before replacing the pressor foot. Otherwise, injuries may occur if (Start/stop button) is accidentally pressed and the machine starts sewing.... UTILITY STITCHES Buttonhole sewing The maximum buttonhole length is about 28 mm (1-1/8 inches) (diameter + thickness of the buttonhole. 1...
...parts of buttonhole foot "A", which is used for sewing buttonholes, are sewn from the front of the presser foot to the back, as shown below . Use chalk to turn off the main power before replacing the pressor foot. Otherwise, injuries may occur if (Start/stop button) is accidentally pressed and the machine starts sewing.... UTILITY STITCHES Buttonhole sewing The maximum buttonhole length is about 28 mm (1-1/8 inches) (diameter + thickness of the buttonhole. 1...

Users Manual - English
Page 89
...buttonhole on stretch fabrics, use the seam ripper in any slack. Lower the presser foot lever and the f buttonhole lever, and then start sewing. Use a handsewing needle to pull the gimp h thread to "Adjusting the stitch length" (page 59). It fits into the grooves,.... ■ Changing the stitch width Adjust the stitch width. When sewing is intended. ■ Sewing buttonholes on stretch fabrics When sewing buttonholes on a scrap piece of the stitching Adjust the stitch length. Hook the gimp thread onto the part of a buttonhole foot "A" shown in the illustration. ■ Changing...
...buttonhole on stretch fabrics, use the seam ripper in any slack. Lower the presser foot lever and the f buttonhole lever, and then start sewing. Use a handsewing needle to pull the gimp h thread to "Adjusting the stitch length" (page 59). It fits into the grooves,.... ■ Changing the stitch width Adjust the stitch width. When sewing is intended. ■ Sewing buttonholes on stretch fabrics When sewing buttonholes on a scrap piece of the stitching Adjust the stitch length. Hook the gimp thread onto the part of a buttonhole foot "A" shown in the illustration. ■ Changing...

Users Manual - English
Page 128
...sewing embroidery projects. The needle may be sewn incorrectly. 1 2 3 a Stabilizer material b Fabric (wrong side) c Attached surface † When it cannot be ironed or placed in the hoop For fabrics, such as towels, which cannot be ironed or for embroidery. To obtain optional accessories or parts, visit [http://www.brother....com/], or [http:// www.brothermall.com] (in the embroidery frame without using stabilizers with adhesive, place b the adhesive ...
...sewing embroidery projects. The needle may be sewn incorrectly. 1 2 3 a Stabilizer material b Fabric (wrong side) c Attached surface † When it cannot be ironed or placed in the hoop For fabrics, such as towels, which cannot be ironed or for embroidery. To obtain optional accessories or parts, visit [http://www.brother....com/], or [http:// www.brothermall.com] (in the embroidery frame without using stabilizers with adhesive, place b the adhesive ...
Users Manual - English
Page 133
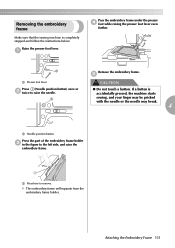
...and follow the instructions below. Make sure that the sewing machine is accidentally pressed, the machine starts sewing, and your finger may be pricked with the needle or the needle may break. 4 a Needle position button Press the part of the embroidery frame holder c in the figure to the left ...side, and raise the embroidery frame. 1 a Press here to raise the needle. a a...
...and follow the instructions below. Make sure that the sewing machine is accidentally pressed, the machine starts sewing, and your finger may be pricked with the needle or the needle may break. 4 a Needle position button Press the part of the embroidery frame holder c in the figure to the left ...side, and raise the embroidery frame. 1 a Press here to raise the needle. a a...
Users Manual - English
Page 141
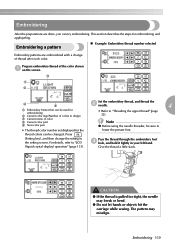
...), and then change of color d Current color part e Next color part • Refer to "Threading the upper thread" (page 32). Embroidering 139 Note z Before using the needle threader, be sure to "LCD Pass the thread through the embroidery foot c hole, and hold it lightly in ... not let hands or objects hit the carriage while sewing. This section describes the steps for embroidering b Current color step/Number of colors in the setting screen. c a b d e Set the embroidery thread, and thread the b needle. 4 a Embroidery frames that can be used for embroidering and appliqu&#...
...), and then change of color d Current color part e Next color part • Refer to "Threading the upper thread" (page 32). Embroidering 139 Note z Before using the needle threader, be sure to "LCD Pass the thread through the embroidery foot c hole, and hold it lightly in ... not let hands or objects hit the carriage while sewing. This section describes the steps for embroidering b Current color step/Number of colors in the setting screen. c a b d e Set the embroidery thread, and thread the b needle. 4 a Embroidery frames that can be used for embroidering and appliqu&#...
Users Manual - English
Page 155
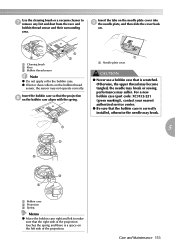
... left side of the projection. Insert the bobbin case so that is scratched. Otherwise, the upper thread may become tangled, the needle may break or sewing performance may break. a 5 b c c b a Bobbin case b Projection c Spring Memo z Move the bobbin case right and left to make sure that the ... z If lint or dust collects on . Use the cleaning brush or a vacuum cleaner to the bobbin case. For a new bobbin case (part code: XC3152-221 (green marking)), contact your nearest authorized service center. ● Be sure that the right side of the projection touches the spring...
... left side of the projection. Insert the bobbin case so that is scratched. Otherwise, the upper thread may become tangled, the needle may break or sewing performance may break. a 5 b c c b a Bobbin case b Projection c Spring Memo z Move the bobbin case right and left to make sure that the ... z If lint or dust collects on . Use the cleaning brush or a vacuum cleaner to the bobbin case. For a new bobbin case (part code: XC3152-221 (green marking)), contact your nearest authorized service center. ● Be sure that the right side of the projection touches the spring...

