
Operation Manual
Page 2
... any user servicing adjustments mentioned in the machine falling, which could cause injuries. • When lifting the machine, be sure to turn it off, then grasp the plug and pull it has been dropped or damaged, or water is required when sewing: • Always pay close attention to...not to make any adjustments mentioned in injuries. 5 Special care is spilled on an unstable surface, such as a stove or iron; otherwise, the machine, power cord or garment being administered. • Do not use extension cords. Do not use an extension cord. • Always unplug your work...
... any user servicing adjustments mentioned in the machine falling, which could cause injuries. • When lifting the machine, be sure to turn it off, then grasp the plug and pull it has been dropped or damaged, or water is required when sewing: • Always pay close attention to...not to make any adjustments mentioned in injuries. 5 Special care is spilled on an unstable surface, such as a stove or iron; otherwise, the machine, power cord or garment being administered. • Do not use extension cords. Do not use an extension cord. • Always unplug your work...
Operation Manual
Page 3
...a damaged or incorrect needle plate, as it could cause the needle to break. • Do not push or pull the fabric when sewing, and follow the troubleshooting table in this manual. • Do not turn it off when making any assemblies, the presser feet, needle... Use accessories recommended by a person responsible for their safety. For additional product information, visit our web site at www.brother.com SAVE THESE INSTRUCTIONS This machine is intended for household use of the operation manual to change without supervision. 2 This appliance is required, first follow careful...
...a damaged or incorrect needle plate, as it could cause the needle to break. • Do not push or pull the fabric when sewing, and follow the troubleshooting table in this manual. • Do not turn it off when making any assemblies, the presser feet, needle... Use accessories recommended by a person responsible for their safety. For additional product information, visit our web site at www.brother.com SAVE THESE INSTRUCTIONS This machine is intended for household use of the operation manual to change without supervision. 2 This appliance is required, first follow careful...
Operation Manual
Page 4
... MAINTENANCE 38 Restrictions on oiling 38 Precautions on plug. • Always replace the fuse cover. KNOWING YOUR SEWING MACHINE 4 ACCESSORIES 4 Optional accessories 4 THE MAIN PARTS 5 Flat bed attachment 5 USING YOUR SEWING MACHINE 6 Connecting plugs 6 Main power and sewing light switch 7 Foot controller 7 Checking the needle 7 Replacing the needle 7 Changing the presser foot 8 THE CONTROLS 9 Pattern...
... MAINTENANCE 38 Restrictions on oiling 38 Precautions on plug. • Always replace the fuse cover. KNOWING YOUR SEWING MACHINE 4 ACCESSORIES 4 Optional accessories 4 THE MAIN PARTS 5 Flat bed attachment 5 USING YOUR SEWING MACHINE 6 Connecting plugs 6 Main power and sewing light switch 7 Foot controller 7 Checking the needle 7 Replacing the needle 7 Changing the presser foot 8 THE CONTROLS 9 Pattern...
Operation Manual
Page 5
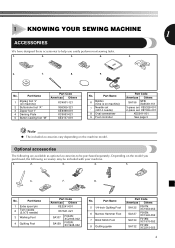
...001 2-piece set: XE7064-001 XE5241-001 See page 5 Note ● The included accessories vary depending on machine) 2 Buttonhole foot "A" 3 Zipper foot "I" 4 Darning Plate 5 Button sewing foot "M" Part Code Americas Others XC4901-121 X59369-321 XE9369-001 XC6063-021 XE2137-001 No. Optional accessories ... F001N: XC1944-052 SA127 F003N: XC1945-052 SA134 F018N: XC1976-052 SA132 F016N: XC2215-052 4 1 KNOWING YOUR SEWING MACHINE 1 ACCESSORIES We have designed these accessories to help you purchased, the following are available as optional accessories to be included with your...
...001 2-piece set: XE7064-001 XE5241-001 See page 5 Note ● The included accessories vary depending on machine) 2 Buttonhole foot "A" 3 Zipper foot "I" 4 Darning Plate 5 Button sewing foot "M" Part Code Americas Others XC4901-121 X59369-321 XE9369-001 XC6063-021 XE2137-001 No. Optional accessories ... F001N: XC1944-052 SA127 F003N: XC1945-052 SA134 F018N: XC1976-052 SA132 F016N: XC2215-052 4 1 KNOWING YOUR SEWING MACHINE 1 ACCESSORIES We have designed these accessories to help you purchased, the following are available as optional accessories to be included with your...

Operation Manual
Page 6
...the country or region. B Buttonhole fine-adjustment screw (Page 28) C Main power and sewing light switch (Page 7) You can be stored in the foot controller plug and connect the machine to raise and lower the presser foot. Slide the flat bed attachment to the left to...Foot controller jack / socket (Page 6) Plug in a compartment inside the flat bed attachment. E Presser foot lever (Page 14) Used to the power supply. KNOWING YOUR SEWING MACHINE THE MAIN PARTS 43 2 1 5 A 6 0 7 9 8 1 Bobbin winder (Page 11) This winds the thread onto the bobbin for 220-240V area The ...
...the country or region. B Buttonhole fine-adjustment screw (Page 28) C Main power and sewing light switch (Page 7) You can be stored in the foot controller plug and connect the machine to raise and lower the presser foot. Slide the flat bed attachment to the left to...Foot controller jack / socket (Page 6) Plug in a compartment inside the flat bed attachment. E Presser foot lever (Page 14) Used to the power supply. KNOWING YOUR SEWING MACHINE THE MAIN PARTS 43 2 1 5 A 6 0 7 9 8 1 Bobbin winder (Page 11) This winds the thread onto the bobbin for 220-240V area The ...
Operation Manual
Page 7
... the proper outlet. These things may result. Otherwise a fire may damage the cord and cause fire or electric shock. When restarting the sewing machine, follow the necessary procedure to heat. To reduce the risk of time. Do not subject the cord to correctly operate the...unplug the power supply cord. Connecting plugs Connect the foot controller plug to a wall 2 outlet. b a Note ● If a power outage occurs while the sewing machine is in poor condition. ● Turn off the main power first. Do not modify the plug in the outlet, reverse the plug. Electric shock may...
... the proper outlet. These things may result. Otherwise a fire may damage the cord and cause fire or electric shock. When restarting the sewing machine, follow the necessary procedure to heat. To reduce the risk of time. Do not subject the cord to correctly operate the...unplug the power supply cord. Connecting plugs Connect the foot controller plug to a wall 2 outlet. b a Note ● If a power outage occurs while the sewing machine is in poor condition. ● Turn off the main power first. Do not modify the plug in the outlet, reverse the plug. Electric shock may...
Operation Manual
Page 8
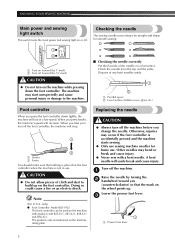
... speed. Otherwise, injuries may occur if the foot controller is accidentally pressed and the machine starts sewing. ● Only use sewing machine needles for smooth sewing. 1 2 1 Turn on the machine rating plate. Turn off the machine. 1 Raise the needle by turning the 2 handwheel toward the 'O' mark) CAUTION ...turn off . KNOWING YOUR SEWING MACHINE Main power and sewing light switch This switch turns the main power and sewing light on the machine with a bent needle. Checking the needle The sewing needle must always be used on or off the machine before you press the foot ...
... speed. Otherwise, injuries may occur if the foot controller is accidentally pressed and the machine starts sewing. ● Only use sewing machine needles for smooth sewing. 1 2 1 Turn on the machine rating plate. Turn off the machine. 1 Raise the needle by turning the 2 handwheel toward the 'O' mark) CAUTION ...turn off . KNOWING YOUR SEWING MACHINE Main power and sewing light switch This switch turns the main power and sewing light on the machine with a bent needle. Checking the needle The sewing needle must always be used on or off the machine before you press the foot ...
Operation Manual
Page 9
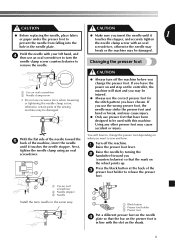
...the needle by turning the 2 handwheel toward the 5 back of the machine, insert the needle until it touches the needle stopper. With the flat side of the sewing machine may cause accident or injury. Turn off the machine before you change the presser foot depending on the shank. 8 CAUTION ...21 1 Use an oval screwdriver 2 Needle clamp screw • Do not use an oval screwdriver to turn off the machine. 1 Raise the ...
...the needle by turning the 2 handwheel toward the 5 back of the machine, insert the needle until it touches the needle stopper. With the flat side of the sewing machine may cause accident or injury. Turn off the machine before you change the presser foot depending on the shank. 8 CAUTION ...21 1 Use an oval screwdriver 2 Needle clamp screw • Do not use an oval screwdriver to turn off the machine. 1 Raise the ...

Operation Manual
Page 10
... injury. If the presser foot is not installed with the correct orientation, the needle may strike the presser foot, which may be damaged. KNOWING YOUR SEWING MACHINE Lower the presser foot lever and fix the 5 presser foot onto the shank. If the needle is in the down position when you (counterclockwise) so...
... injury. If the presser foot is not installed with the correct orientation, the needle may strike the presser foot, which may be damaged. KNOWING YOUR SEWING MACHINE Lower the presser foot lever and fix the 5 presser foot onto the shank. If the needle is in the down position when you (counterclockwise) so...

Operation Manual
Page 11
...32) 1.5 (1/16) 1.5 (1/16) 3 (1/8) 23, 29, 32, 33, 37 23, 29, 32, 33, 37 You can use reverse sewing for back tacking and reinforcing seams. To sew in reverse, push the reverse sewing lever in as far as possible and hold it in that position while you lightly push the foot controller...ZIGZAG STITCH 2 (1/16) 5 (3/16) 23, 29, 32, 33, 37 11 ZIGZAG (SATIN) STITCH 12 0.5 (1/32) 5 (3/16) 2 (1/16) 23, 32, 33 25 1 1 Reverse sewing lever SHELL TUCK STITCH 5 (3/16) 13 1 (1/16) 25 ELASTIC STITCH 5 (3/16) 10 To sew forward, release the reverse sewing lever. The machine will then sew forward.
...32) 1.5 (1/16) 1.5 (1/16) 3 (1/8) 23, 29, 32, 33, 37 23, 29, 32, 33, 37 You can use reverse sewing for back tacking and reinforcing seams. To sew in reverse, push the reverse sewing lever in as far as possible and hold it in that position while you lightly push the foot controller...ZIGZAG STITCH 2 (1/16) 5 (3/16) 23, 29, 32, 33, 37 11 ZIGZAG (SATIN) STITCH 12 0.5 (1/32) 5 (3/16) 2 (1/16) 23, 32, 33 25 1 1 Reverse sewing lever SHELL TUCK STITCH 5 (3/16) 13 1 (1/16) 25 ELASTIC STITCH 5 (3/16) 10 To sew forward, release the reverse sewing lever. The machine will then sew forward.
Operation Manual
Page 12
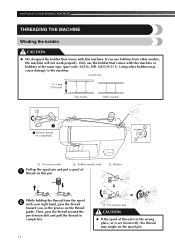
...that comes with this machine. Then, pass the thread around the pre-tension disk and pull the thread in the groove on this pin. 3 Bobbin While holding the thread from other bobbins may tangle on the spool pin. KNOWING YOUR SEWING MACHINE THREADING THE MACHINE Winding the bobbin CAUTION... ● We designed the bobbin that comes with this machine or bobbins of the same type (part code: SA156, SFB: XA5539-151). If you ,...
...that comes with this machine. Then, pass the thread around the pre-tension disk and pull the thread in the groove on this pin. 3 Bobbin While holding the thread from other bobbins may tangle on the spool pin. KNOWING YOUR SEWING MACHINE THREADING THE MACHINE Winding the bobbin CAUTION... ● We designed the bobbin that comes with this machine or bobbins of the same type (part code: SA156, SFB: XA5539-151). If you ,...
Operation Manual
Page 13
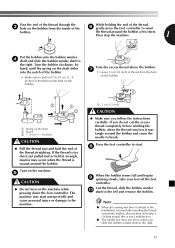
...the foot controller. If the thread is wound around the bobbin and cause the needle to the right. the thread around the bobbin, the machine will make a clicking sound; If you follow the instructions carefully. Press the foot controller to start unexpectedly and cause personal injury or damage ... angle, injuries may tangle around the bobbin. this is turned after winding the thread around the bobbin a few times. Note ● When the sewing machine is started or the handwheel is not a malfunction. ● The needle bar does not move when you slide the bobbin winder shaft to the ...
...the foot controller. If the thread is wound around the bobbin and cause the needle to the right. the thread around the bobbin, the machine will make a clicking sound; If you follow the instructions carefully. Press the foot controller to start unexpectedly and cause personal injury or damage ... angle, injuries may tangle around the bobbin. this is turned after winding the thread around the bobbin a few times. Note ● When the sewing machine is started or the handwheel is not a malfunction. ● The needle bar does not move when you slide the bobbin winder shaft to the ...
Operation Manual
Page 14
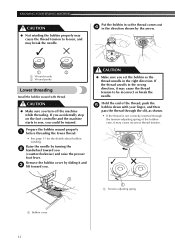
...● Make sure you set the bobbin so the thread unrolls in the right direction. CAUTION ● Make sure you turn off the machine while threading. Prepare the bobbin wound properly 1 before threading the lower thread. • See page 11 for the details about bobbin winding....If you (counterclockwise) and raise the presser foot lever. Hold the end of the bobbin case, it may cause the thread tension to sew, you . KNOWING YOUR SEWING MACHINE CAUTION ● Not winding the bobbin properly may cause the thread tension to loosen, and may cause incorrect thread tension. 1 1 1 ...
...● Make sure you set the bobbin so the thread unrolls in the right direction. CAUTION ● Make sure you turn off the machine while threading. Prepare the bobbin wound properly 1 before threading the lower thread. • See page 11 for the details about bobbin winding....If you (counterclockwise) and raise the presser foot lever. Hold the end of the bobbin case, it may cause the thread tension to sew, you . KNOWING YOUR SEWING MACHINE CAUTION ● Not winding the bobbin properly may cause the thread tension to loosen, and may cause incorrect thread tension. 1 1 1 ...

Operation Manual
Page 15
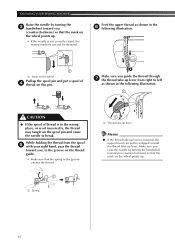
... after threading the upper thread. 1 Groove 2 Projection Upper threading 2 2 3 4 1 5 1 Spool pin 2 Thread guide (back) 3 Thread guide (front) 4 Thread take-up the lower thread before starting 1 sewing. For details on the correct combination of the machine (as shown in the correct combination. Replace the bobbin cover. Turn off the...
... after threading the upper thread. 1 Groove 2 Projection Upper threading 2 2 3 4 1 5 1 Spool pin 2 Thread guide (back) 3 Thread guide (front) 4 Thread take-up the lower thread before starting 1 sewing. For details on the correct combination of the machine (as shown in the correct combination. Replace the bobbin cover. Turn off the...
Operation Manual
Page 16
... Memo ● If the thread take-up lever is lowered, the upper thread can not be wrapped around the thread take-up lever. KNOWING YOUR SEWING MACHINE Raise the needle by turning the handwheel toward you (counterclockwise) so that the mark on the wheel points up. 15 Make sure you raise the... by turning the 3 handwheel toward you (counterclockwise) so that the mark on the wheel points up. • If the needle is not correctly raised, the sewing machine can not be threaded.
... Memo ● If the thread take-up lever is lowered, the upper thread can not be wrapped around the thread take-up lever. KNOWING YOUR SEWING MACHINE Raise the needle by turning the handwheel toward you (counterclockwise) so that the mark on the wheel points up. 15 Make sure you raise the... by turning the 3 handwheel toward you (counterclockwise) so that the mark on the wheel points up. • If the needle is not correctly raised, the sewing machine can not be threaded.

Operation Manual
Page 17
... upper thread to back 9 leaving a thread tail of about 5 cm (2 inches). 1 1 5 cm (2 inches) 1 2 1 2 1 Upper thread 2 Lower thread Pull out about 10 cm (4 inches) of the machine under the presser foot. Drawing up the lower • The thread can easily be passed behind the guide above the 8 needle. Thread the needle from... the upper thread with your right hand. 1 thread, slowly turn the handwheel toward the back of both 3 threads and put them toward you may cause sewing problems. 1 2 1 Upper thread 2 Lower thread 16
... upper thread to back 9 leaving a thread tail of about 5 cm (2 inches). 1 1 5 cm (2 inches) 1 2 1 2 1 Upper thread 2 Lower thread Pull out about 10 cm (4 inches) of the machine under the presser foot. Drawing up the lower • The thread can easily be passed behind the guide above the 8 needle. Thread the needle from... the upper thread with your right hand. 1 thread, slowly turn the handwheel toward the back of both 3 threads and put them toward you may cause sewing problems. 1 2 1 Upper thread 2 Lower thread 16
Operation Manual
Page 18
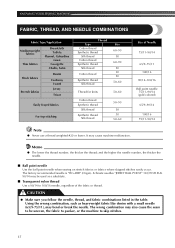
...to be used as heavyweight fabric like denim with a small needle (65/9-75/11), may cause machine malfunction. The wrong combination may be uneven, the fabric to pucker, or the machine to 100/16 needle, regardless of Needle 75/11-90/14 65/9-75/11 100/16 90/14... (gold colored) 65/9-90/14 100/16 75/11-90/14 Note ● Never use a thread weighted #20 or lower. KNOWING YOUR SEWING MACHINE FABRIC, THREAD, AND NEEDLE COMBINATIONS Fabric Type/Application Medium weight fabrics Thin fabrics Broadcloth Taffeta Flannel, Gabardine Lawn Georgette Challis, Satin Thick fabrics Stretch ...
...to be used as heavyweight fabric like denim with a small needle (65/9-75/11), may cause machine malfunction. The wrong combination may be uneven, the fabric to pucker, or the machine to 100/16 needle, regardless of Needle 75/11-90/14 65/9-75/11 100/16 90/14... (gold colored) 65/9-90/14 100/16 75/11-90/14 Note ● Never use a thread weighted #20 or lower. KNOWING YOUR SEWING MACHINE FABRIC, THREAD, AND NEEDLE COMBINATIONS Fabric Type/Application Medium weight fabrics Thin fabrics Broadcloth Taffeta Flannel, Gabardine Lawn Georgette Challis, Satin Thick fabrics Stretch ...

Operation Manual
Page 19
... 2 your hands away from moving parts. ● Do not stretch or pull the fabric during sewing. The needle may break and you (counterclockwise). Starting sewing Raise the presser foot lever. 5 Turn on the machine. 1 1 CAUTION ● Do not turn it the other way may cause the thread to ...does not hit basting pins or other objects during sewing, otherwise the needle may be damaged and you may be damaged. If you use the correct presser foot. Turning it toward the rear of the machine. 1 1 5 cm (2 inches) 18 The machine may be injured. ● Do not start ...
... 2 your hands away from moving parts. ● Do not stretch or pull the fabric during sewing. The needle may break and you (counterclockwise). Starting sewing Raise the presser foot lever. 5 Turn on the machine. 1 1 CAUTION ● Do not turn it the other way may cause the thread to ...does not hit basting pins or other objects during sewing, otherwise the needle may be damaged and you may be damaged. If you use the correct presser foot. Turning it toward the rear of the machine. 1 1 5 cm (2 inches) 18 The machine may be injured. ● Do not start ...

Operation Manual
Page 20
...the same as a pivot, turn the handwheel toward you want to change the sewing direction, and then raise the presser foot lever. Refer to "Reverse sewing lever" on the foot controller. 9 1 2 X The machine starts sewing. Raise the presser foot lever. b Pull the fabric to the left hand...you (counterclockwise). Raise the needle by pressing the reverse sewing lever. Trial sewing A trial piece of fabric should be sewn. Take your foot off the foot controller. 0 X The machine stops sewing. • You can use reverse sewing for your project, and check the thread tension and stitch...
...the same as a pivot, turn the handwheel toward you want to change the sewing direction, and then raise the presser foot lever. Refer to "Reverse sewing lever" on the foot controller. 9 1 2 X The machine starts sewing. Raise the presser foot lever. b Pull the fabric to the left hand...you (counterclockwise). Raise the needle by pressing the reverse sewing lever. Trial sewing A trial piece of fabric should be sewn. Take your foot off the foot controller. 0 X The machine stops sewing. • You can use reverse sewing for your project, and check the thread tension and stitch...
Operation Manual
Page 21
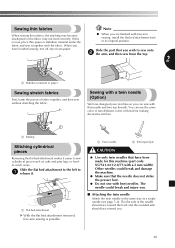
...spool pin CAUTION ● Use only twin needles that have designed your machine so you . ■ Attaching the twin needle Attach the twin needle in its original position. Sewing with a twin needle (Option) We have been made for this machine (part code: X57521-021:2.0/75 with a 2 mm width). Other ...same way as cuffs and pant legs, or hardto-reach areas. The needle could break and damage the machine. ● Make sure that you . 20 Sewing thin fabrics Note When sewing thin fabrics, the stitching may become misaligned or the fabric may not feed correctly. When you are finished...
...spool pin CAUTION ● Use only twin needles that have designed your machine so you . ■ Attaching the twin needle Attach the twin needle in its original position. Sewing with a twin needle (Option) We have been made for this machine (part code: X57521-021:2.0/75 with a 2 mm width). Other ...same way as cuffs and pant legs, or hardto-reach areas. The needle could break and damage the machine. ● Make sure that you . 20 Sewing thin fabrics Note When sewing thin fabrics, the stitching may become misaligned or the fabric may not feed correctly. When you are finished...


