

Accessory Catalog
Page 7
... the presser foot and guide the fabric through the presser foot as needed. 3. SA160 ABCDEFGHJKLMNO Straight Stitch Foot Straight Stitch Foot and Straight Stitch Needle Plate Vertical Stitching Alignment Foot Brother General Sewing Accessories 12 Straight Stitch Foot For precise straight stitching on thin fabrics or on both straight and curved lines. Use this presser foot only with the QuattroTM 6000D but is models. Available in the presser foot can be used for perfect topstitching on edges of the fabric against the presser foot. Make a cut edge like a serger or overlock...
... the presser foot and guide the fabric through the presser foot as needed. 3. SA160 ABCDEFGHJKLMNO Straight Stitch Foot Straight Stitch Foot and Straight Stitch Needle Plate Vertical Stitching Alignment Foot Brother General Sewing Accessories 12 Straight Stitch Foot For precise straight stitching on thin fabrics or on both straight and curved lines. Use this presser foot only with the QuattroTM 6000D but is models. Available in the presser foot can be used for perfect topstitching on edges of the fabric against the presser foot. Make a cut edge like a serger or overlock...

Accessory Catalog
Page 11
... ABCDEFJKMN www.brother.com Set the zigzag width slightly wider than the width of the braid. 3. Attach the presser foot and pull cords under the presser foot. 3. Perfect for couching! 1. Line up the center guide mark on the presser foot. 2. It can be used with brother sewing machines of 7 mm feed width. 1. Insert cords or threads into each hole on the machine. 2. Attach the presser foot onto the machine. 5. Stitch braid in place. Perfect for quilting appliqué! 1. Tighten...
... ABCDEFJKMN www.brother.com Set the zigzag width slightly wider than the width of the braid. 3. Attach the presser foot and pull cords under the presser foot. 3. Perfect for couching! 1. Line up the center guide mark on the presser foot. 2. It can be used with brother sewing machines of 7 mm feed width. 1. Insert cords or threads into each hole on the machine. 2. Attach the presser foot onto the machine. 5. Stitch braid in place. Perfect for quilting appliqué! 1. Tighten...

Accessory Catalog
Page 12
... the presser foot. Adjust the upper thread tension. 2. Decrease the upper thread tension and test various settings to see which one works on a drawn pattern line and sew (cut the center of the foot with the guideline and sew. Gathering Foot Used for ULT series, PC-6500, PC-8200 and PC-8500 sewing machines. Select a straight stitch, left needle position. 2. Requires Low Shank Adapter for gathering fabrics. Line up the center of loops to make or attach piping. Place threaded...
... the presser foot. Adjust the upper thread tension. 2. Decrease the upper thread tension and test various settings to see which one works on a drawn pattern line and sew (cut the center of the foot with the guideline and sew. Gathering Foot Used for ULT series, PC-6500, PC-8200 and PC-8500 sewing machines. Select a straight stitch, left needle position. 2. Requires Low Shank Adapter for gathering fabrics. Line up the center of loops to make or attach piping. Place threaded...

Accessory Catalog
Page 13
SA143 AFJKM Ruffler Foot Makes ruffles with this presser foot. 1. Adjust the amount of tuck or gather by placing the completed row in the center position. 3. Install and manually thread a twin needle. 2. Sew slowly for details.) Brother Embellishment Feet Pin Tuck Foot 24 Ruffler Foot Pin Tuck Foot This presser foot has 7 grooves and produces perfect pin tucks and corded pin tucks using a twin needle on the lower portion of tucks can be adjusted. 1. Draw a reference line to sew the first row...
SA143 AFJKM Ruffler Foot Makes ruffles with this presser foot. 1. Adjust the amount of tuck or gather by placing the completed row in the center position. 3. Install and manually thread a twin needle. 2. Sew slowly for details.) Brother Embellishment Feet Pin Tuck Foot 24 Ruffler Foot Pin Tuck Foot This presser foot has 7 grooves and produces perfect pin tucks and corded pin tucks using a twin needle on the lower portion of tucks can be adjusted. 1. Draw a reference line to sew the first row...

Accessory Catalog
Page 15
... zigzag stitch. 5. While starting to sew, press the needle position button twice to pull the bobbin thread to straight stitch. 3. Begin to hold the fabric firmly. 5. Lower the feed dogs. 3. Select a straight stitch or your preferred stitch such as the machine's lower feed dogs to be easily sewn. Set the fabric under the presser foot. 6. Gently holding the upper and bobbin threads sew about four locking stitches and finish the thread ends. Guide the fabric with the needle to allow fabric to feed the fabric consistently. The foot raises and lowers...
... zigzag stitch. 5. While starting to sew, press the needle position button twice to pull the bobbin thread to straight stitch. 3. Begin to hold the fabric firmly. 5. Lower the feed dogs. 3. Select a straight stitch or your preferred stitch such as the machine's lower feed dogs to be easily sewn. Set the fabric under the presser foot. 6. Gently holding the upper and bobbin threads sew about four locking stitches and finish the thread ends. Guide the fabric with the needle to allow fabric to feed the fabric consistently. The foot raises and lowers...

Accessory Catalog
Page 17
...drop embroidery pattern positioning. - Automatic Height Adjuster™ (AHA) feature adjusts the presser foot pressure automatically and continuously to repeat designs vertically or horizontally. Includes three new free-motion presser feet: Free-motion quilting foot "C" for more features to the next location! 4000D Premium Package Exclusively for embellishing a wide variety of making beautiful borders. Allows you superior stitch quality when stitching over differing fabric thicknesses. - Good for the Innov-is 4000D this upgrade adds outstanding quilting features, updated...
...drop embroidery pattern positioning. - Automatic Height Adjuster™ (AHA) feature adjusts the presser foot pressure automatically and continuously to repeat designs vertically or horizontally. Includes three new free-motion presser feet: Free-motion quilting foot "C" for more features to the next location! 4000D Premium Package Exclusively for embellishing a wide variety of making beautiful borders. Allows you superior stitch quality when stitching over differing fabric thicknesses. - Good for the Innov-is 4000D this upgrade adds outstanding quilting features, updated...

Accessory Catalog
Page 33
... the storage slots. Some hoops can be removed to accommodate a variety of spool sizes. The spool pins can set up to 10 spools of your selected dealer or check on creating. Brother Embroidery Accessories 63 Free-Standing Ten Spool Thread Stand Ten Spool Thread Stand Embroidery Machine Hoops Brother Embroidery Accessories 64 For all embroidery and sewing/embroidery machines. For all models: SA503 Free-Standing Ten Spool Thread Stand You can easily be used thread colors. Ask your spool thread tails by placing them...
... the storage slots. Some hoops can be removed to accommodate a variety of spool sizes. The spool pins can set up to 10 spools of your selected dealer or check on creating. Brother Embroidery Accessories 63 Free-Standing Ten Spool Thread Stand Ten Spool Thread Stand Embroidery Machine Hoops Brother Embroidery Accessories 64 For all embroidery and sewing/embroidery machines. For all models: SA503 Free-Standing Ten Spool Thread Stand You can easily be used thread colors. Ask your spool thread tails by placing them...

Accessory Catalog
Page 34
... sewing and embroidery machine brands. Designed for high speed embroidery stitching, made in a 5-pack sleeve) at selected dealers. 30-Pack: CYTPK30 Brother Countr y Yarn Embroider y Threads (30 Color Thread Pack) Attention all embroiderers, Quilters and Heirloom stitchers! Available in a 14-Pack and individual colors (sold in Japan for Brother® Embroidery Machines, but compatible with other sewing and embroidery machine brands. For best results, use the Brother Bobbin Thread designed specifically for your sewing...
... sewing and embroidery machine brands. Designed for high speed embroidery stitching, made in a 5-pack sleeve) at selected dealers. 30-Pack: CYTPK30 Brother Countr y Yarn Embroider y Threads (30 Color Thread Pack) Attention all embroiderers, Quilters and Heirloom stitchers! Available in a 14-Pack and individual colors (sold in Japan for Brother® Embroidery Machines, but compatible with other sewing and embroidery machine brands. For best results, use the Brother Bobbin Thread designed specifically for your sewing...

Accessory Catalog
Page 36
... thread is required to maintain contact with a chalk pen. 3. Brother Sewing Machine Attachments for PQ Series 69 Heavyweight Foot Ver y Narrow Foot Bobbin for PQ Series One package includes five metal bobbins. Attach the Needle Felting Attachment and lower the feed dogs. 2. Put a small amount of the fabric to get needle felting effects easily on the fabric under the Needle Felting Attachment. 4. SA159 SA180B SA181 Needle Felting Attachment Felting Needle Brother Sewing Machine Attachments for attaching piping, zippers, stitching angled...
... thread is required to maintain contact with a chalk pen. 3. Brother Sewing Machine Attachments for PQ Series 69 Heavyweight Foot Ver y Narrow Foot Bobbin for PQ Series One package includes five metal bobbins. Attach the Needle Felting Attachment and lower the feed dogs. 2. Put a small amount of the fabric to get needle felting effects easily on the fabric under the Needle Felting Attachment. 4. SA159 SA180B SA181 Needle Felting Attachment Felting Needle Brother Sewing Machine Attachments for attaching piping, zippers, stitching angled...

Accessory Catalog
Page 40
... the machine. 2. SA224CV SA221CV Hemming Set Finishes hems easily and quickly. Brother Cover Stitch Feet 78 Top Stitching Foot Set Top Stitching Foot Set Use included presser foot to 1/2 inch) bias tapes as holding the fabric lightly with 3 or 6 mm wide cover stitch. 3. SA226CV www.brother.com Attaching 12 mm (approx. 1/2") bias tape: Use the large bias tape sliding plate with the LC1 presser foot (included with your machine for a cover stitch, with the LC2 presser foot. Attach the hem positioning plate A/B to your machine for a cover stitch, with a tweezers. Sew...
... the machine. 2. SA224CV SA221CV Hemming Set Finishes hems easily and quickly. Brother Cover Stitch Feet 78 Top Stitching Foot Set Top Stitching Foot Set Use included presser foot to 1/2 inch) bias tapes as holding the fabric lightly with 3 or 6 mm wide cover stitch. 3. SA226CV www.brother.com Attaching 12 mm (approx. 1/2") bias tape: Use the large bias tape sliding plate with the LC1 presser foot (included with your machine for a cover stitch, with the LC2 presser foot. Attach the hem positioning plate A/B to your machine for a cover stitch, with a tweezers. Sew...

Users Manual - Multi
Page 2
... operate the machine with same type rated 15 watts. Keep ventilation openings of the machine and foot control free from outlet. 9. "SAVE THESE INSTRUCTIONS" "This machine is not intended for household use by the manufacturer as threading needle, changing needle, threading bobbin, or changing the presser foot, and the like. 15. Use this manual. 3. Special care is not working properly, if it to the symbol "O" position when making any opening. 6. Do not pull or push fabric while stitching...
... operate the machine with same type rated 15 watts. Keep ventilation openings of the machine and foot control free from outlet. 9. "SAVE THESE INSTRUCTIONS" "This machine is not intended for household use by the manufacturer as threading needle, changing needle, threading bobbin, or changing the presser foot, and the like. 15. Use this manual. 3. Special care is not working properly, if it to the symbol "O" position when making any opening. 6. Do not pull or push fabric while stitching...
Users Manual - Multi
Page 7
... ...3 OPERATING YOUR SEWING MACHINE ...5 Connecting Plugs ...5 Main Power/Sewing Light Switch ...7 Foot Controller ...8 Checking the Needle ...9 Replacing the Needle ...9 Changing the Presser Foot ...11 Flat Bed Attachment ...11 VARIOUS CONTROLS ...12 Pattern Selection Dial ...12 Recommended Widths and Lengths for Stitches ...13 Stitch Length Dial ...16 Stitch Width Dial ...17 Reverse Sewing Lever ...17 Feed Dog Position Switch ...18 Converting to Free-arm Style ...18 Wide table ...19 THREADING THE MACHINE ...21 Winding the Bobbin ...21 Lower Threading ...23 Upper Threading ...25 Using Needle...
... ...3 OPERATING YOUR SEWING MACHINE ...5 Connecting Plugs ...5 Main Power/Sewing Light Switch ...7 Foot Controller ...8 Checking the Needle ...9 Replacing the Needle ...9 Changing the Presser Foot ...11 Flat Bed Attachment ...11 VARIOUS CONTROLS ...12 Pattern Selection Dial ...12 Recommended Widths and Lengths for Stitches ...13 Stitch Length Dial ...16 Stitch Width Dial ...17 Reverse Sewing Lever ...17 Feed Dog Position Switch ...18 Converting to Free-arm Style ...18 Wide table ...19 THREADING THE MACHINE ...21 Winding the Bobbin ...21 Lower Threading ...23 Upper Threading ...25 Using Needle...

Users Manual - Multi
Page 10
A FEED DOG POSITION SWITCH (Page 18) B PATTERN INDICATION WINDOW (Page 12) Shows the stitch number selected. F MAIN POWER/SEWING LIGHT SWITCH (Page 7) Turn ON/OFF the main power/sewing light switch. H BUTTONHOLE FINE ADJUSTMENT SCREW (Page 51) I J 1 C HOLE FOR VERTICAL SPOOL PIN (Page 31) Used to control sewing speed/start and stop. B 8 : 9 C D A E F G H I PRESSER FOOT LEVER (Page 25) J FOOT CONTROLLER (Page 8) Used to hold a second spool of the upper thread. 6 BUTTONHOLE LEVER (Page 47) 7 NEEDLE THREADER (Page 27) 8 FLAT BED ATTACHMENT WITH ACCESSORY COMPARTMENT (Page 11, 18...
A FEED DOG POSITION SWITCH (Page 18) B PATTERN INDICATION WINDOW (Page 12) Shows the stitch number selected. F MAIN POWER/SEWING LIGHT SWITCH (Page 7) Turn ON/OFF the main power/sewing light switch. H BUTTONHOLE FINE ADJUSTMENT SCREW (Page 51) I J 1 C HOLE FOR VERTICAL SPOOL PIN (Page 31) Used to control sewing speed/start and stop. B 8 : 9 C D A E F G H I PRESSER FOOT LEVER (Page 25) J FOOT CONTROLLER (Page 8) Used to hold a second spool of the upper thread. 6 BUTTONHOLE LEVER (Page 47) 7 NEEDLE THREADER (Page 27) 8 FLAT BED ATTACHMENT WITH ACCESSORY COMPARTMENT (Page 11, 18...

Users Manual - Multi
Page 12
...ACCESSORIES Zipper Foot (1 pc.) Bobbin (3 pcs.) Needle Pack Twin Needle (1 pc.) Buttonhole Foot (1 pc.) Satin Stitch Foot (1 pc.) Spool Cap (Large) (1 pc.) Spool Cap (Small) (1 pc.) Cleaning Brush (1 pc.) Extra Spool Pin (1 pc.) Screwdriver (1 pc.) Seam Ripper (1 pc.) Hard Case (1 pc.) Wide table(1 pc.) KNOWING YOUR SEWING MACHINE CONOZCA SU MÁQUINA DE COSER CONNAITRE SA MACHINE A COUDRE 3 129583-021 4 X57521-021 5 XA4911-121 6 137988-101 E Walking Foot F Free-motion Quilting Foot G 1/4-Inch Quilting Foot 7 130012-054 8 130013-154 H Quilting guide Zigzag Presser Foot is on machine...
...ACCESSORIES Zipper Foot (1 pc.) Bobbin (3 pcs.) Needle Pack Twin Needle (1 pc.) Buttonhole Foot (1 pc.) Satin Stitch Foot (1 pc.) Spool Cap (Large) (1 pc.) Spool Cap (Small) (1 pc.) Cleaning Brush (1 pc.) Extra Spool Pin (1 pc.) Screwdriver (1 pc.) Seam Ripper (1 pc.) Hard Case (1 pc.) Wide table(1 pc.) KNOWING YOUR SEWING MACHINE CONOZCA SU MÁQUINA DE COSER CONNAITRE SA MACHINE A COUDRE 3 129583-021 4 X57521-021 5 XA4911-121 6 137988-101 E Walking Foot F Free-motion Quilting Foot G 1/4-Inch Quilting Foot 7 130012-054 8 130013-154 H Quilting guide Zigzag Presser Foot is on machine...
Users Manual - Multi
Page 32
... the needle to its highest position by turning the handwheel toward you accidentally press on the right side (see arrow 1 at left) until the cover clicks into place. * You can begin sewing immediately without drawing up the bobbin thread. 23 If you (counterclockwise) and raise the presser foot lever. 2. Insert bobbin and pass thread through the bobbin thread path, then pull the thread forward to operate...
... the needle to its highest position by turning the handwheel toward you accidentally press on the right side (see arrow 1 at left) until the cover clicks into place. * You can begin sewing immediately without drawing up the bobbin thread. 23 If you (counterclockwise) and raise the presser foot lever. 2. Insert bobbin and pass thread through the bobbin thread path, then pull the thread forward to operate...

Users Manual - Multi
Page 36
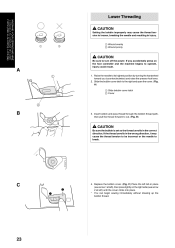
... twin needle and wing needle. A) 1 Needle 2 Needle threader lever 3 Guide 2 1 4 4. Check the table on page 33 for appropriate needle and thread combinations. Make sure that the hook catches the thread. 1 2 3 4 Needle Needle threader lever Guide Hook holder B 5. While lightly holding the thread, rotate the needle threader lever toward the front of the machine (toward the back of the needle manually from you (counter-clockwise) to raise the needle to "O". 1. Make sure the main power switch is in the highest position. D 27 CAUTION When using...
... twin needle and wing needle. A) 1 Needle 2 Needle threader lever 3 Guide 2 1 4 4. Check the table on page 33 for appropriate needle and thread combinations. Make sure that the hook catches the thread. 1 2 3 4 Needle Needle threader lever Guide Hook holder B 5. While lightly holding the thread, rotate the needle threader lever toward the front of the machine (toward the back of the needle manually from you (counter-clockwise) to raise the needle to "O". 1. Make sure the main power switch is in the highest position. D 27 CAUTION When using...

Users Manual - Multi
Page 44
... position. 2. REMOVING THE MATERIAL FROM THE MACHINE 1. Cut both threads with the needle still in the Pattern Indication Window. 3. Straight Stitching Pattern (Straight Stitch) (Triple Stretch Stitch) Stitch Length 1-4.5 3.5 SS Stitch Width STARTING SEWING 1. Place the fabric under the presser foot toward the back of the machine. Lower the presser foot and start sewing in the forward direction by applying pressure to the left side of seams and where reinforcement is also in the new direction. Release the Reverse Sewing Lever and start sewing in its new direction using...
... position. 2. REMOVING THE MATERIAL FROM THE MACHINE 1. Cut both threads with the needle still in the Pattern Indication Window. 3. Straight Stitching Pattern (Straight Stitch) (Triple Stretch Stitch) Stitch Length 1-4.5 3.5 SS Stitch Width STARTING SEWING 1. Place the fabric under the presser foot toward the back of the machine. Lower the presser foot and start sewing in the forward direction by applying pressure to the left side of seams and where reinforcement is also in the new direction. Release the Reverse Sewing Lever and start sewing in its new direction using...

Users Manual - Multi
Page 67
... presser foot, injury may result. Lower the feed dogs by A in the illustration is above the needle clamp screw, then lower the Presser Foot Lever and tighten the presser foot screw. * Be sure that the needle clamp screw is useful for darning, monogramming and freemotion machine quilting. 1. Set the Pattern Selection Dial to Straight Stitch. * Before starting to tighten the presser foot holder screw securely. Be sure to turn the handwheel toward the front of the machine to sew over the drawn design. (See fig. Remove the power...
... presser foot, injury may result. Lower the feed dogs by A in the illustration is above the needle clamp screw, then lower the Presser Foot Lever and tighten the presser foot screw. * Be sure that the needle clamp screw is useful for darning, monogramming and freemotion machine quilting. 1. Set the Pattern Selection Dial to Straight Stitch. * Before starting to tighten the presser foot holder screw securely. Be sure to turn the handwheel toward the front of the machine to sew over the drawn design. (See fig. Remove the power...

Users Manual - Multi
Page 69
...Remove the presser foot and presser foot holder. Sandwich a piece of quilt batting between embroidery hoops as firmly as shown on the surface of the design by setting the Feed Dog Position Switch to the appropriate stitch setting for embroidering and quilting) on page 18. 2. Monogramming, Embroidering and Quilting Pattern (Zigzag Stitch) Stitch Length Stitch Width Any Any Foot Feed Dog Free-motion quilting foot Down Position PREPARING FOR MONOGRAMMING, EMBROIDERING, AND QUILTING 1. Lower the feed dogs by moving the hoop slowly along the lettering at the starting position...
...Remove the presser foot and presser foot holder. Sandwich a piece of quilt batting between embroidery hoops as firmly as shown on the surface of the design by setting the Feed Dog Position Switch to the appropriate stitch setting for embroidering and quilting) on page 18. 2. Monogramming, Embroidering and Quilting Pattern (Zigzag Stitch) Stitch Length Stitch Width Any Any Foot Feed Dog Free-motion quilting foot Down Position PREPARING FOR MONOGRAMMING, EMBROIDERING, AND QUILTING 1. Lower the feed dogs by moving the hoop slowly along the lettering at the starting position...

Users Manual - Multi
Page 87
... Feed Dog Position Switch ...18 Flat Bed Attachment with Accessory Compartment ...11, 18 Foot Controller ...8 Free-arm sewing ...18 Free-motion Quilting Foot ...3, 58, 60, 62 T Thread Tension ...32 Triangle Stitch ...43 Triple Stretch Stitch ...35 Triple Zigzag Stretch Stitch ...46 Twin Needle Sewing ...30 G Gathering ...55 H Hole for Vertical Spool Pin ...31 U Upper Tension Control Dial ...32 Upper Threading ...25 Using Needle Threader ...27 L Lightning Stitch ...43 Link Stitch ...44 Lower Threading ...23 W Walking Foot ...3, 63 Wide table ...3, 19 Winding the Bobbin ...21 M Main Power...
... Feed Dog Position Switch ...18 Flat Bed Attachment with Accessory Compartment ...11, 18 Foot Controller ...8 Free-arm sewing ...18 Free-motion Quilting Foot ...3, 58, 60, 62 T Thread Tension ...32 Triangle Stitch ...43 Triple Stretch Stitch ...35 Triple Zigzag Stretch Stitch ...46 Twin Needle Sewing ...30 G Gathering ...55 H Hole for Vertical Spool Pin ...31 U Upper Tension Control Dial ...32 Upper Threading ...25 Using Needle Threader ...27 L Lightning Stitch ...43 Link Stitch ...44 Lower Threading ...23 W Walking Foot ...3, 63 Wide table ...3, 19 Winding the Bobbin ...21 M Main Power...


