
Users Manual - English and Spanish
Page 2
... ensure compliance with the limits for any interference received,including interference that the product Product Name Model Number : Brother P-touch Electronic Labeling System : PT-1950/1960 complies with the instructions, may not cause harmful interference, and (2) this equipment does cause harmful interference to... est conforme à la norme NMB-003 du Canada. The names of Conformity (For USA Only) Responsible Party : Brother International Corporation 100 Somerset Corporate Boulevard Bridgewater, NJ 08807-0911 USA TEL : (908) 704-1700 declares that may cause undesired operation...
... ensure compliance with the limits for any interference received,including interference that the product Product Name Model Number : Brother P-touch Electronic Labeling System : PT-1950/1960 complies with the instructions, may not cause harmful interference, and (2) this equipment does cause harmful interference to... est conforme à la norme NMB-003 du Canada. The names of Conformity (For USA Only) Responsible Party : Brother International Corporation 100 Somerset Corporate Boulevard Bridgewater, NJ 08807-0911 USA TEL : (908) 704-1700 declares that may cause undesired operation...

Users Manual - English and Spanish
Page 3
.... For the name of your Product is eligible for loss or damage to Brother or an Authorized Service Center within 90 days from other than defects in materials or workmanship. You are not limited to label cassettes, cutters, stamps, power adapters, cases and batteries. • Except ...as to whether to repair or replace the Machine and/or accompanying Consumable and Accessory Item(s) is made available for parts or labor. Brother reserves the right to supply a ...
.... For the name of your Product is eligible for loss or damage to Brother or an Authorized Service Center within 90 days from other than defects in materials or workmanship. You are not limited to label cassettes, cutters, stamps, power adapters, cases and batteries. • Except ...as to whether to repair or replace the Machine and/or accompanying Consumable and Accessory Item(s) is made available for parts or labor. Brother reserves the right to supply a ...
Users Manual - English and Spanish
Page 6
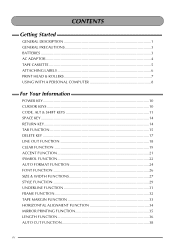
CONTENTS Getting Started GENERAL DESCRIPTION 1 GENERAL PRECAUTIONS 3 BATTERIES ...3 AC ADAPTOR ...4 TAPE CASSETTE 5 ATTACHING LABELS 6 PRINT HEAD & ROLLERS 7 USING WITH A PERSONAL COMPUTER 8 For Your Information POWER KEY...10 CURSOR KEYS 10 CODE, ALT & SHIFT KEYS 11 SPACE KEY ...14 RETURN ...
CONTENTS Getting Started GENERAL DESCRIPTION 1 GENERAL PRECAUTIONS 3 BATTERIES ...3 AC ADAPTOR ...4 TAPE CASSETTE 5 ATTACHING LABELS 6 PRINT HEAD & ROLLERS 7 USING WITH A PERSONAL COMPUTER 8 For Your Information POWER KEY...10 CURSOR KEYS 10 CODE, ALT & SHIFT KEYS 11 SPACE KEY ...14 RETURN ...
Users Manual - English and Spanish
Page 13
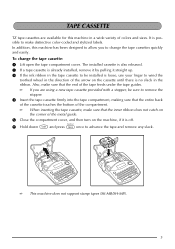
Also, make sure that the entire back of the cassette touches the bottom of the compartment. The installed cassette is also released. 2 If a tape cassette is already installed, remove it by pulling it is off. 6 Hold ... firmly into the tape compartment, making sure that the end of colors and sizes. When inserting the tape cassette, make distinctive color-coded and stylized labels. If you are available for this machine has been designed to allow you to make sure that the inner ribbon does not catch on the...
Also, make sure that the entire back of the cassette touches the bottom of the compartment. The installed cassette is also released. 2 If a tape cassette is already installed, remove it by pulling it is off. 6 Hold ... firmly into the tape compartment, making sure that the end of colors and sizes. When inserting the tape cassette, make distinctive color-coded and stylized labels. If you are available for this machine has been designed to allow you to make sure that the inner ribbon does not catch on the...
Users Manual - English and Spanish
Page 14
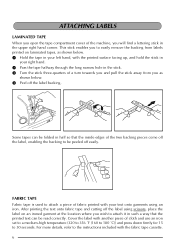
... as shown below. 4 Peel off easily. FABRIC TAPE Fabric tape is used to attach a piece of fabric printed with the fabric tape cassette. 6 Cover the label with another piece of cloth and use an iron set to a medium-high temperature (320 to 356 ˚F (160 to 180 ˚C)) and press down... 15 to the instructions included with your right hand. 2 Pass the tape halfway through the long narrow hole in the upper right hand corner. ATTACHING LABELS LAMINATED TAPE When you open the tape compartment cover of the machine, you will find a lettering stick in the stick. 3 Turn the stick three-...
... as shown below. 4 Peel off easily. FABRIC TAPE Fabric tape is used to attach a piece of fabric printed with the fabric tape cassette. 6 Cover the label with another piece of cloth and use an iron set to a medium-high temperature (320 to 356 ˚F (160 to 180 ˚C)) and press down... 15 to the instructions included with your right hand. 2 Pass the tape halfway through the long narrow hole in the upper right hand corner. ATTACHING LABELS LAMINATED TAPE When you open the tape compartment cover of the machine, you will find a lettering stick in the stick. 3 Turn the stick three-...
Users Manual - English and Spanish
Page 15
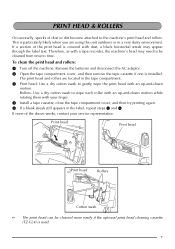
.... If a section of the print head is covered with your service representative. The print head and rollers are using the unit outdoors or in the label, repeat steps 3 and 4. To clean the print head and rollers: 1 Turn off the machine. Rollers: Use a dry cotton swab to wipe each roller with an... rotating them with dust, a black horizontal streak may need to gently wipe the print head with a tape recorder, the machine's head may appear through the label text.
.... If a section of the print head is covered with your service representative. The print head and rollers are using the unit outdoors or in the label, repeat steps 3 and 4. To clean the print head and rollers: 1 Turn off the machine. Rollers: Use a dry cotton swab to wipe each roller with an... rotating them with dust, a black horizontal streak may need to gently wipe the print head with a tape recorder, the machine's head may appear through the label text.
Users Manual - English and Spanish
Page 16
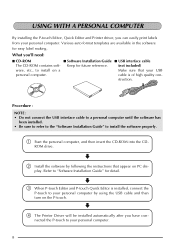
... been installed. • Be sure to refer to the "Software Installation Guide" to install on the P-touch. 4 The Printer Driver will be installed automatically after you can easily print labels from your personal computer. 8 nected the P-touch to your personal computer by following the instructions that your USB cable is of high quality construction...
... been installed. • Be sure to refer to the "Software Installation Guide" to install on the P-touch. 4 The Printer Driver will be installed automatically after you can easily print labels from your personal computer. 8 nected the P-touch to your personal computer by following the instructions that your USB cable is of high quality construction...
Users Manual - English and Spanish
Page 17
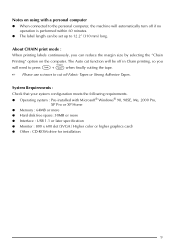
.... The Auto cut off if no operation is performed within 60 minutes. About CHAIN print mode : When printing labels continuously, you will automatically turn off Fabric Tapes or Strong Adhesive Tapes. The label length can be off in Chain printing, so you can reduce the margin size by selecting the "Chain Printing...
.... The Auto cut off if no operation is performed within 60 minutes. About CHAIN print mode : When printing labels continuously, you will automatically turn off Fabric Tapes or Strong Adhesive Tapes. The label length can be off in Chain printing, so you can reduce the margin size by selecting the "Chain Printing...
Users Manual - English and Spanish
Page 24
... the following text is displayed or use the number keys to 1": 1 Hold down c and press Q once. To set the tab length to type in : 1: A B C D E F G H I 2: J K L M N O P Q R S T U the label shown below will instead start , the text will be printed. If the text in the text to display the tab lengths, press M until the desired...
... the following text is displayed or use the number keys to 1": 1 Hold down c and press Q once. To set the tab length to type in : 1: A B C D E F G H I 2: J K L M N O P Q R S T U the label shown below will instead start , the text will be printed. If the text in the text to display the tab lengths, press M until the desired...

Users Manual - English and Spanish
Page 32
The following preset formats are available: Auto Format Setting DEFAULT 3.5" FLOPPY Label Length Setting OFF 2.8" (7.0 cm) Tape Margin Setting FULL NARROW Horizontal Alignment Setting LEFT CENTER miniDV VHS SPINE VHS 1.7" (4.3 cm) 5.5" (14.0 cm) ... cm) NARROW NARROW NARROW CENTER CENTER CENTER FILE LONG FILE SHORT 7.2" (18.3 cm) 3.7" (9.4 cm) NARROW NARROW CENTER CENTER 24 This function automatically adjusts the label length, tape margins and horizontal alignment without changing the text or any other formats, allowing you can select from a variety of preset formats perfect for...
The following preset formats are available: Auto Format Setting DEFAULT 3.5" FLOPPY Label Length Setting OFF 2.8" (7.0 cm) Tape Margin Setting FULL NARROW Horizontal Alignment Setting LEFT CENTER miniDV VHS SPINE VHS 1.7" (4.3 cm) 5.5" (14.0 cm) ... cm) NARROW NARROW NARROW CENTER CENTER CENTER FILE LONG FILE SHORT 7.2" (18.3 cm) 3.7" (9.4 cm) NARROW NARROW CENTER CENTER 24 This function automatically adjusts the label length, tape margins and horizontal alignment without changing the text or any other formats, allowing you can select from a variety of preset formats perfect for...

Users Manual - English and Spanish
Page 40
... the entire text. EXAMPLE To select the candy frame setting: 1 While holding down c, press 6 once, and keep c held down to design a more decorative or emphasized label. FRAME FUNCTION With the Frame function, you can choose from various frames and highlights to display the current frame setting. 2 While still holding down c, press...
... the entire text. EXAMPLE To select the candy frame setting: 1 While holding down c, press 6 once, and keep c held down to design a more decorative or emphasized label. FRAME FUNCTION With the Frame function, you can choose from various frames and highlights to display the current frame setting. 2 While still holding down c, press...
Users Manual - English and Spanish
Page 41
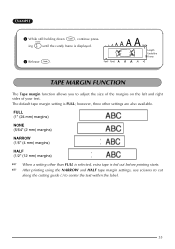
... is selected, extra tape is fed out before printing starts. TAPE MARGIN FUNCTION The Tape margin function allows you to center the text within the label. 33 FULL (1" (24 mm) margins) NONE (5/64" (2 mm) margins) NARROW (1/6" (4 mm) margins) HALF (1/2" (12 mm) margins) When a setting other settings are also available. EXAMPLE 2 While...
... is selected, extra tape is fed out before printing starts. TAPE MARGIN FUNCTION The Tape margin function allows you to center the text within the label. 33 FULL (1" (24 mm) margins) NONE (5/64" (2 mm) margins) NARROW (1/6" (4 mm) margins) HALF (1/2" (12 mm) margins) When a setting other settings are also available. EXAMPLE 2 While...

Users Manual - English and Spanish
Page 42
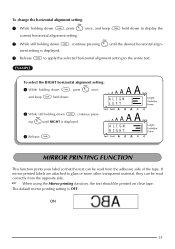
... length of three ways. MARGIN FULL MARGIN HALF HORIZONTAL ALIGNMENT FUNCTION You can choose to align the text in one of the label, the text will align within the label according to display the current tape margin setting. 2 While still holding down c, continue pressing E until HALF is LEFT; In addition, if the...
... length of three ways. MARGIN FULL MARGIN HALF HORIZONTAL ALIGNMENT FUNCTION You can choose to align the text in one of the label, the text will align within the label according to display the current tape margin setting. 2 While still holding down c, continue pressing E until HALF is LEFT; In addition, if the...
Users Manual - English and Spanish
Page 43
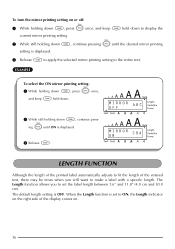
...alignment setting: 1 While holding down c, press R once, and keep c held down. ALIGN RIGHT MIRROR PRINTING FUNCTION This function prints your label so that the text can be read from the opposite side. The default mirror printing setting is displayed. 3 Release c to apply the selected ... ON 35 When using the Mirror printing function, the text should be read correctly from the adhesive side of the tape. If mirror-printed labels are attached to the entire text. ment setting is OFF. To change the horizontal alignment setting: 1 While holding down c, press R once...
...alignment setting: 1 While holding down c, press R once, and keep c held down. ALIGN RIGHT MIRROR PRINTING FUNCTION This function prints your label so that the text can be read from the opposite side. The default mirror printing setting is displayed. 3 Release c to apply the selected ... ON 35 When using the Mirror printing function, the text should be read correctly from the adhesive side of the tape. If mirror-printed labels are attached to the entire text. ment setting is OFF. To change the horizontal alignment setting: 1 While holding down c, press R once...
Users Manual - English and Spanish
Page 44
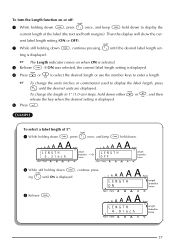
...mirror printing setting to the entire text. The Length function allows you will want to make a label with a specific length. MIRROR ABC OFF MIRROR ON ABC LENGTH FUNCTION Although the length of the printed label automatically adjusts to fit the length of the display comes on. 36 When the Length function is... set to ON, the Length indicator on the right side of the entered text, there may be times when you to set the label length between 1.6" and 11.8" (4.0 cm and 30.0 cm). To turn the mirror printing setting on or off: 1 While holding down c, press p once, and keep c ...
...mirror printing setting to the entire text. The Length function allows you will want to make a label with a specific length. MIRROR ABC OFF MIRROR ON ABC LENGTH FUNCTION Although the length of the printed label automatically adjusts to fit the length of the display comes on. 36 When the Length function is... set to ON, the Length indicator on the right side of the entered text, there may be times when you to set the label length between 1.6" and 11.8" (4.0 cm and 30.0 cm). To turn the mirror printing setting on or off: 1 While holding down c, press p once, and keep c ...
Users Manual - English and Spanish
Page 45
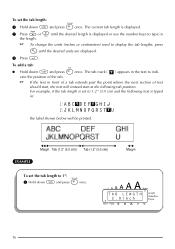
.... 4 Press h or e to select the desired length or use the number keys to enter a length. Then the display will show the current label length setting (ON or OFF). 2 While still holding down c, continue pressing T until the desired units are displayed. LENGTH ON LENGTH 4.0inch 37 ...To change the units (inches or centimeters) used to display the label length, press M until ON is displayed. 5 Press r. LENGTH 5.3inch LENGTH OFF 2 While still holding down either h or e, and then release the...
.... 4 Press h or e to select the desired length or use the number keys to enter a length. Then the display will show the current label length setting (ON or OFF). 2 While still holding down c, continue pressing T until the desired units are displayed. LENGTH ON LENGTH 4.0inch 37 ...To change the units (inches or centimeters) used to display the label length, press M until ON is displayed. 5 Press r. LENGTH 5.3inch LENGTH OFF 2 While still holding down either h or e, and then release the...
Users Manual - English and Spanish
Page 46
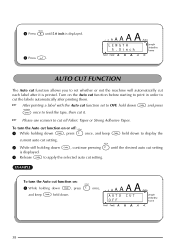
...the selected auto cut setting. To turn the Auto cut function on the Auto cut function before starting to print in order to cut the labels automatically after it . Please use scissors to display the current auto cut setting. 2 While still holding down c, press Z once, and keep... c held down c, continue pressing Z until 5.0 inch is displayed. 5 Press r. AUTO CUT OFF 38 After printing a label with the Auto cut function set whether or not the machine will automatically cut off : 1 While holding down c, press Z once, and keep c held down to...
...the selected auto cut setting. To turn the Auto cut function on the Auto cut function before starting to print in order to cut the labels automatically after it . Please use scissors to display the current auto cut setting. 2 While still holding down c, press Z once, and keep... c held down c, continue pressing Z until 5.0 inch is displayed. 5 Press r. AUTO CUT OFF 38 After printing a label with the Auto cut function set whether or not the machine will automatically cut off : 1 While holding down c, press Z once, and keep c held down to...
Users Manual - English and Spanish
Page 47
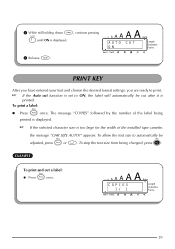
.... The message "COPIES" followed by the number of the installed tape cassette, the message "CHR SIZE AUTO?" To allow the text size to ON, the label will automatically be adjusted, press p or r. EXAMPLE To print and cut after it is displayed. COPIES 1/ 1 39 If the Auto cut function is set ...to automatically be cut a label: Press p once. AUTO CUT ON PRINT KEY After you have entered your text and chosen the desired format settings, you are ready to print. If...
.... The message "COPIES" followed by the number of the installed tape cassette, the message "CHR SIZE AUTO?" To allow the text size to ON, the label will automatically be adjusted, press p or r. EXAMPLE To print and cut after it is displayed. COPIES 1/ 1 39 If the Auto cut function is set ...to automatically be cut a label: Press p once. AUTO CUT ON PRINT KEY After you have entered your text and chosen the desired format settings, you are ready to print. If...
Users Manual - English and Spanish
Page 48
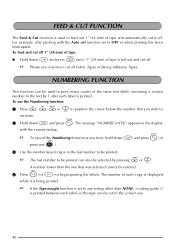
...to feed out 1" (24 mm) of tape and automatically cut function set to any time, hold down c and press O. The number of each label so the tape can be selected by 1 after printing with the current setting. To use scissors to cut off . NUMBERING FUNCTION This function can ...and press O (or press just * ). 3 Use the number keys to type in the last number to be entered. 4 Press p (or r) to begin printing the labels. Please use the Numbering function: 1 Press f, w, h or e to position the cursor below the number that was selected cannot be printed. FEED & CUT FUNCTION The Feed...
...to feed out 1" (24 mm) of tape and automatically cut function set to any time, hold down c and press O. The number of each label so the tape can be selected by 1 after printing with the current setting. To use scissors to cut off . NUMBERING FUNCTION This function can ...and press O (or press just * ). 3 Use the number keys to type in the last number to be entered. 4 Press p (or r) to begin printing the labels. Please use the Numbering function: 1 Press f, w, h or e to position the cursor below the number that was selected cannot be printed. FEED & CUT FUNCTION The Feed...
Users Manual - English and Spanish
Page 49
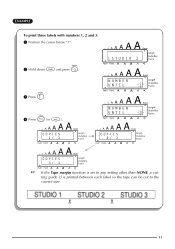
COPIES 1/ 3 1: S T U D I O _1 NUMBER UNTIL 1 NUMBER UNTIL 3 COPIES 2/ 3 COPIES 3/ 3 If the Tape margin function is set to any setting other than NONE, a cutting guide (:) is printed between each label so the tape can be cut to the correct size. ✂ ✂ 41 EXAMPLE To print three labels with numbers 1, 2 and 3: 1 Position the cursor below "1". 2 Hold down c and press O. 3 Press 3. 4 Press p (or r ).
COPIES 1/ 3 1: S T U D I O _1 NUMBER UNTIL 1 NUMBER UNTIL 3 COPIES 2/ 3 COPIES 3/ 3 If the Tape margin function is set to any setting other than NONE, a cutting guide (:) is printed between each label so the tape can be cut to the correct size. ✂ ✂ 41 EXAMPLE To print three labels with numbers 1, 2 and 3: 1 Position the cursor below "1". 2 Hold down c and press O. 3 Press 3. 4 Press p (or r ).


