
Users Manual - English
Page 2
... order to use, we suggest that the product Product Name Model Number : Brother Label Printer P-touch : PT-1600/1650 complies with the limits for a Class B digital device, pursuant to quickly and easily label patch panels, cables, connectors and other components. This equipment has been tested ...B digital device. - Changes or modifications not expressly approved by one or more of Conformity (For USA Only) Responsible Party : Brother International Corporation 100 Somerset Corporate Boulevard Bridgewater, NJ 08807-0911 USA TEL : (908) 704-1700 declares that you read this User's Guide...
... order to use, we suggest that the product Product Name Model Number : Brother Label Printer P-touch : PT-1600/1650 complies with the limits for a Class B digital device, pursuant to quickly and easily label patch panels, cables, connectors and other components. This equipment has been tested ...B digital device. - Changes or modifications not expressly approved by one or more of Conformity (For USA Only) Responsible Party : Brother International Corporation 100 Somerset Corporate Boulevard Bridgewater, NJ 08807-0911 USA TEL : (908) 704-1700 declares that you read this User's Guide...
Users Manual - English
Page 3
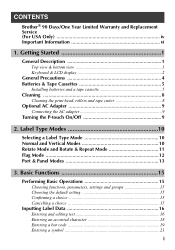
...a tape cassette 5 Cleaning 8 Cleaning the print head, rollers and tape cutter 8 Optional AC Adapter 9 Connecting the AC adapter 9 Turning the P-touch On/Off 9 2. Basic Functions 15 Performing Basic Operations 15 Choosing functions, parameters, settings and groups 15 Choosing the default setting 15 Confirming a choice...a bar code 19 Entering a symbol 21 i Label Type Modes 10 Selecting a Label Type Mode 10 Normal and Vertical Modes 10 Rotate Mode and Rotate & Repeat Mode 11 Flag Mode 12 Port & Panel Modes 13 3. CONTENTS Brother® 90 Days/One Year Limited Warranty and ...
...a tape cassette 5 Cleaning 8 Cleaning the print head, rollers and tape cutter 8 Optional AC Adapter 9 Connecting the AC adapter 9 Turning the P-touch On/Off 9 2. Basic Functions 15 Performing Basic Operations 15 Choosing functions, parameters, settings and groups 15 Choosing the default setting 15 Confirming a choice...a bar code 19 Entering a symbol 21 i Label Type Modes 10 Selecting a Label Type Mode 10 Normal and Vertical Modes 10 Rotate Mode and Rotate & Repeat Mode 11 Flag Mode 12 Port & Panel Modes 13 3. CONTENTS Brother® 90 Days/One Year Limited Warranty and ...
Users Manual - English
Page 4
...the units of measure 40 Changing the language 40 Displaying version information 40 5. Formatting the Label 24 Specifying a label length 24 Specifying a margin size 24 Framing the text 25 Specifying the character size 26...touch With a Computer (for PT-1650 only) ...41 Installing the Software & Printer Driver 42 Before installation 42 Installing the P-touch Editor 3.2 software 43 Installing the USB printer driver 44 Reading the User's Guide 46 Using P-touch Editor 3.2 47 Starting up P-touch Editor 3.2 48 Displaying the Properties 48 Entering text 49 Notes on usage 49 Transferring...
...the units of measure 40 Changing the language 40 Displaying version information 40 5. Formatting the Label 24 Specifying a label length 24 Specifying a margin size 24 Framing the text 25 Specifying the character size 26...touch With a Computer (for PT-1650 only) ...41 Installing the Software & Printer Driver 42 Before installation 42 Installing the P-touch Editor 3.2 software 43 Installing the USB printer driver 44 Reading the User's Guide 46 Using P-touch Editor 3.2 47 Starting up P-touch Editor 3.2 48 Displaying the Properties 48 Entering text 49 Notes on usage 49 Transferring...

Users Manual - English
Page 6
...freight prepaid or made by Brother in its Authorized Service Center will be required to deliver (by hand if you are not limited to label cassettes, cutters, stamps, power adapters, cases and batteries. • Except as otherwise provided herein, Brother warrants that expired in ...accordance with a photocopy of your dated bill of local Brother Authorized Service Center(s), call 1-800-521-2846. Brother® 90 Days/...
...freight prepaid or made by Brother in its Authorized Service Center will be required to deliver (by hand if you are not limited to label cassettes, cutters, stamps, power adapters, cases and batteries. • Except as otherwise provided herein, Brother warrants that expired in ...accordance with a photocopy of your dated bill of local Brother Authorized Service Center(s), call 1-800-521-2846. Brother® 90 Days/...
Users Manual - English
Page 10
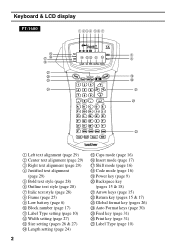
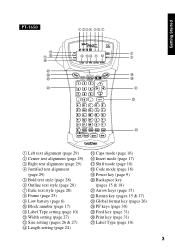
... PT-1600 1 234 56 7 E GF H Q P O N D CB A 0 8 9 I J K L M 1 Left text alignment (page 29) 2 Center text alignment (page 29) 3 Right text alignment (page 29) 4 Justified text alignment (page 29) 5 Bold text style (page 28) 6 Outline text style (page 28) 7 Italic text style (page 28) 8 Frame (page 25) 9 Low battery (page 6) 0 Block number (page 17) A Label... (page 15) L Return key (pages 15 & 17) M Global format key (pages 26) N Auto Format keys (page 30) O Feed key (page 31) P Print key (page 31) Q Label Type (page 10) 2
... PT-1600 1 234 56 7 E GF H Q P O N D CB A 0 8 9 I J K L M 1 Left text alignment (page 29) 2 Center text alignment (page 29) 3 Right text alignment (page 29) 4 Justified text alignment (page 29) 5 Bold text style (page 28) 6 Outline text style (page 28) 7 Italic text style (page 28) 8 Frame (page 25) 9 Low battery (page 6) 0 Block number (page 17) A Label... (page 15) L Return key (pages 15 & 17) M Global format key (pages 26) N Auto Format keys (page 30) O Feed key (page 31) P Print key (page 31) Q Label Type (page 10) 2
Users Manual - English
Page 11
... Started PT-1650 E GF H Q P O N 1 234 56 7 D CB A 0 8 9 I J K L M 1 Left text alignment (page 29) 2 Center text alignment (page 29) 3 Right text alignment (page 29) 4 Justified text alignment (page 29) 5 Bold text style (page 28) 6 Outline text style (page 28) 7 Italic text style (page 28) 8 Frame (page 25) 9 Low battery (page 6) 0 Block number (page 17) A Label... keys (page 15) L Return key (pages 15 & 17) M Global format key (pages 26) N PF keys (page 30) O Feed key (page 31) P Print key (page 31) Q Label Type (page 10) 3
... Started PT-1650 E GF H Q P O N 1 234 56 7 D CB A 0 8 9 I J K L M 1 Left text alignment (page 29) 2 Center text alignment (page 29) 3 Right text alignment (page 29) 4 Justified text alignment (page 29) 5 Bold text style (page 28) 6 Outline text style (page 28) 7 Italic text style (page 28) 8 Frame (page 25) 9 Low battery (page 6) 0 Block number (page 17) A Label... keys (page 15) L Return key (pages 15 & 17) M Global format key (pages 26) N PF keys (page 30) O Feed key (page 31) P Print key (page 31) Q Label Type (page 10) 3
Users Manual - English
Page 13
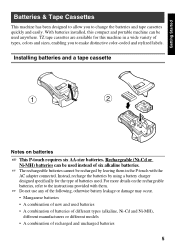
... on the rechargeable batteries, refer to the instructions provided with the AC adapter connected. For more details on batteries ☞ This P-touch requires six AA-size batteries. Getting Started Batteries & Tape Cassettes This machine has been designed to allow you to make distinctive color...-coded and stylized labels. With batteries installed, this machine in the P-touch with them in a wide variety of batteries used anywhere. Instead, recharge the batteries by leaving them . ...
... on the rechargeable batteries, refer to the instructions provided with the AC adapter connected. For more details on batteries ☞ This P-touch requires six AA-size batteries. Getting Started Batteries & Tape Cassettes This machine has been designed to allow you to make distinctive color...-coded and stylized labels. With batteries installed, this machine in the P-touch with them in a wide variety of batteries used anywhere. Instead, recharge the batteries by leaving them . ...
Users Manual - English
Page 15
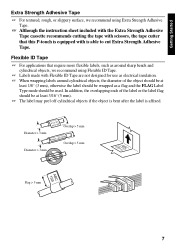
... at least 3/16" (5 mm). ☞ The label may peel off cylindrical objects if the object is bent after the label is able to cut Extra Strength Adhesive Tape. Flexible ID Tape ☞ For applications that this P-touch is equipped with Flexible ID Tape are not designed for... use as electrical insulation. ☞ When wrapping labels around cylindrical objects, the diameter of the label or the label flag should be at least 1/8" (3 mm), otherwise the label should be wrapped as around sharp ...
... at least 3/16" (5 mm). ☞ The label may peel off cylindrical objects if the object is bent after the label is able to cut Extra Strength Adhesive Tape. Flexible ID Tape ☞ For applications that this P-touch is equipped with Flexible ID Tape are not designed for... use as electrical insulation. ☞ When wrapping labels around cylindrical objects, the diameter of the label or the label flag should be at least 1/8" (3 mm), otherwise the label should be wrapped as around sharp ...
Users Manual - English
Page 16
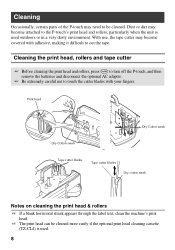
... then remove the batteries and disconnect the optional AC adapter. ☞ Be extremely careful not to touch the cutter blades with adhesive, making it difficult to the P-touch's print head and rollers, particularly when the unit is used outdoors or in a very dusty environment. With use, the tape cutter may become attached... swab Tape cutter blades Tape cutter blades Dry cotton swab Notes on cleaning the print head & rollers ☞ If a blank horizontal streak appears through the label text, clean the machine's print head. ☞ The print head can be cleaned.
... then remove the batteries and disconnect the optional AC adapter. ☞ Be extremely careful not to touch the cutter blades with adhesive, making it difficult to the P-touch's print head and rollers, particularly when the unit is used outdoors or in a very dusty environment. With use, the tape cutter may become attached... swab Tape cutter blades Tape cutter blades Dry cotton swab Notes on cleaning the print head & rollers ☞ If a blank horizontal streak appears through the label text, clean the machine's print head. ☞ The print head can be cleaned.
Users Manual - English
Page 17
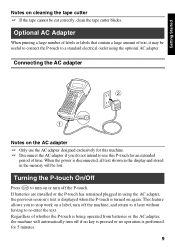
... If the tape cannot be cut correctly, clean the tape cutter blades. Getting Started Notes on or turn off the P-touch. Connecting the AC adapter 2 DC IN 9.5V 1 Notes on the AC adapter ☞ Only use this machine. ... outlet using the AC adapter, the previous session's text is displayed when the P-touch is turned on a label, turn off if no key is pressed or no operation is being operated from ...it may be lost. Optional AC Adapter When printing a large number of labels or labels that contain a large amount of whether the P-touch is performed for an extended period of time.
... If the tape cannot be cut correctly, clean the tape cutter blades. Getting Started Notes on or turn off the P-touch. Connecting the AC adapter 2 DC IN 9.5V 1 Notes on the AC adapter ☞ Only use this machine. ... outlet using the AC adapter, the previous session's text is displayed when the P-touch is turned on a label, turn off if no key is pressed or no operation is being operated from ...it may be lost. Optional AC Adapter When printing a large number of labels or labels that contain a large amount of whether the P-touch is performed for an extended period of time.
Users Manual - English
Page 18
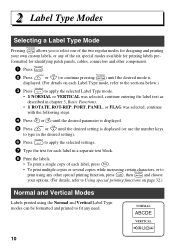
... Mode Pressing a allows you to select one of the two regular modes for designing and printing your own custom labels, or any of the six special modes available for printing labels preformatted for identifying patch panels, cables, connectors and other components. 1 Press a. 2 Press u or d (or continue...in the desired setting). 6 Press n to apply the selected settings. 7 Type the text for each label in a separate text block. 8 Print the labels. • To print a single copy of each label, press p. • To print multiple copies or several copies while increasing certain characters, or to print...
... Mode Pressing a allows you to select one of the two regular modes for designing and printing your own custom labels, or any of the six special modes available for printing labels preformatted for identifying patch panels, cables, connectors and other components. 1 Press a. 2 Press u or d (or continue...in the desired setting). 6 Press n to apply the selected settings. 7 Type the text for each label in a separate text block. 8 Print the labels. • To print a single copy of each label, press p. • To print multiple copies or several copies while increasing certain characters, or to print...
Users Manual - English
Page 19
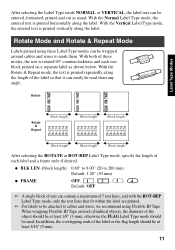
...mode, only the text lines that it can be attached to mark them. After selecting the Label Type mode NORMAL or VERTICAL, the label text can easily be read from any angle. Rotate Label Type Modes Rotate & Repeat Block length Block length Block length Block length Block length Block ... be entered, formatted, printed and cut as shown below. With the Rotate & Repeat mode, the text is rotated 90° counterclockwise and each label and a frame style if desired. ● BLK LEN. (block length): 0.80" to 8.00" (20 to 200 mm) Default: 1.20" (30 mm) ● FRAME: OFF, 1 , 2 , 3...
...mode, only the text lines that it can be attached to mark them. After selecting the Label Type mode NORMAL or VERTICAL, the label text can easily be read from any angle. Rotate Label Type Modes Rotate & Repeat Block length Block length Block length Block length Block length Block ... be entered, formatted, printed and cut as shown below. With the Rotate & Repeat mode, the text is rotated 90° counterclockwise and each label and a frame style if desired. ● BLK LEN. (block length): 0.80" to 8.00" (20 to 200 mm) Default: 1.20" (30 mm) ● FRAME: OFF, 1 , 2 , 3...
Users Manual - English
Page 20
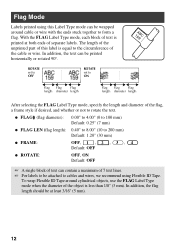
... Tape. ROTATE set to OFF ROTATE set to ON Flag Flag Flag length diameter length Flag Flag Flag length diameter length After selecting the FLAG Label Type mode, specify the length and diameter of the flag, a frame style if desired, and whether or not to rotate the text. ● FLAG (flag...) Default: 1.20" (30 mm) ● FRAME: OFF, 1 , 2 , 3 , 4 Default: OFF ● ROTATE: OFF, ON Default: OFF ☞ A single block of text can contain a maximum of separate labels. With the FLAG Label Type mode, each block of the cable or wire. The length of the unprinted part of this...
... Tape. ROTATE set to OFF ROTATE set to ON Flag Flag Flag length diameter length Flag Flag Flag length diameter length After selecting the FLAG Label Type mode, specify the length and diameter of the flag, a frame style if desired, and whether or not to rotate the text. ● FLAG (flag...) Default: 1.20" (30 mm) ● FRAME: OFF, 1 , 2 , 3 , 4 Default: OFF ● ROTATE: OFF, ON Default: OFF ☞ A single block of text can contain a maximum of separate labels. With the FLAG Label Type mode, each block of the cable or wire. The length of the unprinted part of this...
Users Manual - English
Page 21
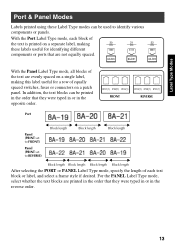
...on a patch panel. For the PANEL Label Type mode, select whether the text blocks are not equally spaced. Label Type Modes Port & Panel Modes Labels printed using these labels useful for a row of the text are evenly spaced on a single label, making these Label Type modes can be used to identify ... Block length Block length Block length Block length After selecting the PORT or PANEL Label Type mode, specify the length of each block of the text is printed on a separate label, making this label useful for identifying different components or ports that are printed in the order that...
...on a patch panel. For the PANEL Label Type mode, select whether the text blocks are not equally spaced. Label Type Modes Port & Panel Modes Labels printed using these labels useful for a row of the text are evenly spaced on a single label, making these Label Type modes can be used to identify ... Block length Block length Block length Block length After selecting the PORT or PANEL Label Type mode, specify the length of each block of the text is printed on a separate label, making this label useful for identifying different components or ports that are printed in the order that...
Users Manual - English
Page 22
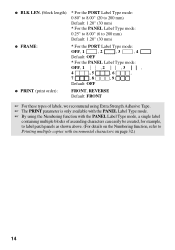
...mm) ● FRAME: * For the PORT Label Type mode: OFF, 1 , 2 , 3 , 4 Default: OFF * For the PANEL Label Type mode: OFF, 1 , 2 , 3 , 4 , 5 , 6 , 7 , 8 , 9 Default: OFF ● PRINT (print order): FRONT, REVERSE Default: FRONT ☞ For these types of labels, we recommend using Extra Strength Adhesive Tape. &#...is only available with the PANEL Label Type mode. ☞ By using the Numbering function with the PANEL Label Type mode, a single label containing multiple blocks of ascending characters can easily be created, for example, to label patch panels as shown above....
...mm) ● FRAME: * For the PORT Label Type mode: OFF, 1 , 2 , 3 , 4 Default: OFF * For the PANEL Label Type mode: OFF, 1 , 2 , 3 , 4 , 5 , 6 , 7 , 8 , 9 Default: OFF ● PRINT (print order): FRONT, REVERSE Default: FRONT ☞ For these types of labels, we recommend using Extra Strength Adhesive Tape. &#...is only available with the PANEL Label Type mode. ☞ By using the Numbering function with the PANEL Label Type mode, a single label containing multiple blocks of ascending characters can easily be created, for example, to label patch panels as shown above....
Users Manual - English
Page 24
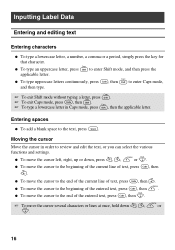
Inputting Label Data Entering and editing text Entering characters ● To type a lowercase letter, a number, a comma or a period, simply press the key for that character. ● To ...
Inputting Label Data Entering and editing text Entering characters ● To type a lowercase letter, a number, a comma or a period, simply press the key for that character. ● To ...
Users Manual - English
Page 25
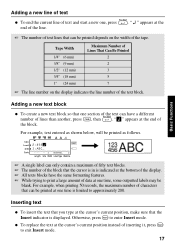
... line of lines than another, press g, then n. Adding a new text block ● To create a new text block so that one time, some outputted labels may be printed depends on the display indicates the line number of the block. R R2:456 R1:ABC_ ---- -- 1 NORMAL 2 Basic Functions ☞ A single... label can only contain a maximum of fifty text blocks. ☞ The number of the block that can be blank. " " appears at the end of the line...
... line of lines than another, press g, then n. Adding a new text block ● To create a new text block so that one time, some outputted labels may be printed depends on the display indicates the line number of the block. R R2:456 R1:ABC_ ---- -- 1 NORMAL 2 Basic Functions ☞ A single... label can only contain a maximum of fifty text blocks. ☞ The number of the block that can be blank. " " appears at the end of the line...
Users Manual - English
Page 27
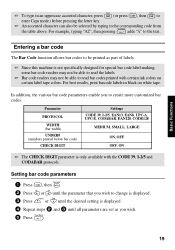
...SMALL, LARGE ON, OFF OFF, ON ☞ The CHECK DIGIT parameter is not specifically designed for special bar code label-making, some bar code readers may not be able to read the labels. ☞ Bar code readers may not be able to read bar codes printed with the CODE 39, I-2/5 and...you wish to change is displayed. 3 Press u or d until the desired setting is displayed. 4 Repeat steps 2 and 3 until all parameters are set as part of labels. ☞ Since this machine is only available with certain ink colors on white tape. Setting bar code parameters 1 Press g, then c. 2 Press l or r until ...
...SMALL, LARGE ON, OFF OFF, ON ☞ The CHECK DIGIT parameter is not specifically designed for special bar code label-making, some bar code readers may not be able to read the labels. ☞ Bar code readers may not be able to read bar codes printed with the CODE 39, I-2/5 and...you wish to change is displayed. 3 Press u or d until the desired setting is displayed. 4 Repeat steps 2 and 3 until all parameters are set as part of labels. ☞ Since this machine is only available with certain ink colors on white tape. Setting bar code parameters 1 Press g, then c. 2 Press l or r until ...
Users Manual - English
Page 32
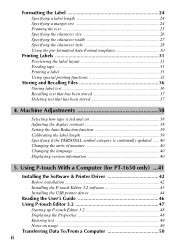
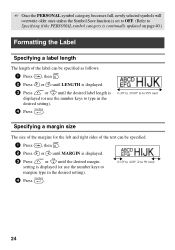
...unless the Symbol Save function is set to OFF. (Refer to Specifying if the PERSONAL symbol category is continually updated on page 40.) Formatting the Label Specifying a label length The length of the label can be specified as follows. 1 Press g, then A. 2 Press l or r until LENGTH is displayed. 3 Press u or d until the desired... label length is displayed (or use the number keys to type in the desired setting). 4 Press n. 0.30" to 39.00" (6 to 999 mm) Specifying a margin ...
...unless the Symbol Save function is set to OFF. (Refer to Specifying if the PERSONAL symbol category is continually updated on page 40.) Formatting the Label Specifying a label length The length of the label can be specified as follows. 1 Press g, then A. 2 Press l or r until LENGTH is displayed. 3 Press u or d until the desired... label length is displayed (or use the number keys to type in the desired setting). 4 Press n. 0.30" to 39.00" (6 to 999 mm) Specifying a margin ...
Users Manual - English
Page 34
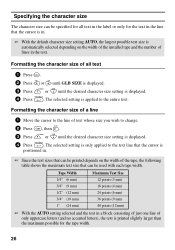
... the desired character size setting is applied to the entire text. The selected setting is only applied to the line of all text in the label or only for the tape width. 26 The selected setting is displayed. 4 Press n. Formatting the character size of a line 1 Move the cursor to the text...
... the desired character size setting is applied to the entire text. The selected setting is only applied to the line of all text in the label or only for the tape width. 26 The selected setting is displayed. 4 Press n. Formatting the character size of a line 1 Move the cursor to the text...


