Table Set Installation Manual PRWT1
Page 2
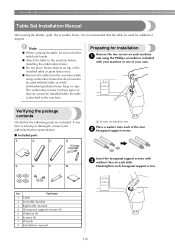
...Verifying the package contents Check that do no need to be sure to hold it . ● Remove the table from the machine while using embroidery frame that the following parts are included. Part Name 1 Table 2 Left table bracket 3 Right table bracket 4 Hexagonal support screws... (4) 5 Washers (4) 6 Screws (4) 7 Wrench 8 Installation manual 1/4 Note ● When carrying the table, be used for installation Remove the two screws on it with 3 washers (two on machine arm Place a washer onto each of your authorized sales representative. ...
...Verifying the package contents Check that do no need to be sure to hold it . ● Remove the table from the machine while using embroidery frame that the following parts are included. Part Name 1 Table 2 Left table bracket 3 Right table bracket 4 Hexagonal support screws... (4) 5 Washers (4) 6 Screws (4) 7 Wrench 8 Installation manual 1/4 Note ● When carrying the table, be used for installation Remove the two screws on it with 3 washers (two on machine arm Place a washer onto each of your authorized sales representative. ...

Table Set Installation Manual PRWT1
Page 3
Using the Phillips screwdriver included with the hexagonal support screws on the right side of your own,...for the left table brackets are installed on each hexagonal support screw (two on the machine. Memo ● Even if you sew without using the table, you can leave the brackets attached. 1 Hexagonal support screws 2 Holes in right table bracket Align the right table bracket with...table bracket 5 with 8 your machine or one of the machine. X The right and left side. ENGLISH Using the included wrench, firmly tighten 4 each side). Align the holes in place. 1 Screws 2/4
Using the Phillips screwdriver included with the hexagonal support screws on the right side of your own,...for the left table brackets are installed on each hexagonal support screw (two on the machine. Memo ● Even if you sew without using the table, you can leave the brackets attached. 1 Hexagonal support screws 2 Holes in right table bracket Align the right table bracket with...table bracket 5 with 8 your machine or one of the machine. X The right and left side. ENGLISH Using the included wrench, firmly tighten 4 each side). Align the holes in place. 1 Screws 2/4

Operation Manual
Page 1
We recommend that you keep this document before using the machine. Embroidery Machine Operation Manual Product Code: 884-T20 Be sure to read this document nearby for future reference.
We recommend that you keep this document before using the machine. Embroidery Machine Operation Manual Product Code: 884-T20 Be sure to read this document nearby for future reference.

Operation Manual
Page 3
... INSTRUCTIONS Please read the "IMPORTANT SAFETY INSTRUCTIONS", and then study this manual for use the machine. Return the machine to the nearest authorized Brother dealer or service center for future reference. In addition, after using, when cleaning, when making any other user servicing adjustments mentioned in the machine ...fire, electric shock, or injury to turn it off, then grasp the plug and pull it out of the electrical outlet. do not use a damaged power supply plug or loose electrical outlet, and ensure that the power supply plug is fully inserted and secure. • While...
... INSTRUCTIONS Please read the "IMPORTANT SAFETY INSTRUCTIONS", and then study this manual for use the machine. Return the machine to the nearest authorized Brother dealer or service center for future reference. In addition, after using, when cleaning, when making any other user servicing adjustments mentioned in the machine ...fire, electric shock, or injury to turn it off, then grasp the plug and pull it out of the electrical outlet. do not use a damaged power supply plug or loose electrical outlet, and ensure that the power supply plug is fully inserted and secure. • While...

Operation Manual
Page 4
...included accessory or while maintaining the machine, be supervised to the danger of it could cause the garment being administered. • Do not use the machine near a space heater, iron, halogen lamp, or other parts to assure correct installation. 2 Keep ventilation openings of lint, ...dust, and loose cloth. • Do not use extension cords. Do not use bent or damaged needles. • Keep fingers away from all machine openings, such as it . 6 Special care is required when sewing...
...included accessory or while maintaining the machine, be supervised to the danger of it could cause the garment being administered. • Do not use the machine near a space heater, iron, halogen lamp, or other parts to assure correct installation. 2 Keep ventilation openings of lint, ...dust, and loose cloth. • Do not use extension cords. Do not use bent or damaged needles. • Keep fingers away from all machine openings, such as it . 6 Special care is required when sewing...

Operation Manual
Page 5
...experience and knowledge if they have been given supervision or instruction concerning use of this product are subject to obtain the correct lead. 3 If the problem persists, please consult your authorized Brother dealer to change without supervision. The contents of this manual and ...the appliance. carrying the mark, rating as contained in this equipment, you should be used by an authorized Brother dealer. • In the event a malfunction occurs or adjustment is intended for household use. Use this machine in any way, otherwise a fire, electric shock or injuries may result....
...experience and knowledge if they have been given supervision or instruction concerning use of this product are subject to obtain the correct lead. 3 If the problem persists, please consult your authorized Brother dealer to change without supervision. The contents of this manual and ...the appliance. carrying the mark, rating as contained in this equipment, you should be used by an authorized Brother dealer. • In the event a malfunction occurs or adjustment is intended for household use. Use this machine in any way, otherwise a fire, electric shock or injuries may result....

Operation Manual
Page 6
...not occur in a particular installation. These limits are designed to Part 15 of Conformity (For USA Only) Responsible Party: Brother International Corporation 200 Crossing Boulevard P.O. This equipment has been tested and found to comply with the limits for help. • ...PR670E complies with the instructions, may not cause harmful interference, and (2) this equipment does cause harmful interference to radio or television reception, which can radiate radio frequency energy and, if not installed and used in a residential installation. This equipment generates, uses, and can be used...
...not occur in a particular installation. These limits are designed to Part 15 of Conformity (For USA Only) Responsible Party: Brother International Corporation 200 Crossing Boulevard P.O. This equipment has been tested and found to comply with the limits for help. • ...PR670E complies with the instructions, may not cause harmful interference, and (2) this equipment does cause harmful interference to radio or television reception, which can radiate radio frequency energy and, if not installed and used in a residential installation. This equipment generates, uses, and can be used...

Operation Manual
Page 7
...the CONTENT to be governed by the laws of Brother Industries, Ltd. ("BROTHER"). Nothing in this agreement constitutes a waiver of the rights of BROTHER under the terms and conditions of the CONTENT included in this package. BY USING THE CONTENT, THE CUSTOMER ACCEPTS THE TERMS AND... CONTENT in combination with an embroidery machine that CUSTOMER owns or uses, provided that are licensed (not sold) to you ("CUSTOMER") under any law. BROTHER retains ownership of all rights to CONTENT and to Brother Industries, Ltd., 1-1-1 Kawagishi, Mizuho-ku, Nagoya 467-8562, Japan, Attention: P&H company...
...the CONTENT to be governed by the laws of Brother Industries, Ltd. ("BROTHER"). Nothing in this agreement constitutes a waiver of the rights of BROTHER under the terms and conditions of the CONTENT included in this package. BY USING THE CONTENT, THE CUSTOMER ACCEPTS THE TERMS AND... CONTENT in combination with an embroidery machine that CUSTOMER owns or uses, provided that are licensed (not sold) to you ("CUSTOMER") under any law. BROTHER retains ownership of all rights to CONTENT and to Brother Industries, Ltd., 1-1-1 Kawagishi, Mizuho-ku, Nagoya 467-8562, Japan, Attention: P&H company...

Operation Manual
Page 8
Label locations 6 Warning Labels The following warning labels are on the machine. Be sure to observe the precautions described in the labels. 1 2 Please put a drop of oil onto the hook once a day before use.
Label locations 6 Warning Labels The following warning labels are on the machine. Be sure to observe the precautions described in the labels. 1 2 Please put a drop of oil onto the hook once a day before use.

Operation Manual
Page 9
...the appropriate needle for each color. The thread colors assigned to "Selecting/Managing Thread Colors for assigning the thread colors. For more professional embroidering, using a manual color sequence allows the needle bar assignments to left: needle bar 1, needle bar 2, needle bar 3, needle bar 4, needle bar ...needle. Machine Structure and Features Six-needle machine embroidering Your machine has six needles, each threaded with a color that will be used in the next pattern are assigned to the same thread color based on the needle bars are indicated as indicated. 1 1 The...
...the appropriate needle for each color. The thread colors assigned to "Selecting/Managing Thread Colors for assigning the thread colors. For more professional embroidering, using a manual color sequence allows the needle bar assignments to left: needle bar 1, needle bar 2, needle bar 3, needle bar 4, needle bar ...needle. Machine Structure and Features Six-needle machine embroidering Your machine has six needles, each threaded with a color that will be used in the next pattern are assigned to the same thread color based on the needle bars are indicated as indicated. 1 1 The...

Operation Manual
Page 10
... the different needles to be moved to the left and right so that the machine is already used . In addition, the embroidering position can be changed. If the pattern uses seven or more than six colors, and if total color change threads and finish stitching, sewing time...positioned in the needle plate 2. With this machine, it continues to operate automatically, from single-needle machines ■ Can sew embroidery patterns using six or less colors without the need to performing the specified operations at a time. Since the machine can be sewn within the embroidery ...
... the different needles to be moved to the left and right so that the machine is already used . In addition, the embroidering position can be changed. If the pattern uses seven or more than six colors, and if total color change threads and finish stitching, sewing time...positioned in the needle plate 2. With this machine, it continues to operate automatically, from single-needle machines ■ Can sew embroidery patterns using six or less colors without the need to performing the specified operations at a time. Since the machine can be sewn within the embroidery ...

Operation Manual
Page 11
...pattern can be rearranged allowing you will be previewed in embroidery editing software provided with overlapping patterns. ■ Link function - However, by using the thread color sorting function, the thread color order will need to replace the thread spool multiple times with a large 10.1-inch LCD ...NEXT /10 or later, from a computer to an embroidery machine. For example, when embroidering after simply arranging the same pattern to be used with the Link function, such as on page 142.) 9 The thread color sorting function cannot be repeated side-by-side, you to ...
...pattern can be rearranged allowing you will be previewed in embroidery editing software provided with overlapping patterns. ■ Link function - However, by using the thread color sorting function, the thread color order will need to replace the thread spool multiple times with a large 10.1-inch LCD ...NEXT /10 or later, from a computer to an embroidery machine. For example, when embroidering after simply arranging the same pattern to be used with the Link function, such as on page 142.) 9 The thread color sorting function cannot be repeated side-by-side, you to ...

Operation Manual
Page 13
...want to move or thread. (Refer to "Moving and threading a selected needle bar" on page 136.) ■ Automatic needle-threading mechanism Using the automatic needle-threading mechanism, threads each needle easily. From this table, the pattern can be displayed with only the thread colors that ...card, which is embroidered. ■ USB port/SD card slot available as realistic true color The colors and thread color numbers are changed using the included USB cable, embroidery patterns can be transferred to/from the computer. (Refer to "Saving embroidery patterns in the machine's memory...
...want to move or thread. (Refer to "Moving and threading a selected needle bar" on page 136.) ■ Automatic needle-threading mechanism Using the automatic needle-threading mechanism, threads each needle easily. From this table, the pattern can be displayed with only the thread colors that ...card, which is embroidered. ■ USB port/SD card slot available as realistic true color The colors and thread color numbers are changed using the included USB cable, embroidery patterns can be transferred to/from the computer. (Refer to "Saving embroidery patterns in the machine's memory...

Operation Manual
Page 14
... arrange the patterns. Available features Designs with a maximum size of this machine If you specify the thread colors used with this machine, or if you use DST files frequently, it would be convenient to use of 200 mm (H) × 300 mm (W) (7-7/8 inches (H) × 11-3/4 inches (W)) can be embroidered. &#...9632; Manual color sequence - More professional use the manual color sequence. (Refer to "Selecting/Managing Thread Colors for Each Needle Bar (Manual Color Sequence)" on page 108.) ■ Various...
... arrange the patterns. Available features Designs with a maximum size of this machine If you specify the thread colors used with this machine, or if you use DST files frequently, it would be convenient to use of 200 mm (H) × 300 mm (W) (7-7/8 inches (H) × 11-3/4 inches (W)) can be embroidered. &#...9632; Manual color sequence - More professional use the manual color sequence. (Refer to "Selecting/Managing Thread Colors for Each Needle Bar (Manual Color Sequence)" on page 108.) ■ Various...

Operation Manual
Page 15
... a pattern and master the operation of contents. Follow the steps of the embroidery machine and the various preparations required before use of these basic operations. Manual Structure This manual is required Chapter 4: Embroidering Settings This chapter contains descriptions on the various ...embroidering settings, which make editing patterns simple. Before using the machine, check the procedures described with a help feature. This shows the sequence of the settings key and the machine...
... a pattern and master the operation of contents. Follow the steps of the embroidery machine and the various preparations required before use of these basic operations. Manual Structure This manual is required Chapter 4: Embroidering Settings This chapter contains descriptions on the various ...embroidering settings, which make editing patterns simple. Before using the machine, check the procedures described with a help feature. This shows the sequence of the settings key and the machine...

Operation Manual
Page 16
...and Features 7 Six-needle machine embroidering 7 Differences from single-needle machines 8 Other features 9 Available features 12 Manual Structure 13 Read before use 13 Read when additional information is required 13 Searching for the first time 36 Understanding the screens 36 Screen overview 37 3. Specifying Embroidering ...Stabilizer (Backing) to Fabric 84 Hooping the Fabric 85 Hooping the fabric in the extra-large and large embroidery frames 85 Using the embroidery sheet 86 Large/small pieces of Machine Parts and Their Functions 17 Front view 17 Right-side/rear view ...
...and Features 7 Six-needle machine embroidering 7 Differences from single-needle machines 8 Other features 9 Available features 12 Manual Structure 13 Read before use 13 Read when additional information is required 13 Searching for the first time 36 Understanding the screens 36 Screen overview 37 3. Specifying Embroidering ...Stabilizer (Backing) to Fabric 84 Hooping the Fabric 85 Hooping the fabric in the extra-large and large embroidery frames 85 Using the embroidery sheet 86 Large/small pieces of Machine Parts and Their Functions 17 Front view 17 Right-side/rear view ...

Operation Manual
Page 17
...Setting 119 Uninterrupted embroidering (monochrome 119 Reserved Needle Bar and Sewing Speed Settings 120 Chapter5 SELECTING/EDITING/SAVING PATTERNS 123 Using the Memory Function 123 Embroidery data precautions 123 Concerning USB media 124 Selecting an Embroidery Pattern 124 General pattern selection... a custom thread table 167 Choosing a color from the custom thread table ....... 169 Saving and recalling the custom thread table using USB media 170 Duplicating a pattern 171 Deleting a pattern 171 Editing the Embroidery Pattern (Embroidering Settings Screen 172 Rotating the entire...
...Setting 119 Uninterrupted embroidering (monochrome 119 Reserved Needle Bar and Sewing Speed Settings 120 Chapter5 SELECTING/EDITING/SAVING PATTERNS 123 Using the Memory Function 123 Embroidery data precautions 123 Concerning USB media 124 Selecting an Embroidery Pattern 124 General pattern selection... a custom thread table 167 Choosing a color from the custom thread table ....... 169 Saving and recalling the custom thread table using USB media 170 Duplicating a pattern 171 Deleting a pattern 171 Editing the Embroidery Pattern (Embroidering Settings Screen 172 Rotating the entire...

Operation Manual
Page 18
... the remaining length of thread 185 Selecting the "Eco Mode" or "Shutoff Support Mode 185 Changing the screen saver settings 186 Using the Machine Operations Guide Key 187 Viewing the operation guides 187 Playing a tutorial video 189 Playing MPEG-4 (MP4) videos 190 ...(.dst) embroidery data 200 Creating Beautiful Embroidery 201 Threads 201 Stabilizers (backing 202 Hooping techniques 203 Fabric/stabilizer compatibility chart 204 Using the Optional Bobbin Winder .......... 205 Precautions 205 Optional bobbin winder and its accessories 205 Setting up the optional bobbin winder 206 ...
... the remaining length of thread 185 Selecting the "Eco Mode" or "Shutoff Support Mode 185 Changing the screen saver settings 186 Using the Machine Operations Guide Key 187 Viewing the operation guides 187 Playing a tutorial video 189 Playing MPEG-4 (MP4) videos 190 ...(.dst) embroidery data 200 Creating Beautiful Embroidery 201 Threads 201 Stabilizers (backing 202 Hooping techniques 203 Fabric/stabilizer compatibility chart 204 Using the Optional Bobbin Winder .......... 205 Precautions 205 Optional bobbin winder and its accessories 205 Setting up the optional bobbin winder 206 ...

Operation Manual
Page 19
... first refer to "Accessories" on or when the machine is turned on page 19, and check that all listed accessories are included. Before using the sewing machine, carefully read these descriptions to learn the names of the sewing machine and their functions are described in the settings screen. When...Moves to the left and right. 5 Hook cover/Hook Open the hook cover, and then insert the bobbin case into the hook. 6 Feet Use the feet to the carriage. Front view 1 Thread tension knobs Adjust the tension of the machine and the various preparations required before starting to ...
... first refer to "Accessories" on or when the machine is turned on page 19, and check that all listed accessories are included. Before using the sewing machine, carefully read these descriptions to learn the names of the sewing machine and their functions are described in the settings screen. When...Moves to the left and right. 5 Hook cover/Hook Open the hook cover, and then insert the bobbin case into the hook. 6 Feet Use the feet to the carriage. Front view 1 Thread tension knobs Adjust the tension of the machine and the various preparations required before starting to ...

Operation Manual
Page 20
... select and edit patterns and confirm various information. 18 Right-side/rear view Operation panel Bottom 1 Touch pen holder Use the touch pen holder to hold the touch pen when not in use. 2 SD card slot Insert an SD card into the SD card slot in orange : When the machine can start... port for computer In order to import/export patterns between a computer and the machine, plug the USB cable into the USB port. 5 Main power switch Use the main power switch to turn the power on soon after turning the power off 2 Thread trimming button Press the thread trimming button to trim...
... select and edit patterns and confirm various information. 18 Right-side/rear view Operation panel Bottom 1 Touch pen holder Use the touch pen holder to hold the touch pen when not in use. 2 SD card slot Insert an SD card into the SD card slot in orange : When the machine can start... port for computer In order to import/export patterns between a computer and the machine, plug the USB cable into the USB port. 5 Main power switch Use the main power switch to turn the power on soon after turning the power off 2 Thread trimming button Press the thread trimming button to trim...


