
Users Manual - English
Page 5
...when: • Operation is required, first follow the troubleshooting table at www.brother.com iv Plug the machine directly into the wall. Do not use or store the machine near a space heater, iron, halogen lamp, or other parts to assure ...needle, or other parts • A power failure occurs during use extension cords. When storing this Operation Manual to inspect and adjust the machine yourself. Do not drop or hit the machine. 4. For additional product information and updates, visit our web site at the back of the most advanced computerized household embroidery machines...
...when: • Operation is required, first follow the troubleshooting table at www.brother.com iv Plug the machine directly into the wall. Do not use or store the machine near a space heater, iron, halogen lamp, or other parts to assure ...needle, or other parts • A power failure occurs during use extension cords. When storing this Operation Manual to inspect and adjust the machine yourself. Do not drop or hit the machine. 4. For additional product information and updates, visit our web site at the back of the most advanced computerized household embroidery machines...

Users Manual - English
Page 13
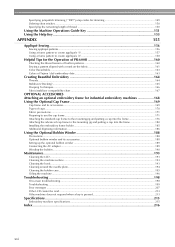
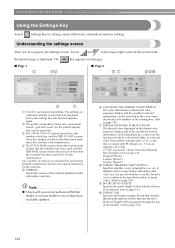
... This chapter provides details on page 58. Chapter 6: Basic Settings and Help Feature This chapter contains descriptions on the use of the embroidery machine and the various preparations required before use a screen feature Touch the help key. Look for the desired information. Learning how to embroider...when sewing a pattern with seven or more colors, and other information that is equipped with a help key, refer to change the needle. Read before starting to the page that should be provided. For details on using the help feature. Learning how to 57. xii...
... This chapter provides details on page 58. Chapter 6: Basic Settings and Help Feature This chapter contains descriptions on the use of the embroidery machine and the various preparations required before use a screen feature Touch the help key. Look for the desired information. Learning how to embroider...when sewing a pattern with seven or more colors, and other information that is equipped with a help key, refer to change the needle. Read before starting to the page that should be provided. For details on using the help feature. Learning how to 57. xii...
Users Manual - English
Page 17
... Tips for the Operation of PR-600II 160 Checking the thread tension of built-in patterns 160 Sewing a pattern aligned with a mark on the fabric 161 Color thread table ...163 Colors of Tajima (.dst) embroidery data ...163 Creating Beautiful Embroidery 164 Threads ...164 Stabilizers (...needle plate...194 Cleaning the bobbin case...195 Oiling the machine ...196 Troubleshooting ...198 On-screen troubleshooting...198 Troubleshooting ...199 Error messages ...207 If the LCD cannot be read ...213 If the machine does not respond when a key is pressed 213 Specifications ...215 Embroidery machine...
... Tips for the Operation of PR-600II 160 Checking the thread tension of built-in patterns 160 Sewing a pattern aligned with a mark on the fabric 161 Color thread table ...163 Colors of Tajima (.dst) embroidery data ...163 Creating Beautiful Embroidery 164 Threads ...164 Stabilizers (...needle plate...194 Cleaning the bobbin case...195 Oiling the machine ...196 Troubleshooting ...198 On-screen troubleshooting...198 Troubleshooting ...199 Error messages ...207 If the LCD cannot be read ...213 If the machine does not respond when a key is pressed 213 Specifications ...215 Embroidery machine...

Users Manual - English
Page 33
...caught in the needle bending or breaking. This is a normal characteristic of a malfunction. Note ● It is up to 1 mm (3/8 inch) thick. Do not use of the display screen may be dark immediately after the embroidery machine is turned on page 66 for the needle to penetrate the ...fabric, possibly resulting in the carriage. Note ● Your machine can embroider fabric that is recommended that the fabric is difficult to read . ...
...caught in the needle bending or breaking. This is a normal characteristic of a malfunction. Note ● It is up to 1 mm (3/8 inch) thick. Do not use of the display screen may be dark immediately after the embroidery machine is turned on page 66 for the needle to penetrate the ...fabric, possibly resulting in the carriage. Note ● Your machine can embroider fabric that is recommended that the fabric is difficult to read . ...

Users Manual - English
Page 37
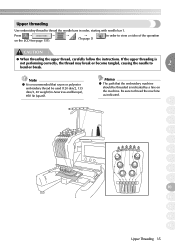
Plug the power supply cord into a 2 household electrical outlet. X The buzzer beeps once and the LCD screen comes on the embroidery machine. At that time, you will automatically save the design position when turned on page 83.) 20 Switch on the main power switch on the ...to page 14. Memo ● If the machine is not already at the embroidering position, the needle bar case moves and the number 1 needle bar moves to its initial position. 5 • If the number 1 needle bar is turned off in red. Turning ON the Machine Connect the power supply cord, and then turn...
Plug the power supply cord into a 2 household electrical outlet. X The buzzer beeps once and the LCD screen comes on the embroidery machine. At that time, you will automatically save the design position when turned on page 83.) 20 Switch on the main power switch on the ...to page 14. Memo ● If the machine is not already at the embroidering position, the needle bar case moves and the number 1 needle bar moves to its initial position. 5 • If the number 1 needle bar is turned off in red. Turning ON the Machine Connect the power supply cord, and then turn...

Users Manual - English
Page 39
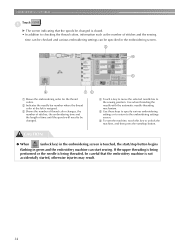
...screen. In the embroidering screen, check the thread colors assigned to the needle bars, and then install the upper threads.Touch the unlock key so that the start/stop button starts flashing in green and the embroidery machine is sewn, the embroidering settings screen appears. (Refer to page 33... this key to return to the pattern type selection screen. 2 Touch this key to continue to the embroidering settings screen. 22 After the embroidery is ready to the pattern editing screen. In the embroidering settings screen, if it is a combined pattern , edit the entire pattern, specify...
...screen. In the embroidering screen, check the thread colors assigned to the needle bars, and then install the upper threads.Touch the unlock key so that the start/stop button starts flashing in green and the embroidery machine is sewn, the embroidering settings screen appears. (Refer to page 33... this key to return to the pattern type selection screen. 2 Touch this key to continue to the embroidering settings screen. 22 After the embroidery is ready to the pattern editing screen. In the embroidering settings screen, if it is a combined pattern , edit the entire pattern, specify...
Users Manual - English
Page 51
EMBROIDERING TUTORIAL Touch . 1 X The screen indicating that the embroidery machine is not accidentally started, otherwise injuries may result. 34 If the upper threading is being performed or the needle is being threaded, be changed is closed. • In addition to checking the thread colors, ...the sewing time can be checked and various embroidering settings can be specified in green and the embroidery machine can start sewing. Use when threading the needle with the automatic needle-threading mechanism. 5 Use these keys to specify various embroidering settings or to return to the ...
EMBROIDERING TUTORIAL Touch . 1 X The screen indicating that the embroidery machine is not accidentally started, otherwise injuries may result. 34 If the upper threading is being performed or the needle is being threaded, be changed is closed. • In addition to checking the thread colors, ...the sewing time can be checked and various embroidering settings can be specified in green and the embroidery machine can start sewing. Use when threading the needle with the automatic needle-threading mechanism. 5 Use these keys to specify various embroidering settings or to return to the ...
Users Manual - English
Page 52
...break or become tangled, causing the needle to 2 bend or break. Press → → on the machine. Be sure to thread the machine as indicated. 1 2 3 4 5 6 7 8 9 10 11 12 13 14 Upper Threading 35 Note ● It is recommended that the embroidery machine should be used (120 den/2, 135... dtex/2, 40 weight (in Americas and Europe), #50 (in Japan)). Upper threading Use embroidery thread to thread the needle bars in order to view a video of the operation CAUTION...
...break or become tangled, causing the needle to 2 bend or break. Press → → on the machine. Be sure to thread the machine as indicated. 1 2 3 4 5 6 7 8 9 10 11 12 13 14 Upper Threading 35 Note ● It is recommended that the embroidery machine should be used (120 den/2, 135... dtex/2, 40 weight (in Americas and Europe), #50 (in Japan)). Upper threading Use embroidery thread to thread the needle bars in order to view a video of the operation CAUTION...

Users Manual - English
Page 59
... not be started within 10 seconds after unlocking the embroidery machine, the machine becomes locked again. Normally, the embroidery machine is not started . • If the start /stop button shows whether or not the embroidery machine is reached. If the embroidery machine is locked (it automatically returns to the needle location. If the start sewing). If the start /stop button...
... not be started within 10 seconds after unlocking the embroidery machine, the machine becomes locked again. Normally, the embroidery machine is not started . • If the start /stop button shows whether or not the embroidery machine is reached. If the embroidery machine is locked (it automatically returns to the needle location. If the start sewing). If the start /stop button...

Users Manual - English
Page 60
...used for the second needle bar is surrounded by the green crosshairs in the pattern display area. In addition, the number of stitches and the time count up in the screen continues to the second color, and the thread information for sewing. • While the embroidery machine is sewing, the point... being sewn. (Refer to the 2nd color position and sewing of the first color is sewn, and 4 the embroidery machine automatically stops. After sewing of the second color begins. X The embroidering screen appears so the same pattern can be sewn again. 2 To select a ...
...used for the second needle bar is surrounded by the green crosshairs in the pattern display area. In addition, the number of stitches and the time count up in the screen continues to the second color, and the thread information for sewing. • While the embroidery machine is sewing, the point... being sewn. (Refer to the 2nd color position and sewing of the first color is sewn, and 4 the embroidery machine automatically stops. After sewing of the second color begins. X The embroidering screen appears so the same pattern can be sewn again. 2 To select a ...
Users Manual - English
Page 79
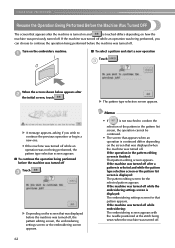
... when an operation is finished: That pattern editing screen appears. If the machine was turned off while embroidering: The embroidering screen appears with the needle positioned at the stitch being sewn when the machine was turned off . Memo • If is not touched to confirm ... turned off while the embroidering settings screen is displayed: The embroidering settings screen for the selected pattern appears. Turn on the embroidery machine. 1 ■ To select a pattern and start a new operation Touch . 3 When the screen shown below appears after 2 the initial screen, touch ....
... when an operation is finished: That pattern editing screen appears. If the machine was turned off while embroidering: The embroidering screen appears with the needle positioned at the stitch being sewn when the machine was turned off . Memo • If is not touched to confirm ... turned off while the embroidering settings screen is displayed: The embroidering settings screen for the selected pattern appears. Turn on the embroidery machine. 1 ■ To select a pattern and start a new operation Touch . 3 When the screen shown below appears after 2 the initial screen, touch ....

Users Manual - English
Page 80
... the allen screw driver in "Checking the needle" (on page 15). Loosen the needle set screw, otherwise the machine may be applied to turn the needle set screw counterclockwise. Replacing the needle Turn off the embroidery machine before replacing the needle, otherwise injuries may be damaged. 3 CAUTION... included allen screw driver to break. 3 1 Needle bar stopper 2 Needle 3 Flat side of the needle is designed specifically for this machine and that is broken, replace the needle with your right hand and turn off the embroidery machine. 1 • Do not apply extreme force ...
... the allen screw driver in "Checking the needle" (on page 15). Loosen the needle set screw, otherwise the machine may be applied to turn the needle set screw counterclockwise. Replacing the needle Turn off the embroidery machine before replacing the needle, otherwise injuries may be damaged. 3 CAUTION... included allen screw driver to break. 3 1 Needle bar stopper 2 Needle 3 Flat side of the needle is designed specifically for this machine and that is broken, replace the needle with your right hand and turn off the embroidery machine. 1 • Do not apply extreme force ...

Users Manual - English
Page 87
... any of the embroidery frame holder. In addition, the embroidery frame cannot be replaced may appear even if no embroidery frame is installed. 70 2 1 Center of embroidery frame at the correct position 2 Needle position when the embroidery frame is replaced ...8226; The embroidery machine is changed . Embroidery frames with the small frame, the following provides information concerning the embroidery frame when operating the embroidery machine. ■ Embroidery frames that the cap frame (sold separately) is displayed. The embroidery machine detects which embroidery frame is installed...
... any of the embroidery frame holder. In addition, the embroidery frame cannot be replaced may appear even if no embroidery frame is installed. 70 2 1 Center of embroidery frame at the correct position 2 Needle position when the embroidery frame is replaced ...8226; The embroidery machine is changed . Embroidery frames with the small frame, the following provides information concerning the embroidery frame when operating the embroidery machine. ■ Embroidery frames that the cap frame (sold separately) is displayed. The embroidery machine detects which embroidery frame is installed...

Users Manual - English
Page 89
... the stitching was adjusted so that the center of the entire pattern can easily be hooped evenly within the embroidery frame and the pattern is aligned with the needle drop point at an angle on the fabric. As shown in the illustration, insert the allen 1 screwdriver ...position), the needle drop point can be adjusted if the fabric cannot be seen. X The pattern in the pattern display area moves in the same direction of the embroidery frame is positioned at the sewing position. OTHER BASIC PROCEDURES Changing the Embroidering Position When the embroidery machine is not...
... the stitching was adjusted so that the center of the entire pattern can easily be hooped evenly within the embroidery frame and the pattern is aligned with the needle drop point at an angle on the fabric. As shown in the illustration, insert the allen 1 screwdriver ...position), the needle drop point can be adjusted if the fabric cannot be seen. X The pattern in the pattern display area moves in the same direction of the embroidery frame is positioned at the sewing position. OTHER BASIC PROCEDURES Changing the Embroidering Position When the embroidery machine is not...

Users Manual - English
Page 117
... will differ depending on the screen. The machine will not recognize the above USB devices or USB memory cards through USB Type "A" (host) connector. SELECTING/EDITING/SAVING PATTERNS Embroidery Data Precautions Observe the following precautions when using embroidery data other than our original patterns, the thread or needle may not be usable with a stitch...
... will differ depending on the screen. The machine will not recognize the above USB devices or USB memory cards through USB Type "A" (host) connector. SELECTING/EDITING/SAVING PATTERNS Embroidery Data Precautions Observe the following precautions when using embroidery data other than our original patterns, the thread or needle may not be usable with a stitch...
Users Manual - English
Page 157
...selected, choose from another manufacturer, or as a color that is created with your local authorized Brother dealer or at www.brother.com for the machine. 5 VERSION Shows the version of the needle), refer to page 150. 140 The key appears on available updates. 6 CHANGING THE THREAD COLOR...been used , and the TRIP TIME counter shows the amount of time that remains threaded through the eye of the software installed on this embroidery machine Note ● Check with PE-Design ver. 5.0 as a standard for performing periodic maintenance and for receiving maintenance for details on all ...
...selected, choose from another manufacturer, or as a color that is created with your local authorized Brother dealer or at www.brother.com for the machine. 5 VERSION Shows the version of the needle), refer to page 150. 140 The key appears on available updates. 6 CHANGING THE THREAD COLOR...been used , and the TRIP TIME counter shows the amount of time that remains threaded through the eye of the software installed on this embroidery machine Note ● Check with PE-Design ver. 5.0 as a standard for performing periodic maintenance and for receiving maintenance for details on all ...
Users Manual - English
Page 160
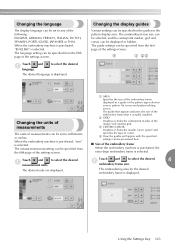
...from the fifth page of the settings screen. 1 AREA Specifies the size of the embroidery frame When the embroidery machine is purchased, the extra-large embroidery frame is displayed. When the embroidery machine is purchased, "mm" is displayed. Touch and to select the desired The desired ...language is selected. When the embroidery machine is purchased, "ENGLISH" is actually installed. 2 GRID Displays or hides the centerpoint marker of the design (red) and the grid. 3 CENTER CURSOR Displays or hides the needle cursor (green) and specifies the type of cursor...
...from the fifth page of the settings screen. 1 AREA Specifies the size of the embroidery frame When the embroidery machine is purchased, the extra-large embroidery frame is displayed. When the embroidery machine is purchased, "mm" is displayed. Touch and to select the desired The desired ...language is selected. When the embroidery machine is purchased, "ENGLISH" is actually installed. 2 GRID Displays or hides the centerpoint marker of the design (red) and the grid. 3 CENTER CURSOR Displays or hides the needle cursor (green) and specifies the type of cursor...
Users Manual - English
Page 162
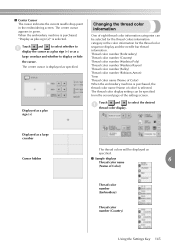
...; Sample displays 6 Thread color name (Name of Color) Thread color number (Embroidery) Thread color number (Country) Using the Settings Key 145 The center cursor is selected. ■ Center Cursor The cursor indicates the current needle drop point in green. When the embroidery machine is purchased, "Display as a large crossbar and whether to select the...
...; Sample displays 6 Thread color name (Name of Color) Thread color number (Embroidery) Thread color number (Country) Using the Settings Key 145 The center cursor is selected. ■ Center Cursor The cursor indicates the current needle drop point in green. When the embroidery machine is purchased, "Display as a large crossbar and whether to select the...

Users Manual - English
Page 163
... color will be displayed. If "OFF" is created by the PE-Design's "User Thread Chart", the machine will be displayed in the change thread color screen. When the embroidery machine is purchased, "OFF" is selected, one of the settings screen. 146 The thread color numbers are displayed... as original colors or another manufacturer's thread colors. Display expanded thread color The thread colors displayed in the thread color sequence display and in the needle bar ...
... color will be displayed. If "OFF" is created by the PE-Design's "User Thread Chart", the machine will be displayed in the change thread color screen. When the embroidery machine is purchased, "OFF" is selected, one of the settings screen. 146 The thread color numbers are displayed... as original colors or another manufacturer's thread colors. Display expanded thread color The thread colors displayed in the thread color sequence display and in the needle bar ...
Users Manual - English
Page 167
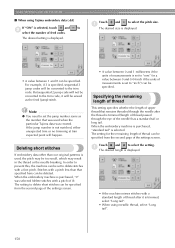
... setting is trimmed (length of thread after it will be converted to the trim code. When the embroidery machine is purchased, "0" was created. The setting to delete stitches with a standard length of thread passed through the needle after the thread is displayed. Note ● You need to set to delete short stitches can...
... setting is trimmed (length of thread after it will be converted to the trim code. When the embroidery machine is purchased, "0" was created. The setting to delete stitches with a standard length of thread passed through the needle after the thread is displayed. Note ● You need to set to delete short stitches can...


