
Users Manual - English
Page 2
...: Model Number: Brother USB Writer PE-Design complies with Part 15 of the FCC Rules. These limits are designed to radio communications. Reorient or relocate the receiving antenna. - Increase the separation between the equipment and receiver. - IMPORTANT INFORMATION: REGULATIONS Federal Communications Commissions (FCC) Declaration of Conformity (For USA Only) Responsible Party: Brother International Corporation 100 Somerset...
...: Model Number: Brother USB Writer PE-Design complies with Part 15 of the FCC Rules. These limits are designed to radio communications. Reorient or relocate the receiving antenna. - Increase the separation between the equipment and receiver. - IMPORTANT INFORMATION: REGULATIONS Federal Communications Commissions (FCC) Declaration of Conformity (For USA Only) Responsible Party: Brother International Corporation 100 Somerset...

Users Manual - English
Page 4
Turn Any Design Into Original Embroidery With PE-DESIGN This software provides digitizing and editing capabilities, allowing you the creative freedom to design original embroidery. Easily turn illustrations, photos and lettering into custom embroidery designs. ■ Layout ready-made designs ■ Large-sized patterns (☞p. 15) (☞p. 176 in the Instruction Manual (PDF format)) 2
Turn Any Design Into Original Embroidery With PE-DESIGN This software provides digitizing and editing capabilities, allowing you the creative freedom to design original embroidery. Easily turn illustrations, photos and lettering into custom embroidery designs. ■ Layout ready-made designs ■ Large-sized patterns (☞p. 15) (☞p. 176 in the Instruction Manual (PDF format)) 2
Users Manual - English
Page 6
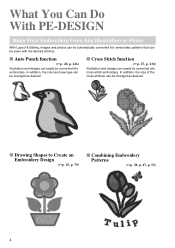
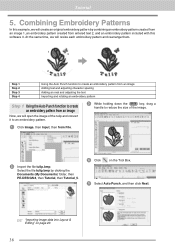
What You Can Do With PE-DESIGN Make Vivid Embroidery From Any Illustration or Photo With Layout & Editing, images and photos can be automatically converted into embroidery patterns that can be sewn ... into cross-stitch embroidery. In addition, the size of the cross-stitches can easily be changed as desired. ■ Drawing Shapes to Create an Embroidery Design (☞p. 29, p. 70) ■ Combining Embroidery Patterns (☞p. 38, p. 47, p. 52) 4 In addition, the color and sew type can be changed as desired. ■ Cross...
What You Can Do With PE-DESIGN Make Vivid Embroidery From Any Illustration or Photo With Layout & Editing, images and photos can be automatically converted into embroidery patterns that can be sewn ... into cross-stitch embroidery. In addition, the size of the cross-stitches can easily be changed as desired. ■ Drawing Shapes to Create an Embroidery Design (☞p. 29, p. 70) ■ Combining Embroidery Patterns (☞p. 38, p. 47, p. 52) 4 In addition, the color and sew type can be changed as desired. ■ Cross...
Users Manual - English
Page 15
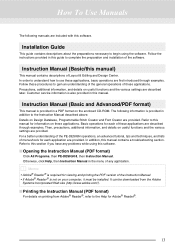
... of the software. In addition, this software. ■ Opening the Instruction Manual (PDF format) Click All Programs, then PE-DESIGN 8, then Instruction Manual. It can be installed. Installation Guide This guide contains descriptions about the preparations necessary to begin using this...Then, precautions, additional information, and details on useful functions and the various settings are provided. For a better understanding of the PE-DESIGN operations, an advanced tutorial, tips and techniques, and lists of menus/tools for each of these applications, basic operations are ...
... of the software. In addition, this software. ■ Opening the Instruction Manual (PDF format) Click All Programs, then PE-DESIGN 8, then Instruction Manual. It can be installed. Installation Guide This guide contains descriptions about the preparations necessary to begin using this...Then, precautions, additional information, and details on useful functions and the various settings are provided. For a better understanding of the PE-DESIGN operations, an advanced tutorial, tips and techniques, and lists of menus/tools for each of these applications, basic operations are ...
Users Manual - English
Page 18
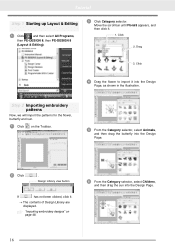
... . 1. Click 2. Move the scroll bar until Floral3 appears, and then click it . → The contents of Design Library are displayed. Drag 3. Tutorial Step 1 Starting up Layout & Editing 1 Click , and then select All Programs, then PE-DESIGN 8, then PE-DESIGN 8 (Layout & Editing). 3 Click Category selector. Step 2 Importing embroidery patterns Now, we will import the patterns for...
... . 1. Click 2. Move the scroll bar until Floral3 appears, and then click it . → The contents of Design Library are displayed. Drag 3. Tutorial Step 1 Starting up Layout & Editing 1 Click , and then select All Programs, then PE-DESIGN 8, then PE-DESIGN 8 (Layout & Editing). 3 Click Category selector. Step 2 Importing embroidery patterns Now, we will import the patterns for...
Users Manual - English
Page 25
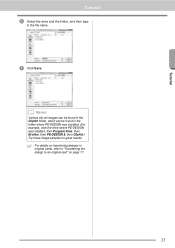
Tutorial Tutorial 2 Select the drive and the folder, and then type in the folder where PE-DESIGN was installed. (For example, click the drive where PE-DESIGN was installed, then Program Files, then Brother, then PE-DESIGN 8, then ClipArt.) Try these image samples for great results. b Memo: Various clip art images can be found in the ClipArt folder, which can be found in the file name. 3 Click Save. c For details on transferring designs to original cards, refer to "Transferring the design to an original card" on page 17. 23
Tutorial Tutorial 2 Select the drive and the folder, and then type in the folder where PE-DESIGN was installed. (For example, click the drive where PE-DESIGN was installed, then Program Files, then Brother, then PE-DESIGN 8, then ClipArt.) Try these image samples for great results. b Memo: Various clip art images can be found in the ClipArt folder, which can be found in the file name. 3 Click Save. c For details on transferring designs to original cards, refer to "Transferring the design to an original card" on page 17. 23
Users Manual - English
Page 40
... entered text 2, and an embroidery pattern included with this example, we will create an original embroidery pattern by clicking the Documents (My Documents) folder, then PE-DESIGN 8, then Tutorial, then Tutorial_5. 4 Click on page 20. 38 c "Importing image data into Layout & Editing" on the Tool Box. 5 Select Auto Punch, and then click...
... entered text 2, and an embroidery pattern included with this example, we will create an original embroidery pattern by clicking the Documents (My Documents) folder, then PE-DESIGN 8, then Tutorial, then Tutorial_5. 4 Click on page 20. 38 c "Importing image data into Layout & Editing" on the Tool Box. 5 Select Auto Punch, and then click...
Users Manual - English
Page 44
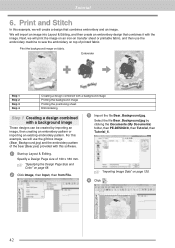
... will import an image into Layout & Editing, and then create an embroidery design that combines embroidery and an image. We will create a design that combines it with a background image These designs can be created by clicking the Documents (My Documents) folder, then PE-DESIGN 8, then Tutorial, then Tutorial_6. 1 Start up Layout & Editing. Print the background...
... will import an image into Layout & Editing, and then create an embroidery design that combines embroidery and an image. We will create a design that combines it with a background image These designs can be created by clicking the Documents (My Documents) folder, then PE-DESIGN 8, then Tutorial, then Tutorial_6. 1 Start up Layout & Editing. Print the background...
Users Manual - English
Page 45
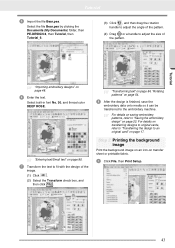
...the size of the pattern. (4) Drag or a handle to "Saving the embroidery design" on page 48. 6 Enter the text. Select the file Bear.pes by clicking the Documents (My Documents) folder, then PE-DESIGN 8, then Tutorial, then Tutorial_6. (3) Click , and then drag the rotation handle... to adjust the angle of the pattern. (3) Tutorial (4) c "Importing embroidery designs" on page 22. c "Entering text/...
...the size of the pattern. (4) Drag or a handle to "Saving the embroidery design" on page 48. 6 Enter the text. Select the file Bear.pes by clicking the Documents (My Documents) folder, then PE-DESIGN 8, then Tutorial, then Tutorial_6. (3) Click , and then drag the rotation handle... to adjust the angle of the pattern. (3) Tutorial (4) c "Importing embroidery designs" on page 22. c "Entering text/...
Users Manual - English
Page 48
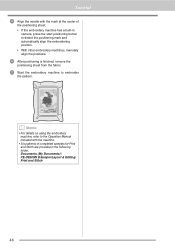
... needle with the machine. • Six patterns of the positioning sheet. • If the embroidery machine has a built-in the following folder. Documents (My Documents)\ PE-DESIGN 8\Sample\Layout & Editing\ Print and Stitch 46
... needle with the machine. • Six patterns of the positioning sheet. • If the embroidery machine has a built-in the following folder. Documents (My Documents)\ PE-DESIGN 8\Sample\Layout & Editing\ Print and Stitch 46
Users Manual - English
Page 84
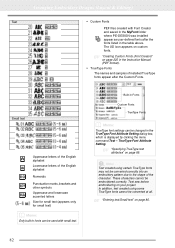
... displayed by clicking the menu command Text - In addition, text created using certain TrueType fonts may not be converted at all. Arranging Embroidery Designs (Layout & Editing) Text • Custom Fonts PEF files created with small text. c "Specifying TrueType text attributes" on custom fonts. ... "Entering text/Small text" on your project. These characters cannot be used with Font Creator and saved in the MyFont folder where PE-DESIGN was installed appear as user-defined fonts after the Custom Fonts. Built-in Fonts Custom Fonts TrueType Fonts b Memo: TrueType font settings...
... displayed by clicking the menu command Text - In addition, text created using certain TrueType fonts may not be converted at all. Arranging Embroidery Designs (Layout & Editing) Text • Custom Fonts PEF files created with small text. c "Specifying TrueType text attributes" on custom fonts. ... "Entering text/Small text" on your project. These characters cannot be used with Font Creator and saved in the MyFont folder where PE-DESIGN was installed appear as user-defined fonts after the Custom Fonts. Built-in Fonts Custom Fonts TrueType Fonts b Memo: TrueType font settings...
Users Manual - English
Page 112
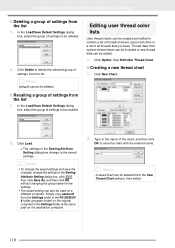
Arranging Embroidery Designs (Layout & Editing) ■ Deleting a group of settings to be recalled. In the Load/Save Default Settings dialog box, select the group of settings from the ... settings. Simply copy sastu.txt from the list 1. Click Load. → The settings in the Sewing Attribute Setting dialog box change the settings in the PE-DESIGN 8 folder (program folder) on the destination computer. 2. In the Load/Save Default Settings dialog box, select the group of settings from the Settings folder in...
Arranging Embroidery Designs (Layout & Editing) ■ Deleting a group of settings to be recalled. In the Load/Save Default Settings dialog box, select the group of settings from the ... settings. Simply copy sastu.txt from the list 1. Click Load. → The settings in the Sewing Attribute Setting dialog box change the settings in the PE-DESIGN 8 folder (program folder) on the destination computer. 2. In the Load/Save Default Settings dialog box, select the group of settings from the Settings folder in...
Users Manual - English
Page 122
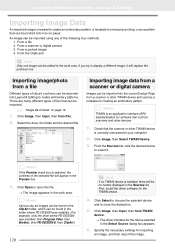
... can be found in the ClipArt folder, which can be found in the folder where PE-DESIGN was installed. (For example, click the drive where PE-DESIGN was installed, then Program Files, then Brother, then PE-DESIGN 8, then ClipArt.) 120 a Note: If no names displayed in the Select Source dialog...from a scanner or other devices. 1. Click Image, then Select TWAIN Device. 3. b Memo: Various clip art images can be imported into the current Design Page from File. 2. Importing image/photo from TWAIN device. → The driver interface for the TWAIN device. 4. Click Image, then Input, then...
... can be found in the ClipArt folder, which can be found in the folder where PE-DESIGN was installed. (For example, click the drive where PE-DESIGN was installed, then Program Files, then Brother, then PE-DESIGN 8, then ClipArt.) 120 a Note: If no names displayed in the Select Source dialog...from a scanner or other devices. 1. Click Image, then Select TWAIN Device. 3. b Memo: Various clip art images can be imported into the current Design Page from File. 2. Importing image/photo from TWAIN device. → The driver interface for the TWAIN device. 4. Click Image, then Input, then...
Users Manual - English
Page 148
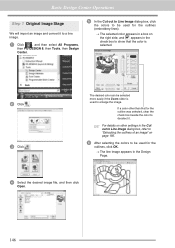
... dialog box, refer to "Extracting the outlines of an image" on the right side, and appears in the check box to enlarge the image. Basic Design Center Operations Step 1 Original Image Stage We will import an image and convert it . The desired color can be selected more easily if the Zoom... appears in a box on page 156. 6 After selecting the colors to deselect it to a line image. 1 Click , and then select All Programs, then PE-DESIGN 8, then Tools, then Design Center. 5 In the Cut out to Line Image dialog box, click the colors to be used for the outlines, click OK. → The line...
... dialog box, refer to "Extracting the outlines of an image" on the right side, and appears in the check box to enlarge the image. Basic Design Center Operations Step 1 Original Image Stage We will import an image and convert it . The desired color can be selected more easily if the Zoom... appears in a box on page 156. 6 After selecting the colors to deselect it to a line image. 1 Click , and then select All Programs, then PE-DESIGN 8, then Tools, then Design Center. 5 In the Cut out to Line Image dialog box, click the colors to be used for the outlines, click OK. → The line...
Users Manual - English
Page 172
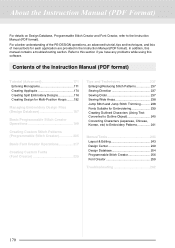
...troubleshooting section. In addition, this software. Refer to the Instruction Manual (PDF format). For a better understanding of the PE-DESIGN operations, an advanced tutorial, tips and techniques, and lists of the Instruction Manual (PDF format) Tutorial (Advanced 171 ...Entering Monograms 171 Creating Appliqués 174 Creating Split Embroidery Designs 176 Creating Design for Multi-Position Hoops ........182 Managing Embroidery Design Files (Design Database 187 Basic Programmable Stitch Creator Operations 199 Creating Custom Stitch Patterns (Programmable...
...troubleshooting section. In addition, this software. Refer to the Instruction Manual (PDF format). For a better understanding of the PE-DESIGN operations, an advanced tutorial, tips and techniques, and lists of the Instruction Manual (PDF format) Tutorial (Advanced 171 ...Entering Monograms 171 Creating Appliqués 174 Creating Split Embroidery Designs 176 Creating Design for Multi-Position Hoops ........182 Managing Embroidery Design Files (Design Database 187 Basic Programmable Stitch Creator Operations 199 Creating Custom Stitch Patterns (Programmable...
Users Manual - English
Page 173
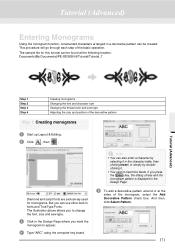
...by selecting it in the character table, then clicking Insert, or simply by doubleclicking it. • You cannot insert line feeds. Documents(My Documents)\PE-DESIGN 8\Tutorial\Tutorial_7 Tutorial (Advanced) Step 1 Step 2 Step 3 Step 4 Creating monograms Changing the font and character size Changing the thread color and ...want the monogram to change the font, size and sew type. 3 Click in the Design Page where you press the Enter key, the dialog closes and the monogram pattern is displayed in the Design Page. 5 To add a decorative pattern around or at the following location. Diamond and...
...by selecting it in the character table, then clicking Insert, or simply by doubleclicking it. • You cannot insert line feeds. Documents(My Documents)\PE-DESIGN 8\Tutorial\Tutorial_7 Tutorial (Advanced) Step 1 Step 2 Step 3 Step 4 Creating monograms Changing the font and character size Changing the thread color and ...want the monogram to change the font, size and sew type. 3 Click in the Design Page where you press the Enter key, the dialog closes and the monogram pattern is displayed in the Design Page. 5 To add a decorative pattern around or at the following location. Diamond and...

Users Manual - English
Page 176
Documents(My Documents)\PE-DESIGN 8\Tutorial\Tutorial_8 Step 1 Step 2 Creating an appliqué pattern Using the Applique Wizard Step 1 Creating an appliqué pattern An appliqué can be sewn ... (No) the outline of the basic operation. Tutorial (Advanced) Creating Appliqués The Applique Wizard provides instructions for this tutorial can be specified in the Design Page to the desired size. This procedure will draw a circle and create an appliqué. 1 Start up Layout & Editing. 2 To draw a circle click on embroidering...
Documents(My Documents)\PE-DESIGN 8\Tutorial\Tutorial_8 Step 1 Step 2 Creating an appliqué pattern Using the Applique Wizard Step 1 Creating an appliqué pattern An appliqué can be sewn ... (No) the outline of the basic operation. Tutorial (Advanced) Creating Appliqués The Applique Wizard provides instructions for this tutorial can be specified in the Design Page to the desired size. This procedure will draw a circle and create an appliqué. 1 Start up Layout & Editing. 2 To draw a circle click on embroidering...

Users Manual - English
Page 178
...My Documents)\PE-DESIGN 8\Tutorial\Tutorial_9 Step 1 Step 2 Step 3 Step 4 Step 5 Step 6 Step 7 Specifying the Design Page size in Layout & Editing Creating the embroidery design Checking the embroidering order Attaching stabilizer to the fabric Marking the embroidering position Hooping the fabric Embroidering Step 1 Specifying the Design Page size ...(for Hoop Size) setting, the width and height of the sections are 10mm smaller than the embroidery hoop. The sample file for the Design Page. For this tutorial can be used for sewing. 5 Click OK. For this example, select 120 × 170 mm (130...
...My Documents)\PE-DESIGN 8\Tutorial\Tutorial_9 Step 1 Step 2 Step 3 Step 4 Step 5 Step 6 Step 7 Specifying the Design Page size in Layout & Editing Creating the embroidery design Checking the embroidering order Attaching stabilizer to the fabric Marking the embroidering position Hooping the fabric Embroidering Step 1 Specifying the Design Page size ...(for Hoop Size) setting, the width and height of the sections are 10mm smaller than the embroidery hoop. The sample file for the Design Page. For this tutorial can be used for sewing. 5 Click OK. For this example, select 120 × 170 mm (130...
Users Manual - English
Page 179
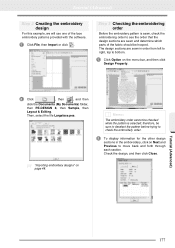
...2 To display information for the other design sections in order from left to right, top to bottom. 1 Click Option on the menu bar, and then click Design Property. 2 Click , then , and then click the Documents (My Documents) folder, then PE-DESIGN 8, then Sample, then Layout & Editing.... Tutorial (Advanced) 177 Then, select the file Largelace.pes. b Memo: The embroidery order cannot be checked while...
...2 To display information for the other design sections in order from left to right, top to bottom. 1 Click Option on the menu bar, and then click Design Property. 2 Click , then , and then click the Documents (My Documents) folder, then PE-DESIGN 8, then Sample, then Layout & Editing.... Tutorial (Advanced) 177 Then, select the file Largelace.pes. b Memo: The embroidery order cannot be checked while...
Users Manual - English
Page 184
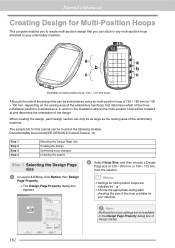
...: • Settings for your embroidery machine. Documents(My Documents)\PE-DESIGN 8\Tutorial\Tutorial_10 Step 1 Step 2 Step 3 Step 4 Selecting the Design Page size Creating the design Optimizing hoop changes Checking the pattern Step 1 Selecting the Design Page size 1 In Layout & Editing, click Option, then Design Page Property. → The Design Page Property dialog box appears. 2 Select Hoop Size...
...: • Settings for your embroidery machine. Documents(My Documents)\PE-DESIGN 8\Tutorial\Tutorial_10 Step 1 Step 2 Step 3 Step 4 Selecting the Design Page size Creating the design Optimizing hoop changes Checking the pattern Step 1 Selecting the Design Page size 1 In Layout & Editing, click Option, then Design Page Property. → The Design Page Property dialog box appears. 2 Select Hoop Size...


