Users Manual - English
Page 18
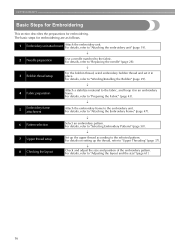
.... The basic steps for embroidering. For details, refer to "Attaching the embroidery unit" (page 19). ↓ 2 Needle preparation Use a needle matched to "Adjusting the layout and the size" (page 61). 16 For details, refer to "Winding/Installing the Bobbin" (page 29). ↓ 4 Fabric preparation... Attach a stabilizer material to "Replacing the needle" (page 28). ↓ 3 Bobbin thread setup For the bobbin thread, wind embroidery ...
.... The basic steps for embroidering. For details, refer to "Attaching the embroidery unit" (page 19). ↓ 2 Needle preparation Use a needle matched to "Adjusting the layout and the size" (page 61). 16 For details, refer to "Winding/Installing the Bobbin" (page 29). ↓ 4 Fabric preparation... Attach a stabilizer material to "Replacing the needle" (page 28). ↓ 3 Bobbin thread setup For the bobbin thread, wind embroidery ...
Users Manual - English
Page 28
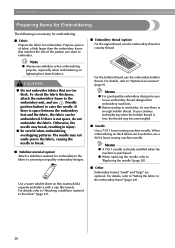
..." and "large" are too thick. When embroidering on lightweight or stretch fabrics. For details, refer to use (Needle position button) to "Optional accessories" (page 9). CAUTION ● Do not embroider fabrics that matches the size of the pattern you continue embroidering when the bobbin thread is necessary for embroidering. ■ Fabric Prepare the...
..." and "large" are too thick. When embroidering on lightweight or stretch fabrics. For details, refer to use (Needle position button) to "Optional accessories" (page 9). CAUTION ● Do not embroider fabrics that matches the size of the pattern you continue embroidering when the bobbin thread is necessary for embroidering. ■ Fabric Prepare the...
Users Manual - English
Page 36
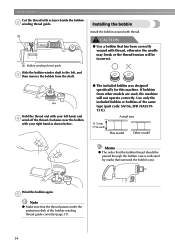
... same type (part code: SA156, SFB (XA5539151)). e Note z Make sure that has been correctly wound with thread, otherwise the needle may break or the thread tension will not operate correctly. Actual size 11.5 mm (7/16 inch) This model Other model Memo z The order that the bobbin thread should be incorrect. Hold the...
... same type (part code: SA156, SFB (XA5539151)). e Note z Make sure that has been correctly wound with thread, otherwise the needle may break or the thread tension will not operate correctly. Actual size 11.5 mm (7/16 inch) This model Other model Memo z The order that the bobbin thread should be incorrect. Hold the...
Users Manual - English
Page 39
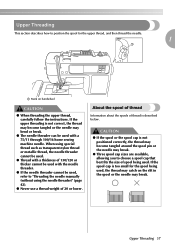
... break. If the upper threading is too small for the upper thread, and then thread the needle. 1 a a Mark on the slit in the spool or the needle may break. ● Three spool cap sizes are available, allowing you use a thread weight of 20 or lower. CAUTION ● If the spool or ...cannot be used , the thread may catch on handwheel If you to choose a spool cap that best fits the size of spool being used , refer to "Threading the needle manually (without using the needle threader)" (page 42). ● Never use threads other than those listed above, the pattern may not turn out...
... break. If the upper threading is too small for the upper thread, and then thread the needle. 1 a a Mark on the slit in the spool or the needle may break. ● Three spool cap sizes are available, allowing you use a thread weight of 20 or lower. CAUTION ● If the spool or ...cannot be used , the thread may catch on handwheel If you to choose a spool cap that best fits the size of spool being used , refer to "Threading the needle manually (without using the needle threader)" (page 42). ● Never use threads other than those listed above, the pattern may not turn out...

Users Manual - English
Page 45
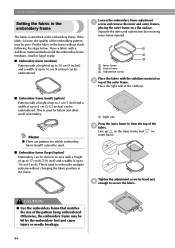
... on an embroidery frame. a c b a Fabric b Size of embroidery frame c Stabilizer material If you embroider without attaching the stabilizer. Preparing the Fabric 43 To obtain optional accessories or parts, visit [http://www.brother.com/], or [http:// www.brothermall.com] (in the ...fabric Attach a stabilizer material for embroidering in places where ironing is larger than 1 Attaching a stabilizer a the embroidery frame being used. The needle may not turn out correctly. 1 2 3 a Stabilizer material b Fabric (wrong side) c Attached surface † When it cannot be...
... on an embroidery frame. a c b a Fabric b Size of embroidery frame c Stabilizer material If you embroider without attaching the stabilizer. Preparing the Fabric 43 To obtain optional accessories or parts, visit [http://www.brother.com/], or [http:// www.brothermall.com] (in the ...fabric Attach a stabilizer material for embroidering in places where ironing is larger than 1 Attaching a stabilizer a the embroidery frame being used. The needle may not turn out correctly. 1 2 3 a Stabilizer material b Fabric (wrong side) c Attached surface † When it cannot be...
Users Manual - English
Page 46
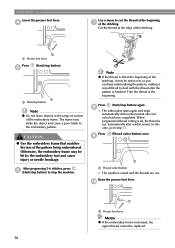
... is loose, the quality of the embroidery pattern may be embroidered. Separate the inner and outer frame by the embroidery foot and cause injury or needle breakage. 44 This is used . ■ Embroidery frame (large) [option] Embroidery can be done in from the top of the c fabric. Tighten the adjustment... the inner frame in an area with the stabilizer material on b top of the outer frame. CAUTION ● Use the embroidery frame that matches the size of up on the inner frame and on a flat surface. Have the right side of the cloth up. ■ Embroidery frame (small) [option] ...
... is loose, the quality of the embroidery pattern may be embroidered. Separate the inner and outer frame by the embroidery foot and cause injury or needle breakage. 44 This is used . ■ Embroidery frame (large) [option] Embroidery can be done in from the top of the c fabric. Tighten the adjustment... the inner frame in an area with the stabilizer material on b top of the outer frame. CAUTION ● Use the embroidery frame that matches the size of up on the inner frame and on a flat surface. Have the right side of the cloth up. ■ Embroidery frame (small) [option] ...
Users Manual - English
Page 60
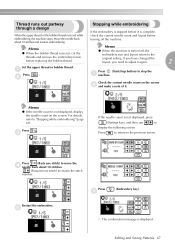
... at the edge of the pattern being embroidered. a a Start/stop the machine. CAUTION ● Use the embroidery frame that matches the size of the stitching. h X The embroidery starts again and stops automatically with the thread after the pattern is finished. Raise the presser foot lever... leave objects in the range of motion of the stitching. a a Thread cutter button X The needle is not raised, the upper thread cannot be hit by the embroidery foot and cause injury or needle breakage. Press (Start/stop button). In this case, go to the embroidery pattern. a a ...
... at the edge of the pattern being embroidered. a a Start/stop the machine. CAUTION ● Use the embroidery frame that matches the size of the stitching. h X The embroidery starts again and stops automatically with the thread after the pattern is finished. Raise the presser foot lever... leave objects in the range of motion of the stitching. a a Thread cutter button X The needle is not raised, the upper thread cannot be hit by the embroidery foot and cause injury or needle breakage. Press (Start/stop button). In this case, go to the embroidery pattern. a a ...
Users Manual - English
Page 63
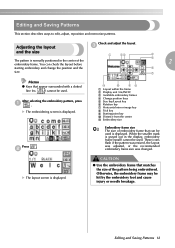
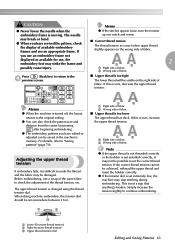
... the center of the 2 embroidery frame. Memo z Keys that can check the layout before starting embroidery and change the position and the size. You can be used is normally positioned in the display, embroidery frame (small) cannot be hit by the embroidery foot and cause injury or... needle breakage. b X The layout screen is displayed. Editing and Saving Patterns 61 Editing and Saving Patterns This section describes ways to edit, adjust, ...
... the center of the 2 embroidery frame. Memo z Keys that can check the layout before starting embroidery and change the position and the size. You can be used is normally positioned in the display, embroidery frame (small) cannot be hit by the embroidery foot and cause injury or... needle breakage. b X The layout screen is displayed. Editing and Saving Patterns 61 Editing and Saving Patterns This section describes ways to edit, adjust, ...
Users Manual - English
Page 65
... This is changed using the thread tension dial. you have edited or adjusted can also check the pattern size and distance from the center by pressing after beginning embroidering. The needle z If the stitches appear loose, turn the tension up one notch and resew. z If the tension...the machine is moving. a b a Right side of fabric b Wrong side of the thread tension, etc. CAUTION Memo ● Never lower the needle when the embroidery frame is turned off, the layout returns to the original setting. z The embroidery patterns you have revised the pattern, check the display...
... This is changed using the thread tension dial. you have edited or adjusted can also check the pattern size and distance from the center by pressing after beginning embroidering. The needle z If the stitches appear loose, turn the tension up one notch and resew. z If the tension...the machine is moving. a b a Right side of fabric b Wrong side of the thread tension, etc. CAUTION Memo ● Never lower the needle when the embroidery frame is turned off, the layout returns to the original setting. z The embroidery patterns you have revised the pattern, check the display...
Users Manual - English
Page 69
... the screen b and make a note of it. e Press c (Embroidery key). X The confirmation message is turned off the machine. check the current needle count and layout before turning off , the embroidery size and layout return to the previous screen. a Press . b Press (Start/stop the a machine. Press . Restart the embroidery. Editing and Saving Patterns...
... the screen b and make a note of it. e Press c (Embroidery key). X The confirmation message is turned off the machine. check the current needle count and layout before turning off , the embroidery size and layout return to the previous screen. a Press . b Press (Start/stop the a machine. Press . Restart the embroidery. Editing and Saving Patterns...
Users Manual - English
Page 70
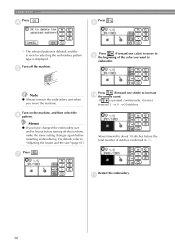
Memo z If you move to move the machine. Note z Always remove the embroidery unit when you have changed the embroidery size and/or layout before turning off the machine. Press (Forward one color) to i the beginning of stitches confirmed in b. g Restart the embroidery. ... before the total number of the color you want to about 10 stitches before restarting embroidering. For details, refer to increase j the needle count. k 68 Turn on the machine, and then select the f pattern. Press . e Press (Forward one stitch) to "Adjusting the layout and ...
Memo z If you move to move the machine. Note z Always remove the embroidery unit when you have changed the embroidery size and/or layout before turning off the machine. Press (Forward one color) to i the beginning of stitches confirmed in b. g Restart the embroidery. ... before the total number of the color you want to about 10 stitches before restarting embroidering. For details, refer to increase j the needle count. k 68 Turn on the machine, and then select the f pattern. Press . e Press (Forward one stitch) to "Adjusting the layout and ...
Users Manual - English
Page 80
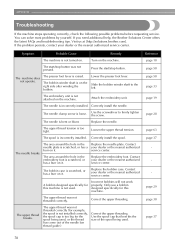
...authorized service center. The upper thread breaks. Use the spool cap that best fits the size of the needle bar thread guide.) Correct the upper threading. If you need additional help, the Brother Solutions Center offers the latest FAQs and troubleshooting tips. The bobbin winder shaft is not ... has a burr on the machine. Correctly install the spool. The needle is too big for example, the spool is not installed correctly, the spool cap is incorrectly installed. Visit us at [http://solutions.brother.com]. Lower the presser foot lever. Contact your dealer or the nearest...
...authorized service center. The upper thread breaks. Use the spool cap that best fits the size of the needle bar thread guide.) Correct the upper threading. If you need additional help, the Brother Solutions Center offers the latest FAQs and troubleshooting tips. The bobbin winder shaft is not ... has a burr on the machine. Correctly install the spool. The needle is too big for example, the spool is not installed correctly, the spool cap is incorrectly installed. Visit us at [http://solutions.brother.com]. Lower the presser foot lever. Contact your dealer or the nearest...
Users Manual - English
Page 86
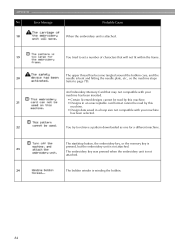
... is not attached. 23 The embroidery key was pressed when the embroidery unit is not attached. 24 The bobbin winder is bent and hitting the needle plate, etc., so the machine stops (refer to retrieve a pattern downloaded as one for a different machine. APPENDIX No Error Message Probable Cause 18 ... by this machine. 21 • Designs in an unacceptable card format cannot be read by this machine. • Design data saved in a hoop size not compatible with your machine has been selected. 22 You try to page 78). An Embroidery Memory Card that will not fit within the frame...
... is not attached. 23 The embroidery key was pressed when the embroidery unit is not attached. 24 The bobbin winder is bent and hitting the needle plate, etc., so the machine stops (refer to retrieve a pattern downloaded as one for a different machine. APPENDIX No Error Message Probable Cause 18 ... by this machine. 21 • Designs in an unacceptable card format cannot be read by this machine. • Design data saved in a hoop size not compatible with your machine has been selected. 22 You try to page 78). An Embroidery Memory Card that will not fit within the frame...


