
Accessory Catalog
Page 4
...select a straight stitch (left or right. 3. Check the needle does not hit the presser foot, and then tighten the clamp screw with just right pressure. 1. Brother General Sewing Accessories 05 Sew as you like. Position the presser foot over the long feed dogs on the presser foot. 4. Screw on the edge... of zipper/piping, avoiding the non-flat parts of the presser foot and slide the presser foot so that the needle fits on the opening on either left ). 2. Requires Low Shank Adapter for...
...select a straight stitch (left or right. 3. Check the needle does not hit the presser foot, and then tighten the clamp screw with just right pressure. 1. Brother General Sewing Accessories 05 Sew as you like. Position the presser foot over the long feed dogs on the presser foot. 4. Screw on the edge... of zipper/piping, avoiding the non-flat parts of the presser foot and slide the presser foot so that the needle fits on the opening on either left ). 2. Requires Low Shank Adapter for...

Accessory Catalog
Page 6
... (See page 53 for consistent feeding with the wrong side facing up under the presser foot. 3. Non Stick Foot Designed for details.) www.brother.com Sews overcast seams to the end of the foot. 6. Place the fabric with fabrics such as leather, vinyl and other novelty fabrics.... SA164 ABCDEFJKMN SA149 GHILOP SA114 ABCDEFGHJKLMNO SA122 IP Travel Jewelr y Portfolio Innov-is rolling around the curled part of the fabric behind the needle and lower the presser foot. 7. Sew along the guide. Hold the fabric from the back and front...
... (See page 53 for consistent feeding with the wrong side facing up under the presser foot. 3. Non Stick Foot Designed for details.) www.brother.com Sews overcast seams to the end of the foot. 6. Place the fabric with fabrics such as leather, vinyl and other novelty fabrics.... SA164 ABCDEFJKMN SA149 GHILOP SA114 ABCDEFGHJKLMNO SA122 IP Travel Jewelr y Portfolio Innov-is rolling around the curled part of the fabric behind the needle and lower the presser foot. 7. Sew along the guide. Hold the fabric from the back and front...
Users Manual - English
Page 2
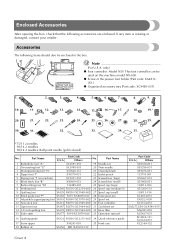
...19.* 28. 29. 35. *75/11 2 needles 90/14 2 needles 90/14 2 needles: Ball point needle (gold colored) No. Part Name Part Code U.S.A. If any item is missing or damaged, contact your retailer. only) z Foot controller: Model N5V This foot controller can be enclosed in...-151) Part Code U.S.A. Note (For U.S.A. Part Name 1 Buttonhole foot "A" XC2691-051 19 Needle set 2 Overcasting foot "G" XC3098-051 20 Twin needle 3 Monogramming foot "N" X53840-351 21 Cleaning brush 4 Zipper foot "I" X59370-051 22 Eyelet punch 5 Zigzag foot "J" (on this machine model NX-600. Others ...
...19.* 28. 29. 35. *75/11 2 needles 90/14 2 needles 90/14 2 needles: Ball point needle (gold colored) No. Part Name Part Code U.S.A. If any item is missing or damaged, contact your retailer. only) z Foot controller: Model N5V This foot controller can be enclosed in...-151) Part Code U.S.A. Note (For U.S.A. Part Name 1 Buttonhole foot "A" XC2691-051 19 Needle set 2 Overcasting foot "G" XC3098-051 20 Twin needle 3 Monogramming foot "N" X53840-351 21 Cleaning brush 4 Zipper foot "I" X59370-051 22 Eyelet punch 5 Zigzag foot "J" (on this machine model NX-600. Others ...
Users Manual - English
Page 3
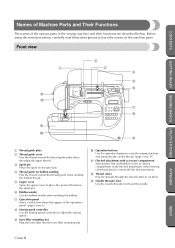
... around the thread guide plate when threading the upper thread. g Operation panel Select a stitch from those that appear in the accessory compartment of the machine parts. Before using the sewing machine, carefully read these descriptions to adjust the sewing speed. Front view 1 C B 2 3 4 5 6 7 8 A 0 9 a Thread guide plate b Thread guide cover Pass the thread..., remove the flat bed attachment. e Upper cover Open the upper cover to thread the needle. CONTENTS GETTING READY SEWING BASICS UTILITY STITCHES Names of Machine Parts and Their Functions The names of the various...
... around the thread guide plate when threading the upper thread. g Operation panel Select a stitch from those that appear in the accessory compartment of the machine parts. Before using the sewing machine, carefully read these descriptions to adjust the sewing speed. Front view 1 C B 2 3 4 5 6 7 8 A 0 9 a Thread guide plate b Thread guide cover Pass the thread..., remove the flat bed attachment. e Upper cover Open the upper cover to thread the needle. CONTENTS GETTING READY SEWING BASICS UTILITY STITCHES Names of Machine Parts and Their Functions The names of the various...

Users Manual - English
Page 7
CONTENTS Optional Accessories The following are available as optional accessories. 1. Wide table Part code: SA537, WT2 (XC4541-051) Memo z To obtain optional accessories or parts, contact your sales representative or the nearest authorized service center. GETTING READY SEWING BASICS UTILITY STITCHES APPENDIX INDEX 1 Optional Accessories 1.
CONTENTS Optional Accessories The following are available as optional accessories. 1. Wide table Part code: SA537, WT2 (XC4541-051) Memo z To obtain optional accessories or parts, contact your sales representative or the nearest authorized service center. GETTING READY SEWING BASICS UTILITY STITCHES APPENDIX INDEX 1 Optional Accessories 1.
Users Manual - English
Page 9
CONTENTS GETTING READY SEWING BASICS UTILITY STITCHES Contents Enclosed Accessories Cover A Accessories ...Cover A Names of Machine Parts and Their Functions Cover B Front view ...Cover B Needle and presser foot section ...Cover C Right-side/rear view ...Cover C Operation buttons ...Cover D Operation panel...Cover E Optional ...
CONTENTS GETTING READY SEWING BASICS UTILITY STITCHES Contents Enclosed Accessories Cover A Accessories ...Cover A Names of Machine Parts and Their Functions Cover B Front view ...Cover B Needle and presser foot section ...Cover C Right-side/rear view ...Cover C Operation buttons ...Cover D Operation panel...Cover E Optional ...
Users Manual - English
Page 12
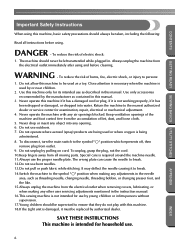
... BASICS UTILITY STITCHES Important Safety Instructions When using . Never operate this machine, basic safety precautions should never be taken, including the following: Read all moving parts. Do not use bent needles. 13.Do not pull or push fabric while stitching. To unplug, grasp the plug, not the cord. 10.Keep fingers...
... BASICS UTILITY STITCHES Important Safety Instructions When using . Never operate this machine, basic safety precautions should never be taken, including the following: Read all moving parts. Do not use bent needles. 13.Do not pull or push fabric while stitching. To unplug, grasp the plug, not the cord. 10.Keep fingers...
Users Manual - English
Page 14
... Replacing or removing the needle or any assemblies, the presser feet, needle, or other moving parts. 2. For additional product information and updates, visit our web site at www.brother.com 8 APPENDIX INDEX Plug the machine directly into the wall. Do not store anything on ...Do not use extension cords. Use only neutral soaps or detergents to keep your local authorized Brother dealer. Do not use or store the machine near a space heater, iron, halogen lamp, or other parts • A power failure occurs during use • Maintaining the machine • Leaving ...
... Replacing or removing the needle or any assemblies, the presser feet, needle, or other moving parts. 2. For additional product information and updates, visit our web site at www.brother.com 8 APPENDIX INDEX Plug the machine directly into the wall. Do not store anything on ...Do not use extension cords. Use only neutral soaps or detergents to keep your local authorized Brother dealer. Do not use or store the machine near a space heater, iron, halogen lamp, or other parts • A power failure occurs during use • Maintaining the machine • Leaving ...

Users Manual - English
Page 24
Use of the same type (part code: SA156, SFB (XA5539-151)). 11.5 mm (7/16 inch) Actual size This model Older model Winding the bobbin Wind the thread around the bobbin to ... a broken line on the sewing machine. If bobbins from older models are used, the machine will not operate correctly. CAUTION ● Only use the bobbin (part code: SA156, SFB (XA5539-151)) designed specifically for this sewing machine. Be sure to the machine. ● The enclosed bobbin was designed specifically for this...
Use of the same type (part code: SA156, SFB (XA5539-151)). 11.5 mm (7/16 inch) Actual size This model Older model Winding the bobbin Wind the thread around the bobbin to ... a broken line on the sewing machine. If bobbins from older models are used, the machine will not operate correctly. CAUTION ● Only use the bobbin (part code: SA156, SFB (XA5539-151)) designed specifically for this sewing machine. Be sure to the machine. ● The enclosed bobbin was designed specifically for this...

Users Manual - English
Page 28
... the bobbin cover latch to the left. ● The bobbin was designed specifically for this sewing machine. Lightly hold c the end of the same type (part code: SA156, SFB (XA5539151)). 11.5 mm (7/16 inch) Actual size This model Older model • Be sure to insert the bobbin correctly. Memo z The order...
... the bobbin cover latch to the left. ● The bobbin was designed specifically for this sewing machine. Lightly hold c the end of the same type (part code: SA156, SFB (XA5539151)). 11.5 mm (7/16 inch) Actual size This model Older model • Be sure to insert the bobbin correctly. Memo z The order...
Users Manual - English
Page 34
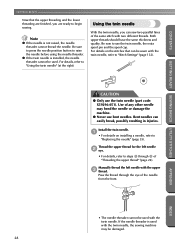
... needle threader is used with the twin needle, the sewing machine may bend the needle or damage the machine. ● Never use the twin needle (part code: X59296-051).
... needle threader is used with the twin needle, the sewing machine may bend the needle or damage the machine. ● Never use the twin needle (part code: X59296-051).

Users Manual - English
Page 42
... tighten the needle clamp screw. a Screwdriver b Needle clamp screw • Do not apply a strong force when loosening or tightening the needle clamp screw, otherwise certain parts of the machine, insert the needle until it touches the needle stopper. APPENDIX INDEX 36 GETTING READY CONTENTS Hold the needle with your left hand...
... tighten the needle clamp screw. a Screwdriver b Needle clamp screw • Do not apply a strong force when loosening or tightening the needle clamp screw, otherwise certain parts of the machine, insert the needle until it touches the needle stopper. APPENDIX INDEX 36 GETTING READY CONTENTS Hold the needle with your left hand...
Users Manual - English
Page 48
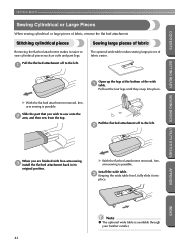
...from the top. Pull out the four legs until they snap into place. X With the flat bed attachment removed, freearm sewing is available through your brother retailer. 42 c Keeping the wide table level, fully slide it easier to the left . Pull the flat bed attachment off to sew cylindrical pieces ...Install the wide table. APPENDIX INDEX Note z The optional wide table is possible. X With the flat bed attachment removed, freearm sewing is possible. Slide the part that you are finished with free-arm sewing, c install the flat bed attachment back in its original position.
...from the top. Pull out the four legs until they snap into place. X With the flat bed attachment removed, freearm sewing is available through your brother retailer. 42 c Keeping the wide table level, fully slide it easier to the left . Pull the flat bed attachment off to sew cylindrical pieces ...Install the wide table. APPENDIX INDEX Note z The optional wide table is possible. X With the flat bed attachment removed, freearm sewing is possible. Slide the part that you are finished with free-arm sewing, c install the flat bed attachment back in its original position.

Users Manual - English
Page 52
... 66). ↓ 3 Attach the presser foot. The thread may also be sewn under the presser foot. In addition, keep your hands away from all moving parts such as the needle and balance wheel, otherwise injuries may occur. ● Do not pull or push the fabric too hard while sewing, otherwise injuries...
... 66). ↓ 3 Attach the presser foot. The thread may also be sewn under the presser foot. In addition, keep your hands away from all moving parts such as the needle and balance wheel, otherwise injuries may occur. ● Do not pull or push the fabric too hard while sewing, otherwise injuries...

Users Manual - English
Page 83
... below. Buttonhole Stitching 77 INDEX Use chalk to the back, as shown below. 1 1 1 GETTING READY SEWING BASICS UTILITY STITCHES APPENDIX 1 a Reinforcement stitching The names of parts of buttonhole foot "A", which is about 28 mm (1-1/8 inch) (diameter + thickness of buttonhole b foot "A", and then insert the button that will be put through the...
... below. Buttonhole Stitching 77 INDEX Use chalk to the back, as shown below. 1 1 1 GETTING READY SEWING BASICS UTILITY STITCHES APPENDIX 1 a Reinforcement stitching The names of parts of buttonhole foot "A", which is about 28 mm (1-1/8 inch) (diameter + thickness of buttonhole b foot "A", and then insert the button that will be put through the...

Users Manual - English
Page 86
... the fabric, and then tie it . c Adjust the stitch width to "Replacing the presser foot" (page 37). With a seam ripper, cut the middle part of the h gimp thread remaining at the top end of fabric. ■ Sewing buttonholes on stretch fabrics When sewing buttonholes on stretch fabrics, use a gimp...start sewing. When sewing is finished, gently pull the gimp f thread to the wrong side of the d gimp thread. Hook the gimp thread onto the part of the gimp thread. Use a handsewing needle to pull the gimp g thread to remove any excess of a buttonhole foot "A" shown in the illustration ...
... the fabric, and then tie it . c Adjust the stitch width to "Replacing the presser foot" (page 37). With a seam ripper, cut the middle part of the h gimp thread remaining at the top end of fabric. ■ Sewing buttonholes on stretch fabrics When sewing buttonholes on stretch fabrics, use a gimp...start sewing. When sewing is finished, gently pull the gimp f thread to the wrong side of the d gimp thread. Hook the gimp thread onto the part of the gimp thread. Use a handsewing needle to pull the gimp g thread to remove any excess of a buttonhole foot "A" shown in the illustration ...

Users Manual - English
Page 101
.... 1 2 3 a 6.4mm (1/4 inch) b End of stitching c Mark on 1/4 inch quilting foot b Beginning of stitching When sewing with a seam allowance, align the left edge of the narrow part of the 1/4 inch quilting foot with the upper edge of the fabric. e When the end of the stitching is used, seams can be sewn with... the right edge of the narrow part of the 1/4 inch quilting foot. 1 2 a Mark on 1/4 inch quilting foot • For details, refer to piece together. Align the right edge of the fabric with...
.... 1 2 3 a 6.4mm (1/4 inch) b End of stitching c Mark on 1/4 inch quilting foot b Beginning of stitching When sewing with a seam allowance, align the left edge of the narrow part of the 1/4 inch quilting foot with the upper edge of the fabric. e When the end of the stitching is used, seams can be sewn with... the right edge of the narrow part of the 1/4 inch quilting foot. 1 2 a Mark on 1/4 inch quilting foot • For details, refer to piece together. Align the right edge of the fabric with...

Users Manual - English
Page 126
... panel. d X The screen for finer stitching. Press and until the desired density is changed. The length can be bunched together, causing the needle to one part of a satin stitch can be changed . f X The initial stitch screen appears again, and the stitching density is too fine, depending on the needle, the stitches...
... panel. d X The screen for finer stitching. Press and until the desired density is changed. The length can be bunched together, causing the needle to one part of a satin stitch can be changed . f X The initial stitch screen appears again, and the stitching density is too fine, depending on the needle, the stitches...
Users Manual - English
Page 130
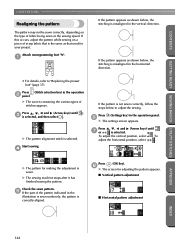
... alignment stitch is sewn. d If the pattern is not sewn correctly, follow the steps below , the stitching is misaligned in the vertical direction. e If the part of stitches appears. h X The screen for your project. GETTING READY SEWING BASICS UTILITY STITCHES UTILITY STITCHES Realigning the pattern If the pattern appears as shown...
... alignment stitch is sewn. d If the pattern is not sewn correctly, follow the steps below , the stitching is misaligned in the vertical direction. e If the part of stitches appears. h X The screen for your project. GETTING READY SEWING BASICS UTILITY STITCHES UTILITY STITCHES Realigning the pattern If the pattern appears as shown...

Users Manual - English
Page 147
... from you . Turning the balance wheel away from the race and its surrounding area. d Grasp the shuttle, and then pull it out. For a new shuttle (part code: XC3153-051), contact your nearest authorized service center. ● Be sure that the projection on . Remove the shuttle.
... from you . Turning the balance wheel away from the race and its surrounding area. d Grasp the shuttle, and then pull it out. For a new shuttle (part code: XC3153-051), contact your nearest authorized service center. ● Be sure that the projection on . Remove the shuttle.

