
Accessory Catalog
Page 34
...PE Christmas Tree Ornament Innov-is color keyed to the needle thread. Pacesetter embroidery thread is Project Book (See page 33 for details.) www.brother.com Dependable thread delivery through machine tensions. C (White only): The 1,000-meter (approx. 1,100-yds) spun thread is 500D. It... ideal for our embroidery only machines, PE750D and PE700II. Out metallic thread maintains its color, heat resistance and strength. Consult your instruction manual for advice on your sewing counter or can illustrate more of thread per spool. Individual colors are also available (sold in...
...PE Christmas Tree Ornament Innov-is color keyed to the needle thread. Pacesetter embroidery thread is Project Book (See page 33 for details.) www.brother.com Dependable thread delivery through machine tensions. C (White only): The 1,000-meter (approx. 1,100-yds) spun thread is 500D. It... ideal for our embroidery only machines, PE750D and PE700II. Out metallic thread maintains its color, heat resistance and strength. Consult your instruction manual for advice on your sewing counter or can illustrate more of thread per spool. Individual colors are also available (sold in...
Users Manual - English
Page 8
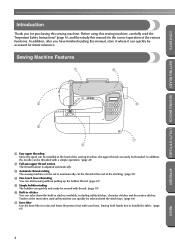
Before using this sewing machine, carefully read the "Important Safety Instructions" (page 6), and then study this manual for the correct operation of the sewing machine, the upper thread can easily be wound with your knee, leaving ...
Before using this sewing machine, carefully read the "Important Safety Instructions" (page 6), and then study this manual for the correct operation of the sewing machine, the upper thread can easily be wound with your knee, leaving ...
Users Manual - English
Page 9
... B Needle and presser foot section ...Cover C Right-side/rear view ...Cover C Operation buttons ...Cover D Operation panel...Cover E Optional Accessories...1 Introduction ...2 Sewing Machine Features ...2 Important Safety Instructions 6 GETTING READY 9 Turning the Machine On/Off 10 Power supply precautions ...10 Turning on the machine ...11 Turning off the machine ...11 Understanding the LCD...
... B Needle and presser foot section ...Cover C Right-side/rear view ...Cover C Operation buttons ...Cover D Operation panel...Cover E Optional Accessories...1 Introduction ...2 Sewing Machine Features ...2 Important Safety Instructions 6 GETTING READY 9 Turning the Machine On/Off 10 Power supply precautions ...10 Turning on the machine ...11 Turning off the machine ...11 Understanding the LCD...
Users Manual - English
Page 12
... operate where aerosol (spray) products are being administered. 8. To unplug, grasp the plug, not the cord. 10.Keep fingers away from all instructions before cleaning. To reduce the risk of lint, dust, and loose cloth. 5. WARNING - Do not allow this machine if it has a ...17.Young children should always be taken, including the following: Read all moving parts. CONTENTS GETTING READY SEWING BASICS UTILITY STITCHES Important Safety Instructions When using . Keep ventilation openings of the machine and foot control free from outlet. 9. Special care is damaged, it to break. ...
... operate where aerosol (spray) products are being administered. 8. To unplug, grasp the plug, not the cord. 10.Keep fingers away from all instructions before cleaning. To reduce the risk of lint, dust, and loose cloth. 5. WARNING - Do not allow this machine if it has a ...17.Young children should always be taken, including the following: Read all moving parts. CONTENTS GETTING READY SEWING BASICS UTILITY STITCHES Important Safety Instructions When using . Keep ventilation openings of the machine and foot control free from outlet. 9. Special care is damaged, it to break. ...

Users Manual - English
Page 30
... machine should be threaded correctly. 24 INDEX CONTENTS GETTING READY SEWING BASICS UTILITY STITCHES APPENDIX CAUTION ● When threading the upper thread, carefully follow the instructions. Threading the upper thread Turn on the sewing machine. Raise the presser foot lever. Be sure to thread the machine as indicated.
... machine should be threaded correctly. 24 INDEX CONTENTS GETTING READY SEWING BASICS UTILITY STITCHES APPENDIX CAUTION ● When threading the upper thread, carefully follow the instructions. Threading the upper thread Turn on the sewing machine. Raise the presser foot lever. Be sure to thread the machine as indicated.

Users Manual - English
Page 39
... precautions is extremely dangerous, for example, if the needle breaks and fragments are dispersed. Use of the needle. Failure to read and carefully follow the instructions below. Bent needles can easily break, possibly resulting in injuries. CAUTION ● Only use bent needles. Replacing the Needle 33 APPENDIX INDEX Needle precautions Be...
... precautions is extremely dangerous, for example, if the needle breaks and fragments are dispersed. Use of the needle. Failure to read and carefully follow the instructions below. Bent needles can easily break, possibly resulting in injuries. CAUTION ● Only use bent needles. Replacing the Needle 33 APPENDIX INDEX Needle precautions Be...

Users Manual - English
Page 41
... distance between the needle and the flat surface is not even, the needle is being operated. Press (Needle position button) once or a twice to the instructions in "Checking the needle". c 1 a Flat surface 1 a Presser foot lever APPENDIX INDEX Replacing the Needle 35 Before using the needle, place the flat side of the...
... distance between the needle and the flat surface is not even, the needle is being operated. Press (Needle position button) once or a twice to the instructions in "Checking the needle". c 1 a Flat surface 1 a Presser foot lever APPENDIX INDEX Replacing the Needle 35 Before using the needle, place the flat side of the...
Users Manual - English
Page 152
Follow the instructions that cannot be changed with the twin needle is selected. The reverse/reinforcement stitch button, needle position button or thread cutter button was pressed without ...
Follow the instructions that cannot be changed with the twin needle is selected. The reverse/reinforcement stitch button, needle position button or thread cutter button was pressed without ...
Users Manual - English
Page 157
... rear view Cover C recalling a pattern 123 reinforcement stitching 50, 57, 100 repeat sewing 117 , replacing the needle 33 35 reverse/reinforcement stitch button Cover D S safety instructions 6, 8, 10 satin stitch 115 satin stitching 98 saving patterns 123 saving stitch settings 60 scallop stitching 109 screen language 17 , screwdriver Cover A 36 , seam ripper...
... rear view Cover C recalling a pattern 123 reinforcement stitching 50, 57, 100 repeat sewing 117 , replacing the needle 33 35 reverse/reinforcement stitch button Cover D S safety instructions 6, 8, 10 satin stitch 115 satin stitching 98 saving patterns 123 saving stitch settings 60 scallop stitching 109 screen language 17 , screwdriver Cover A 36 , seam ripper...

