
Accessory Catalog
Page 34
...Threads 14 different metallic colors, 100% polyester thread developed and made for Brother Embroidery machines, but compatible with other sewing and embroidery machine brands. Stabilizers and Water Soluble Stabilizers When doing machine embroidery, the use of needle and stabilizer types. SA520 Water Soluble Stabilizer ..., use the Brother Bobbin Thread designed specifically for advice on the top surface of colors specifically designed for brightness and durability to hoop your fabric properly with a stabilizer. Consult your instruction manual for your sewing counter or can...
...Threads 14 different metallic colors, 100% polyester thread developed and made for Brother Embroidery machines, but compatible with other sewing and embroidery machine brands. Stabilizers and Water Soluble Stabilizers When doing machine embroidery, the use of needle and stabilizer types. SA520 Water Soluble Stabilizer ..., use the Brother Bobbin Thread designed specifically for advice on the top surface of colors specifically designed for brightness and durability to hoop your fabric properly with a stabilizer. Consult your instruction manual for your sewing counter or can...
Users Manual - English
Page 1
GETTING READY SEWING BASICS UTILITY STITCHES APPENDIX CPS5X V[Y Computerized Sewing Machine Operation Manual
GETTING READY SEWING BASICS UTILITY STITCHES APPENDIX CPS5X V[Y Computerized Sewing Machine Operation Manual
Users Manual - English
Page 8
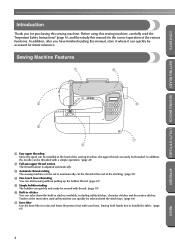
... easily be threaded with your knee, leaving both hands free to handle the fabric. (page 61) 2 INDEX Before using this sewing machine, carefully read the "Important Safety Instructions" (page 6), and then study this manual, store it where it can quickly be selected with the stitch keys. (page 66) g Knee lifter Use the knee...
... easily be threaded with your knee, leaving both hands free to handle the fabric. (page 61) 2 INDEX Before using this sewing machine, carefully read the "Important Safety Instructions" (page 6), and then study this manual, store it where it can quickly be selected with the stitch keys. (page 66) g Knee lifter Use the knee...
Users Manual - English
Page 12
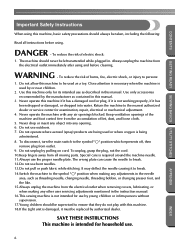
... fingers away from the electrical outlet immediately after using and before using this machine, basic safety precautions should be left unattended while plugged in the instruction manual. 16.This sewing machine is not intended for household use the proper needle plate. The machine should never be supervised to ensure that they do not play with...
... fingers away from the electrical outlet immediately after using and before using this machine, basic safety precautions should be left unattended while plugged in the instruction manual. 16.This sewing machine is not intended for household use the proper needle plate. The machine should never be supervised to ensure that they do not play with...
Users Manual - English
Page 14
... the most advanced computerized household sewing machines. When storing this machine, avoid direct sunlight and high humidity locations. up lever, needle, or other parts • A power failure occurs during use • Maintaining the machine • Leaving the machine unattended 3. Do not store anything on the needle while sewing. Always consult the operation manual when replacing or installing...
... the most advanced computerized household sewing machines. When storing this machine, avoid direct sunlight and high humidity locations. up lever, needle, or other parts • A power failure occurs during use • Maintaining the machine • Leaving the machine unattended 3. Do not store anything on the needle while sewing. Always consult the operation manual when replacing or installing...
Users Manual - English
Page 19
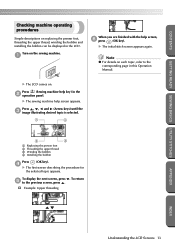
... . X The initial stitch screen appears again. a When you are finished with the help key) in the b operation panel. Press (Sewing machine help screen, f press (OK key). To return APPENDIX INDEX Understanding the LCD Screens 13 X The LCD comes on replacing the presser foot...the upper thread, winding the bobbin and installing the bobbin can be displayed in this Operation Manual. d X The first screen describing the procedure for the selected topic appears. Note z For details on the sewing machine. To display the next screen, press e to the corresponding page in the LCD. ...
... . X The initial stitch screen appears again. a When you are finished with the help key) in the b operation panel. Press (Sewing machine help screen, f press (OK key). To return APPENDIX INDEX Understanding the LCD Screens 13 X The LCD comes on replacing the presser foot...the upper thread, winding the bobbin and installing the bobbin can be displayed in this Operation Manual. d X The first screen describing the procedure for the selected topic appears. Note z For details on the sewing machine. To display the next screen, press e to the corresponding page in the LCD. ...
Users Manual - English
Page 34
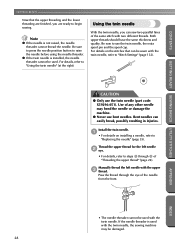
...is used with the twin needle, the sewing machine may bend the needle or damage the machine. ● Never use the twin needle, the extra spool pin and the spool cap. For details, refer to "Replacing the needle" (page 35). Install the twin needle. Manually thread the left needle b eye. ... needle threader. GETTING READY CONTENTS Now that can be used with the twin needle. Be sure to press the needle position button to begin sewing. For details on installing a needle, refer to "Using the twin needle" (at the right). Bent needles can easily break, possibly resulting...
...is used with the twin needle, the sewing machine may bend the needle or damage the machine. ● Never use the twin needle, the extra spool pin and the spool cap. For details, refer to "Replacing the needle" (page 35). Install the twin needle. Manually thread the left needle b eye. ... needle threader. GETTING READY CONTENTS Now that can be used with the twin needle. Be sure to press the needle position button to begin sewing. For details on installing a needle, refer to "Using the twin needle" (at the right). Bent needles can easily break, possibly resulting...
Users Manual - English
Page 35
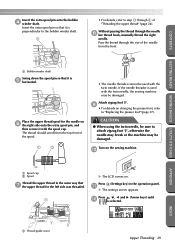
...If the needle threader is perpendicular to the bobbin winder shaft. 1 • For details, refer to step h through the needle h bar thread hook, manually thread the right needle. Press (Settings key) in the same way that it is used with the twin needle. k X The settings screen appears. Press...the bobbin d winder shaft. a Bobbin winder shaft Swing down the spool pin so that g the upper thread for the needle on the sewing machine. The thread should unroll from the front. Attach zigzag foot "J". CAUTION ● When using the twin needle, be used with the spool ...
...If the needle threader is perpendicular to the bobbin winder shaft. 1 • For details, refer to step h through the needle h bar thread hook, manually thread the right needle. Press (Settings key) in the same way that it is used with the twin needle. k X The settings screen appears. Press...the bobbin d winder shaft. a Bobbin winder shaft Swing down the spool pin so that g the upper thread for the needle on the sewing machine. The thread should unroll from the front. Attach zigzag foot "J". CAUTION ● When using the twin needle, be used with the spool ...

Users Manual - English
Page 58
... cut the threads. SEWING BASICS CONTENTS Memo z The machine can be set so that the threads are cut automatically, refer to "Automatically cutting the thread" (page 58). ■ Using the manual thread cutter When sewing with thread thicker than #30, nylon or metallic threads, or other special threads..., use the thread cutter on the side of the machine, c and then pass the threads through the thread cutter to ...
... cut the threads. SEWING BASICS CONTENTS Memo z The machine can be set so that the threads are cut automatically, refer to "Automatically cutting the thread" (page 58). ■ Using the manual thread cutter When sewing with thread thicker than #30, nylon or metallic threads, or other special threads..., use the thread cutter on the side of the machine, c and then pass the threads through the thread cutter to ...
Users Manual - English
Page 76
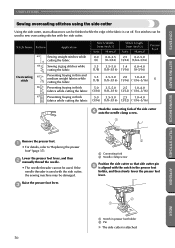
... holder, and then slowly lower the presser foot lever. 2 1 a Notch in thick fabrics while cutting the fabric Stitch Width [mm (inch.)] Auto Manual 0.0 0.0-2.5 (0) (0-3/32) Stitch Length [mm (inch.)] Auto Manual Presser Foot 2.5 0.2-5.0 (3/32) (1/64-3/16) 3.5 3.5-5.0 1.4 0.0-4.0 (1/8) (1/8-3/16) (1/16) (0-3/16) 3.5 3.5-5.0 2.0 1.0-4.0 (1/8) (1/8-3/16) (1/16) ( 1/16-3/16) S 5.0 3.5-5.0 2.5 1.0-4.0 (3/16) (1/8-3/16) (3/32) ( 1/16-3/16) 5.0 ... foot holder b Pin X The side cutter is used with the side cutter, the sewing machine may be used to "Replacing the presser foot" (page 37).
... holder, and then slowly lower the presser foot lever. 2 1 a Notch in thick fabrics while cutting the fabric Stitch Width [mm (inch.)] Auto Manual 0.0 0.0-2.5 (0) (0-3/32) Stitch Length [mm (inch.)] Auto Manual Presser Foot 2.5 0.2-5.0 (3/32) (1/64-3/16) 3.5 3.5-5.0 1.4 0.0-4.0 (1/8) (1/8-3/16) (1/16) (0-3/16) 3.5 3.5-5.0 2.0 1.0-4.0 (1/8) (1/8-3/16) (1/16) ( 1/16-3/16) S 5.0 3.5-5.0 2.5 1.0-4.0 (3/16) (1/8-3/16) (3/32) ( 1/16-3/16) 5.0 ... foot holder b Pin X The side cutter is used with the side cutter, the sewing machine may be used to "Replacing the presser foot" (page 37).

Users Manual - English
Page 110
...on top of the other. Stitch Name Pattern Application 56 Eyelet stitch Sewing eyelets, for example, on belts Stitch Width [mm (inch.)] Auto Manual 7.0, 6.0 or 7.0 5.0 (1/4) (1/4, 15/64 or 3/16) Stitch Length [mm (inch.)] Auto Manual 7.0, 6.0 or 7.0 5.0 (1/4) (1/4, 15/64 or 3/16) ... mm (1/4, 15/64 and 3/16 inch). Memo z If thin thread is completed, the machine automatically sews reinforcement stitches, then stops. UTILITY STITCHES CONTENTS GETTING READY SEWING BASICS UTILITY STITCHES Eyelet Stitching Eyelets, such as those on belts, can be open. Adjust either...
...on top of the other. Stitch Name Pattern Application 56 Eyelet stitch Sewing eyelets, for example, on belts Stitch Width [mm (inch.)] Auto Manual 7.0, 6.0 or 7.0 5.0 (1/4) (1/4, 15/64 or 3/16) Stitch Length [mm (inch.)] Auto Manual 7.0, 6.0 or 7.0 5.0 (1/4) (1/4, 15/64 or 3/16) ... mm (1/4, 15/64 and 3/16 inch). Memo z If thin thread is completed, the machine automatically sews reinforcement stitches, then stops. UTILITY STITCHES CONTENTS GETTING READY SEWING BASICS UTILITY STITCHES Eyelet Stitching Eyelets, such as those on belts, can be open. Adjust either...
Users Manual - English
Page 113
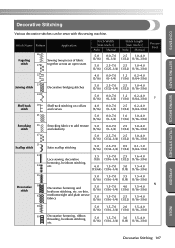
...) (1/64-1/16) 33 3.5 1.5-7.0 2.5 1.6-4.0 Lace sewing, decorative (1/8) (1/16-1/4) (3/32) (1/16-3/16) hemming, heirloom stitching, 34 etc. 6.0 1.5-7.0 3.0 1.5-4.0 (15/64) (1/16-1/4) (1/8) (1/16-3/16) 35 Decorative 36 stitch 37 5.0 1.5-7.0 3.5 1.5-4.0 (3/16) (1/16-1/4) (1/8) (1/16-3/16) N Decorative hemming and heirloom stitching, etc. CONTENTS GETTING READY SEWING BASICS UTILITY STITCHES Decorative Stitching Various decorative stitches can be sewn with this sewing machine.
...) (1/64-1/16) 33 3.5 1.5-7.0 2.5 1.6-4.0 Lace sewing, decorative (1/8) (1/16-1/4) (3/32) (1/16-3/16) hemming, heirloom stitching, 34 etc. 6.0 1.5-7.0 3.0 1.5-4.0 (15/64) (1/16-1/4) (1/8) (1/16-3/16) 35 Decorative 36 stitch 37 5.0 1.5-7.0 3.5 1.5-4.0 (3/16) (1/16-1/4) (1/8) (1/16-3/16) N Decorative hemming and heirloom stitching, etc. CONTENTS GETTING READY SEWING BASICS UTILITY STITCHES Decorative Stitching Various decorative stitches can be sewn with this sewing machine.

Users Manual - English
Page 118
..., creating a lace-like decorative stitch. Select stitch 33 . Install the wing needle. c The stitches that the needle does not touch the presser foot. Manually pass the thread through the eye of 6.0 mm (15/64 inch) or less. c INDEX • For details, refer to "Replacing the presser foot...; Select a stitch width of 6.0 mm (15/64 inch) or less, otherwise the needle may be used with the wing needle, otherwise the sewing machine may bend or break. ● After adjusting the stitch width, slowly turn the balance wheel toward you and check that can be damaged. Start...
..., creating a lace-like decorative stitch. Select stitch 33 . Install the wing needle. c The stitches that the needle does not touch the presser foot. Manually pass the thread through the eye of 6.0 mm (15/64 inch) or less. c INDEX • For details, refer to "Replacing the presser foot...; Select a stitch width of 6.0 mm (15/64 inch) or less, otherwise the needle may be used with the wing needle, otherwise the sewing machine may bend or break. ● After adjusting the stitch width, slowly turn the balance wheel toward you and check that can be damaged. Start...
Users Manual - English
Page 157
... key Cover E open toe foot Cover A openings 100 operating procedures 13 operation beep 148 , operation buttons Cover B Cover D operation manual Cover A , operation panel Cover B Cover E optional accessories 1 original patterns 126 overcasting stitches 68 P patchwork stitching 94 pattern length ... 36 , seam ripper Cover A 79 selecting stitching 66 settings 14 , settings key Cover E 14 , sewing machine help key Cover E 13 sewing machine needles 33 sewing speed 48 sewing speed controller Cover B, Cover D, 98 shell tuck stitch 110 shutter 26 , shuttle 22 140 shuttle hook 140...
... key Cover E open toe foot Cover A openings 100 operating procedures 13 operation beep 148 , operation buttons Cover B Cover D operation manual Cover A , operation panel Cover B Cover E optional accessories 1 original patterns 126 overcasting stitches 68 P patchwork stitching 94 pattern length ... 36 , seam ripper Cover A 79 selecting stitching 66 settings 14 , settings key Cover E 14 , sewing machine help key Cover E 13 sewing machine needles 33 sewing speed 48 sewing speed controller Cover B, Cover D, 98 shell tuck stitch 110 shutter 26 , shuttle 22 140 shuttle hook 140...


