
Accessory Catalog
Page 5
...guide of the presser foot. 4. Sew. 8. SA133 ABCDEFJKMN SA134 GHILOP SA128 All Brother home-use sewing machines Concealed Zipper Foot Allows you to reference lines in the seam. 6. Sew holding coil to install concealed zippers easily. 1. Sew. Fold back the fabric along the seam allowance.... 4. Sew. Blind hem: 1. Brother General Sewing Accessories 07 Blind Stitch Foot Concealed Zipper Foot Blind Stitch Foot Creates ...
...guide of the presser foot. 4. Sew. 8. SA133 ABCDEFJKMN SA134 GHILOP SA128 All Brother home-use sewing machines Concealed Zipper Foot Allows you to reference lines in the seam. 6. Sew holding coil to install concealed zippers easily. 1. Sew. Fold back the fabric along the seam allowance.... 4. Sew. Blind hem: 1. Brother General Sewing Accessories 07 Blind Stitch Foot Concealed Zipper Foot Blind Stitch Foot Creates ...

Accessory Catalog
Page 7
... included with the QuattroTM 6000D but is models. Available in Fall 2008. Sew. Sew the stitches keeping a certain seam allowance. Installing the Straight Stitch Needle Plate automatically sets the needle position to the edge of the fabric against the presser foot. The side extension...the center straight stitch. SA160 ABCDEFGHJKLMNO Straight Stitch Foot Straight Stitch Foot and Straight Stitch Needle Plate Vertical Stitching Alignment Foot Brother General Sewing Accessories 12 Straight Stitch Foot For precise straight stitching on thin fabrics or on selected machines. Can be ...
... included with the QuattroTM 6000D but is models. Available in Fall 2008. Sew. Sew the stitches keeping a certain seam allowance. Installing the Straight Stitch Needle Plate automatically sets the needle position to the edge of the fabric against the presser foot. The side extension...the center straight stitch. SA160 ABCDEFGHJKLMNO Straight Stitch Foot Straight Stitch Foot and Straight Stitch Needle Plate Vertical Stitching Alignment Foot Brother General Sewing Accessories 12 Straight Stitch Foot For precise straight stitching on thin fabrics or on selected machines. Can be ...

Accessory Catalog
Page 13
...is moved forward, its teeth catch a fabric and force it forward into the slot, and stitch slowly. 3. Sew slowly for details.) Brother Embellishment Feet Pin Tuck Foot 24 Ruffler Foot Pin Tuck Foot This presser foot has 7 grooves and produces perfect pin tucks and corded pin ...tuck setting and depth setting. 2. Use a stiff card to get started. Install and manually thread a twin needle. 2. Adjust the amount of tuck or gather by placing the completed row in the center position. 3. www.brother.com The intervals of the grooves. 4. The ruffling blade on lightweight fabric...
...is moved forward, its teeth catch a fabric and force it forward into the slot, and stitch slowly. 3. Sew slowly for details.) Brother Embellishment Feet Pin Tuck Foot 24 Ruffler Foot Pin Tuck Foot This presser foot has 7 grooves and produces perfect pin tucks and corded pin ...tuck setting and depth setting. 2. Use a stiff card to get started. Install and manually thread a twin needle. 2. Adjust the amount of tuck or gather by placing the completed row in the center position. 3. www.brother.com The intervals of the grooves. 4. The ruffling blade on lightweight fabric...
Users Manual - English
Page 3
... inspect and adjust the machine yourself. For additional product information, visit our web site at www.brother.com 2 Save these instructions. If the problem persists, please consult your local authorized Brother dealer. Use accessories recommended by or near children. • Do not use as described in...it off when making any assemblies, the presser feet, needle, or other hot objects. • Use only neutral soaps or detergents to assure correct installation. 8 For repair or adjustment: • If the Light unit (light-emitting diode) is damaged, it must be used. • Always ...
... inspect and adjust the machine yourself. For additional product information, visit our web site at www.brother.com 2 Save these instructions. If the problem persists, please consult your local authorized Brother dealer. Use accessories recommended by or near children. • Do not use as described in...it off when making any assemblies, the presser feet, needle, or other hot objects. • Use only neutral soaps or detergents to assure correct installation. 8 For repair or adjustment: • If the Light unit (light-emitting diode) is damaged, it must be used. • Always ...

Users Manual - English
Page 5
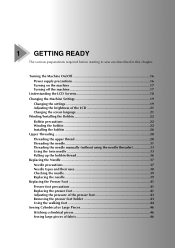
... Machine Settings 19 Changing the settings ...19 Adjusting the brightness of the LCD ...21 Changing the screen language...21 Winding/Installing the Bobbin 22 Bobbin precautions ...22 Winding the bobbin ...22 Installing the bobbin ...26 Upper Threading ...28 Threading the upper thread ...28 Threading the needle ...31 Threading the needle manually (without...
... Machine Settings 19 Changing the settings ...19 Adjusting the brightness of the LCD ...21 Changing the screen language...21 Winding/Installing the Bobbin 22 Bobbin precautions ...22 Winding the bobbin ...22 Installing the bobbin ...26 Upper Threading ...28 Threading the upper thread ...28 Threading the needle ...31 Threading the needle manually (without...
Users Manual - English
Page 8
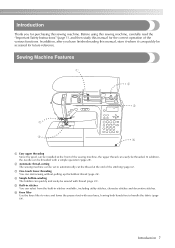
... automatically cut the thread at the front of the sewing machine, the upper thread can quickly be threaded. d Simple bobbin-winding The bobbin can be installed at the end of the stitching (page 62). Introduction Thank you have finished reading this sewing machine. c One-touch lower threading You can select from...
... automatically cut the thread at the front of the sewing machine, the upper thread can quickly be threaded. d Simple bobbin-winding The bobbin can be installed at the end of the stitching (page 62). Introduction Thank you have finished reading this sewing machine. c One-touch lower threading You can select from...
Users Manual - English
Page 16
... Machine Settings 19 Changing the settings 19 Adjusting the brightness of the LCD 21 Changing the screen language 21 Winding/Installing the Bobbin 22 Bobbin precautions 22 Winding the bobbin 22 Installing the bobbin 26 Upper Threading ...28 Threading the upper thread 28 Threading the needle 31 Threading the needle manually (without...
... Machine Settings 19 Changing the settings 19 Adjusting the brightness of the LCD 21 Changing the screen language 21 Winding/Installing the Bobbin 22 Bobbin precautions 22 Winding the bobbin 22 Installing the bobbin 26 Upper Threading ...28 Threading the upper thread 28 Threading the needle 31 Threading the needle manually (without...
Users Manual - English
Page 18
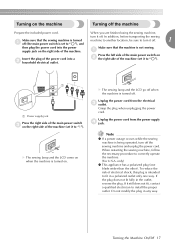
... the machine (set it to " "), and then plug the power cord into a b household electrical outlet. When restarting the sewing machine, follow the necessary procedure to install the proper outlet. Unplug the power cord from the electrical c outlet. Turning on the machine Turning off .
... the machine (set it to " "), and then plug the power cord into a b household electrical outlet. When restarting the sewing machine, follow the necessary procedure to install the proper outlet. Unplug the power cord from the electrical c outlet. Turning on the machine Turning off .
Users Manual - English
Page 23
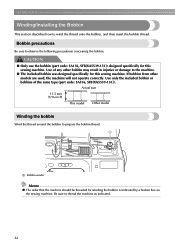
.... ● The included bobbin was designed specifically for this sewing machine. Use of the same type (part code: SA156, SFB(XA5539-151)). GETTING READY Winding/Installing the Bobbin This section describes how to thread the machine as indicated. 22
.... ● The included bobbin was designed specifically for this sewing machine. Use of the same type (part code: SA156, SFB(XA5539-151)). GETTING READY Winding/Installing the Bobbin This section describes how to thread the machine as indicated. 22
Users Manual - English
Page 24
... is too small for the bobbin onto f the spool pin. If the spool cap is inserted onto the e spool pin. 1 2 a Spool pin b Spool cap Winding/Installing the Bobbin 23
... is too small for the bobbin onto f the spool pin. If the spool cap is inserted onto the e spool pin. 1 2 a Spool pin b Spool cap Winding/Installing the Bobbin 23
Users Manual - English
Page 26
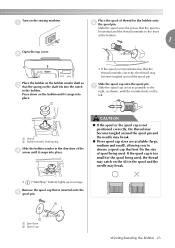
... hand. CAUTION ● When the bobbin winding becomes slow, stop the machine. Pass the end of the thread o wound around the bobbin winder shaft. p Winding/Installing the Bobbin 25 Use scissors to wind the thread clockwise around the bobbin, otherwise the thread will become tangled in cutter) X The thread is cut...
... hand. CAUTION ● When the bobbin winding becomes slow, stop the machine. Pass the end of the thread o wound around the bobbin winder shaft. p Winding/Installing the Bobbin 25 Use scissors to wind the thread clockwise around the bobbin, otherwise the thread will become tangled in cutter) X The thread is cut...
Users Manual - English
Page 27
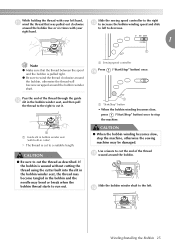
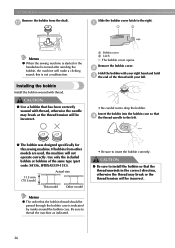
... machine is started or the handwheel is not a malfunction. Remove the bobbin cover. If bobbins from the shaft. CAUTION ● Be sure to install the bobbin so that d the thread unrolls to the left . • Be careful not to drop the bobbin. q Slide the bobbin cover ...READY Remove the bobbin from other models are used, the machine will not operate correctly. a Bobbin cover b Latch X The bobbin cover opens. Installing the bobbin Install the bobbin wound with thread, otherwise the needle may break or the thread tension will make a clicking sound; Actual size 11.5 mm (7/16...
... machine is started or the handwheel is not a malfunction. Remove the bobbin cover. If bobbins from the shaft. CAUTION ● Be sure to install the bobbin so that d the thread unrolls to the left . • Be careful not to drop the bobbin. q Slide the bobbin cover ...READY Remove the bobbin from other models are used, the machine will not operate correctly. a Bobbin cover b Latch X The bobbin cover opens. Installing the bobbin Install the bobbin wound with thread, otherwise the needle may break or the thread tension will make a clicking sound; Actual size 11.5 mm (7/16...
Users Manual - English
Page 28
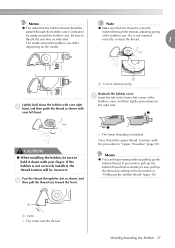
...the front. 1 X The lower threading is indicated by marks around the bobbin case differ depending on the right side. 2 CAUTION ● When installing the bobbin, be incorrect. Next, thread the upper thread. If it down on the model. The marks around the bobbin case. g Insert the...the tension-adjusting spring of the bobbin cover, and then lightly press down with the procedure in "Pulling up the bobbin thread. Winding/Installing the Bobbin 27 Continue with your left corner of the bobbin case. Be sure to the procedure in "Upper Threading" (page 28)....
...the front. 1 X The lower threading is indicated by marks around the bobbin case differ depending on the right side. 2 CAUTION ● When installing the bobbin, be incorrect. Next, thread the upper thread. If it down on the model. The marks around the bobbin case. g Insert the...the tension-adjusting spring of the bobbin cover, and then lightly press down with the procedure in "Pulling up the bobbin thread. Winding/Installing the Bobbin 27 Continue with your left corner of the bobbin case. Be sure to the procedure in "Upper Threading" (page 28)....

Users Manual - English
Page 34
..., refer to the needle bar thread a guide. Lower the presser foot lever. Install the twin needle. Thread the upper thread for the left needle with the twin needle. Upper Threading 33 If the needle threader is used with ...
..., refer to the needle bar thread a guide. Lower the presser foot lever. Install the twin needle. Thread the upper thread for the left needle with the twin needle. Upper Threading 33 If the needle threader is used with ...

Users Manual - English
Page 37
... pulled up the bobbin thread as described below. Insert the bobbin into the bobbin case. b Do not cut the thread with c your left corner of "Installing the bobbin" (page 26). Reattach the bobbin cover. position, press ("Needle Position" button) twice to steps a through the slot. f Insert the tab in the lower...
... pulled up the bobbin thread as described below. Insert the bobbin into the bobbin case. b Do not cut the thread with c your left corner of "Installing the bobbin" (page 26). Reattach the bobbin cover. position, press ("Needle Position" button) twice to steps a through the slot. f Insert the tab in the lower...

Users Manual - English
Page 39
... and needle combinations are shown in the table above. If the combination of the fabric, thread and needle is purchased. z A 75/11 needle is already installed when the sewing machine is not correct, particularly when sewing thick fabrics (such as 65/9 to sew.
... and needle combinations are shown in the table above. If the combination of the fabric, thread and needle is purchased. z A 75/11 needle is already installed when the sewing machine is not correct, particularly when sewing thick fabrics (such as 65/9 to sew.

Users Manual - English
Page 41
... clamp screw with your left hand, and then e use a screwdriver to turn the needle clamp screw toward the rear f of the sewing machine may result. Install the twin needle in the same way. d While holding the needle with your left hand, g use the screwdriver to tighten the needle clamp screw. 1 a Presser...
... clamp screw with your left hand, and then e use a screwdriver to turn the needle clamp screw toward the rear f of the sewing machine may result. Install the twin needle in the same way. d While holding the needle with your left hand, g use the screwdriver to tighten the needle clamp screw. 1 a Presser...

Users Manual - English
Page 43
... at the back of the d presser foot holder. Note z When a stitch is selected, the icon for the presser foot that the presser foot pin is installed, turn off the sewing machine, attach the correct presser foot, and then select the desired stitch again. b a Black button b Presser foot holder X The presser foot...
... at the back of the d presser foot holder. Note z When a stitch is selected, the icon for the presser foot that the presser foot pin is installed, turn off the sewing machine, attach the correct presser foot, and then select the desired stitch again. b a Black button b Presser foot holder X The presser foot...

Users Manual - English
Page 44
...Replacing the presser foot" (page 41). The presser foot pressure can be Remove the presser foot holder when cleaning the sewing machine or when installing a presser foot that 1 adjusted. b ac a Screwdriver b Presser foot holder c Presser foot holder screw ■ Attaching the presser foot... Hold the presser foot holder in place with the lowera left hand. 1 a Screwdriver Note z If the presser foot holder is not correctly installed, the thread tension will be incorrect. The larger the setting, the stronger the pressure. Use the screwdriver to loosen the presser foot b holder...
...Replacing the presser foot" (page 41). The presser foot pressure can be Remove the presser foot holder when cleaning the sewing machine or when installing a presser foot that 1 adjusted. b ac a Screwdriver b Presser foot holder c Presser foot holder screw ■ Attaching the presser foot... Hold the presser foot holder in place with the lowera left hand. 1 a Screwdriver Note z If the presser foot holder is not correctly installed, the thread tension will be incorrect. The larger the setting, the stronger the pressure. Use the screwdriver to loosen the presser foot b holder...

Users Manual - English
Page 47
... makes it easier to sew onto the b arm, and then sew from the top. Slide the part that you are finished with free-arm sewing, c install the flat bed attachment back in its original position.
... makes it easier to sew onto the b arm, and then sew from the top. Slide the part that you are finished with free-arm sewing, c install the flat bed attachment back in its original position.


