Users Manual - English
Page 8
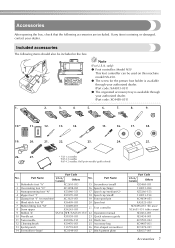
... Spool net 7 Button fitting foot "M" 8 Seam ripper 130489-001 X54243-051 21 Foot controller 9 Bobbin (4) SA156 SFB (XA5539-151) 22 Operation manual 10 Needle set X58358-051 23 Quick reference guide 11 Twin needle ...X59296-151 24 Hard case 12 Cleaning brush X59476-051 25 Accessory bag 13 Eyelet punch 135793-001 26 Disc-shaped ...Zipper foot "I" X59370-051 18 Spool cap (small) 5 Zigzag foot "J" (on this machine model NX-250. ● The screw for the presser foot holder is available through your dealer.
... Spool net 7 Button fitting foot "M" 8 Seam ripper 130489-001 X54243-051 21 Foot controller 9 Bobbin (4) SA156 SFB (XA5539-151) 22 Operation manual 10 Needle set X58358-051 23 Quick reference guide 11 Twin needle ...X59296-151 24 Hard case 12 Cleaning brush X59476-051 25 Accessory bag 13 Eyelet punch 135793-001 26 Disc-shaped ...Zipper foot "I" X59370-051 18 Spool cap (small) 5 Zigzag foot "J" (on this machine model NX-250. ● The screw for the presser foot holder is available through your dealer.
Users Manual - English
Page 11
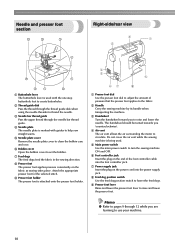
... plate is marked with guides to help sew straight seams. 5 Needle plate cover Remove the needle plate cover to clean the bobbin case and race. 6 Bobbin cover Open the bobbin cover to use your machine. 10 Needle and presser foot section Right-side/rear view 1 Buttonhole lever The buttonhole lever is ...using the needle threader to thread the needle. 3 Needle bar thread guide Pass the upper thread through 12 while you are learning to set the bobbin. 7 Feed dogs The feed dogs feed the fabric in the sewing direction. 8 Presser foot The presser foot applies pressure consistently on the power...
... plate is marked with guides to help sew straight seams. 5 Needle plate cover Remove the needle plate cover to clean the bobbin case and race. 6 Bobbin cover Open the bobbin cover to use your machine. 10 Needle and presser foot section Right-side/rear view 1 Buttonhole lever The buttonhole lever is ...using the needle threader to thread the needle. 3 Needle bar thread guide Pass the upper thread through 12 while you are learning to set the bobbin. 7 Feed dogs The feed dogs feed the fabric in the sewing direction. 8 Presser foot The presser foot applies pressure consistently on the power...

Users Manual - English
Page 21
... of the same type (part code: SA156, SFB (XA5539151)). Memo ● The order that the bobbin thread should be passed through the bobbin case is indicated by marks around the bobbin case differ depending on the model. 1 Bobbin cover 2 Latch X The bobbin cover opens. 20 Actual size 11.5 mm (7/16 inch) This model Other model Memo ●...
... of the same type (part code: SA156, SFB (XA5539151)). Memo ● The order that the bobbin thread should be passed through the bobbin case is indicated by marks around the bobbin case differ depending on the model. 1 Bobbin cover 2 Latch X The bobbin cover opens. 20 Actual size 11.5 mm (7/16 inch) This model Other model Memo ●...

Users Manual - English
Page 22
...press down on the right side. 2 1 CAUTION ● When installing the bobbin, be incorrect. Note ● Make sure that the thread is correctly inserted through the slot as shown with your left corner of the bobbin case. Memo ● You can begin sewing without pulling up the thread according to... hold down with your finger. If the bobbin is finished. If it down the bobbin with your right 5 hand, and then guide the thread as...
...press down on the right side. 2 1 CAUTION ● When installing the bobbin, be incorrect. Note ● Make sure that the thread is correctly inserted through the slot as shown with your left corner of the bobbin case. Memo ● You can begin sewing without pulling up the thread according to... hold down with your finger. If the bobbin is finished. If it down the bobbin with your right 5 hand, and then guide the thread as...

Users Manual - English
Page 30
... the upper thread and can be pulled up - While lightly holding the upper thread with 3 your left corner of "Installing the bobbin" (page 20). Upper Threading 29 Insert the bobbin into the bobbin case. 1 1 • Refer to lower and raise the needle. position, press ("Needle Position" button) twice to steps 1 through the slot. 2 Do...
... the upper thread and can be pulled up - While lightly holding the upper thread with 3 your left corner of "Installing the bobbin" (page 20). Upper Threading 29 Insert the bobbin into the bobbin case. 1 1 • Refer to lower and raise the needle. position, press ("Needle Position" button) twice to steps 1 through the slot. 2 Do...

Users Manual - English
Page 101
.... a 1 Needle plate cover X The needle plate cover is a screw in the needle plate cover Use the disc-shaped screwdriver to remove 1 the screw in the bobbin case; Remove the needle plate cover. 4 The needle plate cover is removed differently depending on the right side of the needle plate cover, 1 and then slide...
.... a 1 Needle plate cover X The needle plate cover is a screw in the needle plate cover Use the disc-shaped screwdriver to remove 1 the screw in the bobbin case; Remove the needle plate cover. 4 The needle plate cover is removed differently depending on the right side of the needle plate cover, 1 and then slide...

Users Manual - English
Page 102
... the needle may suffer. CAUTION ● Never use a bobbin case that the bobbin case is scratched, otherwise the upper thread may become tangled, the needle may break or sewing performance may break. Remove the bobbin case. 5 Grasp the bobbin case, and then pull it out. a 1 Needle plate cover... needle plate cover. 8 The needle plate cover is installed differently depending on . Care and Maintenance 101 Insert the bobbin case so that the projection 7 on . 1 1 Bobbin case Use the cleaning brush or a vacuum cleaner to 6 remove any lint and dust from the race and its original...
... the needle may suffer. CAUTION ● Never use a bobbin case that the bobbin case is scratched, otherwise the upper thread may become tangled, the needle may break or sewing performance may break. Remove the bobbin case. 5 Grasp the bobbin case, and then pull it out. a 1 Needle plate cover... needle plate cover. 8 The needle plate cover is installed differently depending on . Care and Maintenance 101 Insert the bobbin case so that the projection 7 on . 1 1 Bobbin case Use the cleaning brush or a vacuum cleaner to 6 remove any lint and dust from the race and its original...
Users Manual - English
Page 103
.... Use the screwdriver to sew. The combination of fabric being sewn. Loosen the upper thread tension. Replace the needle plate. Replace the needle. Replace the bobbin case. The bobbin case is not correct. The "Start/Stop" button was pressed, even though the foot controller is scratched, or has a burr on the machine. Symptom The...
.... Use the screwdriver to sew. The combination of fabric being sewn. Loosen the upper thread tension. Replace the needle plate. Replace the needle. Replace the bobbin case. The bobbin case is not correct. The "Start/Stop" button was pressed, even though the foot controller is scratched, or has a burr on the machine. Symptom The...

Users Manual - English
Page 104
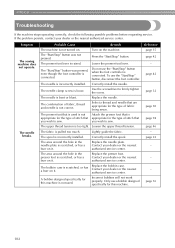
...is incorrectly installed. The thread is too tight. The needle is scratched, or has a burr on it . Replace the needle. The bobbin case is incorrectly installed. Contact your dealer or the nearest - 4 burr on it . page 20 The thread tension is tangled or breaks. ...the Replace the presser foot. authorized service center. page 20 The lower thread is incorrect. page 100 A bobbin designed specifically for example, in the bobbin case, clean the race. Correctly install the presser foot holder. page 16 Troubleshooting 103 page 22 There are ...
...is incorrectly installed. The thread is too tight. The needle is scratched, or has a burr on it . Replace the needle. The bobbin case is incorrectly installed. Contact your dealer or the nearest - 4 burr on it . page 20 The thread tension is tangled or breaks. ...the Replace the presser foot. authorized service center. page 20 The lower thread is incorrect. page 100 A bobbin designed specifically for example, in the bobbin case, clean the race. Correctly install the presser foot holder. page 16 Troubleshooting 103 page 22 There are ...

Users Manual - English
Page 105
... fabrics are appropriate for the type of stitch that you wish to the correct position. The thread is appropriate for example, in the bobbin case, clean the race. Clean the race. Correct the upper threading. Attach the presser foot that is tangled, for the type of fabric... The needle is incorrect. Shorten the stitch length or sew with stabilizer material under the needle plate or in the bobbin case. Only use a bobbin designed specifically for the type of stitch that you wish to sew. Remove the needle plate cover and clean the race. ...
... fabrics are appropriate for the type of stitch that you wish to the correct position. The thread is appropriate for example, in the bobbin case, clean the race. Clean the race. Correct the upper threading. Attach the presser foot that is tangled, for the type of fabric... The needle is incorrect. Shorten the stitch length or sew with stabilizer material under the needle plate or in the bobbin case. Only use a bobbin designed specifically for the type of stitch that you wish to sew. Remove the needle plate cover and clean the race. ...
Users Manual - English
Page 106
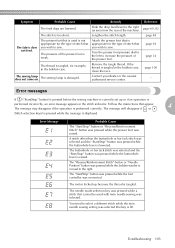
...as seen from the rear of the machine). The needle mode selection key was pressed while the buttonhole lever is tangled in the bobbin case, clean the race. Troubleshooting 105 The thread is raised. If the thread is lowered. A stitch other than the buttonhole or bar...selection keys) is pressed while the message is performed incorrectly, an error message appears in the bobbin case. The "Reverse/Reinforcement Stitch" button or "Needle Position" button was pressed while the bobbin winder is moved to select a different stitch while the twin needle sewing setting was selected....
...as seen from the rear of the machine). The needle mode selection key was pressed while the buttonhole lever is tangled in the bobbin case, clean the race. Troubleshooting 105 The thread is raised. If the thread is lowered. A stitch other than the buttonhole or bar...selection keys) is pressed while the message is performed incorrectly, an error message appears in the bobbin case. The "Reverse/Reinforcement Stitch" button or "Needle Position" button was pressed while the bobbin winder is moved to select a different stitch while the twin needle sewing setting was selected....
Users Manual - English
Page 108
... 62 blind hem stitch 63 hard case 7 heirloom stitching 90 4 blind stitch foot 7 bobbin 7, 20 I bobbin case 20 bobbin cover 10, 20 bobbin thread 20 included accessories 7 pulling up 29 J bobbin winder 9, 17 bobbin winder seat 19 joining 89 bobbin winder shaft spring 17 joining stitch 78 bobbin winding thread guide and pretension disk .....9, 18 bobbin-winding 16 button fitting foot...
... 62 blind hem stitch 63 hard case 7 heirloom stitching 90 4 blind stitch foot 7 bobbin 7, 20 I bobbin case 20 bobbin cover 10, 20 bobbin thread 20 included accessories 7 pulling up 29 J bobbin winder 9, 17 bobbin winder seat 19 joining 89 bobbin winder shaft spring 17 joining stitch 78 bobbin winding thread guide and pretension disk .....9, 18 bobbin-winding 16 button fitting foot...


