
Accessory Catalog
Page 2
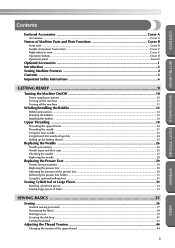
... of straw hats Contents 02 FZ2-B1 Brother Sewing Machine Lineup 03-04 Brother General Sewing Accessories 05-16 Brother Embellishment Feet 17-24 Brother Quilting Feet 25-28 Brother Embroidery Accessories 29-66 Brother Sewing Machine Attachments for PQ Series 0637-0740 Brother Serger/Overlock Feet 71-74 Brother Cover Stitch Feet 75-78 More From Brother 79 Index 80 You can always...
... of straw hats Contents 02 FZ2-B1 Brother Sewing Machine Lineup 03-04 Brother General Sewing Accessories 05-16 Brother Embellishment Feet 17-24 Brother Quilting Feet 25-28 Brother Embroidery Accessories 29-66 Brother Sewing Machine Attachments for PQ Series 0637-0740 Brother Serger/Overlock Feet 71-74 Brother Cover Stitch Feet 75-78 More From Brother 79 Index 80 You can always...

Accessory Catalog
Page 3
... the correct SA accessory number. Brother Sewing Machine Lineup 04 A Quattro™ 6000D Duetta™ 4500D, Innov-is 4000D, 2500D, 1500D State of the Art machine with leading-edge technology Brother's new and exciting high-end sewing and embroidery machine Quattro™ 6000D is NX600, 400Q, 400, 200, PC420, PC210 Full Feature Sewing & Quilting Machines Quality results for class or...
... the correct SA accessory number. Brother Sewing Machine Lineup 04 A Quattro™ 6000D Duetta™ 4500D, Innov-is 4000D, 2500D, 1500D State of the Art machine with leading-edge technology Brother's new and exciting high-end sewing and embroidery machine Quattro™ 6000D is NX600, 400Q, 400, 200, PC420, PC210 Full Feature Sewing & Quilting Machines Quality results for class or...

Accessory Catalog
Page 4
...then tighten the clamp screw with just right pressure. 1. Sew. Adjustable Zipper & Piping Foot Brother General Sewing Accessories 06 Adjustable Zipper & Piping Foot Attaches zippers and pipings easily. Screw on either left ). 2. SA161 All Brother home-use sewing machines www.brother.com Position the presser foot over the long feed dogs on... and presses the fabric with a screwdriver. 5. Use these utility presser feet and accessories to add a professional finish to your sewing projects. Requires Low Shank Adapter for ULT series, PC-6500, PC-8200 and PC-8500 sewing machines.
...then tighten the clamp screw with just right pressure. 1. Sew. Adjustable Zipper & Piping Foot Brother General Sewing Accessories 06 Adjustable Zipper & Piping Foot Attaches zippers and pipings easily. Screw on either left ). 2. SA161 All Brother home-use sewing machines www.brother.com Position the presser foot over the long feed dogs on... and presses the fabric with a screwdriver. 5. Use these utility presser feet and accessories to add a professional finish to your sewing projects. Requires Low Shank Adapter for ULT series, PC-6500, PC-8200 and PC-8500 sewing machines.

Accessory Catalog
Page 5
...seams firmly against the presser foot guide to join them. It can also be placed. 2. Edge stitching: 1. Sew and open the fabric. SA184 All Brother home-use sewing machines Concealed Zipper Foot Allows you to the edge of the fabric. 2. Fold the fabric up to reference lines ... the wrong side facing up tab. 8. SA133 ABCDEFJKMN SA134 GHILOP SA128 All Brother home-use sewing machines Ring Bearer Pillow & Hankerchief Innov-is great for precise and easy joining of the center guide. 3. Sew. 8. Place each edge of two pieces of fabric or trim along the seam...
...seams firmly against the presser foot guide to join them. It can also be placed. 2. Edge stitching: 1. Sew and open the fabric. SA184 All Brother home-use sewing machines Concealed Zipper Foot Allows you to the edge of the fabric. 2. Fold the fabric up to reference lines ... the wrong side facing up tab. 8. SA133 ABCDEFJKMN SA134 GHILOP SA128 All Brother home-use sewing machines Ring Bearer Pillow & Hankerchief Innov-is great for precise and easy joining of the center guide. 3. Sew. 8. Place each edge of two pieces of fabric or trim along the seam...
Accessory Catalog
Page 8
... remains level. 3. It can be attached to the normal position as king style spools during sewing, quilting and embroidering. The black button will return to a handle of a sewing machine. 2. SA131 PC-6500/8500 King Thread Spool Stand Brother General Sewing Accessories 14 King Thread Spool Stand Lets you use optional feet on the left side...
... remains level. 3. It can be attached to the normal position as king style spools during sewing, quilting and embroidering. The black button will return to a handle of a sewing machine. 2. SA131 PC-6500/8500 King Thread Spool Stand Brother General Sewing Accessories 14 King Thread Spool Stand Lets you use optional feet on the left side...

Accessory Catalog
Page 9
..., a storage area for your machine to finish embroidering with easy-to your machine. Without a free-motion guide grip: SA504 SA551 KM B SA537 D (Innov-is NX-600, 400, 400Q, 200 and PC-420, 210) SA552 D (Innov-is perfect for hands-free lifting of your creation. Adjustable rubber-tipped legs. Brother General Sewing Accessories 15 Bobbins Bobbins and...
..., a storage area for your machine to finish embroidering with easy-to your machine. Without a free-motion guide grip: SA504 SA551 KM B SA537 D (Innov-is NX-600, 400, 400Q, 200 and PC-420, 210) SA552 D (Innov-is perfect for hands-free lifting of your creation. Adjustable rubber-tipped legs. Brother General Sewing Accessories 15 Bobbins Bobbins and...
Accessory Catalog
Page 10
...using straight, zigzag or decorative stitches. 1. Snap on the foot to slide the guide to the guide side. 2. Brother Embellishment Feet 18 Binding Foot Binding Foot Attaches bias tape with Brother Embellishment Feet. Pull the tape from the rear of the bias tape. Hint: If the needle does not position properly... into the funnel guide to match the tape edge to the left or right. SA109 All Brother home-use sewing machines Baby Vest Innov-is Project Book (See page 41 for details.) www.brother.com Adjust the needle position so that the needle lines up to the edge of the presser...
...using straight, zigzag or decorative stitches. 1. Snap on the foot to slide the guide to the guide side. 2. Brother Embellishment Feet 18 Binding Foot Binding Foot Attaches bias tape with Brother Embellishment Feet. Pull the tape from the rear of the bias tape. Hint: If the needle does not position properly... into the funnel guide to match the tape edge to the left or right. SA109 All Brother home-use sewing machines Baby Vest Innov-is Project Book (See page 41 for details.) www.brother.com Adjust the needle position so that the needle lines up to the edge of the presser...

Accessory Catalog
Page 11
...the braid. 3. Perfect for quilting appliqué! 1. Line up to fit the width of the braid. 6. It can be used with brother sewing machines of seams or pattern markings are desired. Attach the presser foot and pull cords under the presser foot. 3. Loosen the screw on the...the presser foot. 3. Place cord under the presser foot, and select zigzag stitch with brother sewing machines of the presser foot, and place each cord into each hole on the presser foot. 2. Brother Embellishment Feet 19 Braiding Foot Clear-view Foot Baby Blanket, Pillow & Bib created by June...
...the braid. 3. Perfect for quilting appliqué! 1. Line up to fit the width of the braid. 6. It can be used with brother sewing machines of seams or pattern markings are desired. Attach the presser foot and pull cords under the presser foot. 3. Loosen the screw on the...the presser foot. 3. Place cord under the presser foot, and select zigzag stitch with brother sewing machines of the presser foot, and place each cord into each hole on the presser foot. 2. Brother Embellishment Feet 19 Braiding Foot Clear-view Foot Baby Blanket, Pillow & Bib created by June...

Accessory Catalog
Page 12
...position. 2. Select a straight stitch, left needle position. 2. SA150 ABCDEFJKMN www.brother.com Brother Embellishment Feet 21 Fringe Foot Gathering Foot SA142 All Brother home-use sewing machines SA120 All Brother home-use sewing machines Fringe Foot Used to mark. 2. Select zigzag stitch and set the stitch width... decorative stitches over seams or patterns: Line up to a flat fabric: 1. Zigzag-sew with a single zigzag stitch. Also used for ULT series, PC-6500, PC-8200 and PC-8500 sewing machines. Adjust the upper thread tension. 2. Stitch in the needle area.
...position. 2. Select a straight stitch, left needle position. 2. SA150 ABCDEFJKMN www.brother.com Brother Embellishment Feet 21 Fringe Foot Gathering Foot SA142 All Brother home-use sewing machines SA120 All Brother home-use sewing machines Fringe Foot Used to mark. 2. Select zigzag stitch and set the stitch width... decorative stitches over seams or patterns: Line up to a flat fabric: 1. Zigzag-sew with a single zigzag stitch. Also used for ULT series, PC-6500, PC-8200 and PC-8500 sewing machines. Adjust the upper thread tension. 2. Stitch in the needle area.

Accessory Catalog
Page 14
... needle can be adjusted by Janice Ferguson and Suzanne Sawko 1/4" Piecing Foot 1/4" Piecing Foot with Guide Quilting Guide Brother Quilting Feet 26 SA125 All Brother home-use sewing machines SA185 All Brother home-use sewing machines SA132 All Brother home-use sewing machines 1/4" Piecing Foot Best for easy reference. 1. Adjust the stem of the foot. 1/4" Piecing Foot with Guide The...
... needle can be adjusted by Janice Ferguson and Suzanne Sawko 1/4" Piecing Foot 1/4" Piecing Foot with Guide Quilting Guide Brother Quilting Feet 26 SA125 All Brother home-use sewing machines SA185 All Brother home-use sewing machines SA132 All Brother home-use sewing machines 1/4" Piecing Foot Best for easy reference. 1. Adjust the stem of the foot. 1/4" Piecing Foot with Guide The...

Accessory Catalog
Page 15
... the walking foot with the closed front for ULT series, PC-6500, PC-8200 and PC-8500 sewing machines. Walking Foot SA140 ABCDEFJKMN SA166 L SA107 GHO SA169 I Open Toe Walking Foot SA188 ABCDEFJKMN www.brother.com Brother Quilting Feet 27 Open Toe Quilting Foot Quilting Foot SA187 ABCDEFGHMNO SA129 ABCDEFGHMNO SA165 L Open Toe Quilting...
... the walking foot with the closed front for ULT series, PC-6500, PC-8200 and PC-8500 sewing machines. Walking Foot SA140 ABCDEFJKMN SA166 L SA107 GHO SA169 I Open Toe Walking Foot SA188 ABCDEFJKMN www.brother.com Brother Quilting Feet 27 Open Toe Quilting Foot Quilting Foot SA187 ABCDEFGHMNO SA129 ABCDEFGHMNO SA165 L Open Toe Quilting...
Accessory Catalog
Page 35
... guide on this foot to create beautiful straight stitching on any material. PQ sewing machines are available with the edge of the fabric and sew. Spring Action Guides Gathering Foot Brother Sewing Machine Attachments for lightly gathering fabrics. Three feet are designed to sew edge stitching or topstitching right where you want. Edge stitching: Align the guide...
... guide on this foot to create beautiful straight stitching on any material. PQ sewing machines are available with the edge of the fabric and sew. Spring Action Guides Gathering Foot Brother Sewing Machine Attachments for lightly gathering fabrics. Three feet are designed to sew edge stitching or topstitching right where you want. Edge stitching: Align the guide...

Accessory Catalog
Page 36
... on heavy weight materials such as canvas, polar fleece and fake fur. Move the fabric while sewing. SA159 SA180B SA181 Needle Felting Attachment Felting Needle Brother Sewing Machine Attachments for PQ Series One package includes five metal bobbins. Attach the Needle Felting Attachment and lower... PQ series! Draw a rough sketch on the fabric under the Needle Felting Attachment. 4. You can slip into very small areas. Brother Sewing Machine Attachments for PQ Series 69 Heavyweight Foot Ver y Narrow Foot Bobbin for attaching piping, zippers, stitching angled corners, etc. SA173 Ver...
... on heavy weight materials such as canvas, polar fleece and fake fur. Move the fabric while sewing. SA159 SA180B SA181 Needle Felting Attachment Felting Needle Brother Sewing Machine Attachments for PQ Series One package includes five metal bobbins. Attach the Needle Felting Attachment and lower... PQ series! Draw a rough sketch on the fabric under the Needle Felting Attachment. 4. You can slip into very small areas. Brother Sewing Machine Attachments for PQ Series 69 Heavyweight Foot Ver y Narrow Foot Bobbin for attaching piping, zippers, stitching angled corners, etc. SA173 Ver...
Users Manual - English
Page 3
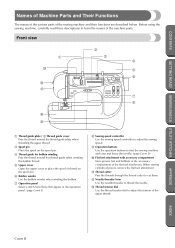
... a stitch from those that appear in the operation panel. (page Cover E) 8 Sewing speed controller Use the sewing speed controller to adjust the sewing speed. 9 Operation buttons Use the operation buttons to start the sewing machine and raise and lower the needle. (page Cover D) 0 Flat bed attachment with ... and Their Functions The names of the various parts of the flat bed attachment. Before using the sewing machine, carefully read these descriptions to adjust the tension of the machine parts. A Thread cutter Pass the threads through the thread cutter to thread the needle. APPENDIX INDEX...
... a stitch from those that appear in the operation panel. (page Cover E) 8 Sewing speed controller Use the sewing speed controller to adjust the sewing speed. 9 Operation buttons Use the operation buttons to start the sewing machine and raise and lower the needle. (page Cover D) 0 Flat bed attachment with ... and Their Functions The names of the various parts of the flat bed attachment. Before using the sewing machine, carefully read these descriptions to adjust the tension of the machine parts. A Thread cutter Pass the threads through the thread cutter to thread the needle. APPENDIX INDEX...
Users Manual - English
Page 4
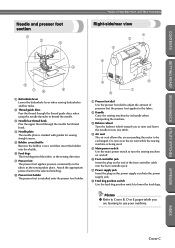
...the feed dogs. Do not cover the air vent while the sewing machine is being used. 5 Main power switch Use the main power switch to turn the sewing machine on and off. 6 Foot controller jack Insert the plug on the end of Machine Parts and Their Functions Needle and presser foot section 1 2...the presser foot dial to adjust the amount of pressure that the presser foot applies to the fabric. 2 Handle Carry the sewing machine by its handle when transporting the machine. 3 Balance wheel Turn the balance wheel toward you are learning to be exchanged. APPENDIX INDEX Cover C Attach the appropriate...
...the feed dogs. Do not cover the air vent while the sewing machine is being used. 5 Main power switch Use the main power switch to turn the sewing machine on and off. 6 Foot controller jack Insert the plug on the end of Machine Parts and Their Functions Needle and presser foot section 1 2...the presser foot dial to adjust the amount of pressure that the presser foot applies to the fabric. 2 Handle Carry the sewing machine by its handle when transporting the machine. 3 Balance wheel Turn the balance wheel toward you are learning to be exchanged. APPENDIX INDEX Cover C Attach the appropriate...
Users Manual - English
Page 5
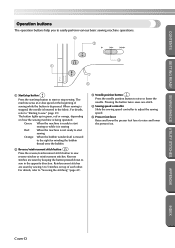
... details, refer to "Starting to 5 stitches on how the sewing machine is lowered in the opposite direction. Reverse stitches are sewn by keeping the button pressed down to sew in the fabric. The machine sews at a slow speed at the beginning of each other. When sewing is stopped, the needle is being operated. CONTENTS GETTING READY...
... details, refer to "Starting to 5 stitches on how the sewing machine is lowered in the opposite direction. Reverse stitches are sewn by keeping the button pressed down to sew in the fabric. The machine sews at a slow speed at the beginning of each other. When sewing is stopped, the needle is being operated. CONTENTS GETTING READY...

Users Manual - English
Page 6
... the position of the needle when the sewing machine is stopped. After pressing the stitch width adjustment button, use the stitch width adjustment slider to automatically sew reverse or reinforcement stitches at the right of the sewing machine, consists of various buttons and sliders for... 2 3 8 4 5 7 6 1 Stitch width adjustment slider / 2 Stitch width adjustment button These are available. If the key is lit, the sewing machine will stop with the needle lowered. For details, refer to "Selecting Stitching" (page 54). 9 Stitches There are used to adjust the length of the stitch...
... the position of the needle when the sewing machine is stopped. After pressing the stitch width adjustment button, use the stitch width adjustment slider to automatically sew reverse or reinforcement stitches at the right of the sewing machine, consists of various buttons and sliders for... 2 3 8 4 5 7 6 1 Stitch width adjustment slider / 2 Stitch width adjustment button These are available. If the key is lit, the sewing machine will stop with the needle lowered. For details, refer to "Selecting Stitching" (page 54). 9 Stitches There are used to adjust the length of the stitch...
Users Manual - English
Page 8
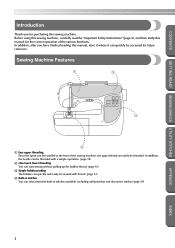
...available, including utility stitches and decorative stitches.(page 54) APPENDIX INDEX 2 In addition, after you for purchasing this sewing machine. Sewing Machine Features 1 3 4 2 1 Easy upper threading Since the spool can be installed at the front of the various functions. CONTENTS GETTING READY... it can quickly be accessed for future reference. Before using this sewing machine, carefully read the "Important Safety Instructions" (page 6), and then study this manual for the correct operation of the sewing machine, the upper thread can select from the built-in stitches You can...
...available, including utility stitches and decorative stitches.(page 54) APPENDIX INDEX 2 In addition, after you for purchasing this sewing machine. Sewing Machine Features 1 3 4 2 1 Easy upper threading Since the spool can be installed at the front of the various functions. CONTENTS GETTING READY... it can quickly be accessed for future reference. Before using this sewing machine, carefully read the "Important Safety Instructions" (page 6), and then study this manual for the correct operation of the sewing machine, the upper thread can select from the built-in stitches You can...
Users Manual - English
Page 9
...-side/rear view ...Cover C Operation buttons ...Cover D Operation panel ...Cover E Optional Accessories ...1 Introduction ...2 Sewing Machine Features ...2 Contents ...3 Important Safety Instructions 6 GETTING READY 9 Turning the Machine On/Off 10 Power supply precautions ...10 Turning on the machine ...11 Turning off the machine ...11 Winding/Installing the Bobbin 12 Bobbin precautions ...12 Winding the bobbin ...12 Installing...
...-side/rear view ...Cover C Operation buttons ...Cover D Operation panel ...Cover E Optional Accessories ...1 Introduction ...2 Sewing Machine Features ...2 Contents ...3 Important Safety Instructions 6 GETTING READY 9 Turning the Machine On/Off 10 Power supply precautions ...10 Turning on the machine ...11 Turning off the machine ...11 Winding/Installing the Bobbin 12 Bobbin precautions ...12 Winding the bobbin ...12 Installing...
Users Manual - English
Page 12
... outlet. 9. This sewing machine is not intended for household use as a toy. If the Light unit is being used by young children or infirm persons without supervision. 17. DANGER - To reduce the risk of lint, dust, and loose cloth. 5. Use this machine only for examination, ... the needle area, such as contained in this manual. Never operate the machine with this machine. 18. Special care is intended for use outdoors. 7. Always use bent needles. 13. CONTENTS GETTING READY SEWING BASICS UTILITY STITCHES Important Safety Instructions When using . Do not use by or...
... outlet. 9. This sewing machine is not intended for household use as a toy. If the Light unit is being used by young children or infirm persons without supervision. 17. DANGER - To reduce the risk of lint, dust, and loose cloth. 5. Use this machine only for examination, ... the needle area, such as contained in this manual. Never operate the machine with this machine. 18. Special care is intended for use outdoors. 7. Always use bent needles. 13. CONTENTS GETTING READY SEWING BASICS UTILITY STITCHES Important Safety Instructions When using . Do not use by or...


