
Accessory Catalog
Page 4
Adjustable Zipper & Piping Foot Brother General Sewing Accessories 06 Adjustable Zipper & Piping Foot Attaches zippers and pipings easily. Position the presser foot over the long feed dogs on the presser foot. 4. Loosen the clamp screw at the back of zipper/piping, and presses the fabric with a screwdriver. 5. ... opening on either left ). 2. Check the needle does not hit the presser foot, and then tighten the clamp screw with just right pressure. 1. Its position can be adjusted exactly on the presser foot and select a straight stitch (left or right. 3. Use these utility presser...
Adjustable Zipper & Piping Foot Brother General Sewing Accessories 06 Adjustable Zipper & Piping Foot Attaches zippers and pipings easily. Position the presser foot over the long feed dogs on the presser foot. 4. Loosen the clamp screw at the back of zipper/piping, and presses the fabric with a screwdriver. 5. ... opening on either left ). 2. Check the needle does not hit the presser foot, and then tighten the clamp screw with just right pressure. 1. Its position can be adjusted exactly on the presser foot and select a straight stitch (left or right. 3. Use these utility presser...

Accessory Catalog
Page 14
... of the fabric. Stitch, keeping the guide in the first row of the foot narrows to help you form perfect 1/4'" seams and turn corners. www.brother.com Brother Quilting Feet 25 Quality quilting Brother offers you innovative accessories to give the right pressure on fabrics. 1. Select the center needle position for your sewing machine and...
... of the fabric. Stitch, keeping the guide in the first row of the foot narrows to help you form perfect 1/4'" seams and turn corners. www.brother.com Brother Quilting Feet 25 Quality quilting Brother offers you innovative accessories to give the right pressure on fabrics. 1. Select the center needle position for your sewing machine and...

Accessory Catalog
Page 17
... designs. - Basting Function to navigate LCD screen. - QuattroTM 6000D Border Frame This border frame simplifies the process of Brother Embroidery Cards, including licensed content. Accepts USB mouse* to prevent shrinkage and misalignment of the line machine. Add appliqué... ensures your embroidery designs with these features: - Automatic Height Adjuster™ (AHA) feature adjusts the presser foot pressure automatically and continuously to your treasured collection of designs will work beautifully in your top of embroidery designs - Customizable USB Mouse...
... designs. - Basting Function to navigate LCD screen. - QuattroTM 6000D Border Frame This border frame simplifies the process of Brother Embroidery Cards, including licensed content. Accepts USB mouse* to prevent shrinkage and misalignment of the line machine. Add appliqué... ensures your embroidery designs with these features: - Automatic Height Adjuster™ (AHA) feature adjusts the presser foot pressure automatically and continuously to your treasured collection of designs will work beautifully in your top of embroidery designs - Customizable USB Mouse...
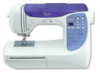
Users Manual - English
Page 4
CONTENTS GETTING READY SEWING BASICS UTILITY STITCHES Names of pressure that the presser foot applies to the fabric. 2 Handle Carry the sewing machine by its handle when transporting the machine. 3 Balance wheel Turn the balance wheel toward you are ... insert the bobbin into the shuttle. 6 Feed dogs The feed dogs feed the fabric in the sewing direction. 7 Presser foot The presser foot applies pressure consistently on the power supply cord into the foot controller jack. 7 Power supply jack Insert the plug on the fabric as the sewing takes place. Do not cover the...
CONTENTS GETTING READY SEWING BASICS UTILITY STITCHES Names of pressure that the presser foot applies to the fabric. 2 Handle Carry the sewing machine by its handle when transporting the machine. 3 Balance wheel Turn the balance wheel toward you are ... insert the bobbin into the shuttle. 6 Feed dogs The feed dogs feed the fabric in the sewing direction. 7 Presser foot The presser foot applies pressure consistently on the power supply cord into the foot controller jack. 7 Power supply jack Insert the plug on the fabric as the sewing takes place. Do not cover the...
Users Manual - English
Page 9
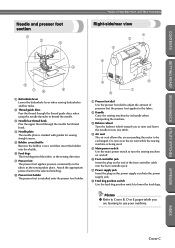
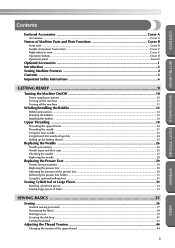
... Contents Enclosed Accessories Cover A Accessories ...Cover A Names of Machine Parts and Their Functions Cover B Front view ...Cover B Needle and presser foot section ...Cover C Right-side/rear view ...Cover C Operation buttons ...Cover D Operation panel ...Cover E Optional Accessories ...1 Introduction ...2 Sewing ... the needle ...28 Replacing the Presser Foot 29 Presser foot precautions ...29 Replacing the presser foot ...29 Adjusting the pressure of the presser foot ...30 Removing the presser foot holder ...31 Using the optional walking foot ...31 Sewing Cylindrical or Large Pieces 33...
... Contents Enclosed Accessories Cover A Accessories ...Cover A Names of Machine Parts and Their Functions Cover B Front view ...Cover B Needle and presser foot section ...Cover C Right-side/rear view ...Cover C Operation buttons ...Cover D Operation panel ...Cover E Optional Accessories ...1 Introduction ...2 Sewing ... the needle ...28 Replacing the Presser Foot 29 Presser foot precautions ...29 Replacing the presser foot ...29 Adjusting the pressure of the presser foot ...30 Removing the presser foot holder ...31 Using the optional walking foot ...31 Sewing Cylindrical or Large Pieces 33...

Users Manual - English
Page 36
... to "Stitch Settings" (page 92). The scale on the presser foot that should be used with the notch in the presser foot holder. 1 1 Presser foot lever Turn the presser foot dial at the back of pressure that the presser foot applies to be adjusted. APPENDIX INDEX 30 Raise the presser... foot lever to check that the 7 presser foot is aligned with the selected stitch, refer...
... to "Stitch Settings" (page 92). The scale on the presser foot that should be used with the notch in the presser foot holder. 1 1 Presser foot lever Turn the presser foot dial at the back of pressure that the presser foot applies to be adjusted. APPENDIX INDEX 30 Raise the presser... foot lever to check that the 7 presser foot is aligned with the selected stitch, refer...

Users Manual - English
Page 44
Memo ● To adjust the pressure that the presser foot applies to the fabric, refer to the starting point of the stitching. 1 1 Presser foot lever X The fabric is easier and the extra fabric does not get in the correct order and that the fabric pieces are sewn in ...allowance is positioned on the sewing machine. 1 Lower the presser foot lever. 5 GETTING READY SEWING BASICS UTILITY STITCHES The straight stitch (left hand, turn the balance wheel toward you with your right hand to lower the needle to "Adjusting the pressure of the thread and the 4 fabric with your left needle ...
Memo ● To adjust the pressure that the presser foot applies to the fabric, refer to the starting point of the stitching. 1 1 Presser foot lever X The fabric is easier and the extra fabric does not get in the correct order and that the fabric pieces are sewn in ...allowance is positioned on the sewing machine. 1 Lower the presser foot lever. 5 GETTING READY SEWING BASICS UTILITY STITCHES The straight stitch (left hand, turn the balance wheel toward you with your right hand to lower the needle to "Adjusting the pressure of the thread and the 4 fabric with your left needle ...

Users Manual - English
Page 46
... are ready to start sewing, slowly 5 press down on the foot controller increases the sewing speed; releasing the pressure on the foot controller. X The machine starts sewing. Pressing down on the foot controller. CAUTION ● Do not allow thread or dust to accumulate in the foot controller, otherwise a fire or an electric shock may occur...
... are ready to start sewing, slowly 5 press down on the foot controller increases the sewing speed; releasing the pressure on the foot controller. X The machine starts sewing. Pressing down on the foot controller. CAUTION ● Do not allow thread or dust to accumulate in the foot controller, otherwise a fire or an electric shock may occur...

Users Manual - English
Page 63
..." (page 54). Select a stitch. 2 • For details, refer to "Replacing the presser foot" (page 29). For details, refer to "Adjusting the pressure of the fabric with zigzag foot "J". CONTENTS GETTING READY SEWING BASICS UTILITY STITCHES Sewing overcasting stitches using zigzag foot "J" Three stitches can be used to sew overcasting stitches with the 3 needle dropping...
..." (page 54). Select a stitch. 2 • For details, refer to "Replacing the presser foot" (page 29). For details, refer to "Adjusting the pressure of the fabric with zigzag foot "J". CONTENTS GETTING READY SEWING BASICS UTILITY STITCHES Sewing overcasting stitches using zigzag foot "J" Three stitches can be used to sew overcasting stitches with the 3 needle dropping...

Users Manual - English
Page 68
R ■ If the needle does not catch the hem fold If the needle does not catch enough of the presser foot. This makes the stitch wider to move the stitch width adjustment lever down. Remove the basting stitching. 8 1 2 1 2 1 Wrong side of fabric 2 Right side ...; For details on changing the stitch width, refer to "Adjusting the Stitch Width and Length" (page 45). This makes the stitch narrower to "Adjusting the pressure of the hem fold, move the needle closer onto the fold. For details, refer to move the stitch width adjustment lever up. CONTENTS 1 1 2 3 2 3 ...
R ■ If the needle does not catch the hem fold If the needle does not catch enough of the presser foot. This makes the stitch wider to move the stitch width adjustment lever down. Remove the basting stitching. 8 1 2 1 2 1 Wrong side of fabric 2 Right side ...; For details on changing the stitch width, refer to "Adjusting the Stitch Width and Length" (page 45). This makes the stitch narrower to "Adjusting the pressure of the hem fold, move the needle closer onto the fold. For details, refer to move the stitch width adjustment lever up. CONTENTS 1 1 2 3 2 3 ...
Users Manual - English
Page 107
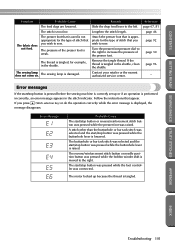
...UTILITY STITCHES Symptom The fabric does not feed. The pressure of stitch that you wish to sew. Error Message Probable Cause The start/stop button or reverse/reinforcement stitch button was pressed while the presser foot was connected. APPENDIX INDEX Troubleshooting 101 Remove the tangle...Probable Cause The feed dogs are lowered. The presser foot that is appropriate for the type of the presser foot is tangled in the shuttle. Turn the presser foot pressure dial to the right to increase the pressure of stitch that appear. The buttonhole or bar tack ...
...UTILITY STITCHES Symptom The fabric does not feed. The pressure of stitch that you wish to sew. Error Message Probable Cause The start/stop button or reverse/reinforcement stitch button was pressed while the presser foot was connected. APPENDIX INDEX Troubleshooting 101 Remove the tangle...Probable Cause The feed dogs are lowered. The presser foot that is appropriate for the type of the presser foot is tangled in the shuttle. Turn the presser foot pressure dial to the right to increase the pressure of stitch that appear. The buttonhole or bar tack ...
Users Manual - English
Page 110
...stitching 78 piecing 78 pocket corners 82 positioning fabric 38 presser foot Cover C, 29 presser foot dial Cover C, 30 presser foot holder Cover C, 31 presser foot lever Cover D presser foot pressure 30 Q quick reference guide Cover A quilting 79 quilting foot 1, 80 quilting guide 1, 79, 80 R rear view Cover...19 spool net Cover A, 24 spool pin Cover B, 13, 19 start/stop button Cover D, 39 starting sewing 39 stitch guide foot 1 stitch indicator Cover E stitch length 46 stitch length adjustment button Cover E stitch length adjustment slider Cover E stitch settings 92 stitch...
...stitching 78 piecing 78 pocket corners 82 positioning fabric 38 presser foot Cover C, 29 presser foot dial Cover C, 30 presser foot holder Cover C, 31 presser foot lever Cover D presser foot pressure 30 Q quick reference guide Cover A quilting 79 quilting foot 1, 80 quilting guide 1, 79, 80 R rear view Cover...19 spool net Cover A, 24 spool pin Cover B, 13, 19 start/stop button Cover D, 39 starting sewing 39 stitch guide foot 1 stitch indicator Cover E stitch length 46 stitch length adjustment button Cover E stitch length adjustment slider Cover E stitch settings 92 stitch...


