
Brother International PC 420 Support Question
Brother International PC 420 Support Question
Find answers below for this question about Brother International PC 420 - PRW Limited Edition Project Runway Sewing Machine.Need a Brother International PC 420 manual? We have 1 online manual for this item!
Question posted by Granteepam5 on October 18th, 2012
Lower Pressure Foot
Machine won't run and lower pressure foot remains
pam
Current Answers
Related Brother International PC 420 Manual Pages
Users Manual - English - Page 4
... shuttle.
6 Feed dogs The feed dogs feed the fabric in the sewing direction.
7 Presser foot The presser foot applies pressure consistently on the end of Machine Parts and Their Functions
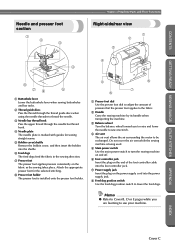
Needle and presser foot section
1 2 3
Right-side/rear view
1 2
3
4
4
8
76
5
1 Buttonhole lever Lower the buttonhole lever when sewing buttonholes and bar tacks.
2 Thread guide discs Pass the thread...
Users Manual - English - Page 5
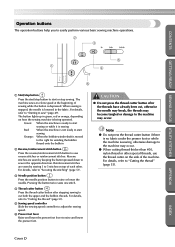
... under the presser foot or while the machine is depressed. The
machine sews at a slow speed at the beginning of the machine.
Green: When the machine is ready to start
sewing or while it is sewing
Red:
When the machine is not ready to start or stop button to start
sewing
Orange: When the bobbin winder shaft is lowered in the...
Users Manual - English - Page 6
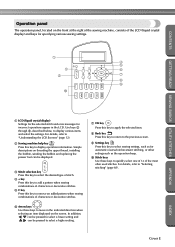
...replacing the presser foot can be displayed.
3 Stitch selection key Press this key to select the desired type of stitch.
4 + key Press this key to add a pattern when sewing combinations of characters...of the sewing machine, consists of the most often used stitches. For details, refer to "Understanding the LCD Screens" (page 12).
2 Sewing machine help key Press this key to select sewing settings,...
Users Manual - English - Page 8
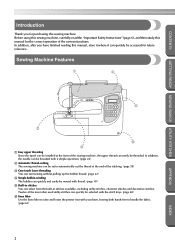
... raise and lower the presser foot with thread. (page 18) 5 Built-in stitches available, including utility stitches, character stitches and decorative stitches. In addition, after you for future reference. Twelve of the most often used utility stitches can easily be accessed for purchasing this manual for the correct operation of the sewing machine, the...
Users Manual - English - Page 9
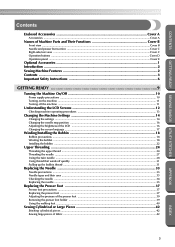
... and Their Functions Cover B
Front view ...Cover B Needle and presser foot section ...Cover C Right-side/rear view ...Cover C Operation buttons ...Cover D Operation panel ...Cover E
Optional Accessories ...1 Introduction ...2 Sewing Machine Features ...2 Contents ...3 Important Safety Instructions 6
GETTING READY 9
Turning the Machine On/Off 10
Power supply precautions ...10 Turning on the...
Users Manual - English - Page 32

GETTING READY SEWING BASICS UTILITY STITCHES
GETTING READY
CONTENTS
CAUTION
● If the spool or the spool cap is not positioned correctly, the thread may become...the order (up → left → down → up → down) shown.
1
1 Shutter The following diagram shows the shutter position when the presser foot is lowered. If the spool cap is lowered, the machine cannot be threaded.
Users Manual - English - Page 33
... READY SEWING BASICS UTILITY STITCHES
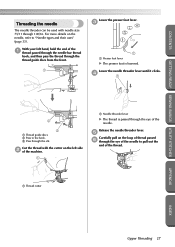
Threading the needle
The needle threader can be used with the cutter on the needle, refer to the back. 3 Pass through 100/16. With your left side 2 of the machine.
1
5
1 Needle threader lever X The thread is passed through the thread guide discs from the front.
1
Lower the presser foot...
Users Manual - English - Page 34
... foot, and then pull out
about 5 cm (2 inch) of thread toward the rear of the machine.
1 1 5 cm (2 inch) X The lower threading is finished. Use of any other needle may bend the needle or damage the machine.
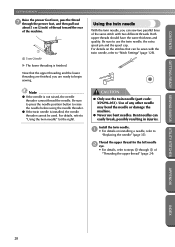
● Never use the twin needle (part code: X59296-051). Now that can be used. Bent needles can sew...
Users Manual - English - Page 36
...machine may be sewn
with the twin needle, refer to
raise the needle from the fabric, and then
raise the presser foot... the needle may break or the machine may be used.
Start sewing.
GETTING READY SEWING BASICS UTILITY STITCHES
X The twin needle...) in the lower-left corner of stitching are sewn parallel to sew" (page 49). CAUTION
● When changing the sewing direction,
press
...
Users Manual - English - Page 38
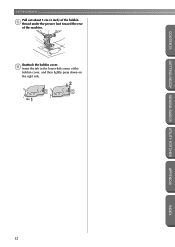
Reattach the bobbin cover. 6 Insert the tab in the lower-left corner of the machine.
CONTENTS
GETTING READY SEWING BASICS UTILITY STITCHES
GETTING READY Pull out about 5 cm (2 inch) of the bobbin
5 thread under the presser foot toward the rear of the
bobbin cover, and then lightly press down on the right side.
2 1
32
APPENDIX
INDEX
Users Manual - English - Page 41
...
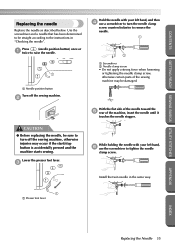
Replacing the needle
Replace the needle as described below. Install the twin needle in "Checking the needle". Lower the presser foot lever.
3
Hold the needle with your left hand, 6 use a screwdriver to turn off the sewing machine. 2
CAUTION
● Before replacing the needle, be sure to turn the needle clamp
screw counterclockwise to be...
Users Manual - English - Page 44

...
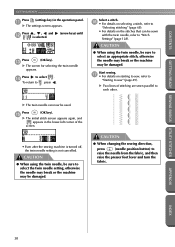
Raise the presser foot lever to check that the 7 presser foot is installed, turn off the sewing machine, attach the correct presser foot, and then select the desired stitch again.
APPENDIX
INDEX
1
1 Presser foot lever X The presser foot is attached before starting to "Stitch Settings" (page 128).
2
3
1 Presser foot holder 2 Notch 3 Pin
Slowly lower the presser foot lever so that...
Users Manual - English - Page 45

...of the 2 sewing machine.
Turn the dial to the left hand.
1 1 Screwdriver
Replacing the Presser Foot 39
INDEX CONTENTS
GETTING READY SEWING BASICS UTILITY STITCHES
Adjusting the pressure of the presser foot
The amount of pressure that does not use the presser foot holder, such as the quilting foot. Lower the presser foot lever.
1
1
1 Presser foot lever Turn the presser foot dial at...
Users Manual - English - Page 46
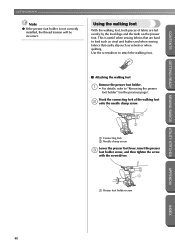
... and leather and when sewing fabrics that are fed evenly by the feed dogs and the teeth on the previous page). Using the walking foot
With the walking foot, both pieces of the walking foot 2 onto the needle clamp screw.
1 2
1 Connecting fork 2 Needle clamp screw Lower the presser foot lever, insert the presser 3 foot holder screw, and...
Users Manual - English - Page 54

... adjust the pressure that the right and wrong sides of the presser foot" (page 39).
Press
2
(needle position button) once or
twice to raise the needle.
1
1 Needle position button
Place the fabric under the presser foot.
3
• If the seam allowance is positioned on the sewing machine.
1
Lower the presser foot lever.
5
GETTING READY SEWING BASICS UTILITY STITCHES...
Users Manual - English - Page 56

... shock may occur.
● If the machine is stopped, the needle remains lowered (in the fabric).
releasing the pressure on the foot controller. Pressing it down on the foot controller decreases the sewing speed.
Slide the sewing speed controller to the left or 4 right to start sewing, slowly 5 press down hard starts sewing too quickly. Once you are ready to...
Users Manual - English - Page 57

...the reverse/reinforcement stitch button
held down
5 on the foot controller. CONTENTS
GETTING READY SEWING BASICS UTILITY STITCHES
Securing the stitching
When sewing with the straight stitch, for example, at the 1 beginning of the stitching, and then lower the
presser foot lever.
X The machine starts sewing.
1 Reverse/reinforcement stitch button
X While the reverse/reinforcement stitch...
Users Manual - English - Page 63

...Press
3
(settings key) in the lower-left corner of the stitching.
APPENDIX
INDEX
Useful Functions 57
X The LCD comes on the sewing machine.
1
X The machine is selected.
(arrow keys) until
...sewing machine can be set to "Selecting stitching" (page 68). X The initial stitch screen appears again, and appears in the operation panel. Position the fabric under the presser foot...
Users Manual - English - Page 68

... needle remained up the machine with the thread and needle appropriate for the type of fabric and thread that are described below. Leave the needle lowered (in order to lower the needle.
Refer to sew around the curve. Sewing curves
Stop sewing, and then slightly change the sewing direction to these tips when sewing your project. For the trial sewing, use...
Users Manual - English - Page 146
... STITCHES
APPENDIX
INDEX
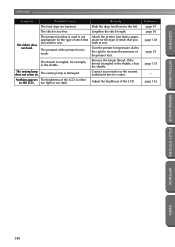
140 Probable Cause
The feed dogs are lowered.
Nothing appears The brightness of the presser foot is damaged.
The sewing lamp is weak.
Turn the presser foot pressure dial to the right to sew. Contact your retailer or the nearest authorized service center. The pressure of the LCD is tangled in the LCD.
The...
Similar Questions

Whats The Resale Value Of The Brother 2300 Prw Limited Edition Project Runway?
(Posted by Anonymous-139615 9 years ago)


How To Thread The Brother Limited Edition Project Runway Sewing Machine
ls2300prw manual
ls2300prw manual
(Posted by jjmaf0 10 years ago)
Brother Pc-420 Prw Limited Edition Project Runway Sewing Machine Will Not
thread needle
thread needle
(Posted by graphevaru 10 years ago)

Wide Table Fit
Will wide table SA 537 XC 4541-022 fit Project Runway PC 420?
Will wide table SA 537 XC 4541-022 fit Project Runway PC 420?
(Posted by dbelvin 12 years ago)