Owners Manual
Page 14
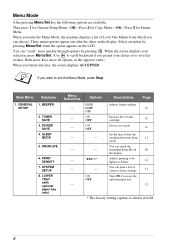
...selection, press Menu/Set. (Use to scroll backward if you want to exit the Menu Mode, press Stop. GENERAL 1. BEEPER SETUP 2. TONER SAVE 3. DRUM LIFE 6. PRINT DENSITY 7. LOWER TRAY (with optional paper tray only) Menu Selections - - - You can print a list of various system settings. ... opposite order.) When you can "scroll" more quickly through options by pressing Menu/Set when the option appears on the display. These menu options appear one after the other on the LCD. Options HIGH LOW OFF ON OFF ON OFF - - - - - - + - - POWER SAVE 4. Descriptions Adjusts...
...selection, press Menu/Set. (Use to scroll backward if you want to exit the Menu Mode, press Stop. GENERAL 1. BEEPER SETUP 2. TONER SAVE 3. DRUM LIFE 6. PRINT DENSITY 7. LOWER TRAY (with optional paper tray only) Menu Selections - - - You can print a list of various system settings. ... opposite order.) When you can "scroll" more quickly through options by pressing Menu/Set when the option appears on the display. These menu options appear one after the other on the LCD. Options HIGH LOW OFF ON OFF ON OFF - - - - - - + - - POWER SAVE 4. Descriptions Adjusts...
Owners Manual
Page 30
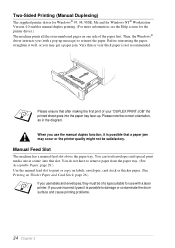
... of your "DUPLEX PRINT JOB" the printed sheet goes into this slot. Very thin or very thick paper is possible to damage or contaminate the drum surface and cause printing problems. 24 Chapter 3 When you may occur or the printer quality might not be of the paper first. Please note the...-up message) to print or copy on labels, envelopes, card stock or thicker paper. (See Printing on one at a time into the paper tray face-up. You can load envelopes and special print media one side of a type suitable for the printer driver.) The machine prints all the even-numbered pages on...
... of your "DUPLEX PRINT JOB" the printed sheet goes into this slot. Very thin or very thick paper is possible to damage or contaminate the drum surface and cause printing problems. 24 Chapter 3 When you may occur or the printer quality might not be of the paper first. Please note the...-up message) to print or copy on labels, envelopes, card stock or thicker paper. (See Printing on one at a time into the paper tray face-up. You can load envelopes and special print media one side of a type suitable for the printer driver.) The machine prints all the even-numbered pages on...
Owners Manual
Page 78
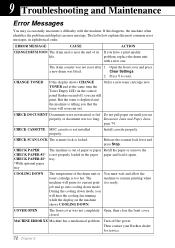
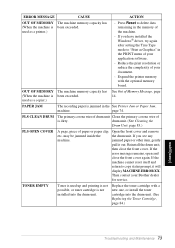
.... 9 Troubleshooting and Maintenance Error Messages You may occasionally encounter a difficulty with a new one. COVER OPEN The front cover was not reset after 1. ERROR MESSAGE CAUSE ACTION CHANGE DRUM SOON The drum unit is locked. Press 1 to resume printing when machine will hear the cooling fan ...Do not pull paper out until you can still print. Then contact your Brother dealer for service. 72 Chapter 9 Open the front cover and press a new drum was too long. CHECK CASSETTE MFC cassette is ready. The machine to reset. The list below explains the most...
.... 9 Troubleshooting and Maintenance Error Messages You may occasionally encounter a difficulty with a new one. COVER OPEN The front cover was not reset after 1. ERROR MESSAGE CAUSE ACTION CHANGE DRUM SOON The drum unit is locked. Press 1 to resume printing when machine will hear the cooling fan ...Do not pull paper out until you can still print. Then contact your Brother dealer for service. 72 Chapter 9 Open the front cover and press a new drum was too long. CHECK CASSETTE MFC cassette is ready. The machine to reset. The list below explains the most...
Owners Manual
Page 79
... jammed paper or other item, gently pull it will display MACHINE ERROR XX. Expand the printer memory with a new one, or install the toner cartridge into the drum unit. Then contact your document. - Reduce the print resolution or reduce the complexity of your application software. - PAPER... JAM The recording paper is jammed in the PRINT menu of your Brother dealer for service. Replace the toner ...
... jammed paper or other item, gently pull it will display MACHINE ERROR XX. Expand the printer memory with a new one, or install the toner cartridge into the drum unit. Then contact your document. - Reduce the print resolution or reduce the complexity of your application software. - PAPER... JAM The recording paper is jammed in the PRINT menu of your Brother dealer for service. Replace the toner ...

Owners Manual
Page 81
Paper is Jammed near the Drum Unit 1 Open the front cover. 2 Remove the drum unit but do not force it if it in the Fuser Unit 1 Open the rear cover. 2 Pull out jammed paper. When you are using. 4 Press ... paper you have to pull paper out the back of the jammed paper from the paper tray. 3 Gently pull out the jammed paper. 4 Reinstall the drum unit. 5 Close the front cover. Instead, pull the edge of the machine, the fuser may get dirty with toner powder causing the next few copies...
Paper is Jammed near the Drum Unit 1 Open the front cover. 2 Remove the drum unit but do not force it if it in the Fuser Unit 1 Open the rear cover. 2 Pull out jammed paper. When you are using. 4 Press ... paper you have to pull paper out the back of the jammed paper from the paper tray. 3 Gently pull out the jammed paper. 4 Reinstall the drum unit. 5 Close the front cover. Instead, pull the edge of the machine, the fuser may get dirty with toner powder causing the next few copies...
Owners Manual
Page 82
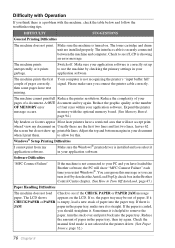
...there is not connected to your PC and you have loaded the Brother software, the PC will not accept print. Software Difficulties "MFC Connect Failure" If the machine is a problem with the optional ...memory board. (See Memory Board, page 94.) My headers or footers appear Most laser printers have text missing...ignore this . The toner cartridge and drum unit are the first two lines and last two lines, leaves 62 the screen but do not show "MFC Connect Failure" each time you should ...
...there is not connected to your PC and you have loaded the Brother software, the PC will not accept print. Software Difficulties "MFC Connect Failure" If the machine is a problem with the optional ...memory board. (See Memory Board, page 94.) My headers or footers appear Most laser printers have text missing...ignore this . The toner cartridge and drum unit are the first two lines and last two lines, leaves 62 the screen but do not show "MFC Connect Failure" each time you should ...
Owners Manual
Page 83
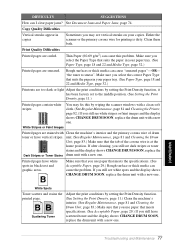
Make sure you still see dark stripes or toner stains and the display shows CHANGE DRUM SOON, replace the Dark Stripes or Toner Stains drum unit with a new one . White Stripes or Faint Images Printed pages are too dark or light Adjust the print conditions by setting the Print Density ...paper in black text and graphic areas. Make sure you still see white stripes or faint images and the display shows CHANGE DRUM SOON, replace the drum unit with a new one . "the toner to the middle position. (See Setting the Print Density, page 11.) Printed pages contain white stripes. ...
Make sure you still see dark stripes or toner stains and the display shows CHANGE DRUM SOON, replace the Dark Stripes or Toner Stains drum unit with a new one . White Stripes or Faint Images Printed pages are too dark or light Adjust the print conditions by setting the Print Density ...paper in black text and graphic areas. Make sure you still see white stripes or faint images and the display shows CHANGE DRUM SOON, replace the drum unit with a new one . "the toner to the middle position. (See Setting the Print Density, page 11.) Printed pages contain white stripes. ...
Owners Manual
Page 84
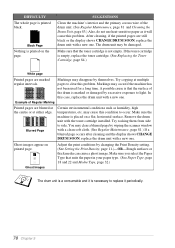
Try copying at either edge. Try rocking them from side to clear this case, replace the drum unit with a new one . Ghost Images Adjust the print conditions by themselves. Make sure you select the Paper Type that suits the paper in your paper type. (See Paper ... is a consumable and it is necessary to light. After cleaning, if the printed pages are still black or the display shows CHANGE DRUM SOON, replace the drum unit with a new one. Markings may be damaged. In this problem. Make sure the machine is not empty. A possible cause is that the toner cartridge is...
Try copying at either edge. Try rocking them from side to clear this case, replace the drum unit with a new one . Ghost Images Adjust the print conditions by themselves. Make sure you select the Paper Type that suits the paper in your paper type. (See Paper ... is a consumable and it is necessary to light. After cleaning, if the printed pages are still black or the display shows CHANGE DRUM SOON, replace the drum unit with a new one. Markings may be damaged. In this problem. Make sure the machine is not empty. A possible cause is that the toner cartridge is...

Owners Manual
Page 85
... and toner cartridge assembly. Leave the toner cartridge installed in the drum unit. If you do not pack the machine correctly, you transport the machine, use the packing materials that came with the machine. And leave it ... machine by failure to lock it. Do not turn off the machine. Packing and Shipping the Machine Whenever you could void your warranty. 4 Remove the drum unit assembly. Press it for 5 seconds. 3 Lock the scanner lock lever. MAINTENANCE Front Cover...
... and toner cartridge assembly. Leave the toner cartridge installed in the drum unit. If you do not pack the machine correctly, you transport the machine, use the packing materials that came with the machine. And leave it ... machine by failure to lock it. Do not turn off the machine. Packing and Shipping the Machine Whenever you could void your warranty. 4 Remove the drum unit assembly. Press it for 5 seconds. 3 Lock the scanner lock lever. MAINTENANCE Front Cover...

Owners Manual
Page 86
... in the plastic bag and place it in the original carton with the original packing material. 10 Place documents (manual, printed material and CD-ROM), drum unit and toner cartridge assembly and power cord into the plastic bag and seal the bag completely. Plastic Bag...
... in the plastic bag and place it in the original carton with the original packing material. 10 Place documents (manual, printed material and CD-ROM), drum unit and toner cartridge assembly and power cord into the plastic bag and seal the bag completely. Plastic Bag...

Owners Manual
Page 87
... roller, and the glass strip under the roller with isopropyl alcohol on a lint-free cloth. Avoid using thinners or other organic solvents to clean the drum unit during this routine. Clean the glass platen and white film with isopropyl alcohol on a lint-free cloth. White Roller Glass Strip ADF Unit MAINTENANCE...
... roller, and the glass strip under the roller with isopropyl alcohol on a lint-free cloth. Avoid using thinners or other organic solvents to clean the drum unit during this routine. Clean the glass platen and white film with isopropyl alcohol on a lint-free cloth. White Roller Glass Strip ADF Unit MAINTENANCE...
Owners Manual
Page 88
... not use isopropyl alcohol. If toner scatters and your finger. • Handle the drum unit carefully as it off and unplug the machine. 2 Open the front cover. 3 Remove the drum unit assembly. When you have used the machine, some internal parts of the machine, never touch the shaded parts shown in the diagram...
... not use isopropyl alcohol. If toner scatters and your finger. • Handle the drum unit carefully as it off and unplug the machine. 2 Open the front cover. 3 Remove the drum unit assembly. When you have used the machine, some internal parts of the machine, never touch the shaded parts shown in the diagram...
Owners Manual
Page 89
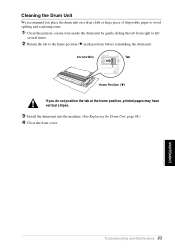
...at the home position, printed pages may have vertical stripes. 3 Install the drum unit into the machine. (See Replacing the Drum Unit, page 88.) 4 Close the front cover. Corona Wire Tab Home Position ( ) If you place the drum unit on a drop cloth or large piece of disposable paper to avoid spilling... and scattering toner. 1 Clean the primary corona wire inside the drum unit by gently sliding the tab from right to left several times. 2 Return the...
...at the home position, printed pages may have vertical stripes. 3 Install the drum unit into the machine. (See Replacing the Drum Unit, page 88.) 4 Close the front cover. Corona Wire Tab Home Position ( ) If you place the drum unit on a drop cloth or large piece of disposable paper to avoid spilling... and scattering toner. 1 Clean the primary corona wire inside the drum unit by gently sliding the tab from right to left several times. 2 Return the...

Owners Manual
Page 91
1 Open the front cover and pull out the drum unit. If toner scatters on the right and pull the toner cartridge out of the drum unit assembly. Troubleshooting and Maintenance 85 MAINTENANCE Place the drum unit on a drop cloth or large piece of disposable paper to avoid spilling and scattering the toner. 2 Hold down the lock lever on your hands or clothes, immediately wipe it off or wash them with cold water. Lock Lever Handle the toner cartridge carefully.
1 Open the front cover and pull out the drum unit. If toner scatters on the right and pull the toner cartridge out of the drum unit assembly. Troubleshooting and Maintenance 85 MAINTENANCE Place the drum unit on a drop cloth or large piece of disposable paper to avoid spilling and scattering the toner. 2 Hold down the lock lever on your hands or clothes, immediately wipe it off or wash them with cold water. Lock Lever Handle the toner cartridge carefully.

Owners Manual
Page 93
Drum Unit Toner Cartridge 7 Clean the primary corona wire inside the drum unit by gently sliding the blue tab from right to the home position before reinstalling the drum unit assembly. MAINTENANCE Troubleshooting and Maintenance 87 Corona Wire Tab Home Position ( ) 8 Reinstall the drum unit into place. Return the blue tab to left several times. 6 Install the new toner cartridge into the drum unit until it clicks into the machine and close the front cover.
Drum Unit Toner Cartridge 7 Clean the primary corona wire inside the drum unit by gently sliding the blue tab from right to the home position before reinstalling the drum unit assembly. MAINTENANCE Troubleshooting and Maintenance 87 Corona Wire Tab Home Position ( ) 8 Reinstall the drum unit into place. Return the blue tab to left several times. 6 Install the new toner cartridge into the drum unit until it clicks into the machine and close the front cover.
Owners Manual
Page 94
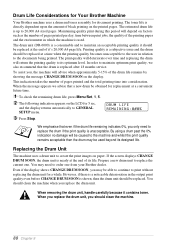
...number of pages printed per day, time between print jobs, the quality of its optimum level. Prepare a new drum unit to replace the current one from your Brother dealer. You should clean the machine when you should be replaced at the end of black printing on paper. When... you replace the drum unit, you replace the drum unit. Drum Life Considerations for Your Brother Machine Your Brother machine uses a drum and toner assembly for...
...number of pages printed per day, time between print jobs, the quality of its optimum level. Prepare a new drum unit to replace the current one from your Brother dealer. You should clean the machine when you should be replaced at the end of black printing on paper. When... you replace the drum unit, you replace the drum unit. Drum Life Considerations for Your Brother Machine Your Brother machine uses a drum and toner assembly for...

Owners Manual
Page 95
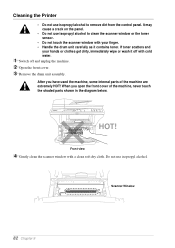
..., some internal parts of the machine will print may be extremely HOT! Front view Follow these estimates. For best performance, use only genuine Brother toner, and the product should be careful. HOT! After you have no control over the many factors that determine the actual drum life, ...we cannot guarantee a minimum number of pages that will be printed by your drum will be significantly less than ...
..., some internal parts of the machine will print may be extremely HOT! Front view Follow these estimates. For best performance, use only genuine Brother toner, and the product should be careful. HOT! After you have no control over the many factors that determine the actual drum life, ...we cannot guarantee a minimum number of pages that will be printed by your drum will be significantly less than ...

Owners Manual
Page 96
.... • Do not touch the scanner window with your finger. 5 Reinstall the toner cartridge into the aluminium bag and discard it . REPLACE DRUM? 1.YES 2.NO 8 Press 1 and when the display shows ACCEPTED, and close the front cover. 90 Chapter 9 When discarding used... drum unit according to unpack the new drum unit until immediately before installing it according to local regulations. • If an unpacked drum unit is subjected to reset the drum life counter. 3 Pull the toner cartridge out of the unit. ...
.... • Do not touch the scanner window with your finger. 5 Reinstall the toner cartridge into the aluminium bag and discard it . REPLACE DRUM? 1.YES 2.NO 8 Press 1 and when the display shows ACCEPTED, and close the front cover. 90 Chapter 9 When discarding used... drum unit according to unpack the new drum unit until immediately before installing it according to local regulations. • If an unpacked drum unit is subjected to reset the drum life counter. 3 Pull the toner cartridge out of the unit. ...

Owners Manual
Page 104
Drum Unit: Life Expectancy: Up to 3,000 pages/standard toner cartridges (TN-6300) (when printing A4 paper at 5% print coverage) Toner life expectancy will vary depending ...: Life Expectancy: Up to 6,000 pages/high yield toner cartridges (TN-6600) Up to 20,000 pages There are many factors that determine the actual drum life, such as temperature, humidity, type of paper and toner that you use, the number of average print job.
Drum Unit: Life Expectancy: Up to 3,000 pages/standard toner cartridges (TN-6300) (when printing A4 paper at 5% print coverage) Toner life expectancy will vary depending ...: Life Expectancy: Up to 6,000 pages/high yield toner cartridges (TN-6600) Up to 20,000 pages There are many factors that determine the actual drum life, such as temperature, humidity, type of paper and toner that you use, the number of average print job.
Owners Manual
Page 106
... trademarks of their respective companies. PaperPort and TextBridge are registered trademarks of International Business Machines Corporation. Ordering Accessories and Supplies For the best quality results use only genuine Brother accessories. Each company whose software title is mentioned in this User's Guide...Software License Agreement specific to 6,000 pages) Drum DR-6000 100 Chapter 12 Hewlett Packard is a registered trademark and HP LaserJet 5P is a registered trademark of Brother Industries, Ltd. These are available from most Brother dealers or alternatively you can contact our ...
... trademarks of their respective companies. PaperPort and TextBridge are registered trademarks of International Business Machines Corporation. Ordering Accessories and Supplies For the best quality results use only genuine Brother accessories. Each company whose software title is mentioned in this User's Guide...Software License Agreement specific to 6,000 pages) Drum DR-6000 100 Chapter 12 Hewlett Packard is a registered trademark and HP LaserJet 5P is a registered trademark of Brother Industries, Ltd. These are available from most Brother dealers or alternatively you can contact our ...


