
Owners Manual
Page 21
... keys: Enlarge, Reduce, Options, Clear Settings, Special and Copy Mode. You can improve your settings and start over, press Clear Settings. You can try different combinations of settings for the best results. Making Copies 15 Copying Using Multiple Settings You can press or to select MANUAL, and then use these temporary...
... keys: Enlarge, Reduce, Options, Clear Settings, Special and Copy Mode. You can improve your settings and start over, press Clear Settings. You can try different combinations of settings for the best results. Making Copies 15 Copying Using Multiple Settings You can press or to select MANUAL, and then use these temporary...

Owners Manual
Page 25
...Copy Options (Using the Glass Platen) You can save paper by copying either two or four pages onto one page or you can create a poster size copy of a photograph. 1 Insert the document face down ... (2in1 or 4in1) 4 Press Copy. COPIER Copy Mode You can save paper by copying either two or four pages onto one page. 1 Insert the document face up in the ADF, or face down on the glass platen. 2 Using the numeric ...setting you want. (2in1, 4in1 or Poster) 4 Press Copy. Auto (line art, graphs, or any combination including photograph) Text (text only) Photo (photograph only) 4 Press Copy.
...Copy Options (Using the Glass Platen) You can save paper by copying either two or four pages onto one page or you can create a poster size copy of a photograph. 1 Insert the document face down ... (2in1 or 4in1) 4 Press Copy. COPIER Copy Mode You can save paper by copying either two or four pages onto one page. 1 Insert the document face up in the ADF, or face down on the glass platen. 2 Using the numeric ...setting you want. (2in1, 4in1 or Poster) 4 Press Copy. Auto (line art, graphs, or any combination including photograph) Text (text only) Photo (photograph only) 4 Press Copy.

Owners Manual
Page 59
Conversion Options Format Combine all files into one file when possible-Click this checkbox to combine all files when possible-Click this checkbox if you choose Scan to E-mail. Show QuickSend Menu Click this checkbox if you want the Select QuickSend ... as Microsoft Exchange, Microsoft Outlook and Eudora. From the Link Preferences window, you want to add to your QuickSend list. Using the Windows®-Based Brother Control Centre (For Windows® Only) 53 QuickSend List You can remove a name from the QuickSend list, by highlighting the name and clicking the Delete...
Conversion Options Format Combine all files into one file when possible-Click this checkbox to combine all files when possible-Click this checkbox if you choose Scan to E-mail. Show QuickSend Menu Click this checkbox if you want the Select QuickSend ... as Microsoft Exchange, Microsoft Outlook and Eudora. From the Link Preferences window, you want to add to your QuickSend list. Using the Windows®-Based Brother Control Centre (For Windows® Only) 53 QuickSend List You can remove a name from the QuickSend list, by highlighting the name and clicking the Delete...
Owners Manual
Page 63
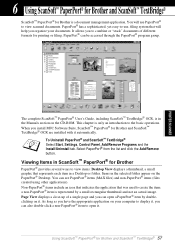
...group. Non-PaperPort® items include an icon that indicates the application that represents each item in ScanSoft™ PaperPort® for Brother PaperPort® provides several ways to view items: Desktop View displays a thumbnail, a small graphic that was used to view scanned ...6 Using ScanSoft™ PaperPort® for Brother and ScanSoft™ TextBridge® ScanSoft™ Paper Port® for Brother and ScanSoft™ TextBridge® 57 It allows you to combine or "stack" documents of a single page and you install MFC Software Suite, ScanSoft™ PaperPort® ...
...group. Non-PaperPort® items include an icon that indicates the application that represents each item in ScanSoft™ PaperPort® for Brother PaperPort® provides several ways to view items: Desktop View displays a thumbnail, a small graphic that was used to view scanned ...6 Using ScanSoft™ PaperPort® for Brother and ScanSoft™ TextBridge® ScanSoft™ Paper Port® for Brother and ScanSoft™ TextBridge® 57 It allows you to combine or "stack" documents of a single page and you install MFC Software Suite, ScanSoft™ PaperPort® ...
Owners Manual
Page 76
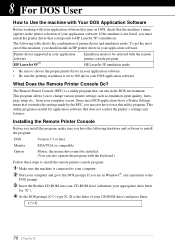
... 5P's emulations. the mouse driver must install the printer driver that corresponds to use this machine, you have the following table shows the combination of this utility program. What Does the Remote Printer Console Do? Since most out of printer driver and emulation mode. C:\>X: 70 Chapter ...: 1 Make sure the machine is connected to your computer. 2 Start your computer and go to the DOS prompt. 3 Insert the Brother CD-ROM into your CD-ROM drive (substitute your appropriate drive letter for application software that the machine's name appears in the printer selection...
... 5P's emulations. the mouse driver must install the printer driver that corresponds to use this machine, you have the following table shows the combination of this utility program. What Does the Remote Printer Console Do? Since most out of printer driver and emulation mode. C:\>X: 70 Chapter ...: 1 Make sure the machine is connected to your computer. 2 Start your computer and go to the DOS prompt. 3 Insert the Brother CD-ROM into your CD-ROM drive (substitute your appropriate drive letter for application software that the machine's name appears in the printer selection...

Service Manual
Page 184
Setting both of these selectors to the PABX. Selectors 6 and 7: Dial tone detection in PABX These selectors activate or deactivate the dial tone detection function which detects a dial tone when a line is connected to "1" activates the dial tone detection function so that the machine starts dialing after the specified WAIT (3.5, 5.0, or 7.0 sec.) without detection of a dial tone when a line is connected. 5 Other setting combinations deactivate the dial tone detection function so that the machine starts dialing upon detection of a dial tone when a line is connected.
Setting both of these selectors to the PABX. Selectors 6 and 7: Dial tone detection in PABX These selectors activate or deactivate the dial tone detection function which detects a dial tone when a line is connected to "1" activates the dial tone detection function so that the machine starts dialing after the specified WAIT (3.5, 5.0, or 7.0 sec.) without detection of a dial tone when a line is connected. 5 Other setting combinations deactivate the dial tone detection function so that the machine starts dialing upon detection of a dial tone when a line is connected.

Service Manual
Page 186
... 100 101 110 111 : 3.5 sec. Setting all of the first digit will become effective so as to WSW07 and WSW08. WAIT : 21.0 sec. Other setting combinations deactivate the dial tone detection function so that the machine starts dialing after dialing 0 : Yes 1: No 0 : 40 ms min. 1: 100 ms min. WAIT : 10.5 sec...
... 100 101 110 111 : 3.5 sec. Setting all of the first digit will become effective so as to WSW07 and WSW08. WAIT : 21.0 sec. Other setting combinations deactivate the dial tone detection function so that the machine starts dialing after dialing 0 : Yes 1: No 0 : 40 ms min. 1: 100 ms min. WAIT : 10.5 sec...