
Users Manual - English
Page 49
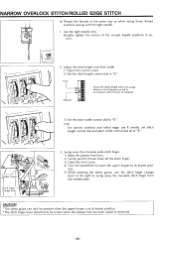
.... 2) Set the stitch length control dial to swing away the movable stitch finger from the needle plate. ra 9 t a 6 3) Set the stitch width control dial to "R." (TIP) For narrow overlock and rolled edge, use R needle, set stitch length control dial and stitch width control dial all to secure. Use the right needle...
.... 2) Set the stitch length control dial to swing away the movable stitch finger from the needle plate. ra 9 t a 6 3) Set the stitch width control dial to "R." (TIP) For narrow overlock and rolled edge, use R needle, set stitch length control dial and stitch width control dial all to secure. Use the right needle...
Users Manual - English
Page 54
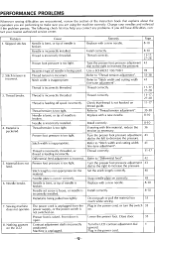
...new needle. 35-38 8-10 Install correctly. 8-10 If sewing with a new needle. Material does not feed. 6. Needle is bent, or tip of needle is broken. Thread correctly. Refer to "Thread tension adjustment". Set the stitch length correctly. Presser foot is incorrectly installed. Needle is ... loose, or needle is open. Needle plate is not hooked on correctly. Front door is incorrectly installed. Needle is bent, or tip of needle is incorrect. Thread is incorrectly threaded, or thread is feeding off spool incorrectly. Thread correctly. 11-17, 27-28 ...
...new needle. 35-38 8-10 Install correctly. 8-10 If sewing with a new needle. Material does not feed. 6. Needle is bent, or tip of needle is broken. Thread correctly. Refer to "Thread tension adjustment". Set the stitch length correctly. Presser foot is incorrectly installed. Needle is ... loose, or needle is open. Needle plate is not hooked on correctly. Front door is incorrectly installed. Needle is bent, or tip of needle is incorrect. Thread is incorrectly threaded, or thread is feeding off spool incorrectly. Thread correctly. 11-17, 27-28 ...
