

Users Manual - English
Page 3
If your plug, pro- carrying the mark, rating as follows. IMPORTANT If the available socket outlet is not suitable for the plug supplied with the letter 'L' or coloured red or brown. nn (0 L I IA • When leaving the sewing machine unattended, the main switch of the machine must be switched off or the plug must be removed from the socketoutlet. • When servicing the sewing machine, or when removing covers or changing lamps, the machine or the electrical set must be cut off and an appropriate three pin plug fitted. WARNING: DO NOT CONNNECT EITHER WIRE TO THE EARTH...
If your plug, pro- carrying the mark, rating as follows. IMPORTANT If the available socket outlet is not suitable for the plug supplied with the letter 'L' or coloured red or brown. nn (0 L I IA • When leaving the sewing machine unattended, the main switch of the machine must be switched off or the plug must be removed from the socketoutlet. • When servicing the sewing machine, or when removing covers or changing lamps, the machine or the electrical set must be cut off and an appropriate three pin plug fitted. WARNING: DO NOT CONNNECT EITHER WIRE TO THE EARTH...
Users Manual - English
Page 4
CAUTION! IF IT STILL DOES NOT FIT, CONTACT A QUALIFIED ELECTRICIAN TO INSTALL THE PROPER OUTLET. WHEN THREADING, REPLACING NEEDLE OR LIGHT BULB, BE SURE TO TURN OFF THE MAIN POWER SWITCH OF THE MACHINE. TO REDUCE THE RISK OF ELECTRIC SHOCK, THIS PLUG IS INTENDED TO FIT IN A POLARIZED OUTLET ONLY ONE WAY. IF THE PLUG DOES NOT FIT FULLY IN THE OUTLET, REVERSE THE PLUG. WHEN THE MACHINE IS NOT IN USE, IT IS RECOMMENDED THAT THE ELECTRIC SUPPLY PLUG IS DISCONNECTED FROM THE WALL SOCKET TO AVOID ANY POSSIBLE HAZARDS. DO NOT MODIFY THE PLUG IN ANY WAY. Enjoy yourself! THIS APPLIANCE ...
CAUTION! IF IT STILL DOES NOT FIT, CONTACT A QUALIFIED ELECTRICIAN TO INSTALL THE PROPER OUTLET. WHEN THREADING, REPLACING NEEDLE OR LIGHT BULB, BE SURE TO TURN OFF THE MAIN POWER SWITCH OF THE MACHINE. TO REDUCE THE RISK OF ELECTRIC SHOCK, THIS PLUG IS INTENDED TO FIT IN A POLARIZED OUTLET ONLY ONE WAY. IF THE PLUG DOES NOT FIT FULLY IN THE OUTLET, REVERSE THE PLUG. WHEN THE MACHINE IS NOT IN USE, IT IS RECOMMENDED THAT THE ELECTRIC SUPPLY PLUG IS DISCONNECTED FROM THE WALL SOCKET TO AVOID ANY POSSIBLE HAZARDS. DO NOT MODIFY THE PLUG IN ANY WAY. Enjoy yourself! THIS APPLIANCE ...
Users Manual - English
Page 5
Retracting the upper cutter 3. Threading upper looper Threading lower looper Threading the double chain stitch looper thread THREADING NEEDLES 1) Right needle thread 2) Threading the left needle thread 3) Double chain stitch needle thread 4) Threading the right needle for chain 2. Retracting the upper looper for model without LCD USING THE COVER STITCH FUNCTION Replacing the presser foot Tri-cover stitch (Three needles four threads cover stitch) Two needles three threads cover stitch THREADING FOR COVER STITCH Looper Needle thread-front right (FRN) and front center (FCN) Needle thread-front ...
Retracting the upper cutter 3. Threading upper looper Threading lower looper Threading the double chain stitch looper thread THREADING NEEDLES 1) Right needle thread 2) Threading the left needle thread 3) Double chain stitch needle thread 4) Threading the right needle for chain 2. Retracting the upper looper for model without LCD USING THE COVER STITCH FUNCTION Replacing the presser foot Tri-cover stitch (Three needles four threads cover stitch) Two needles three threads cover stitch THREADING FOR COVER STITCH Looper Needle thread-front right (FRN) and front center (FCN) Needle thread-front ...
Users Manual - English
Page 6
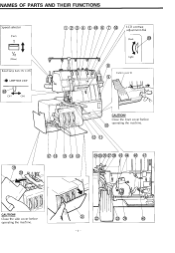
a 0 U Close the front cover before operating the machine. Close the side cover before operating the machine. 00 08 ©0® 8680 80 8 6 CAUTION! NAMES OF PARTS AND THEIR FUNCTIONS Speed selecto (Fast) 1 1//2 (Slow) Rated lamp bulb: BV 2.4W 4 LAMP MAX 24W 0A, OFF ON ©®®®0©T LCD contrast adjustment dial Dark Light Cutter cover II II OC. 9 U CAUTION!
a 0 U Close the front cover before operating the machine. Close the side cover before operating the machine. 00 08 ©0® 8680 80 8 6 CAUTION! NAMES OF PARTS AND THEIR FUNCTIONS Speed selecto (Fast) 1 1//2 (Slow) Rated lamp bulb: BV 2.4W 4 LAMP MAX 24W 0A, OFF ON ©®®®0©T LCD contrast adjustment dial Dark Light Cutter cover II II OC. 9 U CAUTION!

Users Manual - English
Page 7
C ,,,,, (s) I c ® Pressure adjustment dial C) Thread tension dial for left needle thread (and for double chain stitch thread) 0 Thread tension dial for right needle thread and FCN & FRN 8 Liquid crystal display (LCD) C) Liquid crystal display keys 0 Thread tension dial for upper looper thread and FCN ® Thread tension dial for lower looper thread ® Presser foot lever ® Thread tension dial (For double chain stitch looper thread) ® Front cover O Needle plate O Presser foot O Stitch width control dial O Stitch length control dial O Differential feed control dial O ...
C ,,,,, (s) I c ® Pressure adjustment dial C) Thread tension dial for left needle thread (and for double chain stitch thread) 0 Thread tension dial for right needle thread and FCN & FRN 8 Liquid crystal display (LCD) C) Liquid crystal display keys 0 Thread tension dial for upper looper thread and FCN ® Thread tension dial for lower looper thread ® Presser foot lever ® Thread tension dial (For double chain stitch looper thread) ® Front cover O Needle plate O Presser foot O Stitch width control dial O Stitch length control dial O Differential feed control dial O ...

Users Manual - English
Page 8
e THREAD NET (5) THREAD SPOOL CAP (5) ACCESSORIES SOFT COVER Scrap catcher ACCESSORY BOX m LLI O N S (0 SCRAP CATCHER ....e...s.. ....
e THREAD NET (5) THREAD SPOOL CAP (5) ACCESSORIES SOFT COVER Scrap catcher ACCESSORY BOX m LLI O N S (0 SCRAP CATCHER ....e...s.. ....
Users Manual - English
Page 10
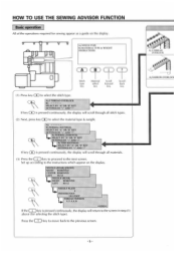
Set up according to the instructions which appear on the display. Press the O key to move back to select the stitch type. AI STITCH TYRE 0) MATERIAL TYPE • wEJOHT INSTRUCIIORD A ) CEF) (M) ( t Sli ch Maloial Scroll Scroll Pipe rebel loneard back • key key key key II) Press key Cr/ to the previous screen. 11 Ai 5 IHRFAL) °vision( Al NARROW ovERLorK KEY sarnmos ST •4* AND • k If key Wm pressed «MilinUOusly, the display will s roll through all stitch types. (2) Next, press key Cl to scam I the material IVO & weight. (N\ A) BINOMIAL ...
Set up according to the instructions which appear on the display. Press the O key to move back to select the stitch type. AI STITCH TYRE 0) MATERIAL TYPE • wEJOHT INSTRUCIIORD A ) CEF) (M) ( t Sli ch Maloial Scroll Scroll Pipe rebel loneard back • key key key key II) Press key Cr/ to the previous screen. 11 Ai 5 IHRFAL) °vision( Al NARROW ovERLorK KEY sarnmos ST •4* AND • k If key Wm pressed «MilinUOusly, the display will s roll through all stitch types. (2) Next, press key Cl to scam I the material IVO & weight. (N\ A) BINOMIAL ...

Users Manual - English
Page 11
Explanation of seehes (IT Ispcs) a ••a• 04m. • " t AI 'TIIRPAI) OVERLOCK AICHAIN SITTOI _ • 414 (a> 171 AI FILLI I I IL IGOE A)COVER STEM 3 Nem? AND • I' I I ) INCORRECT NEEDLE USW/ NEEDLE IN CORRECTLY? 3)1S THREADING CORRECT? AND 19 'IMMO BREAKS SELECT BY *A.' Trouble Symptoms 1 FD SKIPPED PITT(IIIN ll) ILAIEIHREAU TENSION B) THREAD BREAKS PUCKERING-VERTICAL B) PUCKERINGNIDEWAYS R) MATERIAL STRET(11 II) WES NOT Ill?) B)NEEDIE BREAKS B) MATERIAL SUITING ID MACHINE IS NOISY I B)BAD111RILAD 'MANION Igo seuecr BY 'A• OR •ll" KEY ...
Explanation of seehes (IT Ispcs) a ••a• 04m. • " t AI 'TIIRPAI) OVERLOCK AICHAIN SITTOI _ • 414 (a> 171 AI FILLI I I IL IGOE A)COVER STEM 3 Nem? AND • I' I I ) INCORRECT NEEDLE USW/ NEEDLE IN CORRECTLY? 3)1S THREADING CORRECT? AND 19 'IMMO BREAKS SELECT BY *A.' Trouble Symptoms 1 FD SKIPPED PITT(IIIN ll) ILAIEIHREAU TENSION B) THREAD BREAKS PUCKERING-VERTICAL B) PUCKERINGNIDEWAYS R) MATERIAL STRET(11 II) WES NOT Ill?) B)NEEDIE BREAKS B) MATERIAL SUITING ID MACHINE IS NOISY I B)BAD111RILAD 'MANION Igo seuecr BY 'A• OR •ll" KEY ...
Users Manual - English
Page 12
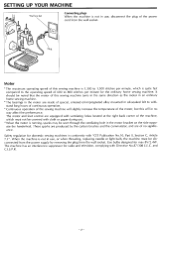
It should be noted that the motor of this sewing machine turns in the same direction as the motor in an ordinary home sewing machine. *The bearings in the motor are made of special, sintered oil-impregnated alloy mounted in oil-soaked felt to withstand long hours of continuous operation. * Continuous operation of the sewing machine will in use, disconnect the plug of the power cord from the wall socket. and C.I.S.P.R. Use bulbs designed for the ordinary home sewing machine. SETTING UP YOUR MACHINE Wall socket Connecting plugs When the machine is quite fast compared to the ...
It should be noted that the motor of this sewing machine turns in the same direction as the motor in an ordinary home sewing machine. *The bearings in the motor are made of special, sintered oil-impregnated alloy mounted in oil-soaked felt to withstand long hours of continuous operation. * Continuous operation of the sewing machine will in use, disconnect the plug of the power cord from the wall socket. and C.I.S.P.R. Use bulbs designed for the ordinary home sewing machine. SETTING UP YOUR MACHINE Wall socket Connecting plugs When the machine is quite fast compared to the ...

Users Manual - English
Page 13
LN RN FLN 0aa FCN FRN When front needles are inserted correctly you can see the top of needle for each needle position. 1O FLN: Front left needle will be higher. SMs for proper size of the needle in the window above each material, refer to see if it is parallel or not. CAUTION! * Use only one, two or three needles at one time. * Do not use with all needles installed at the same time. * If setting the left (LN) and right (RN) needles at the same time, the left needle FCN: Front center needle FRN: Front right needle LN: Left needle RN: Right needle 11 11 Parallel 1 (Needle-...
LN RN FLN 0aa FCN FRN When front needles are inserted correctly you can see the top of needle for each needle position. 1O FLN: Front left needle will be higher. SMs for proper size of the needle in the window above each material, refer to see if it is parallel or not. CAUTION! * Use only one, two or three needles at one time. * Do not use with all needles installed at the same time. * If setting the left (LN) and right (RN) needles at the same time, the left needle FCN: Front center needle FRN: Front right needle LN: Left needle RN: Right needle 11 11 Parallel 1 (Needle-...

Users Manual - English
Page 14
Right needle / t c. IMPORTAM1 Lightly tighten the screw at the unused needle position, so it as far as illustrated. Position of needle when using the cover stitch function Refer to loosen the adjacent needle screw. You will never sew with the needles in its highest position. 1) Hold the needle with allemvrench and remove the needle. To Wert the needle I ) Turn the main power switch to off . 2) Turn the handwheel until the needle is in place as it goes. 4) Tighten the needle set screw with its LOW/ No needles three amid cover mach 6 Mm gar h 1 mm TO 'MOW the needle I ) Turn ...
Right needle / t c. IMPORTAM1 Lightly tighten the screw at the unused needle position, so it as far as illustrated. Position of needle when using the cover stitch function Refer to loosen the adjacent needle screw. You will never sew with the needles in its highest position. 1) Hold the needle with allemvrench and remove the needle. To Wert the needle I ) Turn the main power switch to off . 2) Turn the handwheel until the needle is in place as it goes. 4) Tighten the needle set screw with its LOW/ No needles three amid cover mach 6 Mm gar h 1 mm TO 'MOW the needle I ) Turn ...

Users Manual - English
Page 16
THREADING mood holden Raise the thread holder stand and position it so that you cover the spool with loosely spun nylon or decorative thread, we recommend that the thread hoiden are sewing with the net supplied to the shape of Place thread spools or cones on spool supports 1`/ HOW TO USE THREAD SPOOL CAP AND NET THREAD SPOOL CAP When you are directly above the spool supports. Spool pia of the spool as illustrated. Adapt the net to prevent the thread from slipping off the spool. NET If you use a standard thread spool, use the thread SPOol cap as illustrated.
THREADING mood holden Raise the thread holder stand and position it so that you cover the spool with loosely spun nylon or decorative thread, we recommend that the thread hoiden are sewing with the net supplied to the shape of Place thread spools or cones on spool supports 1`/ HOW TO USE THREAD SPOOL CAP AND NET THREAD SPOOL CAP When you are directly above the spool supports. Spool pia of the spool as illustrated. Adapt the net to prevent the thread from slipping off the spool. NET If you use a standard thread spool, use the thread SPOol cap as illustrated.
Users Manual - English
Page 17
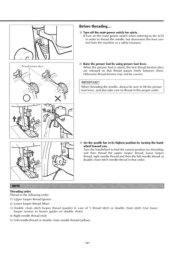
When the presser foot is raised, the two thread tension discs are released so that order. Threading order Thread in the following order: II Upper Raper thread (green) 2) Lower looper thread (blue) 3) Double chain stitch !cope( thread (purple) in case of 5 thread stitch or double chain stitch (Use lower looper tension to brown guides on the main power switch when referring to the LCD in the proper order. /7 0' C 3! IMPORTANT! Otherwise thread tension may not be sure to lift the presser foot lever, and also take care to find the easiest position for safety. *Turn on double chain) ...
When the presser foot is raised, the two thread tension discs are released so that order. Threading order Thread in the following order: II Upper Raper thread (green) 2) Lower looper thread (blue) 3) Double chain stitch !cope( thread (purple) in case of 5 thread stitch or double chain stitch (Use lower looper tension to brown guides on the main power switch when referring to the LCD in the proper order. /7 0' C 3! IMPORTANT! Otherwise thread tension may not be sure to lift the presser foot lever, and also take care to find the easiest position for safety. *Turn on double chain) ...

Users Manual - English
Page 18
THREADING Threading upper looper (green) Run the thread in .) away torn you. On upper boiler. l hen re-Ihread the upper luoper. NOTE apply inOpri mired Iwo lowlso thread II upper looper thread breaks during sewing If the lower lower thread hang!. lower the upper !twi', w turning the handwheel and lake the lower limper thread off upper looper. De'°kite" . thread hPun thread lhowd µwle 0 Thread tension disc a 6 5 0 a Pull ow the dread about I Ira (6 in the sequence illustrated as marked by green dots.
THREADING Threading upper looper (green) Run the thread in .) away torn you. On upper boiler. l hen re-Ihread the upper luoper. NOTE apply inOpri mired Iwo lowlso thread II upper looper thread breaks during sewing If the lower lower thread hang!. lower the upper !twi', w turning the handwheel and lake the lower limper thread off upper looper. De'°kite" . thread hPun thread lhowd µwle 0 Thread tension disc a 6 5 0 a Pull ow the dread about I Ira (6 in the sequence illustrated as marked by green dots.
Users Manual - English
Page 19
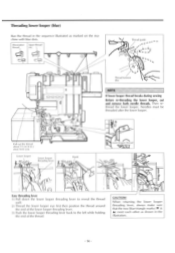
IM or e Spun thread thwart et(. (t) 'Thread pude •• . _ J 1 00 CV SJ. 4 6 4 mead renunn du< If lower looper thread breaks during sewing Before re-threading the lower looper, cut and remove both needle threads. PO OW the thread Ana 15 cm Ifi away lion VOW tow r loupe' OWel likillel Ihiradlii' levet _ Hoot Lauer looster thread 0. 4 4 I Easy threading lever I) Pull down the lower looper threading lever to reveal the thread welt 2) Thread the lower looper eye first then position the thread around the end of the lower former threading lever. 3/ Push the lower looper ...
IM or e Spun thread thwart et(. (t) 'Thread pude •• . _ J 1 00 CV SJ. 4 6 4 mead renunn du< If lower looper thread breaks during sewing Before re-threading the lower looper, cut and remove both needle threads. PO OW the thread Ana 15 cm Ifi away lion VOW tow r loupe' OWel likillel Ihiradlii' levet _ Hoot Lauer looster thread 0. 4 4 I Easy threading lever I) Pull down the lower looper threading lever to reveal the thread welt 2) Thread the lower looper eye first then position the thread around the end of the lower former threading lever. 3/ Push the lower looper ...

Users Manual - English
Page 20
threackte knob • 0000 than thread release kver 41 V CAUTION Press the release lever at step 4 of the thread, return the looper threading knob o its original aOsilMn, make sure that the I mark is aligned with cover stitch needle plate C. - 15 - SI Close the side cover., ._, Threading the thread on the double chain stitch 0 looper hook Correa X wrong CAUTION) When returning the looper threading knob to seat thread properly. THREADING Threading the double chain stitch looper thread (purple) Run the thread in the sequence illustrated. "N. 31 After ...
threackte knob • 0000 than thread release kver 41 V CAUTION Press the release lever at step 4 of the thread, return the looper threading knob o its original aOsilMn, make sure that the I mark is aligned with cover stitch needle plate C. - 15 - SI Close the side cover., ._, Threading the thread on the double chain stitch 0 looper hook Correa X wrong CAUTION) When returning the looper threading knob to seat thread properly. THREADING Threading the double chain stitch looper thread (purple) Run the thread in the sequence illustrated. "N. 31 After ...

Users Manual - English
Page 21
First raise the presser foot lever, and then thread the needle threads in the order shown in .) away from you . Pull out the threads about 15 cm (6 in.) away from you . Pass the thread along the left needle thread (yellow) LN cr i) 000 Thread guide -- 0i y 3 fe 6 7 a Thread tension disc CAUTION! Pass the thread along the right side of the needle thread separator. Needle thread separator Left needle thread 00 Not through front needle guide Pull out the threads about 15 cm (6 in the illustration. 1) Right needle thread (red) RN Thread guide- 2 3 5 4 J 8 U ...
First raise the presser foot lever, and then thread the needle threads in the order shown in .) away from you . Pull out the threads about 15 cm (6 in.) away from you . Pass the thread along the left needle thread (yellow) LN cr i) 000 Thread guide -- 0i y 3 fe 6 7 a Thread tension disc CAUTION! Pass the thread along the right side of the needle thread separator. Needle thread separator Left needle thread 00 Not through front needle guide Pull out the threads about 15 cm (6 in the illustration. 1) Right needle thread (red) RN Thread guide- 2 3 5 4 J 8 U ...

Users Manual - English
Page 22
THREADING NEEDLES 3) Double chain stitch needle thread (yellow) FLN 00 Thread guide. 1c)
THREADING NEEDLES 3) Double chain stitch needle thread (yellow) FLN 00 Thread guide. 1c)
Users Manual - English
Page 23
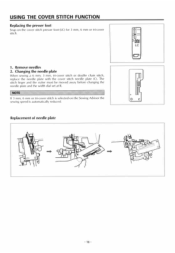
Remove needles 2, Changing the needle plate When sewing a 6 mm, 3 mm, tri•cover stitch or double chain stitch, replace the needle plate with the cover stitch needle plate IC). USING THE COVER STITCH FUNCTION Repladng the presser foot Snap on the cover stitch presser foot (LCI for 3 mm, 6 mm or tri-cover stitch. 1. The stitch finger and the cutler must be moved away before
Remove needles 2, Changing the needle plate When sewing a 6 mm, 3 mm, tri•cover stitch or double chain stitch, replace the needle plate with the cover stitch needle plate IC). USING THE COVER STITCH FUNCTION Repladng the presser foot Snap on the cover stitch presser foot (LCI for 3 mm, 6 mm or tri-cover stitch. 1. The stitch finger and the cutler must be moved away before

Users Manual - English
Page 24
FRN FCN RN * SCHMETZ 130/705H needle (SCHMETZ standard #90) should be used. - 19 - USING THE COVER STITCH FUNCTION TRI-COVER STITCH (THREE NEEDLES FOUR THREADS COVER STITCH) I 0 0 00 5 0 a Thu ugh Iron needle guide C (Green) L (Yellow) R (Red) Inserting the needles Needle hole diagram LN RN Front view 0 0 When sewing s tri-cover stitch, insert the needle into the FLN, FCN and FRN positions.
FRN FCN RN * SCHMETZ 130/705H needle (SCHMETZ standard #90) should be used. - 19 - USING THE COVER STITCH FUNCTION TRI-COVER STITCH (THREE NEEDLES FOUR THREADS COVER STITCH) I 0 0 00 5 0 a Thu ugh Iron needle guide C (Green) L (Yellow) R (Red) Inserting the needles Needle hole diagram LN RN Front view 0 0 When sewing s tri-cover stitch, insert the needle into the FLN, FCN and FRN positions.
