
Users Manual - English and Spanish
Page 3
.... Use accessories recommended by the manufacturer as it could cause the needle to obtain the correct lead. 2 Benzene, thinner, and scouring powders can damage the case and machine, and should contact your local authorized Brother dealer. Do not use a fuse approved by a person responsible for...This appliance is required around the machine needle. • Switch the machine to the symbol "O" position to turn it off when making any assemblies, the presser feet, needle, or other hot objects. • Use only neutral soaps or detergents to change without notice. • Keep fingers ...
.... Use accessories recommended by the manufacturer as it could cause the needle to obtain the correct lead. 2 Benzene, thinner, and scouring powders can damage the case and machine, and should contact your local authorized Brother dealer. Do not use a fuse approved by a person responsible for...This appliance is required around the machine needle. • Switch the machine to the symbol "O" position to turn it off when making any assemblies, the presser feet, needle, or other hot objects. • Use only neutral soaps or detergents to change without notice. • Keep fingers ...

Users Manual - English and Spanish
Page 4
... 4 Optional accessories 4 THE MAIN PARTS 5 Flat bed attachment 5 USING YOUR SEWING MACHINE 6 Connecting plugs 6 Main power and sewing light switch 7 Foot controller 7 Checking the needle 7 Replacing the needle 7 Changing the presser foot 8 THE CONTROLS 9 Pattern selection dial 9 Patterns and stitch names 9 Reverse sewing lever 10 THREADING THE MACHINE 11 Winding the bobbin 11...
... 4 Optional accessories 4 THE MAIN PARTS 5 Flat bed attachment 5 USING YOUR SEWING MACHINE 6 Connecting plugs 6 Main power and sewing light switch 7 Foot controller 7 Checking the needle 7 Replacing the needle 7 Changing the presser foot 8 THE CONTROLS 9 Pattern selection dial 9 Patterns and stitch names 9 Reverse sewing lever 10 THREADING THE MACHINE 11 Winding the bobbin 11...

Users Manual - English and Spanish
Page 8
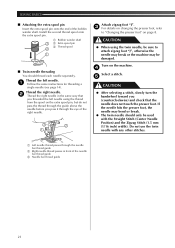
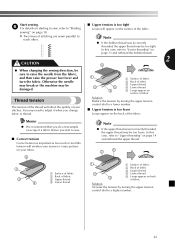
... at a low speed. CAUTION ● Do not allow pieces of cloth and dust to build up . Checking the needle The sewing needle must always be used on (toward the 'O' mark) Foot controller When you change the needle. When you take your foot off (toward the 'I' mark) 2 Turn off the foot controller, the machine will...
... at a low speed. CAUTION ● Do not allow pieces of cloth and dust to build up . Checking the needle The sewing needle must always be used on (toward the 'O' mark) Foot controller When you change the needle. When you take your foot off (toward the 'I' mark) 2 Turn off the foot controller, the machine will...

Users Manual - English and Spanish
Page 9
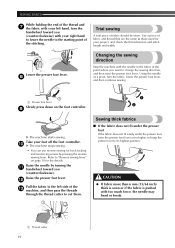
... the flat side of the machine, insert the needle until it touches the needle stopper. Turn off the machine before you have been designed to Changing the presser foot remove the needle. Raise the needle by turning the 2 handwheel toward the 5 back of the needle toward you want to change the presser foot. Using any other presser...
... the flat side of the machine, insert the needle until it touches the needle stopper. Turn off the machine before you have been designed to Changing the presser foot remove the needle. Raise the needle by turning the 2 handwheel toward the 5 back of the needle toward you want to change the presser foot. Using any other presser...
Users Manual - English and Spanish
Page 19
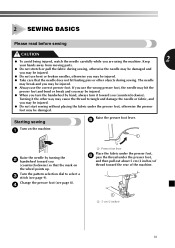
...may be injured. ● Do not use bent or broken needles, otherwise you use the correct presser foot. Starting sewing Raise the presser foot lever. 5 Turn on the wheel points up. Turning it toward you are using the machine. Change the presser foot (see page 9). If you may be injured.... ● Take care that the mark on the machine. 1 1 Raise the needle by hand, always turn it the other objects during sewing. The needle may break and you may be injured. &#...
...may be injured. ● Do not use bent or broken needles, otherwise you use the correct presser foot. Starting sewing Raise the presser foot lever. 5 Turn on the wheel points up. Turning it toward you are using the machine. Change the presser foot (see page 9). If you may be injured.... ● Take care that the mark on the machine. 1 1 Raise the needle by hand, always turn it the other objects during sewing. The needle may break and you may be injured. &#...
Users Manual - English and Spanish
Page 20
...is sewn or if the fabric is pushed with your right hand to lower the needle to the starting point of the stitching. Lower the presser foot lever. 8 Changing the sewing direction Stop the machine with the needle in the fabric at the point where you want to "Reverse sewing lever" ...on the foot controller. 9 1 2 X The machine starts sewing. Refer to change the sewing direction, and then raise the presser foot lever. Using the needle as those used for the details. Take your foot off the foot controller. 0 X The machine stops sewing. • You...
...is sewn or if the fabric is pushed with your right hand to lower the needle to the starting point of the stitching. Lower the presser foot lever. 8 Changing the sewing direction Stop the machine with the needle in the fabric at the point where you want to "Reverse sewing lever" ...on the foot controller. 9 1 2 X The machine starts sewing. Refer to change the sewing direction, and then raise the presser foot lever. Using the needle as those used for the details. Take your foot off the foot controller. 0 X The machine stops sewing. • You...
Users Manual - English and Spanish
Page 22
... presser foot, refer to attach zigzag foot "J", otherwise the needle may break or the machine may bend or break. ● The twin needle should thread each needle separately. Thread the left needle using the twin needle, be sure to "Changing the presser foot" on the machine. 4 Select a stitch. 5 CAUTION ● After selecting a stitch, slowly turn the...
... presser foot, refer to attach zigzag foot "J", otherwise the needle may break or the machine may bend or break. ● The twin needle should thread each needle separately. Thread the left needle using the twin needle, be sure to "Changing the presser foot" on the machine. 4 Select a stitch. 5 CAUTION ● After selecting a stitch, slowly turn the...
Users Manual - English and Spanish
Page 23
... on starting to sew, refer to "Starting sewing" on page 13 and rethread the bobbin thread. 2 CAUTION 2 ● When changing the sewing direction, be sure to raise the needle from the fabric, and then raise the presser foot lever and turn the fabric. In this case, refer to sew. ■.... In this case, refer to "Lower threading" on page 18. Memo ● We recommend that you do a test sample on scrap of a fabric before you change fabric or thread. 1 3 5 4 1 Surface of fabric 2 Back of fabric 3 Upper thread 4 Lower thread 5 Loops appear on surface of fabric Solution Reduce ...
... on starting to sew, refer to "Starting sewing" on page 13 and rethread the bobbin thread. 2 CAUTION 2 ● When changing the sewing direction, be sure to raise the needle from the fabric, and then raise the presser foot lever and turn the fabric. In this case, refer to sew. ■.... In this case, refer to "Lower threading" on page 18. Memo ● We recommend that you do a test sample on scrap of a fabric before you change fabric or thread. 1 3 5 4 1 Surface of fabric 2 Back of fabric 3 Upper thread 4 Lower thread 5 Loops appear on surface of fabric Solution Reduce ...

Users Manual - English and Spanish
Page 30
... a button between the 1 buttonholes and set the pattern selection dial to the Zigzag Stitch with the bobbin thread. The needle may break and you may be injured. Turn off the machine. 2 Change the foot to the wrong side of the stitching. Place the darning plate on the machine. 5 29 At a slow... speed, sew about 10 stitches. 7 CAUTION ● Make sure the needle does not hit the button during sewing. X Use scissors to...
... a button between the 1 buttonholes and set the pattern selection dial to the Zigzag Stitch with the bobbin thread. The needle may break and you may be injured. Turn off the machine. 2 Change the foot to the wrong side of the stitching. Place the darning plate on the machine. 5 29 At a slow... speed, sew about 10 stitches. 7 CAUTION ● Make sure the needle does not hit the button during sewing. X Use scissors to...
Users Manual - English and Spanish
Page 39
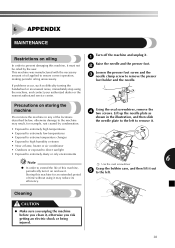
...to the left to remove it. • Exposed to extremely high temperatures • Exposed to extremely low temperatures 1 • Exposed to extreme temperature changes • Exposed to high humidity or steam • Near a flame, heater or air conditioner • Outdoors or exposed to direct sunlight •... center. If problems occur, such as shown in any of oil applied to remove the presser foot holder and the needle. Lift up the needle plate as difficulty turning the handwheel or an unusual noise, immediately stop using it , otherwise you risk getting an electric...
...to the left to remove it. • Exposed to extremely high temperatures • Exposed to extremely low temperatures 1 • Exposed to extreme temperature changes • Exposed to high humidity or steam • Near a flame, heater or air conditioner • Outdoors or exposed to direct sunlight •... center. If problems occur, such as shown in any of oil applied to remove the presser foot holder and the needle. Lift up the needle plate as difficulty turning the handwheel or an unusual noise, immediately stop using it , otherwise you risk getting an electric...
Users Manual - English and Spanish
Page 44
... 31 H Handwheel 14 L Light switch 7 Lower threading 13 M Main parts 5 Main power 7 Maintenance 38 N Narrow hemmer foot 35 Needle checking 7 combinations with fabric and thread ......... 17 replacing 7 P Pattern selection dial 9 Patterns 9 Presser foot changing 8 Q Quilting foot 34 R Race cleaning 38 Reverse sewing lever 10 S , Shell tuck stitching 25 Spool pin 11 14...
... 31 H Handwheel 14 L Light switch 7 Lower threading 13 M Main parts 5 Main power 7 Maintenance 38 N Narrow hemmer foot 35 Needle checking 7 combinations with fabric and thread ......... 17 replacing 7 P Pattern selection dial 9 Patterns 9 Presser foot changing 8 Q Quilting foot 34 R Race cleaning 38 Reverse sewing lever 10 S , Shell tuck stitching 25 Spool pin 11 14...


