Quick Setup Guide - English
Page 1
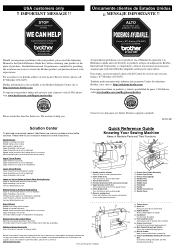
... your expectations. IMPORTANT MESSAGE !! Únicamente clientes de Estados Unidos ¡¡ MENSAJE IMPORTANTE !! Brother International Corporation is also available at our Brother Solutions Center site at www.brothermall.com. Further information is committed to providing the assistance necessary to ensure... Stitches Needle is not sharp and/or straight Needle is inserted incorrectly Needle and/or thread for fabric being used Quick Reference Guide Knowing Your Sewing Machine Name of Machine Parts and Their Functions 12 3 5 6 8 9 0 D 7 F E C 4 1 Needle position selector ...
... your expectations. IMPORTANT MESSAGE !! Únicamente clientes de Estados Unidos ¡¡ MENSAJE IMPORTANTE !! Brother International Corporation is also available at our Brother Solutions Center site at www.brothermall.com. Further information is committed to providing the assistance necessary to ensure... Stitches Needle is not sharp and/or straight Needle is inserted incorrectly Needle and/or thread for fabric being used Quick Reference Guide Knowing Your Sewing Machine Name of Machine Parts and Their Functions 12 3 5 6 8 9 0 D 7 F E C 4 1 Needle position selector ...
Quick Setup Guide - English
Page 2
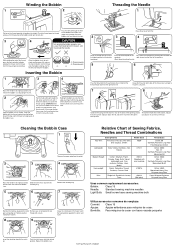
...the thread up the pin) Pass the thread through the thread guide and down the right channel on the front of Sewing Fabrics, Needles and Thread Combinations Very Thin Sewing Fabrics Fine tricot, Fine lace, Thin linen, Silk, Organza, Chiffon Needle Sizes #65/9 Lightweight Voile, Taffeta, ...Polyester Long Fiber Cotton Wrapped Polyester Polyester Long Fiber Uses common replacement accessories: Bobbin: Class 15 Needle: Standard sewing machine needles Light Bulb: Small screw base sewing machine bulb Remove the hook by pulling the latch. 2 Hold the bobbin case as shown. Push the...
...the thread up the pin) Pass the thread through the thread guide and down the right channel on the front of Sewing Fabrics, Needles and Thread Combinations Very Thin Sewing Fabrics Fine tricot, Fine lace, Thin linen, Silk, Organza, Chiffon Needle Sizes #65/9 Lightweight Voile, Taffeta, ...Polyester Long Fiber Cotton Wrapped Polyester Polyester Long Fiber Uses common replacement accessories: Bobbin: Class 15 Needle: Standard sewing machine needles Light Bulb: Small screw base sewing machine bulb Remove the hook by pulling the latch. 2 Hold the bobbin case as shown. Push the...
Users Manual - English and Spanish
Page 2
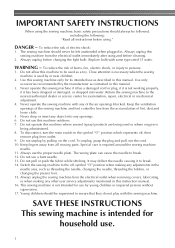
... or mechanical adjustment. 4. Replace bulb with any other user service adjustments mentioned in this machine outdoors. 7. Close attention is necessary when the sewing machine is used or where oxygen is not working properly, if it to persons: 1. Do not pull or push the fabric while stitching.... are being used by pulling on the cord. Keep the ventilation openings of lint, dust and loose cloth. 5. Do not operate this sewing machine only for household use as threading the needle, changing the needle, threading the bobbin, or changing the presser foot. 15. IMPORTANT ...
... or mechanical adjustment. 4. Replace bulb with any other user service adjustments mentioned in this machine outdoors. 7. Close attention is necessary when the sewing machine is used or where oxygen is not working properly, if it to persons: 1. Do not pull or push the fabric while stitching.... are being used by pulling on the cord. Keep the ventilation openings of lint, dust and loose cloth. 5. Do not operate this sewing machine only for household use as threading the needle, changing the needle, threading the bobbin, or changing the presser foot. 15. IMPORTANT ...

Users Manual - English and Spanish
Page 3
... supplied with this machine, avoid direct sunlight and high humidity locations. If the problem persists, please consult your eye on the needle while sewing. carrying the mark, rating as marked on the foot controller. 4. PLEASE READ BEFORE USING THIS MACHINE For safe operation 1. Do not... you should contact your authorized dealer to inspect and adjust the machine yourself. Children should never be supervised to keep your local authorized Brother dealer. Do not store anything on plug. • Always replace the fuse cover. Remember to clean the case. FOR USERS IN...
... supplied with this machine, avoid direct sunlight and high humidity locations. If the problem persists, please consult your eye on the needle while sewing. carrying the mark, rating as marked on the foot controller. 4. PLEASE READ BEFORE USING THIS MACHINE For safe operation 1. Do not... you should contact your authorized dealer to inspect and adjust the machine yourself. Children should never be supervised to keep your local authorized Brother dealer. Do not store anything on plug. • Always replace the fuse cover. Remember to clean the case. FOR USERS IN...
Users Manual - English and Spanish
Page 4
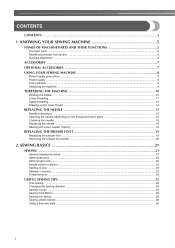
...to sew ...23 Sewing in reverse ...23 Thread tension ...24 USEFUL SEWING TIPS ...25 Trial sewing ...25 Changing the sewing direction ...25 Sewing curves ...25 Sewing thick fabrics ...25 Sewing thin fabrics ...26 Sewing stretch fabrics ...26 Using a free-arm style ...26 3 KNOWING YOUR SEWING MACHINE...FUNCTIONS 5 The main parts ...5 Needle and presser foot section ...6 Flat bed attachment ...6 ACCESSORIES ...7 OPTIONAL ACCESSORIES 7 USING YOUR SEWING MACHINE 8 Power supply precautions ...8 Power supply ...8 Foot controller ...9 Steadying the machine ...9 THREADING THE MACHINE 10 Winding the ...
...to sew ...23 Sewing in reverse ...23 Thread tension ...24 USEFUL SEWING TIPS ...25 Trial sewing ...25 Changing the sewing direction ...25 Sewing curves ...25 Sewing thick fabrics ...25 Sewing thin fabrics ...26 Sewing stretch fabrics ...26 Using a free-arm style ...26 3 KNOWING YOUR SEWING MACHINE...FUNCTIONS 5 The main parts ...5 Needle and presser foot section ...6 Flat bed attachment ...6 ACCESSORIES ...7 OPTIONAL ACCESSORIES 7 USING YOUR SEWING MACHINE 8 Power supply precautions ...8 Power supply ...8 Foot controller ...9 Steadying the machine ...9 THREADING THE MACHINE 10 Winding the ...

Users Manual - English and Spanish
Page 5
... 4 UTILITY STITCHES 27 USEFUL STITCHES ...27 Zigzag stitches ...27 Basic stitching ...27 Blind hem stitching ...28 Darning ...29 Over edge stitch ...29 BUTTONHOLE SEWING/ BUTTON SEWING 30 Buttonhole sewing ...30 Button sewing ...31 ZIPPER INSERTION ...33 APPLIQUÉ, MONOGRAMMING AND EMBROIDERING 34 Appliqués ...34 Monogramming and embroidering ...34 DECORATIVE STITCHING 36 Gathering ...36...
... 4 UTILITY STITCHES 27 USEFUL STITCHES ...27 Zigzag stitches ...27 Basic stitching ...27 Blind hem stitching ...28 Darning ...29 Over edge stitch ...29 BUTTONHOLE SEWING/ BUTTON SEWING 30 Buttonhole sewing ...30 Button sewing ...31 ZIPPER INSERTION ...33 APPLIQUÉ, MONOGRAMMING AND EMBROIDERING 34 Appliqués ...34 Monogramming and embroidering ...34 DECORATIVE STITCHING 36 Gathering ...36...
Users Manual - English and Spanish
Page 6
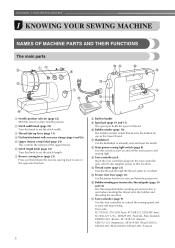
... i Spool pin (page 10 and 13) The spool pin holds the spool of the upper thread. Part code; g Reverse sewing lever (page 23) Press and hold down the reverse sewing lever to cut them. h Built-in the opposite direction. XC7359-021 (110/120V Area), XC7438-321 (220/240V Area), ... The thread guide/bobbin winding pre-tension disc is used when winding the thread onto the bobbin and threading the machine. KNOWING YOUR SEWING MACHINE 1 KNOWING YOUR SEWING MACHINE NAMES OF MACHINE PARTS AND THEIR FUNCTIONS The main parts a Needle position selector (page 22) Shift this lever to set the...
... i Spool pin (page 10 and 13) The spool pin holds the spool of the upper thread. Part code; g Reverse sewing lever (page 23) Press and hold down the reverse sewing lever to cut them. h Built-in the opposite direction. XC7359-021 (110/120V Area), XC7438-321 (220/240V Area), ... The thread guide/bobbin winding pre-tension disc is used when winding the thread onto the bobbin and threading the machine. KNOWING YOUR SEWING MACHINE 1 KNOWING YOUR SEWING MACHINE NAMES OF MACHINE PARTS AND THEIR FUNCTIONS The main parts a Needle position selector (page 22) Shift this lever to set the...

Users Manual - English and Spanish
Page 7
Attach the appropriate presser foot for sewing straight seams. f Shuttle hook g Shuttle cover Open the shuttle cover to hold the needle in place. h Bobbin case i Needle j Needle bar thread guide k Needle clamp ... out, and be lost or damaged. 6 c Presser foot (Zigzag) The presser foot applies pressure consistently on the fabric as the sewing takes place. If the accessories are stored in the sewing direction. Needle and presser foot section Flat bed attachment The accessories are not in the bag, and then store the bag...
Attach the appropriate presser foot for sewing straight seams. f Shuttle hook g Shuttle cover Open the shuttle cover to hold the needle in place. h Bobbin case i Needle j Needle bar thread guide k Needle clamp ... out, and be lost or damaged. 6 c Presser foot (Zigzag) The presser foot applies pressure consistently on the fabric as the sewing takes place. If the accessories are stored in the sewing direction. Needle and presser foot section Flat bed attachment The accessories are not in the bag, and then store the bag...
Users Manual - English and Spanish
Page 8
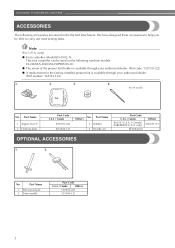
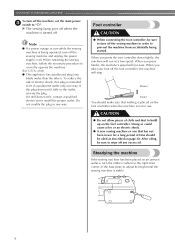
... U.S.A. No. only) ● Foot controller: Model KD-1902, N This foot controller can be able to carry out most sewing tasks. KNOWING YOUR SEWING MACHINE ACCESSORIES The following machine models: LS-2000/LS-2020/LS2250PRW/LS-30. ● The screw of the presser foot holder is available through your authorized dealer. (Part code: 132730...
... U.S.A. No. only) ● Foot controller: Model KD-1902, N This foot controller can be able to carry out most sewing tasks. KNOWING YOUR SEWING MACHINE ACCESSORIES The following machine models: LS-2000/LS-2020/LS2250PRW/LS-30. ● The screw of the presser foot holder is available through your authorized dealer. (Part code: 132730...
Users Manual - English and Spanish
Page 9
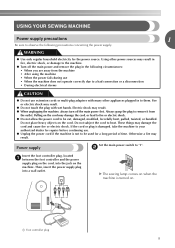
These things may result. X The sewing lamp comes on the cord may result. ● Do not touch the plug with many other appliances plugged in to them. Pulling on when the ... concerning the power supply. b Insert the foot controller plug, located a between the foot controller and the power supply plug on . 1 a Foot controller plug 8 USING YOUR SEWING MACHINE Power supply precautions 1 Be sure to observe the following circumstances: • When you are away from the outlet. Power supply Set the main power...
These things may result. X The sewing lamp comes on the cord may result. ● Do not touch the plug with many other appliances plugged in to them. Pulling on when the ... concerning the power supply. b Insert the foot controller plug, located a between the foot controller and the power supply plug on . 1 a Foot controller plug 8 USING YOUR SEWING MACHINE Power supply precautions 1 Be sure to observe the following circumstances: • When you are away from the outlet. Power supply Set the main power...
Users Manual - English and Spanish
Page 10
...; When connecting the foot controller, be sure to prevent the machine from accidentally being operated, turn off the sewing machine in any excess oil. Steadying the machine If the sewing machine has been placed on the foot controller. If it still does not fit, contact a qualified electrician to...off any way. If the plug does not fit fully in a polarized outlet only one way. When you take your foot off . X The sewing lamp goes off when the machine is being started. When you press the foot controller down lightly, the machine will increase. Note ● If ...
...; When connecting the foot controller, be sure to prevent the machine from accidentally being operated, turn off the sewing machine in any excess oil. Steadying the machine If the sewing machine has been placed on the foot controller. If it still does not fit, contact a qualified electrician to...off any way. If the plug does not fit fully in a polarized outlet only one way. When you take your foot off . X The sewing lamp goes off when the machine is being started. When you press the foot controller down lightly, the machine will increase. Note ● If ...
Users Manual - English and Spanish
Page 11
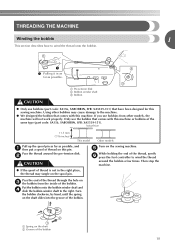
... the spring on the shaft b Groove of the bobbin 10 If you use bobbins (part code: SA156, SABOBBIN, SFB: XA5539-151) that comes with this sewing machine. a Spring on the shaft slides into the groove of the bobbin. a Pre-tension disk b Bobbin winder shaft c Bobbin CAUTION ● Only use ...thread around the pre-tension disk. Pass the end of the thread through the hole on c the bobbin from other bobbins may tangle on the sewing machine. Pass the thread around the bobbin a few times. Put the bobbin onto the bobbin winder shaft and d slide the bobbin winder shaft to...
... the spring on the shaft b Groove of the bobbin 10 If you use bobbins (part code: SA156, SABOBBIN, SFB: XA5539-151) that comes with this sewing machine. a Spring on the shaft slides into the groove of the bobbin. a Pre-tension disk b Bobbin winder shaft c Bobbin CAUTION ● Only use ...thread around the pre-tension disk. Pass the end of the thread through the hole on c the bobbin from other bobbins may tangle on the sewing machine. Pass the thread around the bobbin a few times. Put the bobbin onto the bobbin winder shaft and d slide the bobbin winder shaft to...
Users Manual - English and Spanish
Page 12
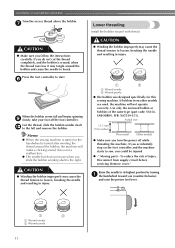
... runs low it may tangle around the bobbin, the machine will not operate correctly. If bobbins from supply circuit before servicing. KNOWING YOUR SEWING MACHINE Trim the excess thread above the bobbin. g Lower threading Install the bobbin wound with thread. h When the bobbin seems full and...turning a the handwheel toward you (counterclockwise) and raise the presser foot lever. 1 2 a Wound evenly b Wound poorly 11 Raise the needle to sew, you slide the bobbin winding shaft to start. If you do not cut the thread completely, and the bobbin is not a malfunction. ● ...
... runs low it may tangle around the bobbin, the machine will not operate correctly. If bobbins from supply circuit before servicing. KNOWING YOUR SEWING MACHINE Trim the excess thread above the bobbin. g Lower threading Install the bobbin wound with thread. h When the bobbin seems full and...turning a the handwheel toward you (counterclockwise) and raise the presser foot lever. 1 2 a Wound evenly b Wound poorly 11 Raise the needle to sew, you slide the bobbin winding shaft to start. If you do not cut the thread completely, and the bobbin is not a malfunction. ● ...

Users Manual - English and Spanish
Page 13
... wrong direction, it will fall out from a full bobbin, and then insert the bobbin into the machine. g CAUTION ● Make sure that were designed to sew. 12 If it is properly placed back into the bobbin case. • Only use bobbins that the bobbin case is incorrectly installed, it may cause...
... wrong direction, it will fall out from a full bobbin, and then insert the bobbin into the machine. g CAUTION ● Make sure that were designed to sew. 12 If it is properly placed back into the bobbin case. • Only use bobbins that the bobbin case is incorrectly installed, it may cause...
Users Manual - English and Spanish
Page 14
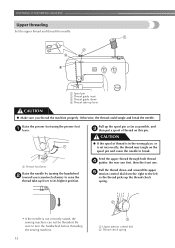
...up the spool pin as far as possible, and c then put a spool of thread is in the wrong place, or is not correctly raised, the sewing machine can not be threaded. Raise the presser foot using the presser foot a lever. a Presser foot lever Raise the needle by turning the handwheel b... toward you (counterclockwise) to raise the thread take -up lever to turn the handwheel before threading the sewing machine. 13 a Upper tension control dial b Thread check spring KNOWING YOUR SEWING MACHINE Upper threading Set the upper thread and thread the needle.
...up the spool pin as far as possible, and c then put a spool of thread is in the wrong place, or is not correctly raised, the sewing machine can not be threaded. Raise the presser foot using the presser foot a lever. a Presser foot lever Raise the needle by turning the handwheel b... toward you (counterclockwise) to raise the thread take -up lever to turn the handwheel before threading the sewing machine. 13 a Upper tension control dial b Thread check spring KNOWING YOUR SEWING MACHINE Upper threading Set the upper thread and thread the needle.

Users Manual - English and Spanish
Page 15
... the tension discs. Pull on the upper thread to its highest position by holding the thread in your right hand. Make sure you may cause sewing problems. a Upper thread b Lower thread Pull out about 5 cm (2 inches) of the upper thread, b raise the needle to draw up lever before you feed the...
... the tension discs. Pull on the upper thread to its highest position by holding the thread in your right hand. Make sure you may cause sewing problems. a Upper thread b Lower thread Pull out about 5 cm (2 inches) of the upper thread, b raise the needle to draw up lever before you feed the...
Users Manual - English and Spanish
Page 16
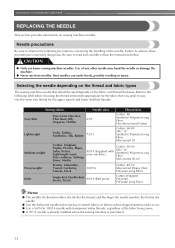
... or fabrics where skipped stitches easily occur. ● Use a 90/14 to read and carefully follow the instructions below. Failure to sew. CAUTION ● Only use bent needles. Refer to the following precautions concerning the handling of any other needle may bend the needle ... Jersey, Tricot 90/14 (Ball point) Cotton Wrapped Polyester Polyester Long Fiber Memo ● The smaller the thread number, the thicker the thread; Sewing fabrics Needle sizes Thread sizes Very thin Fine tricot, Fine lace, Thin linen, Silk, 65/9 Organza, Chiffon Cotton: 80 Synthetic/ Polyester Long Fiber...
... or fabrics where skipped stitches easily occur. ● Use a 90/14 to read and carefully follow the instructions below. Failure to sew. CAUTION ● Only use bent needles. Refer to the following precautions concerning the handling of any other needle may bend the needle ... Jersey, Tricot 90/14 (Ball point) Cotton Wrapped Polyester Polyester Long Fiber Memo ● The smaller the thread number, the thicker the thread; Sewing fabrics Needle sizes Thread sizes Very thin Fine tricot, Fine lace, Thin linen, Silk, 65/9 Organza, Chiffon Cotton: 80 Synthetic/ Polyester Long Fiber...
Users Manual - English and Spanish
Page 17
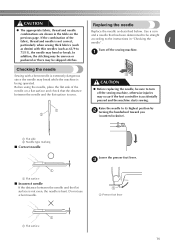
... and the flat surface is not even, the needle is even. 1 2 Replacing the needle Replace the needle as 65/9 to turn off the sewing machine. a CAUTION ● Before replacing the needle, be uneven or puckered or there may occur if the foot controller is being operated. Lower ... lever. In addition, the stitching may be sure to 75/11), the needle may break while the machine is accidentally pressed and the machine starts sewing. a Flat side b Needle type marking ■ Correct needle 1 a Flat surface ■ Incorrect needle If the distance between the needle and the flat...
... and the flat surface is not even, the needle is even. 1 2 Replacing the needle Replace the needle as 65/9 to turn off the sewing machine. a CAUTION ● Before replacing the needle, be uneven or puckered or there may occur if the foot controller is being operated. Lower ... lever. In addition, the stitching may be sure to 75/11), the needle may break while the machine is accidentally pressed and the machine starts sewing. a Flat side b Needle type marking ■ Correct needle 1 a Flat surface ■ Incorrect needle If the distance between the needle and the flat...
Users Manual - English and Spanish
Page 18
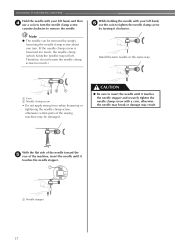
... same way. CAUTION ● Be sure to insert the needle until it clockwise. With the flat side of the needle toward the e rear of the sewing machine may fall off. Therefore, do not loosen the needle clamp screw too much , the needle clamp (which holds the needle) may be removed by... turning it touches the needle stopper. a Needle stopper 17 Note ● The needle can be damaged. KNOWING YOUR SEWING MACHINE Hold the needle with your left hand, and then d use the coin to remove the needle.
... same way. CAUTION ● Be sure to insert the needle until it clockwise. With the flat side of the needle toward the e rear of the sewing machine may fall off. Therefore, do not loosen the needle clamp screw too much , the needle clamp (which holds the needle) may be removed by... turning it touches the needle stopper. a Needle stopper 17 Note ● The needle can be damaged. KNOWING YOUR SEWING MACHINE Hold the needle with your left hand, and then d use the coin to remove the needle.

Users Manual - English and Spanish
Page 19
Sewing with a twin needle (Option) We have been made for this machine (part code: 131096-121). a First ...Use only twin needles that the needle does not touch the presser foot. You can sew with bent needles. The needle could break, and damage the machine. ● Do not sew with the optional twin needle and two top threads. b Put the extra spool pin ... fabric. If the fabric is turned while the needle is lowered, the needle may bend or break. ● When changing the sewing direction, be sure to back. a Attach the twin needle in the hole on the top of less than 3 on the stitch...
Sewing with a twin needle (Option) We have been made for this machine (part code: 131096-121). a First ...Use only twin needles that the needle does not touch the presser foot. You can sew with bent needles. The needle could break, and damage the machine. ● Do not sew with the optional twin needle and two top threads. b Put the extra spool pin ... fabric. If the fabric is turned while the needle is lowered, the needle may bend or break. ● When changing the sewing direction, be sure to back. a Attach the twin needle in the hole on the top of less than 3 on the stitch...


