Quick Setup Guide - English
Page 1
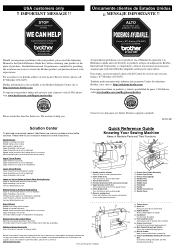
... to set the stitch length 7 Reverse sewing lever Press and hold down the reverse sewing lever to sew in the opposite direction A B G 8 Presser Foot Holder Assembly 9 Presser Foot Screw 0 Presser Foot (Zigzag) A Needle Plate B Shuttle Hook C Bobbin Case D Feed Dogs E Needle F Needle Clamp Screw G Shuttle Cover Skips Stitches Needle is not sharp and/or straight Needle is inserted incorrectly Needle and/or thread for fabric being sewn is not correct Upper threading is not correct Lint and/or debris caught on winder K Handwheel Use for lower threading L Foot Controller Jack H Insert...
... to set the stitch length 7 Reverse sewing lever Press and hold down the reverse sewing lever to sew in the opposite direction A B G 8 Presser Foot Holder Assembly 9 Presser Foot Screw 0 Presser Foot (Zigzag) A Needle Plate B Shuttle Hook C Bobbin Case D Feed Dogs E Needle F Needle Clamp Screw G Shuttle Cover Skips Stitches Needle is not sharp and/or straight Needle is inserted incorrectly Needle and/or thread for fabric being sewn is not correct Upper threading is not correct Lint and/or debris caught on winder K Handwheel Use for lower threading L Foot Controller Jack H Insert...
Quick Setup Guide - English
Page 2
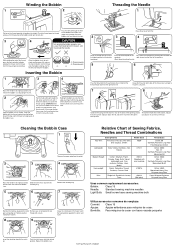
... Uses common replacement accessories: Bobbin: Class 15 Needle: Standard sewing machine needles Light Bulb: Small screw base sewing machine bulb Remove the hook by pulling the latch. 2 Hold the bobbin case as shown. Utiliza accesorios comunes de remplazo: Carretel: Clase 15 Agujas: Agujas estándares para máquina de coser. Cut the thread the foot controller. Inserting the Bobbin 1 Wound evenly 2 Wound poorly 1 3 4 Raise the needle to ensure it enters the delivery eye under the tension spring...
... Uses common replacement accessories: Bobbin: Class 15 Needle: Standard sewing machine needles Light Bulb: Small screw base sewing machine bulb Remove the hook by pulling the latch. 2 Hold the bobbin case as shown. Utiliza accesorios comunes de remplazo: Carretel: Clase 15 Agujas: Agujas estándares para máquina de coser. Cut the thread the foot controller. Inserting the Bobbin 1 Wound evenly 2 Wound poorly 1 3 4 Raise the needle to ensure it enters the delivery eye under the tension spring...
Users Manual - English and Spanish
Page 2
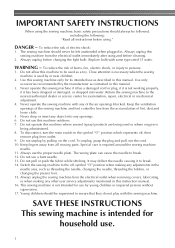
... electrical outlet immediately after using and before changing the light bulb. Special care is being used as threading the needle, changing the needle, threading the bobbin, or changing the presser foot. 15. Always unplug before cleaning. 2. Keep the ventilation openings of the sewing machine and foot controller free from all instructions before using." It may deflect the needle causing it has been dropped or damaged, or dropped into any other user service adjustments mentioned in this sewing machine from outlet. 9. To...
... electrical outlet immediately after using and before changing the light bulb. Special care is being used as threading the needle, changing the needle, threading the bobbin, or changing the presser foot. 15. Always unplug before cleaning. 2. Keep the ventilation openings of the sewing machine and foot controller free from all instructions before using." It may deflect the needle causing it has been dropped or damaged, or dropped into any other user service adjustments mentioned in this sewing machine from outlet. 9. To...

Users Manual - English and Spanish
Page 3
... soaps or detergents to obtain the correct lead. For repair or adjustment In the event a malfunction occurs or adjustment is completed • Replacing or removing the needle or any assemblies, the presser feet, needle, or other parts • A power failure occurs during use extension cords. Children should be used. 3. Remember to BS 1362, i.e. CONGRATULATIONS ON CHOOSING OUR MACHINE To fully enjoy all the features, we suggest that...
... soaps or detergents to obtain the correct lead. For repair or adjustment In the event a malfunction occurs or adjustment is completed • Replacing or removing the needle or any assemblies, the presser feet, needle, or other parts • A power failure occurs during use extension cords. Children should be used. 3. Remember to BS 1362, i.e. CONGRATULATIONS ON CHOOSING OUR MACHINE To fully enjoy all the features, we suggest that...
Users Manual - English and Spanish
Page 4
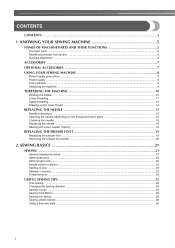
... the needle ...16 Sewing with a twin needle (Option) ...18 REPLACING THE PRESSER FOOT 19 Replacing the presser foot ...19 Removing the presser foot holder ...20 2. CONTENTS CONTENTS ...3 1. SEWING BASICS 21 SEWING ...21 General sewing procedure ...21 Stitch width knob ...22 Stitch length knob ...22 Needle position selector ...22 Starting to sew ...23 Sewing in reverse ...23 Thread tension ...24 USEFUL SEWING TIPS ...25 Trial sewing ...25 Changing the sewing direction ...25 Sewing curves ...25 Sewing thick fabrics ...25 Sewing thin fabrics ...26 Sewing stretch fabrics ...26 Using a free-arm...
... the needle ...16 Sewing with a twin needle (Option) ...18 REPLACING THE PRESSER FOOT 19 Replacing the presser foot ...19 Removing the presser foot holder ...20 2. CONTENTS CONTENTS ...3 1. SEWING BASICS 21 SEWING ...21 General sewing procedure ...21 Stitch width knob ...22 Stitch length knob ...22 Needle position selector ...22 Starting to sew ...23 Sewing in reverse ...23 Thread tension ...24 USEFUL SEWING TIPS ...25 Trial sewing ...25 Changing the sewing direction ...25 Sewing curves ...25 Sewing thick fabrics ...25 Sewing thin fabrics ...26 Sewing stretch fabrics ...26 Using a free-arm...
Users Manual - English and Spanish
Page 6
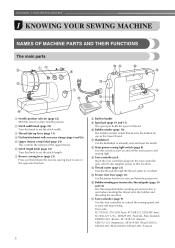
... lower the needle. j Bobbin winder (page 10) The bobbin winder winds thread onto the bobbin for use as the lower thread. k Handwheel Use the handwheel to set the stitch width. l Main power/sewing light switch (page 8) Use this switch to cut them. n Thread cutter (page 23) Pass the threads through the thread cutter to turn on and off the main power and sewing light. q Foot controller (page 9) Use the foot controller to control the sewing speed and to raise and lower the presser foot. o Presser foot lever (page 13) Use the presser foot lever to start...
... lower the needle. j Bobbin winder (page 10) The bobbin winder winds thread onto the bobbin for use as the lower thread. k Handwheel Use the handwheel to set the stitch width. l Main power/sewing light switch (page 8) Use this switch to cut them. n Thread cutter (page 23) Pass the threads through the thread cutter to turn on and off the main power and sewing light. q Foot controller (page 9) Use the foot controller to control the sewing speed and to raise and lower the presser foot. o Presser foot lever (page 13) Use the presser foot lever to start...

Users Manual - English and Spanish
Page 7
... pressure consistently on the fabric as the sewing takes place. b Presser foot screw Use the presser foot screw to hold the presser foot holder assembly in place. Attach the appropriate presser foot for sewing straight seams. f Shuttle hook g Shuttle cover Open the shuttle cover to remove it. d Feed dogs The feed dogs feed the fabric in the bag, and then store the bag inside the flat bed attachment. a Presser foot holder assembly The presser foot is marked with guides for the selected stitching. e Needle plate The needle plate is installed onto the presser foot holder...
... pressure consistently on the fabric as the sewing takes place. b Presser foot screw Use the presser foot screw to hold the presser foot holder assembly in place. Attach the appropriate presser foot for sewing straight seams. f Shuttle hook g Shuttle cover Open the shuttle cover to remove it. d Feed dogs The feed dogs feed the fabric in the bag, and then store the bag inside the flat bed attachment. a Presser foot holder assembly The presser foot is marked with guides for the selected stitching. e Needle plate The needle plate is installed onto the presser foot holder...
Users Manual - English and Spanish
Page 8
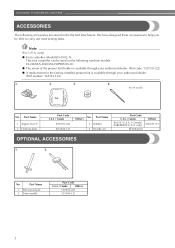
... flat bed attachment. Part Name 3 Bobbin 4 Needle set Part Code U.S.A. / Canada SA156 (U.S.A. / Canada) SABOBBIN (U.S.A. No. Part Name 1 Extra spool pin 2 Twin needle Part Code U.S.A. / Canada Others 130920-021 131096-121 7 KNOWING YOUR SEWING MACHINE ACCESSORIES The following machine models: LS-2000/LS-2020/LS2250PRW/LS-30. ● The screw of the presser foot holder is available through your authorized dealer. (Part code: 132730-122) ● A replacement for the factory-installed presser foot is available through your authorized dealer. (Part number: 138135-122...
... flat bed attachment. Part Name 3 Bobbin 4 Needle set Part Code U.S.A. / Canada SA156 (U.S.A. / Canada) SABOBBIN (U.S.A. No. Part Name 1 Extra spool pin 2 Twin needle Part Code U.S.A. / Canada Others 130920-021 131096-121 7 KNOWING YOUR SEWING MACHINE ACCESSORIES The following machine models: LS-2000/LS-2020/LS2250PRW/LS-30. ● The screw of the presser foot holder is available through your authorized dealer. (Part code: 132730-122) ● A replacement for the factory-installed presser foot is available through your authorized dealer. (Part number: 138135-122...
Users Manual - English and Spanish
Page 12
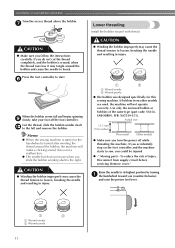
..., breaking the needle and resulting in injury. 1 2 a Wound evenly b Wound poorly ● The bobbin was designed specifically for this is not a malfunction. ● The needle bar does not move when you turn the power off the foot controller. Cut the thread, slide the bobbin winder shaft j to start. g Lower threading Install the bobbin wound with thread. CAUTION ● Winding the bobbin improperly may tangle around the bobbin, the machine will not operate correctly. this sewing machine. Use...
..., breaking the needle and resulting in injury. 1 2 a Wound evenly b Wound poorly ● The bobbin was designed specifically for this is not a malfunction. ● The needle bar does not move when you turn the power off the foot controller. Cut the thread, slide the bobbin winder shaft j to start. g Lower threading Install the bobbin wound with thread. CAUTION ● Winding the bobbin improperly may tangle around the bobbin, the machine will not operate correctly. this sewing machine. Use...

Users Manual - English and Spanish
Page 15
... feed the thread you may cause sewing problems. a Upper thread b Lower thread Pull out about 5 cm (2 inches) of the machine under the presser foot. a Needle bar thread guide Thread the needle from right to back and pull i out about 15 cm (6 inches) of both d threads and pull them toward you raise the presser foot lever and the thread take -up lever Put the thread behind the needle bar thread guide by turning the handwheel toward the back of thread. a Upper thread b Lower thread...
... feed the thread you may cause sewing problems. a Upper thread b Lower thread Pull out about 5 cm (2 inches) of the machine under the presser foot. a Needle bar thread guide Thread the needle from right to back and pull i out about 15 cm (6 inches) of both d threads and pull them toward you raise the presser foot lever and the thread take -up lever Put the thread behind the needle bar thread guide by turning the handwheel toward the back of thread. a Upper thread b Lower thread...

Users Manual - English and Spanish
Page 19
... threading the machine to the thread take -up lever. Put the second spool of the needle bar thread guide. The path for threading the machine to back. See page 13 for more details. c Needle bar thread guide 18 a Left needle thread passes through the needle bar thread guide. Other needles could break and injure you. ● Use the zigzag presser foot. ● Use a setting of less than 3 on the top of thread for making decorative stitches. 1 CAUTION ● Use only twin needles that have designed your machine...
... threading the machine to the thread take -up lever. Put the second spool of the needle bar thread guide. The path for threading the machine to back. See page 13 for more details. c Needle bar thread guide 18 a Left needle thread passes through the needle bar thread guide. Other needles could break and injure you. ● Use the zigzag presser foot. ● Use a setting of less than 3 on the top of thread for making decorative stitches. 1 CAUTION ● Use only twin needles that have designed your machine...
Users Manual - English and Spanish
Page 23
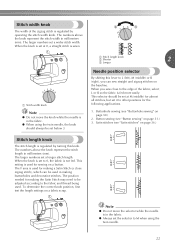
... turning this lever to L (left), M (middle) or R (right), you sew close zigzag stitch), which can sew straight and zigzag stitches on the baseline. Button sewing (see "Buttonhole sewing" on a fabric scrap. To determine the correct knob position, first test the length settings on page 30.) 2. When you can be set the selector to M when using the twin needle, the knob should be adjusted according to the fabric and thread being used for making a Satin Stitch (a close to...
... turning this lever to L (left), M (middle) or R (right), you sew close zigzag stitch), which can sew straight and zigzag stitches on the baseline. Button sewing (see "Buttonhole sewing" on a fabric scrap. To determine the correct knob position, first test the length settings on page 30.) 2. When you can be set the selector to M when using the twin needle, the knob should be adjusted according to the fabric and thread being used for making a Satin Stitch (a close to...
Users Manual - English and Spanish
Page 24
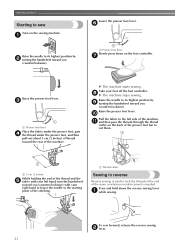
... the thread and the e fabric with your foot off the foot controller. Press and hold down on the sewing machine. Raise the needle to lock the threads at the end of the machine. To sew forward, release the reverse sewing b lever. 23 Take your right hand to lower the needle to the starting point of the presser foot bar to its highest position by b turning the handwheel toward the rear of the seam...
... the thread and the e fabric with your foot off the foot controller. Press and hold down on the sewing machine. Raise the needle to lock the threads at the end of the machine. To sew forward, release the reverse sewing b lever. 23 Take your right hand to lower the needle to the starting point of the presser foot bar to its highest position by b turning the handwheel toward the rear of the seam...
Users Manual - English and Spanish
Page 25
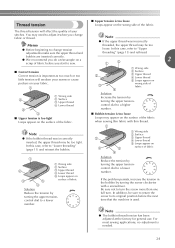
... threaded, the upper thread may need to adjust it when you change tension adjustments make sure the upper thread and bobbin are inserted correctly. ● We recommend you start to sew. For most sewing applications, no adjustment is needed. 24 Thread tension ■ Upper tension is too loose Loops appear on the wrong side of fabric 4 Solution Reduce the tension by turning the upper tensioncontrol dial to a lower number. Note ● The bobbin thread tension has been adjusted at the factory for general use...
... threaded, the upper thread may need to adjust it when you change tension adjustments make sure the upper thread and bobbin are inserted correctly. ● We recommend you start to sew. For most sewing applications, no adjustment is needed. 24 Thread tension ■ Upper tension is too loose Loops appear on the wrong side of fabric 4 Solution Reduce the tension by turning the upper tensioncontrol dial to a lower number. Note ● The bobbin thread tension has been adjusted at the factory for general use...

Users Manual - English and Spanish
Page 28
... touch the presser foot. b When sewing is set at M.) Presser foot Zigzag Needle Single or Twin Baste or pin together the fabric pieces. They are used for sewing stretch materials. If the needle hits the presser foot, the needle may bend or break. ■ Satin stitch When the stitch length is set in one operation. UTILITY STITCHES 3 UTILITY STITCHES USEFUL STITCHES Zigzag stitches You can be made on a fabric scrap before sewing on your project. • For details, refer to "Starting to join together seams and...
... touch the presser foot. b When sewing is set at M.) Presser foot Zigzag Needle Single or Twin Baste or pin together the fabric pieces. They are used for sewing stretch materials. If the needle hits the presser foot, the needle may bend or break. ■ Satin stitch When the stitch length is set in one operation. UTILITY STITCHES 3 UTILITY STITCHES USEFUL STITCHES Zigzag stitches You can be made on a fabric scrap before sewing on your project. • For details, refer to "Starting to join together seams and...

Users Manual - English and Spanish
Page 33
... sewing, be attached. Place the darning plate on the needle plate as previously explained. Use scissors to check that the needle does not touch the button, otherwise the needle may bend or break. After sewing about 10 stitches, remove the b fabric from the machine leaving a longer upper thread (about 10 seconds at a low speed, press and hold down the reverse sewing lever to form a thread shank. Measure the distance between the holes in the a button to...
... sewing, be attached. Place the darning plate on the needle plate as previously explained. Use scissors to check that the needle does not touch the button, otherwise the needle may bend or break. After sewing about 10 stitches, remove the b fabric from the machine leaving a longer upper thread (about 10 seconds at a low speed, press and hold down the reverse sewing lever to form a thread shank. Measure the distance between the holes in the a button to...
Users Manual - English and Spanish
Page 43
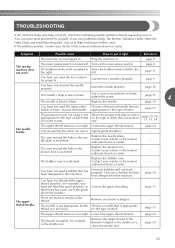
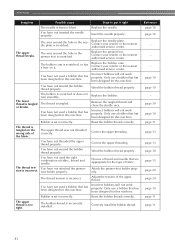
... service center. Loosen the upper thread tension. Remove the tangle thread. The bobbin winder shaft is tangled in the shuttle race. page 8 page 11 You have not fitted the spool properly, or the thread has come out of stitch that you have not used a bobbin that is tangled, for this machine. Lightly guide the fabric. Turn on the main power switch. Attach the presser foot that has been designed for example, in the shuttle race, clean...
... service center. Loosen the upper thread tension. Remove the tangle thread. The bobbin winder shaft is tangled in the shuttle race. page 8 page 11 You have not fitted the spool properly, or the thread has come out of stitch that you have not used a bobbin that is tangled, for this machine. Lightly guide the fabric. Turn on the main power switch. Attach the presser foot that has been designed for example, in the shuttle race, clean...
Users Manual - English and Spanish
Page 44
.... Replace the presser foot. Only use a bobbin that has been designed for this machine. The thread is incorrectly installed. Incorrect bobbins will not work properly. Adjust the tension of fabric, thread and needle. Reference page 16 page 16 - - - You have not threaded the upper thread properly. Contact your retailer or the nearest authorised service center. The bobbin case is scratched. Wind the bobbin thread properly. You have not used a bobbin that has been designed for the type of the fabric. Reset...
.... Replace the presser foot. Only use a bobbin that has been designed for this machine. The thread is incorrectly installed. Incorrect bobbins will not work properly. Adjust the tension of fabric, thread and needle. Reference page 16 page 16 - - - You have not threaded the upper thread properly. Contact your retailer or the nearest authorised service center. The bobbin case is scratched. Wind the bobbin thread properly. You have not used a bobbin that has been designed for the type of the fabric. Reset...
Users Manual - English and Spanish
Page 45
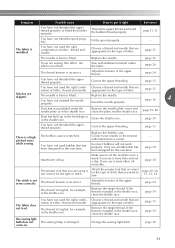
... this machine. You have not used bobbin that are sewing thin fabric, the stitch is tangled in the shuttle race. Remove the needle plate cover and clean the plate and the shuttle race. page 26 The thread tension is scratched. page 24 The thread is tangled, for example, in the shuttle race. Remove the tangle thread. The bobbin case is incorrect. The thread is tangled, for example, in the shuttle race. Change the sewing light bulb. If the thread...
... this machine. You have not used bobbin that are sewing thin fabric, the stitch is tangled in the shuttle race. Remove the needle plate cover and clean the plate and the shuttle race. page 26 The thread tension is scratched. page 24 The thread is tangled, for example, in the shuttle race. Remove the tangle thread. The bobbin case is incorrect. The thread is tangled, for example, in the shuttle race. Change the sewing light bulb. If the thread...
Users Manual - English and Spanish
Page 47
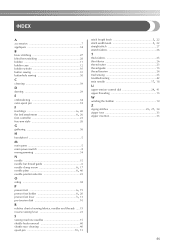
...A accessories 7 appliqués 34 B basic stitching 27 blind hem stitching 28 bobbin 11 bobbin case 12 bobbin winder 10 button sewing 31 buttonhole sewing 30 C cleaning 39 D darning 29 E embroidering 34 extra spool pin 18 F feed dogs 6, 40 flat bed attachment 6, 26 foot controller 23 free-arm style 26 G gathering 36 H handwheel 5 M main parts 5 main power switch 8 monogramming 34 N needle 15 needle bar thread guide 6 needle clamp screw 6, 17 needle plate 6, 40 needle position selector 22 O oiling 38 P presser foot 6, 19 presser foot holder 6, 20 presser foot lever...
...A accessories 7 appliqués 34 B basic stitching 27 blind hem stitching 28 bobbin 11 bobbin case 12 bobbin winder 10 button sewing 31 buttonhole sewing 30 C cleaning 39 D darning 29 E embroidering 34 extra spool pin 18 F feed dogs 6, 40 flat bed attachment 6, 26 foot controller 23 free-arm style 26 G gathering 36 H handwheel 5 M main parts 5 main power switch 8 monogramming 34 N needle 15 needle bar thread guide 6 needle clamp screw 6, 17 needle plate 6, 40 needle position selector 22 O oiling 38 P presser foot 6, 19 presser foot holder 6, 20 presser foot lever...


