

Users Manual - Multi
Page 2
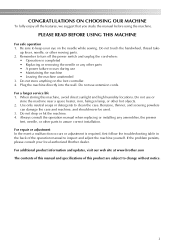
... the nearest authorized dealer or service center for use as threading the needle, changing the needle, threading the bobbin, or changing the presser foot. 15. To unplug, grasp the plug and pull, not the cord. 10. "IMPORTANT SAFETY INSTRUCTIONS" When using the sewing machine, basic safety precautions should always be followed, including the following: "Read...
... the nearest authorized dealer or service center for use as threading the needle, changing the needle, threading the bobbin, or changing the presser foot. 15. To unplug, grasp the plug and pull, not the cord. 10. "IMPORTANT SAFETY INSTRUCTIONS" When using the sewing machine, basic safety precautions should always be followed, including the following: "Read...
Users Manual - Multi
Page 30
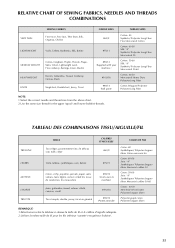
RELATIVE CHART OF SEWING FABRICS, NEEDLES AND THREADS COMBINATIONS VERY THIN SEWING FABRICS Fine tricot, Fine lace, Thin linen, Silk, Organza, Chiffon LIGHTWEIGHT Voile, Taffeta, Synthetics, Silk, Batiste MEDIUM WEIGHT Cotton, Gingham, Poplin, Percale, Pique,..., Suitings, Linen, Muslin HEAVYWEIGHT Denim, Gabardine, Tweed, Corduroy, Canvas, Duck KNITS Single knit, Double knit, Jersey, Tricot NEEDLE SIZES THREAD SIZES #65/9 #75/11 #90/14 (Supplied with your machine.) #100/16 #90/14 (Ball point) Cotton: 80 Synthetic/ Polyester Long Fiber Fine Mercerized Cotton Cotton: 60-80 Silk: "A" ...
RELATIVE CHART OF SEWING FABRICS, NEEDLES AND THREADS COMBINATIONS VERY THIN SEWING FABRICS Fine tricot, Fine lace, Thin linen, Silk, Organza, Chiffon LIGHTWEIGHT Voile, Taffeta, Synthetics, Silk, Batiste MEDIUM WEIGHT Cotton, Gingham, Poplin, Percale, Pique,..., Suitings, Linen, Muslin HEAVYWEIGHT Denim, Gabardine, Tweed, Corduroy, Canvas, Duck KNITS Single knit, Double knit, Jersey, Tricot NEEDLE SIZES THREAD SIZES #65/9 #75/11 #90/14 (Supplied with your machine.) #100/16 #90/14 (Ball point) Cotton: 80 Synthetic/ Polyester Long Fiber Fine Mercerized Cotton Cotton: 60-80 Silk: "A" ...
Users Manual - Multi
Page 54
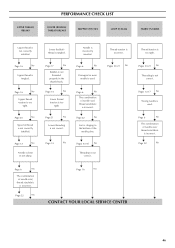
...or not sharp. UPPER THREAD BREAKS PERFORMANCE CHECK LIST LOWER (BOBBIN) THREAD BREAKS SKIPPED STITCHES LOOP IN SEAM FABRIC PUCKERS Upper thread is not correctly installed. Page 20 No Spool of needle size/ thread size/fabric is tangled. Lower (bobbin) thread is not threaded properly in the shuttle hook.... Page 14 No Needle is not correct. Pages 43-45 No Threading is incorrectly inserted. Pages 12-17 No Wrong needle is used . Page 21 No Lower threading is too tight. Page 14 No Lower thread tension is not correct. Page 6 No Damaged or worn needle is...
...or not sharp. UPPER THREAD BREAKS PERFORMANCE CHECK LIST LOWER (BOBBIN) THREAD BREAKS SKIPPED STITCHES LOOP IN SEAM FABRIC PUCKERS Upper thread is not correctly installed. Page 20 No Spool of needle size/ thread size/fabric is tangled. Lower (bobbin) thread is not threaded properly in the shuttle hook.... Page 14 No Needle is not correct. Pages 43-45 No Threading is incorrectly inserted. Pages 12-17 No Wrong needle is used . Page 21 No Lower threading is too tight. Page 14 No Lower thread tension is not correct. Page 6 No Damaged or worn needle is...
Users Manual - Multi
Page 55
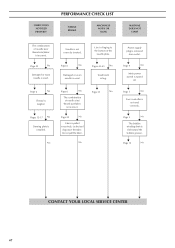
...The combination of needle size/ thread size/fabric is incorrect. Let the feed dogs move the fabric. Page 5 No Foot controller is not used . FABRIC DOES NOT FEED PROPERLY PERFORMANCE CHECK LIST NEEDLE BREAKS MACHINE IS NOISY OR SLOW MACHINE DOES NOT START The combination of... needle size/ thread size/fabric is incorrect. Page 22 No Damaged or worn needle is slid toward the bobbin...
...The combination of needle size/ thread size/fabric is incorrect. Let the feed dogs move the fabric. Page 5 No Foot controller is not used . FABRIC DOES NOT FEED PROPERLY PERFORMANCE CHECK LIST NEEDLE BREAKS MACHINE IS NOISY OR SLOW MACHINE DOES NOT START The combination of... needle size/ thread size/fabric is incorrect. Page 22 No Damaged or worn needle is slid toward the bobbin...
Users Manual - Multi
Page 63
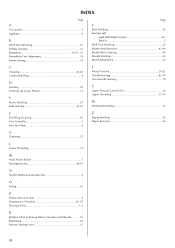
... Stretch Blind Stitch 27 C Cleaning 43-45 Connecting Plugs 4 D Darning 38 Drawing Up Lower Thread 17 E Elastic Stitching 27 Embroidering 40-41 T Thread Tension 20-21 Troubleshooting 46, 47 Twin-Needle Sewing 18 U Upper Tension Control Dial 20 Upper Threading 15-16 W Winding the Bobbin 12 F Feed Dog Cleaning 45 Foot Controller 5 Free-Arm...
... Stretch Blind Stitch 27 C Cleaning 43-45 Connecting Plugs 4 D Darning 38 Drawing Up Lower Thread 17 E Elastic Stitching 27 Embroidering 40-41 T Thread Tension 20-21 Troubleshooting 46, 47 Twin-Needle Sewing 18 U Upper Tension Control Dial 20 Upper Threading 15-16 W Winding the Bobbin 12 F Feed Dog Cleaning 45 Foot Controller 5 Free-Arm...

Users Manual - English
Page 3
... be used by pulling on the cord. It may deflect the needle causing it is used as threading the needle, changing the needle, threading the bobbin, or changing the presser foot. 15. "IMPORTANT SAFETY INSTRUCTIONS" When using the sewing machine, basic safety precautions should be supervised to ensure that they do not play with this...
... be used by pulling on the cord. It may deflect the needle causing it is used as threading the needle, changing the needle, threading the bobbin, or changing the presser foot. 15. "IMPORTANT SAFETY INSTRUCTIONS" When using the sewing machine, basic safety precautions should be supervised to ensure that they do not play with this...
Users Manual - English
Page 5
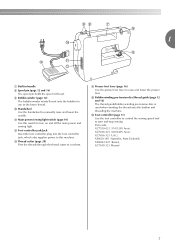
... machine • Leaving the machine unattended 3. For a longer service life 1. Always consult the operation manual when replacing or installing any other moving parts. 2. Do not store anything on the needle while sewing. If the problem persists, please consult your eye on the foot controller. 4. Do not touch the handwheel, thread ..., the presser feet, needle, or other hot objects. 2. For additional product information and updates, visit our web site at www.brother.com The contents of this manual and specifications of the operation manual to assure correct installation.
... machine • Leaving the machine unattended 3. For a longer service life 1. Always consult the operation manual when replacing or installing any other moving parts. 2. Do not store anything on the needle while sewing. If the problem persists, please consult your eye on the foot controller. 4. Do not touch the handwheel, thread ..., the presser feet, needle, or other hot objects. 2. For additional product information and updates, visit our web site at www.brother.com The contents of this manual and specifications of the operation manual to assure correct installation.

Users Manual - English
Page 6
......9 USING YOUR SEWING MACHINE 10 Power supply precautions ...10 Power supply ...10 Foot controller ...11 Steadying the machine ...11 THREADING THE MACHINE 12 Winding the bobbin ...12 Lower threading ...14 Upper threading ...16 Drawing up the lower thread ...18 REPLACING ...2. SEWING BASICS 25 SEWING ...25 General sewing procedure ...25 Selecting stitching ...26 Starting to sew ...27 Sewing in reverse ...28 Thread tension ...28 USEFUL SEWING TIPS ...30 Trial sewing ...30 Changing the sewing direction ...30 Sewing curves ...30 Sewing thick fabrics ...30 Sewing thin fabrics ...31 Sewing stretch...
......9 USING YOUR SEWING MACHINE 10 Power supply precautions ...10 Power supply ...10 Foot controller ...11 Steadying the machine ...11 THREADING THE MACHINE 12 Winding the bobbin ...12 Lower threading ...14 Upper threading ...16 Drawing up the lower thread ...18 REPLACING ...2. SEWING BASICS 25 SEWING ...25 General sewing procedure ...25 Selecting stitching ...26 Starting to sew ...27 Sewing in reverse ...28 Thread tension ...28 USEFUL SEWING TIPS ...30 Trial sewing ...30 Changing the sewing direction ...30 Sewing curves ...30 Sewing thick fabrics ...30 Sewing thin fabrics ...31 Sewing stretch...

Users Manual - English
Page 8
... storage (page 8 and 31) f Reverse sewing lever (page 28) Press and hold down the reverse sewing lever to adjust buttonhole stitching when it is not uniform. KNOWING YOUR SEWING MACHINE 1 KNOWING YOUR SEWING MACHINE NAMES OF MACHINE PARTS AND THEIR FUNCTIONS The main parts a ...Buttonhole fine-adjusting screw (page 38) Turn the buttonhole fine-adjusting screw to sew in the opposite direction. 6 b Pattern selection dial (page 26) Turn the pattern selection dial to use. c Thread...
... storage (page 8 and 31) f Reverse sewing lever (page 28) Press and hold down the reverse sewing lever to adjust buttonhole stitching when it is not uniform. KNOWING YOUR SEWING MACHINE 1 KNOWING YOUR SEWING MACHINE NAMES OF MACHINE PARTS AND THEIR FUNCTIONS The main parts a ...Buttonhole fine-adjusting screw (page 38) Turn the buttonhole fine-adjusting screw to sew in the opposite direction. 6 b Pattern selection dial (page 26) Turn the pattern selection dial to use. c Thread...
Users Manual - English
Page 9
...the sewing speed and to cut them. m Thread cutter (page 28) Pass the threads through the thread cutter to start and stop sewing. Part code; i Bobbin winder (page 12) The bobbin winder winds thread onto the bobbin for use as the lower thread. k Main power/sewing light switch (page 10) Use this machine. ...j Handwheel Use the handwheel to turn on and off the main power and sewing light. 1 g Built-in handle h Spool pin (...
...the sewing speed and to cut them. m Thread cutter (page 28) Pass the threads through the thread cutter to start and stop sewing. Part code; i Bobbin winder (page 12) The bobbin winder winds thread onto the bobbin for use as the lower thread. k Main power/sewing light switch (page 10) Use this machine. ...j Handwheel Use the handwheel to turn on and off the main power and sewing light. 1 g Built-in handle h Spool pin (...
Users Manual - English
Page 10
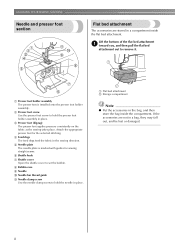
... to hold the needle in place. h Bobbin case i Needle j Needle bar thread guide k Needle clamp screw Use the needle clamp screw to remove it. KNOWING YOUR SEWING MACHINE Needle and presser foot section Flat bed attachment The accessories are not in the sewing direction. e Needle plate The needle plate is installed onto the presser...
... to hold the needle in place. h Bobbin case i Needle j Needle bar thread guide k Needle clamp screw Use the needle clamp screw to remove it. KNOWING YOUR SEWING MACHINE Needle and presser foot section Flat bed attachment The accessories are not in the sewing direction. e Needle plate The needle plate is installed onto the presser...
Users Manual - English
Page 14
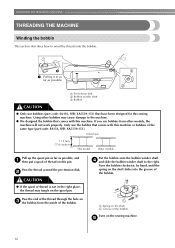
... Groove of the bobbin Turn on c the bobbin from other bobbins may tangle on the shaft slides into the groove of thread on this sewing machine. Pass the thread around the pre-tension disk. e 12 Put the bobbin onto the bobbin winder shaft d and slide the bobbin winder shaft... to wind the thread onto the bobbin. 1 Pulling it in the right place, the thread may cause damage to the machine. ● We designed the bobbin that comes with this machine or bobbins of the thread through the hole on the sewing machine. a Pre-tension disk b Bobbin winder...
... Groove of the bobbin Turn on c the bobbin from other bobbins may tangle on the shaft slides into the groove of thread on this sewing machine. Pass the thread around the pre-tension disk. e 12 Put the bobbin onto the bobbin winder shaft d and slide the bobbin winder shaft... to wind the thread onto the bobbin. 1 Pulling it in the right place, the thread may cause damage to the machine. ● We designed the bobbin that comes with this machine or bobbins of the thread through the hole on the sewing machine. a Pre-tension disk b Bobbin winder...
Users Manual - English
Page 15
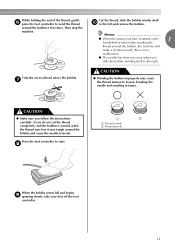
...If you do not cut the thread completely, and the bobbin is turned after winding the thread around the bobbin, the machine will make a clicking sound; Memo ● When the sewing machine is started or the 1 handwheel is wound, when the thread runs low it may cause the thread tension to the left and remove ... ● Make sure you slide the bobbin winding shaft to start. around the bobbin and cause the needle to break. Then stop the machine. h 1 2 a Wound evenly b Wound poorly When the bobbin seems full and begins i spinning slowly, take your foot off the foot controller. 13...
...If you do not cut the thread completely, and the bobbin is turned after winding the thread around the bobbin, the machine will make a clicking sound; Memo ● When the sewing machine is started or the 1 handwheel is wound, when the thread runs low it may cause the thread tension to the left and remove ... ● Make sure you slide the bobbin winding shaft to start. around the bobbin and cause the needle to break. Then stop the machine. h 1 2 a Wound evenly b Wound poorly When the bobbin seems full and begins i spinning slowly, take your foot off the foot controller. 13...

Users Manual - English
Page 16
... use bobbins that were designed to sew, you and pulling it may cause the thread tension to its latch c toward you (counterclockwise) and raise the presser foot lever. If you accidentally step on the foot controller and the machine starts to be injured. Raise the...the enclosed bobbin or bobbins of the machine. CAUTION ● Make sure you turn the power off while threading the machine. If bobbins from the shuttle race. KNOWING YOUR SEWING MACHINE Lower threading Install the bobbin wound with this sewing machine. If the thread unrolls in the wrong direction, it ...
... use bobbins that were designed to sew, you and pulling it may cause the thread tension to its latch c toward you (counterclockwise) and raise the presser foot lever. If you accidentally step on the foot controller and the machine starts to be injured. Raise the...the enclosed bobbin or bobbins of the machine. CAUTION ● Make sure you turn the power off while threading the machine. If bobbins from the shuttle race. KNOWING YOUR SEWING MACHINE Lower threading Install the bobbin wound with this sewing machine. If the thread unrolls in the wrong direction, it ...
Users Manual - English
Page 17
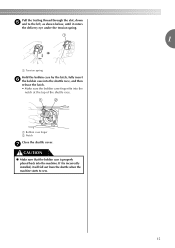
..., it will fall out from the shuttle when the machine starts to the left, as shown below, until it is properly placed back into the notch at the top of the shuttle race. Pull the trailing thread through the slot, down e and to sew. 1 15 If it enters the delivery eye under the... tension spring. a Tension spring Hold the bobbin case by the latch, fully insert f the bobbin case into the shuttle race, and then release the latch. • Make sure the bobbin case finger fits into the machine...
..., it will fall out from the shuttle when the machine starts to the left, as shown below, until it is properly placed back into the notch at the top of the shuttle race. Pull the trailing thread through the slot, down e and to sew. 1 15 If it enters the delivery eye under the... tension spring. a Tension spring Hold the bobbin case by the latch, fully insert f the bobbin case into the shuttle race, and then release the latch. • Make sure the bobbin case finger fits into the machine...
Users Manual - English
Page 18
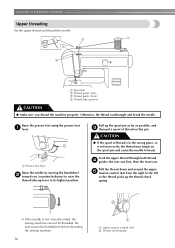
... from the right to turn the handwheel before threading the sewing machine. 16 a Upper tension control dial b Thread check spring Otherwise, the thread could tangle and break the needle. a Spool pin b Thread guide (rear) c Thread guide (front) d Thread take -up the thread check spring. • If the needle is... the spool pin and cause the needle to its highest position. KNOWING YOUR SEWING MACHINE Upper threading Set the upper thread and thread the needle. Feed the upper thread through both thread d guides: the rear one first, then the front one. Raise the presser foot using ...
... from the right to turn the handwheel before threading the sewing machine. 16 a Upper tension control dial b Thread check spring Otherwise, the thread could tangle and break the needle. a Spool pin b Thread guide (rear) c Thread guide (front) d Thread take -up the thread check spring. • If the needle is... the spool pin and cause the needle to its highest position. KNOWING YOUR SEWING MACHINE Upper threading Set the upper thread and thread the needle. Feed the upper thread through both thread d guides: the rear one first, then the front one. Raise the presser foot using ...
Users Manual - English
Page 19
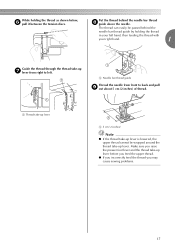
... (2 inches) of thread. Put the thread behind the needle bar thread guide by holding the thread as shown below, f pull it between the tension discs. While holding the thread in your right hand. 1 Guide the thread through the thread take -up lever. a Thread take-up lever a...thread can easily be wrapped around the thread take-up lever before you feed the upper thread. ● If you incorrectly feed the thread you raise the presser foot lever and the thread take -up g lever from front to left hand, then feeding the thread with your left . Make sure you may cause sewing...
... (2 inches) of thread. Put the thread behind the needle bar thread guide by holding the thread as shown below, f pull it between the tension discs. While holding the thread in your right hand. 1 Guide the thread through the thread take -up lever. a Thread take-up lever a...thread can easily be wrapped around the thread take-up lever before you feed the upper thread. ● If you incorrectly feed the thread you raise the presser foot lever and the thread take -up g lever from front to left hand, then feeding the thread with your left . Make sure you may cause sewing...
Users Manual - English
Page 20
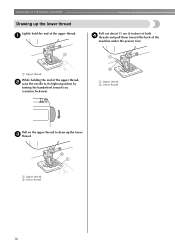
a Upper thread b Lower thread 18 a Upper thread b Lower thread Pull on the upper thread to its highest position by turning the handwheel toward the back of the upper thread, b raise the needle to draw up the lower thread Lightly hold the end of the upper thread. a Pull out about 15 cm (6 inches) of both d threads and pull them toward you (counterclockwise). a Upper thread While holding the end of the machine under the presser foot. KNOWING YOUR SEWING MACHINE Drawing up the lower c thread.
a Upper thread b Lower thread 18 a Upper thread b Lower thread Pull on the upper thread to its highest position by turning the handwheel toward the back of the upper thread, b raise the needle to draw up the lower thread Lightly hold the end of the upper thread. a Pull out about 15 cm (6 inches) of both d threads and pull them toward you (counterclockwise). a Upper thread While holding the end of the machine under the presser foot. KNOWING YOUR SEWING MACHINE Drawing up the lower c thread.

Users Manual - English
Page 21
...needle may bend the needle or damage the machine. ● Never use home sewing machine needles. and the larger the needle number, the thicker the needle. ● Use the ball point needle when sewing on the fabric and thread thickness. CAUTION ● Only use bent needles.... Selecting the needle depending on the thread and fabric types The sewing machine needle that you wish to sew. Sewing fabrics Needle sizes Thread sizes Very thin Fine tricot, Fine lace...
...needle may bend the needle or damage the machine. ● Never use home sewing machine needles. and the larger the needle number, the thicker the needle. ● Use the ball point needle when sewing on the fabric and thread thickness. CAUTION ● Only use bent needles.... Selecting the needle depending on the thread and fabric types The sewing machine needle that you wish to sew. Sewing fabrics Needle sizes Thread sizes Very thin Fine tricot, Fine lace...
Users Manual - English
Page 22
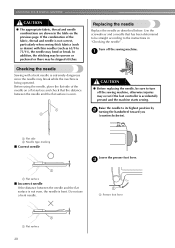
Before using the needle, place the flat side of the fabric, thread and needle is accidentally pressed and the machine starts sewing. Raise the needle to 75/11), the needle may bend or break. a Flat side b Needle type marking ■ Correct needle 1 a Flat... the needle is even. 1 2 Replacing the needle Replace the needle as described below. Do not use a bent needle. KNOWING YOUR SEWING MACHINE CAUTION ● The appropriate fabric, thread and needle combinations are shown in "Checking the needle" . a CAUTION ● Before replacing the needle, be sure to be skipped ...
Before using the needle, place the flat side of the fabric, thread and needle is accidentally pressed and the machine starts sewing. Raise the needle to 75/11), the needle may bend or break. a Flat side b Needle type marking ■ Correct needle 1 a Flat... the needle is even. 1 2 Replacing the needle Replace the needle as described below. Do not use a bent needle. KNOWING YOUR SEWING MACHINE CAUTION ● The appropriate fabric, thread and needle combinations are shown in "Checking the needle" . a CAUTION ● Before replacing the needle, be sure to be skipped ...


