

Users Manual - Multi
Page 2
... when plugged in the needle area, such as threading the needle, changing the needle, threading the bobbin, or changing the presser foot. 15. "IMPORTANT SAFETY INSTRUCTIONS" When using the sewing machine, basic safety precautions should always be used as a toy. To unplug, grasp the plug and pull, not... the cord. 10. Always use ." The wrong plate can cause the needle to the off , then remove plug from the accumulation of the sewing machine and foot controller...
... when plugged in the needle area, such as threading the needle, changing the needle, threading the bobbin, or changing the presser foot. 15. "IMPORTANT SAFETY INSTRUCTIONS" When using the sewing machine, basic safety precautions should always be used as a toy. To unplug, grasp the plug and pull, not... the cord. 10. Always use ." The wrong plate can cause the needle to the off , then remove plug from the accumulation of the sewing machine and foot controller...
Users Manual - Multi
Page 30
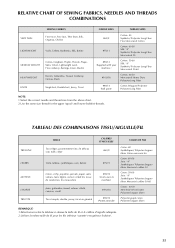
... pour les fils inférieur (canette) et supérieur (bobine). 22 RELATIVE CHART OF SEWING FABRICS, NEEDLES AND THREADS COMBINATIONS VERY THIN SEWING FABRICS Fine tricot, Fine lace, Thin linen, Silk, Organza, Chiffon LIGHTWEIGHT Voile, Taffeta, Synthetics, ...Duck KNITS Single knit, Double knit, Jersey, Tricot NEEDLE SIZES THREAD SIZES #65/9 #75/11 #90/14 (Supplied with your machine.) #100/16 #90/14 (Ball point) Cotton: 80 Synthetic/ Polyester Long Fiber Fine Mercerized Cotton Cotton: 60-80 Silk: "A".... 2.Use the same size thread for the upper (spool) and lower (bobbin) threads.
... pour les fils inférieur (canette) et supérieur (bobine). 22 RELATIVE CHART OF SEWING FABRICS, NEEDLES AND THREADS COMBINATIONS VERY THIN SEWING FABRICS Fine tricot, Fine lace, Thin linen, Silk, Organza, Chiffon LIGHTWEIGHT Voile, Taffeta, Synthetics, ...Duck KNITS Single knit, Double knit, Jersey, Tricot NEEDLE SIZES THREAD SIZES #65/9 #75/11 #90/14 (Supplied with your machine.) #100/16 #90/14 (Ball point) Cotton: 80 Synthetic/ Polyester Long Fiber Fine Mercerized Cotton Cotton: 60-80 Silk: "A".... 2.Use the same size thread for the upper (spool) and lower (bobbin) threads.
Users Manual - Multi
Page 54
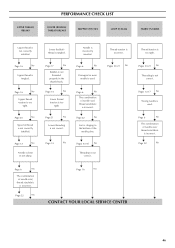
...Pages 43-45 No Threading is used . Pages 20-21 No Threading is too tight. Page 16 No Upper thread tension is not correct. Lower (bobbin) thread is incorrectly inserted. Page 14 No Needle is tangled. Pages 20-21 No Thread tension is incorrect. Page 22 No Page 6 No The ...tension is clinging to the bottom of needle size/ thread size/fabric is too tight. Page 22 No Lint is too tight. Page 17 No Bobbin is not correctly installed. Page 20 No Spool of needle size/ thread size/fabric is not correctly installed. Page 6 No The combination of ...
...Pages 43-45 No Threading is used . Pages 20-21 No Threading is too tight. Page 16 No Upper thread tension is not correct. Lower (bobbin) thread is incorrectly inserted. Page 14 No Needle is tangled. Pages 20-21 No Thread tension is incorrect. Page 22 No Page 6 No The ...tension is clinging to the bottom of needle size/ thread size/fabric is too tight. Page 22 No Lint is too tight. Page 17 No Bobbin is not correctly installed. Page 20 No Spool of needle size/ thread size/fabric is not correctly installed. Page 6 No The combination of ...
Users Manual - Multi
Page 55
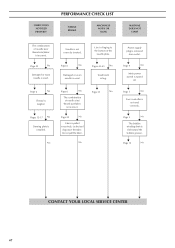
...-45 No Insufficient oiling. Page 6 No Damaged or worn needle is incorrect. Page 5 No The bobbin winding shaft is turned off. Page 4 No Main power switch is slid toward the bobbin presser. No Needle is removed from outlet. Do not pull the fabric. No Power supply plug is...SERVICE CENTER 47 Page 43 No Page 22 No Fabric is installed. FABRIC DOES NOT FEED PROPERLY PERFORMANCE CHECK LIST NEEDLE BREAKS MACHINE IS NOISY OR SLOW MACHINE DOES NOT START The combination of needle size/ thread size/fabric is used. Page 5 No Foot controller is tangled. ...
...-45 No Insufficient oiling. Page 6 No Damaged or worn needle is incorrect. Page 5 No The bobbin winding shaft is turned off. Page 4 No Main power switch is slid toward the bobbin presser. No Needle is removed from outlet. Do not pull the fabric. No Power supply plug is...SERVICE CENTER 47 Page 43 No Page 22 No Fabric is installed. FABRIC DOES NOT FEED PROPERLY PERFORMANCE CHECK LIST NEEDLE BREAKS MACHINE IS NOISY OR SLOW MACHINE DOES NOT START The combination of needle size/ thread size/fabric is used. Page 5 No Foot controller is tangled. ...
Users Manual - Multi
Page 63
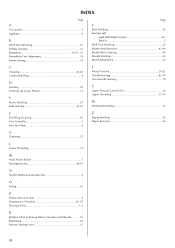
INDEX Page A Accessories 3 Applique 9 B Blind Hem Stitching 27 Bobbin winding 12 Buttonhole 30-31, 33 Buttonhole Fine Adjustment 34 Button Sewing 35 Page S Satin Stitching 26 Sewing Light Light Bulb Replacement 42 Switch 5 Shell Tuck Stitching 29 Shuttle Hook Removal 43-44 Shuttle ... 17 E Elastic Stitching 27 Embroidering 40-41 T Thread Tension 20-21 Troubleshooting 46, 47 Twin-Needle Sewing 18 U Upper Tension Control Dial 20 Upper Threading 15-16 W Winding the Bobbin 12 F Feed Dog Cleaning 45 Foot Controller 5 Free-Arm Style 8 Z Zigzag Stitching 26 Zipper Insertion...
INDEX Page A Accessories 3 Applique 9 B Blind Hem Stitching 27 Bobbin winding 12 Buttonhole 30-31, 33 Buttonhole Fine Adjustment 34 Button Sewing 35 Page S Satin Stitching 26 Sewing Light Light Bulb Replacement 42 Switch 5 Shell Tuck Stitching 29 Shuttle Hook Removal 43-44 Shuttle ... 17 E Elastic Stitching 27 Embroidering 40-41 T Thread Tension 20-21 Troubleshooting 46, 47 Twin-Needle Sewing 18 U Upper Tension Control Dial 20 Upper Threading 15-16 W Winding the Bobbin 12 F Feed Dog Cleaning 45 Foot Controller 5 Free-Arm Style 8 Z Zigzag Stitching 26 Zipper Insertion...

Users Manual - English
Page 3
...sewing machine with any of electric shock: 1. Always unplug the sewing machine...sewing machine. Never operate this sewing machine only for use this sewing machine...this machine outdoors. 7. Use this sewing machine if... when the sewing machine is used or...sewing machine is required around the sewing machine needle. 11. "IMPORTANT SAFETY INSTRUCTIONS" When using the sewing machine, basic... safety precautions should never be left unattended when plugged in. Always unplug before cleaning. 2. Return the sewing machine...sewing machine to the nearest authorized dealer or...
...sewing machine with any of electric shock: 1. Always unplug the sewing machine...sewing machine. Never operate this sewing machine only for use this sewing machine...this machine outdoors. 7. Use this sewing machine if... when the sewing machine is used or...sewing machine is required around the sewing machine needle. 11. "IMPORTANT SAFETY INSTRUCTIONS" When using the sewing machine, basic... safety precautions should never be left unattended when plugged in. Always unplug before cleaning. 2. Return the sewing machine...sewing machine to the nearest authorized dealer or...

Users Manual - English
Page 6
...SEWING BASICS 25 SEWING ...25 General sewing procedure ...25 Selecting stitching ...26 Starting to sew ...27 Sewing in reverse ...28 Thread tension ...28 USEFUL SEWING TIPS ...30 Trial sewing ...30 Changing the sewing direction ...30 Sewing curves ...30 Sewing thick fabrics ...30 Sewing thin fabrics ...31 Sewing stretch fabrics ...31 Using a free-arm style ...31 3. KNOWING YOUR SEWING MACHINE 6 NAMES OF MACHINE...USING YOUR SEWING MACHINE 10 Power supply precautions ...10 Power supply ...10 Foot controller ...11 Steadying the machine ...11 THREADING THE MACHINE 12 Winding the bobbin ...12 ...
...SEWING BASICS 25 SEWING ...25 General sewing procedure ...25 Selecting stitching ...26 Starting to sew ...27 Sewing in reverse ...28 Thread tension ...28 USEFUL SEWING TIPS ...30 Trial sewing ...30 Changing the sewing direction ...30 Sewing curves ...30 Sewing thick fabrics ...30 Sewing thin fabrics ...31 Sewing stretch fabrics ...31 Using a free-arm style ...31 3. KNOWING YOUR SEWING MACHINE 6 NAMES OF MACHINE...USING YOUR SEWING MACHINE 10 Power supply precautions ...10 Power supply ...10 Foot controller ...11 Steadying the machine ...11 THREADING THE MACHINE 12 Winding the bobbin ...12 ...
Users Manual - English
Page 7
APPENDIX ...45 MAINTENANCE ...45 Oiling ...45 Changing the bulb ...45 Cleaning the machine surface ...46 Cleaning the shuttle race ...46 Cleaning the feed dogs ...47 Repacking the machine ...48 Bobbin case tension adjustment ...48 TROUBLESHOOTING ...50 INDEX ...53 5 ZIPPER INSERTION ...40 APPLIQUÉ, MONOGRAMMING AND EMBROIDERING 41 Appliqués ...41 Monogramming and embroidering ...41 DECORATIVE STITCHING 43 Gathering ...43 Shell tuck stitching ...43 Elastic stitching ...44 4.
APPENDIX ...45 MAINTENANCE ...45 Oiling ...45 Changing the bulb ...45 Cleaning the machine surface ...46 Cleaning the shuttle race ...46 Cleaning the feed dogs ...47 Repacking the machine ...48 Bobbin case tension adjustment ...48 TROUBLESHOOTING ...50 INDEX ...53 5 ZIPPER INSERTION ...40 APPLIQUÉ, MONOGRAMMING AND EMBROIDERING 41 Appliqués ...41 Monogramming and embroidering ...41 DECORATIVE STITCHING 43 Gathering ...43 Shell tuck stitching ...43 Elastic stitching ...44 4.
Users Manual - English
Page 9
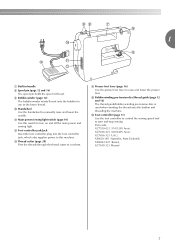
k Main power/sewing light switch (page 10) Use this machine. j Handwheel Use the handwheel to raise and lower the presser foot. 1 g Built-in handle h Spool pin (page 12 and 16) The spool pin holds the ... to this switch to turn on and off the main power and sewing light. n Presser foot lever (page 16) Use the presser foot lever to manually raise and lower the needle. i Bobbin winder (page 12) The bobbin winder winds thread onto the bobbin for use as the lower thread. m Thread cutter (page 28) Pass...
k Main power/sewing light switch (page 10) Use this machine. j Handwheel Use the handwheel to raise and lower the presser foot. 1 g Built-in handle h Spool pin (page 12 and 16) The spool pin holds the ... to this switch to turn on and off the main power and sewing light. n Presser foot lever (page 16) Use the presser foot lever to manually raise and lower the needle. i Bobbin winder (page 12) The bobbin winder winds thread onto the bobbin for use as the lower thread. m Thread cutter (page 28) Pass...
Users Manual - English
Page 10
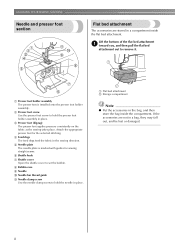
... g Shuttle cover Open the shuttle cover to hold the presser foot holder assembly in place. h Bobbin case i Needle j Needle bar thread guide k Needle clamp screw Use the needle clamp screw to set the bobbin. KNOWING YOUR SEWING MACHINE Needle and presser foot section Flat bed attachment The accessories are not in a bag, they may... The presser foot is marked with guides for the selected stitching. c Presser foot (Zigzag) The presser foot applies pressure consistently on the fabric as the sewing takes place. If the accessories are stored in the...
... g Shuttle cover Open the shuttle cover to hold the presser foot holder assembly in place. h Bobbin case i Needle j Needle bar thread guide k Needle clamp screw Use the needle clamp screw to set the bobbin. KNOWING YOUR SEWING MACHINE Needle and presser foot section Flat bed attachment The accessories are not in a bag, they may... The presser foot is marked with guides for the selected stitching. c Presser foot (Zigzag) The presser foot applies pressure consistently on the fabric as the sewing takes place. If the accessories are stored in the...
Users Manual - English
Page 11
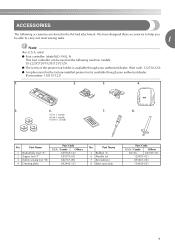
.... Part Name 5 Bobbin (3) 6 Needle set 7 Screwdriver 8 Extra spool pin Part Code U.S.A. / Canada Others SA156 XA5539-151 129583-021 X55467-021 130920-021 9 only) ● Foot controller: Model KD-1902, N This foot controller can be able to carry out most sewing tasks. 1 Note (For U.S.A. ACCESSORIES The following machine models: LS-2220/2720/1520/2125/2125i. ●...
.... Part Name 5 Bobbin (3) 6 Needle set 7 Screwdriver 8 Extra spool pin Part Code U.S.A. / Canada Others SA156 XA5539-151 129583-021 X55467-021 130920-021 9 only) ● Foot controller: Model KD-1902, N This foot controller can be able to carry out most sewing tasks. 1 Note (For U.S.A. ACCESSORIES The following machine models: LS-2220/2720/1520/2125/2125i. ●...
Users Manual - English
Page 14
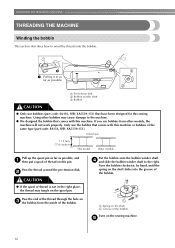
...bobbin. KNOWING YOUR SEWING MACHINE THREADING THE MACHINE Winding the bobbin This section describes how to wind the thread onto the bobbin. 1 Pulling it in the right place, the thread may cause damage to the machine. ● We designed the bobbin that comes with this sewing machine. Put the bobbin onto the bobbin winder shaft d and slide the bobbin... winder shaft to the right. Turn the bobbin clockwise, by hand, until ...
...bobbin. KNOWING YOUR SEWING MACHINE THREADING THE MACHINE Winding the bobbin This section describes how to wind the thread onto the bobbin. 1 Pulling it in the right place, the thread may cause damage to the machine. ● We designed the bobbin that comes with this sewing machine. Put the bobbin onto the bobbin winder shaft d and slide the bobbin... winder shaft to the right. Turn the bobbin clockwise, by hand, until ...
Users Manual - English
Page 15
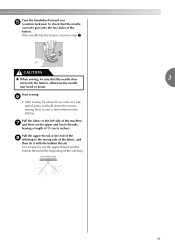
...not a malfunction. ● The needle bar does not move when you slide the bobbin winding shaft to the left and remove the bobbin. around the bobbin, the machine will make a clicking sound; Memo ● When the sewing machine is started or the 1 handwheel is wound, when the thread runs low it may ...cause the thread tension to loosen, breaking the needle and resulting in injury. CAUTION ● Make sure you do not cut the thread completely, and the bobbin is turned after ...
...not a malfunction. ● The needle bar does not move when you slide the bobbin winding shaft to the left and remove the bobbin. around the bobbin, the machine will make a clicking sound; Memo ● When the sewing machine is started or the 1 handwheel is wound, when the thread runs low it may ...cause the thread tension to loosen, breaking the needle and resulting in injury. CAUTION ● Make sure you do not cut the thread completely, and the bobbin is turned after ...

Users Manual - English
Page 16
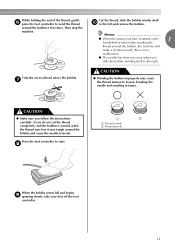
... (4 inches) of thread d from a full bobbin, and then insert the bobbin into the bobbin case. • Only use bobbins that were designed to sew, you could be used , the machine will not operate correctly. CAUTION ● Winding the bobbin improperly may cause the thread tension to loosen, ...part code: SA156, SFB: XA5539-151). KNOWING YOUR SEWING MACHINE Lower threading Install the bobbin wound with this sewing machine. Actual size 11.5 mm (7/16 inches) This model Other models CAUTION ● Make sure you set the bobbin so the thread unrolls in the wrong direction, it out...
... (4 inches) of thread d from a full bobbin, and then insert the bobbin into the bobbin case. • Only use bobbins that were designed to sew, you could be used , the machine will not operate correctly. CAUTION ● Winding the bobbin improperly may cause the thread tension to loosen, ...part code: SA156, SFB: XA5539-151). KNOWING YOUR SEWING MACHINE Lower threading Install the bobbin wound with this sewing machine. Actual size 11.5 mm (7/16 inches) This model Other models CAUTION ● Make sure you set the bobbin so the thread unrolls in the wrong direction, it out...
Users Manual - English
Page 17
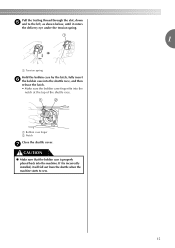
... finger b Notch Close the shuttle cover. a Tension spring Hold the bobbin case by the latch, fully insert f the bobbin case into the shuttle race, and then release the latch. • Make sure the bobbin case finger fits into the machine. Pull the trailing thread through the slot, down e and to the... left, as shown below, until it will fall out from the shuttle when the machine starts to sew. 1 15...
... finger b Notch Close the shuttle cover. a Tension spring Hold the bobbin case by the latch, fully insert f the bobbin case into the shuttle race, and then release the latch. • Make sure the bobbin case finger fits into the machine. Pull the trailing thread through the slot, down e and to the... left, as shown below, until it will fall out from the shuttle when the machine starts to sew. 1 15...

Users Manual - English
Page 21
REPLACING THE NEEDLE This section provides information on sewing machine needles. 1 Needle precautions Be sure to observe the following table when choosing the thread and needle appropriate for the upper (spool) and lower (bobbin) threads. Use of the needle. Refer to the following precautions concerning... the handling of any other needle may bend the needle or damage the machine. ● Never use home sewing machine needles. and the larger the needle number,...
REPLACING THE NEEDLE This section provides information on sewing machine needles. 1 Needle precautions Be sure to observe the following table when choosing the thread and needle appropriate for the upper (spool) and lower (bobbin) threads. Use of the needle. Refer to the following precautions concerning... the handling of any other needle may bend the needle or damage the machine. ● Never use home sewing machine needles. and the larger the needle number,...

Users Manual - English
Page 30
SEWING BASICS Pull the fabric to the left side of the machine, k and then pass the threads through the thread cutter on the back of the seam or wherever reinforcement is needed. a Thread cutter Sewing in reverse Reverse sewing is used to lock the threads at the end of the presser ... before you start to change tension adjustments make sure the upper thread and bobbin are inserted correctly. ● We recommend you change fabric or thread. Memo ● Before beginning to sew. To sew forward, release the reverse sewing b lever. control dial to adjust it when you do a test sample...
SEWING BASICS Pull the fabric to the left side of the machine, k and then pass the threads through the thread cutter on the back of the seam or wherever reinforcement is needed. a Thread cutter Sewing in reverse Reverse sewing is used to lock the threads at the end of the presser ... before you start to change tension adjustments make sure the upper thread and bobbin are inserted correctly. ● We recommend you change fabric or thread. Memo ● Before beginning to sew. To sew forward, release the reverse sewing b lever. control dial to adjust it when you do a test sample...
Users Manual - English
Page 31
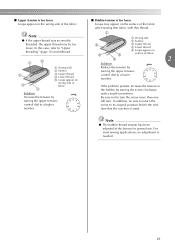
... of fabric Solution Increase the tension by turning the upper tensioncontrol dial to a lower number. In addition, be too loose. For most sewing applications, no adjustment is used. ■ Upper tension is too loose Loops appear on 3 5 surface of fabric 4 2 Solution Reduce... the tension by turning the upper tensioncontrol dial to a higher number. ■ Bobbin tension is too loose Loops may be sure to return the screw to its original position before the next time that the machine is needed. 29 Be sure not to "Upper threading" (page 16) and rethread. 1...
... of fabric Solution Increase the tension by turning the upper tensioncontrol dial to a lower number. In addition, be too loose. For most sewing applications, no adjustment is used. ■ Upper tension is too loose Loops appear on 3 5 surface of fabric 4 2 Solution Reduce... the tension by turning the upper tensioncontrol dial to a higher number. ■ Bobbin tension is too loose Loops may be sure to return the screw to its original position before the next time that the machine is needed. 29 Be sure not to "Upper threading" (page 16) and rethread. 1...
Users Manual - English
Page 41
... the upper thread at a low speed, press and hold down the reverse sewing lever to the wrong side of the stitching. 39 Start sewing. Use scissors to the left side of the machine, g and then cut the upper thread and the bobbin thread at the beginning of the fabric, and then tie it with... the bobbin thread. Pull the fabric to cut the upper and lower threads, leaving...
... the upper thread at a low speed, press and hold down the reverse sewing lever to the wrong side of the stitching. 39 Start sewing. Use scissors to the left side of the machine, g and then cut the upper thread and the bobbin thread at the beginning of the fabric, and then tie it with... the bobbin thread. Pull the fabric to cut the upper and lower threads, leaving...
Users Manual - English
Page 45
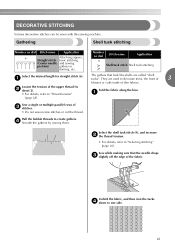
...blouses or cuffs made of the fabric. Number on dial Stitch name Application 6 Attaching zippers, Straight stitch basic stitching, (Center needle and sewing position) gathers or darning, etc. Pull the bobbin threads to "Selecting stitching" (page 26). Select the shell tuck stitch (9), and increase b the thread...that look like shells are used to one side. 43 DECORATIVE STITCHING Various decorative stitches can be sewn with this sewing machine. Gathering Shell tuck stitching Number on dial Stitch name Application 9 Shell tuck stitch Shell tuck stitching Select the desired...
...blouses or cuffs made of the fabric. Number on dial Stitch name Application 6 Attaching zippers, Straight stitch basic stitching, (Center needle and sewing position) gathers or darning, etc. Pull the bobbin threads to "Selecting stitching" (page 26). Select the shell tuck stitch (9), and increase b the thread...that look like shells are used to one side. 43 DECORATIVE STITCHING Various decorative stitches can be sewn with this sewing machine. Gathering Shell tuck stitching Number on dial Stitch name Application 9 Shell tuck stitch Shell tuck stitching Select the desired...


