Operation Manual
Page 1
Operation Manual Embroidery and Sewing Machine Product Code: 888-M20 Be sure to read this document nearby for future reference. We recommend that you keep this document before using the machine.
Operation Manual Embroidery and Sewing Machine Product Code: 888-M20 Be sure to read this document nearby for future reference. We recommend that you keep this document before using the machine.

Operation Manual
Page 6
... patterns 55 Chapter 4 EMBROIDERY 57 Embroidering Preparation 57 Attaching the Embroidery Foot 57 Attaching the Embroidery Unit 58 Embroidery Attractive Finishes 59 Hooping the fabric in the embroidery frame 60 Attaching the Embroidery Frame 62 Embroidering 63 Selecting an embroidery pattern 63 Embroidering a ...é patterns 68 4 Using a frame pattern to make an appliqu 69 Split embroidery patterns 70 Editing Patterns (Pattern Editing Screen 71 Editing Patterns (Embroidery Settings Screen).... 72 Aligning the pattern and the needle position 73 Embroidering linked characters...
... patterns 55 Chapter 4 EMBROIDERY 57 Embroidering Preparation 57 Attaching the Embroidery Foot 57 Attaching the Embroidery Unit 58 Embroidery Attractive Finishes 59 Hooping the fabric in the embroidery frame 60 Attaching the Embroidery Frame 62 Embroidering 63 Selecting an embroidery pattern 63 Embroidering a ...é patterns 68 4 Using a frame pattern to make an appliqu 69 Split embroidery patterns 70 Editing Patterns (Pattern Editing Screen 71 Editing Patterns (Embroidery Settings Screen).... 72 Aligning the pattern and the needle position 73 Embroidering linked characters...
Operation Manual
Page 7
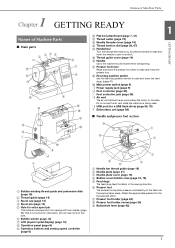
... jack (page 26) M Air vent The air vent allows the air surrounding the motor to circulate. N USB port (for a USB flash drive) (page 55, 75) O Embroidery unit (page 58) ■ Needle and presser foot section i a h b GETTING READY 1 s t u y 1 Bobbin winding thread guide and pretension disk (page 15) 2 Thread guide (page 14) 3 Spool...
... jack (page 26) M Air vent The air vent allows the air surrounding the motor to circulate. N USB port (for a USB flash drive) (page 55, 75) O Embroidery unit (page 58) ■ Needle and presser foot section i a h b GETTING READY 1 s t u y 1 Bobbin winding thread guide and pretension disk (page 15) 2 Thread guide (page 14) 3 Spool...

Operation Manual
Page 8
... the needle stop sewing. Pressing the button twice sews one stitch. 4 Thread cutter button Press the thread cutter button after sewing is 8 mm or more . 6 Embroidery key Press this key to embroider. 7 Utility stitch key Press this key before changing the needle, the presser foot, etc.
... the needle stop sewing. Pressing the button twice sews one stitch. 4 Thread cutter button Press the thread cutter button after sewing is 8 mm or more . 6 Embroidery key Press this key to embroider. 7 Utility stitch key Press this key before changing the needle, the presser foot, etc.
Operation Manual
Page 9
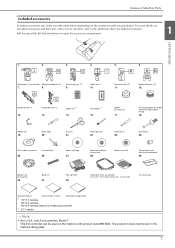
... 1 GETTING READY 1. 2. 3. 4. 5. 6. A Q Overcasting foot "G" 9. Blind stitch foot "R" 11. Pre-wound bobbin (60 weight white embroidery bobbin thread) 18. Scissors 21. only) Foot controller: Model T This foot controller can be used on machine) Monogramming foot "N" 7. 8. Bobbin ... Needle set (medium) 10 cm (H) × 10 cm (W) (4 inches (H) × 4 inches (W)) Accessory bag Operation Manual Quick Reference Guide Embroidery Design Guide *1 75/11 2 needles, 90/14 2 needles, 90/14 2 needles: Ball point needle (gold colored) *2 2/11 needle Note ...
... 1 GETTING READY 1. 2. 3. 4. 5. 6. A Q Overcasting foot "G" 9. Blind stitch foot "R" 11. Pre-wound bobbin (60 weight white embroidery bobbin thread) 18. Scissors 21. only) Foot controller: Model T This foot controller can be used on machine) Monogramming foot "N" 7. 8. Bobbin ... Needle set (medium) 10 cm (H) × 10 cm (W) (4 inches (H) × 4 inches (W)) Accessory bag Operation Manual Quick Reference Guide Embroidery Design Guide *1 75/11 2 needles, 90/14 2 needles, 90/14 2 needles: Ball point needle (gold colored) *2 2/11 needle Note ...
Operation Manual
Page 10
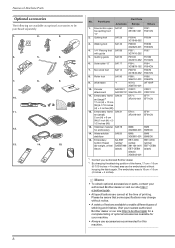
... parts, contact your machine. • Always use accessories recommended for embroidery BM3: BM3 XG6683-001 BM3CN 14. Roller foot SA190 F066: F066 XG6751-001 F066CN 9. Stabilizer material SA519 for this machine. 8 Visit your nearest authorized Brother dealer or our site http://s.brother/cpjab for a complete listing of optional accessories available for your authorized...
... parts, contact your machine. • Always use accessories recommended for embroidery BM3: BM3 XG6683-001 BM3CN 14. Roller foot SA190 F066: F066 XG6751-001 F066CN 9. Stabilizer material SA519 for this machine. 8 Visit your nearest authorized Brother dealer or our site http://s.brother/cpjab for a complete listing of optional accessories available for your authorized...

Operation Manual
Page 14
E Select whether to display the opening display, etc.). L The [No.] is the internal machine number for the embroidery display area. C Change the color of the background for the thumbnail area. ■ General settings D E F G 4 H I Select the level of the... input sensitivity for operation keys. (page 13) J Display the service count which is a reminder to take your machine in for regular servicing. (Contact your authorized Brother...
E Select whether to display the opening display, etc.). L The [No.] is the internal machine number for the embroidery display area. C Change the color of the background for the thumbnail area. ■ General settings D E F G 4 H I Select the level of the... input sensitivity for operation keys. (page 13) J Display the service count which is a reminder to take your machine in for regular servicing. (Contact your authorized Brother...

Operation Manual
Page 15
...page 21). Display the settings screen to the front from the bottom. c Winding/Installing the Bobbin CAUTION • Only use the recommended 60 weight embroidery bobbin thread for this machine or bobbins of the same type (SA156/SFB: XA5539-151/SFB). Adjust the [Input Sensitivity] by pressing / .... setting, the more sensitive the keys will be the same as what is being used for the upper threading. • When winding bobbin for embroidery, be . Display the settings screen, and then adjust the [Input Sensitivity] again. Press e to return to previous screen. ■ If ...
...page 21). Display the settings screen to the front from the bottom. c Winding/Installing the Bobbin CAUTION • Only use the recommended 60 weight embroidery bobbin thread for this machine or bobbins of the same type (SA156/SFB: XA5539-151/SFB). Adjust the [Input Sensitivity] by pressing / .... setting, the more sensitive the keys will be the same as what is being used for the upper threading. • When winding bobbin for embroidery, be . Display the settings screen, and then adjust the [Input Sensitivity] again. Press e to return to previous screen. ■ If ...

Operation Manual
Page 23
Refer to the following table when choosing the thread and needle appropriate for embroidery. GETTING READY 1 Fabric Type/Application Lightweight fabrics Lawn, georgette, challis, organdy, crepe, chiffon, voile, gauze, tulle, lining, etc. Be sure to be used in the ..., regardless of 20 weight or lower. It may be used depends on page 22. • In principle, use thread of the fabric or thread. ■ Embroidery needles Use a 75/11 home sewing machine needle for the fabric that you wish to malfunction. * The smaller the number, the heavier the thread. Stretch...
Refer to the following table when choosing the thread and needle appropriate for embroidery. GETTING READY 1 Fabric Type/Application Lightweight fabrics Lawn, georgette, challis, organdy, crepe, chiffon, voile, gauze, tulle, lining, etc. Be sure to be used in the ..., regardless of 20 weight or lower. It may be used depends on page 22. • In principle, use thread of the fabric or thread. ■ Embroidery needles Use a 75/11 home sewing machine needle for the fabric that you wish to malfunction. * The smaller the number, the heavier the thread. Stretch...

Operation Manual
Page 59
.... 5 Fabric preparation Attach a stabilizer material to 60 the fabric, and hoop it in the embroidery frame. 6 Embroidery frame attachment Attach the embroidery frame 62 to the embroidery unit. 7 Pattern selection Turn the main power to on page 23. 4 EMBROIDERY Hold the embroidery foot "Q" with your right hand, as d shown. Using another presser foot may cause the...
.... 5 Fabric preparation Attach a stabilizer material to 60 the fabric, and hoop it in the embroidery frame. 6 Embroidery frame attachment Attach the embroidery frame 62 to the embroidery unit. 7 Pattern selection Turn the main power to on page 23. 4 EMBROIDERY Hold the embroidery foot "Q" with your right hand, as d shown. Using another presser foot may cause the...

Operation Manual
Page 60
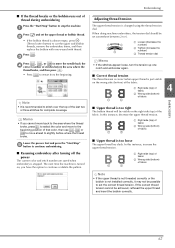
...off the machine. It may strike the presser foot and possibly cause injury. a b c 1 Embroidery foot bar 2 Needle clamp screw 3 Presser bar Secure embroidery foot "Q" with your finger, fit the embroidery foot bar over the needle clamp screw. Press h to turn off the machine. Otherwise, injuries may... could be damaged, and it . Be sure to the embroidery unit may result. • Do not touch the connector in the embroidery unit connector slot. Attaching the Embroidery Unit CAUTION • Before attaching the embroidery unit, be sure to unlock all keys and buttons. Embroidering...
...off the machine. It may strike the presser foot and possibly cause injury. a b c 1 Embroidery foot bar 2 Needle clamp screw 3 Presser bar Secure embroidery foot "Q" with your finger, fit the embroidery foot bar over the needle clamp screw. Press h to turn off the machine. Otherwise, injuries may... could be damaged, and it . Be sure to the embroidery unit may result. • Do not touch the connector in the embroidery unit connector slot. Attaching the Embroidery Unit CAUTION • Before attaching the embroidery unit, be sure to unlock all keys and buttons. Embroidering...

Operation Manual
Page 61
...the release button on the bottom left of the d embroidery unit, and slowly pull the embroidery unit to "Removing the embroidery frame" on . 59 Memo • Utility stitches cannot be selected when the embroidery unit is attached. ■ Removing the embroidery unit Make sure that go into a position where it... can be stored. See the explanation of the needle and thread being used. Turn off the machine before removing the embroidery unit. Be sure that no objects or hands are many factors that the machine is completely stopped and follow the instructions below . ■...
...the release button on the bottom left of the d embroidery unit, and slowly pull the embroidery unit to "Removing the embroidery frame" on . 59 Memo • Utility stitches cannot be selected when the embroidery unit is attached. ■ Removing the embroidery unit Make sure that go into a position where it... can be stored. See the explanation of the needle and thread being used. Turn off the machine before removing the embroidery unit. Be sure that no objects or hands are many factors that the machine is completely stopped and follow the instructions below . ■...

Operation Manual
Page 62
... it with your authorized Brother dealer for the correct stabilizer to use. ■ Inserting the Fabric CAUTION • If you place a piece of water soluble stabilizer on stabilizers (backing) to the fabric For best results in your machine. After completing the embroidery, remove the stabilizer material... as a base. Note • If the fabric is larger than 2 mm (1/16 inch). Embroidering Preparation Hooping the fabric in the embroidery frame CAUTION • Use fabrics with a coarse weave, or fabrics which cause pattern shrinkage. Otherwise, the needle may cause the needle ...
... it with your authorized Brother dealer for the correct stabilizer to use. ■ Inserting the Fabric CAUTION • If you place a piece of water soluble stabilizer on stabilizers (backing) to the fabric For best results in your machine. After completing the embroidery, remove the stabilizer material... as a base. Note • If the fabric is larger than 2 mm (1/16 inch). Embroidering Preparation Hooping the fabric in the embroidery frame CAUTION • Use fabrics with a coarse weave, or fabrics which cause pattern shrinkage. Otherwise, the needle may cause the needle ...

Operation Manual
Page 63
... and a remove the inner and outer frames, placing the outer frame on the inner frame. e 61 c Line up on the inner frame and on the c embroidery sheet. Gently remove the fabric from the top of the fabric you want to align marks on fabric with the stabilizer material on the outer... d frame and adjust the fabric if needed to embroider. 4 EMBROIDERY Tighten the adjustment screw by hand. Place the inner frame with the fabric on top of the fabric. Place the fabric with the...
... and a remove the inner and outer frames, placing the outer frame on the inner frame. e 61 c Line up on the inner frame and on the c embroidery sheet. Gently remove the fabric from the top of the fabric you want to align marks on fabric with the stabilizer material on the outer... d frame and adjust the fabric if needed to embroider. 4 EMBROIDERY Tighten the adjustment screw by hand. Place the inner frame with the fabric on top of the fabric. Place the fabric with the...

Operation Manual
Page 64
... recommended bobbin thread. a b CAUTION • Do not hit the needle with your finger or the embroidery frame. a Press the part of the embroidery frame holder in until it clicks and stops. Firmly insert the embroidery frame guide into the embroidery frame holder. b • If necessary, raise the presser foot lever even further. ■ Removing...
... recommended bobbin thread. a b CAUTION • Do not hit the needle with your finger or the embroidery frame. a Press the part of the embroidery frame holder in until it clicks and stops. Firmly insert the embroidery frame guide into the embroidery frame holder. b • If necessary, raise the presser foot lever even further. ■ Removing...
Operation Manual
Page 65
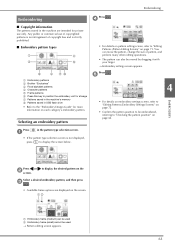
... the pattern type selection screen. • If the pattern type selection screen is strictly prohibited. ■ Embroidery pattern types a b c e f d gh 1 Embroidery patterns 2 Brother "Exclusives" 3 Floral alphabet patterns 4 Character patterns 5 Frame patterns 6 Press this key to position the embroidery unit for storage 7 Patterns saved in the machine's memory 8 Patterns saved in the machine are displayed...
... the pattern type selection screen. • If the pattern type selection screen is strictly prohibited. ■ Embroidery pattern types a b c e f d gh 1 Embroidery patterns 2 Brother "Exclusives" 3 Floral alphabet patterns 4 Character patterns 5 Frame patterns 6 Press this key to position the embroidery unit for storage 7 Patterns saved in the machine's memory 8 Patterns saved in the machine are displayed...

Operation Manual
Page 66
...b 2 Tab Press . The area outside of the embroidering area will have a different background color. • After selecting a character if you want to b embroidery. Press . b Press a tab to display the desired selection screen, and c then type in the right place. d • For details on editing the... pattern, refer to "Editing Patterns (Pattern Editing Screen)" on page 71. ■ Checking the pattern position The embroidery frame moves and shows the pattern position. Watch the frame closely to make a mistake, press to erase the mistake. • To ...
...b 2 Tab Press . The area outside of the embroidering area will have a different background color. • After selecting a character if you want to b embroidery. Press . b Press a tab to display the desired selection screen, and c then type in the right place. d • For details on editing the... pattern, refer to "Editing Patterns (Pattern Editing Screen)" on page 71. ■ Checking the pattern position The embroidery frame moves and shows the pattern position. Watch the frame closely to make a mistake, press to erase the mistake. • To ...

Operation Manual
Page 67
...Press , and then press . This function is down, it could break and result in the settings screen. Set the embroidery thread, and thread the needle. Embroidering a pattern Embroidery patterns are embroidered with a change the setting in injury. To turn this screen, depending on the pattern. Raise the... presser foot lever and pass the thread through c the embroidery foot hole, and hold the fabric to keep it lightly in the settings screen. The pattern may strike the needle, causing the needle ...
...Press , and then press . This function is down, it could break and result in the settings screen. Set the embroidery thread, and thread the needle. Embroidering a pattern Embroidery patterns are embroidered with a change the setting in injury. To turn this screen, depending on the pattern. Raise the... presser foot lever and pass the thread through c the embroidery foot hole, and hold the fabric to keep it lightly in the settings screen. The pattern may strike the needle, causing the needle ...

Operation Manual
Page 68
...(thread number). • If the thread is left at the beginning of the thread colors is displayed. • When [#123] is selected, the embroidery thread number is finished. Embroidering Lower the presser foot, then press the "Start/Stop" d button to stop the machine. Press . If the e ...end of the thread colors or embroidery thread number. f → Stitching stops automatically with the thread after one color has been completed. c → When the last color is embroidered,...
...(thread number). • If the thread is left at the beginning of the thread colors is displayed. • When [#123] is selected, the embroidery thread number is finished. Embroidering Lower the presser foot, then press the "Start/Stop" d button to stop the machine. Press . If the e ...end of the thread colors or embroidery thread number. f → Stitching stops automatically with the thread after one color has been completed. c → When the last color is embroidered,...
Operation Manual
Page 69
...upper thread is just visible on the wrong side (bottom) of the fabric. 1 Right side (top) of fabric 2 Wrong side (bottom) of fabric 4 EMBROIDERY ■ Upper thread is almost empty, press (Thread cutter button) to set somewhere between 2 to stop the machine. In this instance, increase the upper ... is changed using the thread tension dial. If the correct thread tension cannot be possible to cut the upper and bobbin threads, remove the embroidery frame, and then replace the bobbin with thread. ■ If the thread breaks or the bobbin runs out of thread during embroidering Press ...
...upper thread is just visible on the wrong side (bottom) of the fabric. 1 Right side (top) of fabric 2 Wrong side (bottom) of fabric 4 EMBROIDERY ■ Upper thread is almost empty, press (Thread cutter button) to set somewhere between 2 to stop the machine. In this instance, increase the upper ... is changed using the thread tension dial. If the correct thread tension cannot be possible to cut the upper and bobbin threads, remove the embroidery frame, and then replace the bobbin with thread. ■ If the thread breaks or the bobbin runs out of thread during embroidering Press ...


