
Users Manual - English
Page 1
Computerized Embroidery and Sewing Machine Operation Manual Product Code 885-V31/V33 GETTING READY SEWING BASICS UTILITY STITCHES EMBROIDERY APPENDIX
Computerized Embroidery and Sewing Machine Operation Manual Product Code 885-V31/V33 GETTING READY SEWING BASICS UTILITY STITCHES EMBROIDERY APPENDIX

Users Manual - English
Page 3
.... • Always unplug your work area clear: • Never operate the machine with any user servicing adjustments mentioned in the instruction manual • To unplug the machine, switch the machine to the symbol "O" position to use if you notice anything unusual, such as ... Instructions Please read the "Important Safety Instructions", and then study this embroidery and sewing machine. Introduction Thank you for purchasing this manual for the correct operation of the various functions. Before using this machine, carefully read these safety instructions before attempting to turn it...
.... • Always unplug your work area clear: • Never operate the machine with any user servicing adjustments mentioned in the instruction manual • To unplug the machine, switch the machine to the symbol "O" position to use if you notice anything unusual, such as ... Instructions Please read the "Important Safety Instructions", and then study this embroidery and sewing machine. Introduction Thank you for purchasing this manual for the correct operation of the various functions. Before using this machine, carefully read these safety instructions before attempting to turn it...
Users Manual - English
Page 4
...plate, as a stove or iron; Save these instructions. For additional product information and updates, visit our web site at www.brother.com 2 The contents of this manual and specifications of this sewing machine was supplied in injuries. 5 Special care is required when sewing: • Always pay ...break. • Do not push or pull the fabric when sewing, and follow the troubleshooting table in the manual. If the problem persists, please consult your local authorized Brother dealer. Do not use the machine near children. • The plastic bag that this product are subject ...
...plate, as a stove or iron; Save these instructions. For additional product information and updates, visit our web site at www.brother.com 2 The contents of this manual and specifications of this sewing machine was supplied in injuries. 5 Special care is required when sewing: • Always pay ...break. • Do not push or pull the fabric when sewing, and follow the troubleshooting table in the manual. If the problem persists, please consult your local authorized Brother dealer. Do not use the machine near children. • The plastic bag that this product are subject ...
Users Manual - English
Page 11
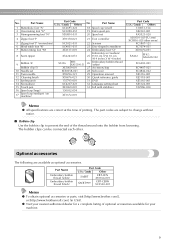
...25 H 10 cm X W 10 cm (H 4 inches X W 4 inches) 26 Embroidery bobbin thread (white) 27 Accessory bag 28 Soft cover 29 Operation manual 30 Quick reference guide 31 DVD 32 Language setting sheet 33 Felt with stabilizer XE1372-001 Part Code U.S.A. / Canada Others 130013-154 XE2241-001 XA5523... / Canada Other SAEBT EBT-CEN X81164-001 SAEBT999 EBT-CEBN XC5520-001 Memo z To obtain optional accessories or parts, visit [http://www.brother.com/], or [http://www.brothermall.com] (in USA). Optional accessories The following are correct at the time of printing. The part codes are...
...25 H 10 cm X W 10 cm (H 4 inches X W 4 inches) 26 Embroidery bobbin thread (white) 27 Accessory bag 28 Soft cover 29 Operation manual 30 Quick reference guide 31 DVD 32 Language setting sheet 33 Felt with stabilizer XE1372-001 Part Code U.S.A. / Canada Others 130013-154 XE2241-001 XA5523... / Canada Other SAEBT EBT-CEN X81164-001 SAEBT999 EBT-CEBN XC5520-001 Memo z To obtain optional accessories or parts, visit [http://www.brother.com/], or [http://www.brothermall.com] (in USA). Optional accessories The following are correct at the time of printing. The part codes are...

Users Manual - English
Page 23
... selected topic appears. X The sewing machine help key) on . Checking machine operating Press (Next page key) to switch to the corresponding page in this Operation Manual. procedures If you press (Previous page key), you finish viewing, press e key) two times. (Back h g fe a Upper threading b Bobbin winding c Bobbin installation d Needle replacement e Presser...
... selected topic appears. X The sewing machine help key) on . Checking machine operating Press (Next page key) to switch to the corresponding page in this Operation Manual. procedures If you press (Previous page key), you finish viewing, press e key) two times. (Back h g fe a Upper threading b Bobbin winding c Bobbin installation d Needle replacement e Presser...
Users Manual - English
Page 33
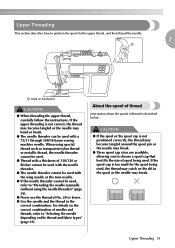
Upper Threading This section describes how to position the spool for the spool being used , refer to "Threading the needle manually (without using the needle threader)" (page 36). ● Never use the thread of needles and threads, refer to choose a spool cap that best fits the ...
Upper Threading This section describes how to position the spool for the spool being used , refer to "Threading the needle manually (without using the needle threader)" (page 36). ● Never use the thread of needles and threads, refer to choose a spool cap that best fits the ...
Users Manual - English
Page 38
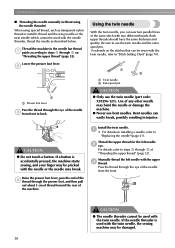
GETTING READY ■ Threading the needle manually (without using the needle threader) When using special thread, such as described below. Raise the presser foot lever, pass the end of the d thread through ... the needle as transparent nylon thread or metallic thread and the wing needle or the twin needle which cannot be used with the twin needle. Manually thread the left needle b eye. b a a Presser foot lever Pass the thread through k of the machine. CAUTION ● The needle threader cannot be sewn with two...
GETTING READY ■ Threading the needle manually (without using the needle threader) When using special thread, such as described below. Raise the presser foot lever, pass the end of the d thread through ... the needle as transparent nylon thread or metallic thread and the wing needle or the twin needle which cannot be used with the twin needle. Manually thread the left needle b eye. b a a Presser foot lever Pass the thread through k of the machine. CAUTION ● The needle threader cannot be sewn with two...

Users Manual - English
Page 39
Then, thread the upper thread. Attach zigzag foot "J". Upper Threading 37 Pass the thread through the needle f bar thread guide, manually thread the right needle. If the needle threader is used with the twin needle, the sewing machine may be damaged. CAUTION ● When using the ...
Then, thread the upper thread. Attach zigzag foot "J". Upper Threading 37 Pass the thread through the needle f bar thread guide, manually thread the right needle. If the needle threader is used with the twin needle, the sewing machine may be damaged. CAUTION ● When using the ...
Users Manual - English
Page 72
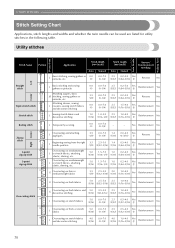
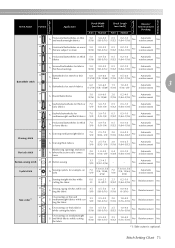
... J Temporarily securing 0.0 0.0-7.0 (0) (0-1/4) - - Utility stitches Twin Needle Walking Foot Presser Foot Stitch Name Pattern Application Stitch Width [mm (inch)] Auto Manual 1 J Basic stitching, sewing gathers or pintucks, etc. 0.0 (0) 0.0-7.0 (0-1/4) Stitch Length [mm (inch)] Auto Manual Reverse/ Reinforcement Stitching 2.5 0.2-5.0 Yes (3/32) (1/64-3/16) (J) Reverse No Left Straight stitch 2 J Basic stitching and sewing gathers or pintucks...
... J Temporarily securing 0.0 0.0-7.0 (0) (0-1/4) - - Utility stitches Twin Needle Walking Foot Presser Foot Stitch Name Pattern Application Stitch Width [mm (inch)] Auto Manual 1 J Basic stitching, sewing gathers or pintucks, etc. 0.0 (0) 0.0-7.0 (0-1/4) Stitch Length [mm (inch)] Auto Manual Reverse/ Reinforcement Stitching 2.5 0.2-5.0 Yes (3/32) (1/64-3/16) (J) Reverse No Left Straight stitch 2 J Basic stitching and sewing gathers or pintucks...
Users Manual - English
Page 73
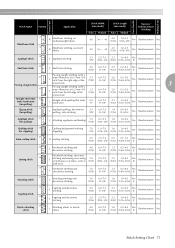
... Blind hem stitch 18 R Blind hem stitching on mediumweight fabrics R Blind hem stitching on stretch fabrics Stitch Width [mm (inch)] Stitch Length [mm (inch)] Auto Manual Auto Manual Reverse/ Reinforcement Stitching 00 3← - →3 2.0 (1/16) 1.0-3.5 (1/16-1/8) No Reinforcement No 00 3← - →3 2.0 (1/16) 1.0-3.5 (1/16-1/8) No Reinforcement No 19 Appliqué stitch J Appliqu...
... Blind hem stitch 18 R Blind hem stitching on mediumweight fabrics R Blind hem stitching on stretch fabrics Stitch Width [mm (inch)] Stitch Length [mm (inch)] Auto Manual Auto Manual Reverse/ Reinforcement Stitching 00 3← - →3 2.0 (1/16) 1.0-3.5 (1/16-1/8) No Reinforcement No 00 3← - →3 2.0 (1/16) 1.0-3.5 (1/16-1/8) No Reinforcement No 19 Appliqué stitch J Appliqu...
Users Manual - English
Page 74
UTILITY STITCHES Presser Foot Twin Needle Walking Foot Stitch Name Pattern Application 35 J Decorative stitching Stitch Width [mm (inch)] Auto 4.0 (3/16) Manual 0.0-7.0 (0-1/4) Stitch Length [mm (inch)] Auto Manual Reverse/ Reinforcement Stitching 3.0 (1/8) 2.0-4.0 (1/16-3/16) No Reinforcement No 36 J Decorative stitching 4.0 (3/16) 0.0-7.0 (0-1/4) 2.5 1.0-4.0 Yes (3/32) (1/16-3/16) (J) Reinforcement No 37 J Decorative stitching 5.5 (7/32) 0.0-7.0 (0-1/4) 1.6 1.0-4.0 Yes (1/16) (1/16...
UTILITY STITCHES Presser Foot Twin Needle Walking Foot Stitch Name Pattern Application 35 J Decorative stitching Stitch Width [mm (inch)] Auto 4.0 (3/16) Manual 0.0-7.0 (0-1/4) Stitch Length [mm (inch)] Auto Manual Reverse/ Reinforcement Stitching 3.0 (1/8) 2.0-4.0 (1/16-3/16) No Reinforcement No 36 J Decorative stitching 4.0 (3/16) 0.0-7.0 (0-1/4) 2.5 1.0-4.0 Yes (3/32) (1/16-3/16) (J) Reinforcement No 37 J Decorative stitching 5.5 (7/32) 0.0-7.0 (0-1/4) 1.6 1.0-4.0 Yes (1/16) (1/16...
Users Manual - English
Page 75
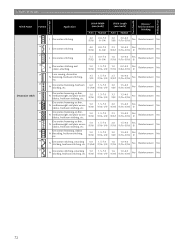
... Twin Needle Walking Foot Stitch Name Pattern Application 48 A Horizontal buttonholes on thin and mediumweight fabrics Stitch Width [mm (inch)] Stitch Length [mm (inch)] Auto Manual Auto Manual Reverse/ Reinforcement Stitching 5.0 (3/16) 3.0-5.0 (1/8-3/16) 0.5 (1/32) 0.2-1.0 (1/64-1/16) No Automatic reinforcement No 49 A Horizontal buttonholes on areas that have backings 5.0 (3/16) 3.0-5.0 (1/8-3/16) 0.5 (1/32) 0.2-1.0 (1/64...
... Twin Needle Walking Foot Stitch Name Pattern Application 48 A Horizontal buttonholes on thin and mediumweight fabrics Stitch Width [mm (inch)] Stitch Length [mm (inch)] Auto Manual Auto Manual Reverse/ Reinforcement Stitching 5.0 (3/16) 3.0-5.0 (1/8-3/16) 0.5 (1/32) 0.2-1.0 (1/64-1/16) No Automatic reinforcement No 49 A Horizontal buttonholes on areas that have backings 5.0 (3/16) 3.0-5.0 (1/8-3/16) 0.5 (1/32) 0.2-1.0 (1/64...
Users Manual - English
Page 76
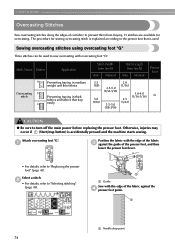
..., and then lower the presser foot lever. • For details, refer to the presser foot that fray easily Stitch Width [mm (inch)] Auto Manual Stitch Length [mm (inch)] Auto Manual Presser Foot 3.5 2.0 (1/8) (1/16) 2.5-5.0 (3/32-3/16) 1.0-4.0 (1/16-3/16) G 5.0 2.5 (3/16) (3/32) 3.5-5.0 (1/8-3/16) CAUTION ● Be sure to sew overcasting with the edge of cut...
..., and then lower the presser foot lever. • For details, refer to the presser foot that fray easily Stitch Width [mm (inch)] Auto Manual Stitch Length [mm (inch)] Auto Manual Presser Foot 3.5 2.0 (1/8) (1/16) 2.5-5.0 (3/32-3/16) 1.0-4.0 (1/16-3/16) G 5.0 2.5 (3/16) (3/32) 3.5-5.0 (1/8-3/16) CAUTION ● Be sure to sew overcasting with the edge of cut...
Users Manual - English
Page 77
... zigzag foot "J" Seven stitches can be used to "Replacing the presser foot" (page 43). Stitch Name Pattern Application Stitch Width [mm (inch)] Auto Manual Stitch Length [mm (inch)] Auto Manual Presser Foot Zigzag stitch (center 7 needle position) Zigzag stitch 8 (right needle position) Preventing fraying (center baseline/reverse stitching) 3.5 (1/8) Preventing fraying (right baseline...
... zigzag foot "J" Seven stitches can be used to "Replacing the presser foot" (page 43). Stitch Name Pattern Application Stitch Width [mm (inch)] Auto Manual Stitch Length [mm (inch)] Auto Manual Presser Foot Zigzag stitch (center 7 needle position) Zigzag stitch 8 (right needle position) Preventing fraying (center baseline/reverse stitching) 3.5 (1/8) Preventing fraying (right baseline...

Users Manual - English
Page 78
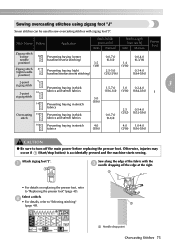
...foot lever. Remove the presser foot. a b a a Notch in thick fabrics while cutting the fabric Stitch Width [mm (inch)] Auto Manual 0.0 0.0-2.5 (0) (0-3/32) 3.5 (1/8) 3.5-5.0 (1/8-3/16) 5.0 (3/16) Stitch Length [mm (inch)] Auto Manual 2.5 0.2-5.0 (3/32) (1/64-3/16) Presser Foot 1.4 0.0-4.0 (1/16) (0-3/16) 2.0 (1/16) S 2.5 (3/32) 1.0-4.0 (1/16-3/16...foot" (page 43). Otherwise, injuries may occur if (Start/stop button) is attached. Note z Thread the needle manually when using the side cutter, or only attach the side cutter after threading the needle using the optional side cutter ...
...foot lever. Remove the presser foot. a b a a Notch in thick fabrics while cutting the fabric Stitch Width [mm (inch)] Auto Manual 0.0 0.0-2.5 (0) (0-3/32) 3.5 (1/8) 3.5-5.0 (1/8-3/16) 5.0 (3/16) Stitch Length [mm (inch)] Auto Manual 2.5 0.2-5.0 (3/32) (1/64-3/16) Presser Foot 1.4 0.0-4.0 (1/16) (0-3/16) 2.0 (1/16) S 2.5 (3/32) 1.0-4.0 (1/16-3/16...foot" (page 43). Otherwise, injuries may occur if (Start/stop button) is attached. Note z Thread the needle manually when using the side cutter, or only attach the side cutter after threading the needle using the optional side cutter ...
Users Manual - English
Page 80
..., refer to "Starting to "Replacing the presser foot" (page 43). Stitch Name Pattern Application 6 Basting stitch Temporarily securing Stitch Width [mm (inch)] Auto Manual Stitch Length [mm (inch)] Auto Manual - - a • For details on replacing the presser foot, refer to sew" (page 51). 78 Otherwise, injuries may occur if (Start/stop button...
..., refer to "Starting to "Replacing the presser foot" (page 43). Stitch Name Pattern Application 6 Basting stitch Temporarily securing Stitch Width [mm (inch)] Auto Manual Stitch Length [mm (inch)] Auto Manual - - a • For details on replacing the presser foot, refer to sew" (page 51). 78 Otherwise, injuries may occur if (Start/stop button...

Users Manual - English
Page 82
Two stitches are available for blind hem stitching. a a b Use a chalk to mark on stretch fabrics Stitch Width [mm (inch)] Auto Manual Stitch Length [mm (inch)] Auto Manual Presser Foot 00 3← - →3 2.0 (1/16) 1.0-3.5 (1/16-1/8) R CAUTION ● Be sure to turn off the main power before replacing the pressor foot. Otherwise, injuries may ...
Two stitches are available for blind hem stitching. a a b Use a chalk to mark on stretch fabrics Stitch Width [mm (inch)] Auto Manual Stitch Length [mm (inch)] Auto Manual Presser Foot 00 3← - →3 2.0 (1/16) 1.0-3.5 (1/16-1/8) R CAUTION ● Be sure to turn off the main power before replacing the pressor foot. Otherwise, injuries may ...
Users Manual - English
Page 85
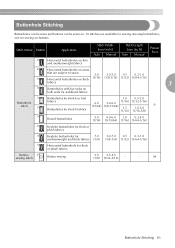
Stitch Name Pattern Application 48 Horizontal buttonholes on thin and mediumweight fabrics Stitch Width [mm (inch)] Auto Manual Stitch Length [mm (inch)] Auto Manual Presser Foot 49 Horizontal buttonholes on areas that are subject to strain 5.0 3.0-5.0 0.5 0.2-1.0 50 Horizontal buttonholes on thick (3/16) (1/8-3/16) (1/32) (1/64-1/16) fabrics 3 51 Buttonholes ...
Stitch Name Pattern Application 48 Horizontal buttonholes on thin and mediumweight fabrics Stitch Width [mm (inch)] Auto Manual Stitch Length [mm (inch)] Auto Manual Presser Foot 49 Horizontal buttonholes on areas that are subject to strain 5.0 3.0-5.0 0.5 0.2-1.0 50 Horizontal buttonholes on thick (3/16) (1/8-3/16) (1/32) (1/64-1/16) fabrics 3 51 Buttonholes ...

Users Manual - English
Page 92
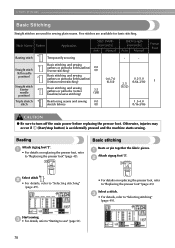
... the fabric. Stitch Name Pattern Application Straight stitch (center 3 needle position) Attaching zippers Sewing concealed seams and pintucks Stitch Width [mm (inch)] Auto Manual Stitch Length [mm (inch)] Auto Manual Presser Foot 3.5 0.0-7.0 2.5 0.2-5.0 (1/8) (0-1/4) (3/32) (1/64-3/16) I CAUTION ● Be sure to the c edge of the fabric facing each other , sew reverse stitches after...
... the fabric. Stitch Name Pattern Application Straight stitch (center 3 needle position) Attaching zippers Sewing concealed seams and pintucks Stitch Width [mm (inch)] Auto Manual Stitch Length [mm (inch)] Auto Manual Presser Foot 3.5 0.0-7.0 2.5 0.2-5.0 (1/8) (0-1/4) (3/32) (1/64-3/16) I CAUTION ● Be sure to the c edge of the fabric facing each other , sew reverse stitches after...

Users Manual - English
Page 97
... Stretch Fabrics and Elastic Tape 95 Stretch stitching Attach zigzag foot "J". b • For details, refer to stretch fabrics Stitch Width [mm (inch)] Auto Manual 0.0 0.0-7.0 (0) (0-1/4) Stitch Length [mm (inch)] Auto Manual Presser Foot 2.5 1.5-4.0 (3/32) (1/16-3/16) 1.0 1.0-3.0 2.5 1.0-4.0 (1/16) (1/16-1/8) (3/32) (1/16-3/16) J 5.0 1.5-7.0 (3/16) (1/16-1/4) 3 1.0 0.2-4.0 (1/16) (1/64-3/16) 4.0 0.0-7.0 (3/16) (0-1/4) Observe the corresponding precautions when performing...
... Stretch Fabrics and Elastic Tape 95 Stretch stitching Attach zigzag foot "J". b • For details, refer to stretch fabrics Stitch Width [mm (inch)] Auto Manual 0.0 0.0-7.0 (0) (0-1/4) Stitch Length [mm (inch)] Auto Manual Presser Foot 2.5 1.5-4.0 (3/32) (1/16-3/16) 1.0 1.0-3.0 2.5 1.0-4.0 (1/16) (1/16-1/8) (3/32) (1/16-3/16) J 5.0 1.5-7.0 (3/16) (1/16-1/4) 3 1.0 0.2-4.0 (1/16) (1/64-3/16) 4.0 0.0-7.0 (3/16) (0-1/4) Observe the corresponding precautions when performing...


