
Product Information - English
Page 1
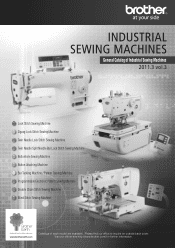
Please find our office to inquire on outside back cover. Visit our official site http://www.brother.com/ for further information. General Catalog of Industrial Sewing Machines 2011.3 vol.3 Lock Stitch Sewing Machine Zigzag Lock Stitch Sewing Machine Twin Needle Lock Stitch Sewing Machine Twin Needle Split Needle Bar Lock Stitch Sewing Machine Buttonhole Sewing Machine Button Attaching Machine Bar Tacking Machine / Pattern Tacking Machine Programmable Electronic Pattern Sewing Machine Double Chain Stitch Sewing Machine Blind Stitch Sewing Machine Catalogs of each model are available.
Please find our office to inquire on outside back cover. Visit our official site http://www.brother.com/ for further information. General Catalog of Industrial Sewing Machines 2011.3 vol.3 Lock Stitch Sewing Machine Zigzag Lock Stitch Sewing Machine Twin Needle Lock Stitch Sewing Machine Twin Needle Split Needle Bar Lock Stitch Sewing Machine Buttonhole Sewing Machine Button Attaching Machine Bar Tacking Machine / Pattern Tacking Machine Programmable Electronic Pattern Sewing Machine Double Chain Stitch Sewing Machine Blind Stitch Sewing Machine Catalogs of each model are available.

Product Information - English
Page 2
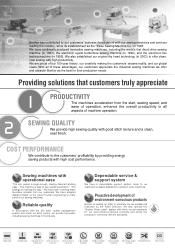
...produce a comfortable working environment for operators. Pictographic indications Lock stitch Chain stitch Double chain stitch Button sewing Button holing Button holing Overedge stitch Safety stitch 1-needle 2-needle Sewing machines with low power consumption and running cost, employing compact motors developed in eliminating lubrication to the needle...optimally designed feed, needle bar, and thread take-up by applying special surface treatment to best fit the machine heads. Sewing machines with clean sewing Brother was the first to succeed in -house to the sliding portions.
...produce a comfortable working environment for operators. Pictographic indications Lock stitch Chain stitch Double chain stitch Button sewing Button holing Button holing Overedge stitch Safety stitch 1-needle 2-needle Sewing machines with low power consumption and running cost, employing compact motors developed in eliminating lubrication to the needle...optimally designed feed, needle bar, and thread take-up by applying special surface treatment to best fit the machine heads. Sewing machines with clean sewing Brother was the first to succeed in -house to the sliding portions.
Product Information - English
Page 3
... adopted designs based on the current human engineering to assure satisfactory operation of environment-conscious products Brother is large enough, making the customers' dreams reality, and our global views. "The settings for sewing are proud of our sewing machines. We have a dependable support system close to our customers to many parts of our 100...
... adopted designs based on the current human engineering to assure satisfactory operation of environment-conscious products Brother is large enough, making the customers' dreams reality, and our global views. "The settings for sewing are proud of our sewing machines. We have a dependable support system close to our customers to many parts of our 100...
Product Information - English
Page 4
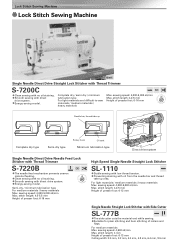
Lock Stitch Sewing Machine Lock Stitch Sewing Machine S-7200C Single Needle Direct Drive Straight Lock Stitcher with Thread Trimmer S-7200C ••Clean sewing with oil from the needle bar and thread take -up area. Energy-saving model. stitch length: 4.5-5.5 mm Height...presser foot: 6-13 mm Cutting width: 2.5 mm, 3.2 mm, 4.0 mm, 4.8 mm, 6.4 mm, 9.5 mm Smooth sewing with no oil staining. Energy-saving model. Smooth sewing with Thread Trimmer S-7220B •The needle feed mechanism prevents uneven •••material feeding. For medium materials Max. stitch...
Lock Stitch Sewing Machine Lock Stitch Sewing Machine S-7200C Single Needle Direct Drive Straight Lock Stitcher with Thread Trimmer S-7200C ••Clean sewing with oil from the needle bar and thread take -up area. Energy-saving model. stitch length: 4.5-5.5 mm Height...presser foot: 6-13 mm Cutting width: 2.5 mm, 3.2 mm, 4.0 mm, 4.8 mm, 6.4 mm, 9.5 mm Smooth sewing with no oil staining. Energy-saving model. Smooth sewing with Thread Trimmer S-7220B •The needle feed mechanism prevents uneven •••material feeding. For medium materials Max. stitch...

Product Information - English
Page 5
... Rotary hook Oil pan Wick lubrication type Built-in type motor driven system Zigzag Lock Stitch Sewing Machine Electronic Direct Drive Zigzag Lock Stitcher Z-8550A Clean sewing with Thread Trimmer Z-8560A •The compact knife mechanism in a single unit enables simple ...energy saving. •Exceptional responsiveness for comfortable sewing. ••A downsized and flat control box providing a much larger leg space to be utilized. Lock Stitch Sewing Machine / Zigzag Lock Stitch Sewing Machine Lock Stitch Sewing Machine S-62600A Single Needle Straight Lock Stitcher with no...
... Rotary hook Oil pan Wick lubrication type Built-in type motor driven system Zigzag Lock Stitch Sewing Machine Electronic Direct Drive Zigzag Lock Stitcher Z-8550A Clean sewing with Thread Trimmer Z-8560A •The compact knife mechanism in a single unit enables simple ...energy saving. •Exceptional responsiveness for comfortable sewing. ••A downsized and flat control box providing a much larger leg space to be utilized. Lock Stitch Sewing Machine / Zigzag Lock Stitch Sewing Machine Lock Stitch Sewing Machine S-62600A Single Needle Straight Lock Stitcher with no...

Product Information - English
Page 6
... Twin Needle Lock Stitcher T-8420C •High position of •foundation garments. Minimum lubrication type For heavy materials Max. sewing speed: 3,000 sti/min Max. Twin Needle Lock Stitch Sewing Machine Twin Needle Lock Stitch Sewing Machine T-8422C Twin Needle Direct Drive Lock Stitcher T-8421C •Direct drive / no oil staining Minimum lubrication type For...
... Twin Needle Lock Stitcher T-8420C •High position of •foundation garments. Minimum lubrication type For heavy materials Max. sewing speed: 3,000 sti/min Max. Twin Needle Lock Stitch Sewing Machine Twin Needle Lock Stitch Sewing Machine T-8422C Twin Needle Direct Drive Lock Stitcher T-8421C •Direct drive / no oil staining Minimum lubrication type For...

Product Information - English
Page 7
... Trimmer T-8752C •Stable thread trimmer operation and large hook provide high •productivity. Twin Needle Split Needle Bar Lock Stitch Sewing Machine Twin Needle Split Needle Bar Lock Stitch Sewing Machine Twin Needle Direct Drive Split Needle Bar Lock Stitcher with Thread Trimmer T-8452C Stable thread trimmer operation enables high productivity. ••...
... Trimmer T-8752C •Stable thread trimmer operation and large hook provide high •productivity. Twin Needle Split Needle Bar Lock Stitch Sewing Machine Twin Needle Split Needle Bar Lock Stitch Sewing Machine Twin Needle Direct Drive Split Needle Bar Lock Stitcher with Thread Trimmer T-8452C Stable thread trimmer operation enables high productivity. ••...
Product Information - English
Page 8
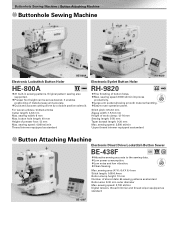
...Sewing Machine / Button Attaching Machine Buttonhole Sewing Machine HE-800A Electronic Lockstitch Button Holer HE-800A •21 built-in sewing patterns. sewing width: 6 mm Max. Large arm pocket allowing smooth material handling. ••Easy-to the sewing data. •Low power consumption. •Low noise and low vibration. ••Clean Sewing... and thread wiper equipped as standard Button Attaching Machine Electronic Direct Drive Lockstitch Button Sewer BE-438F Attractive sewing accurate to -use operation panel. sewing speed: 2,500 sti/min Upper thread trimmer ...
...Sewing Machine / Button Attaching Machine Buttonhole Sewing Machine HE-800A Electronic Lockstitch Button Holer HE-800A •21 built-in sewing patterns. sewing width: 6 mm Max. Large arm pocket allowing smooth material handling. ••Easy-to the sewing data. •Low power consumption. •Low noise and low vibration. ••Clean Sewing... and thread wiper equipped as standard Button Attaching Machine Electronic Direct Drive Lockstitch Button Sewer BE-438F Attractive sewing accurate to -use operation panel. sewing speed: 2,500 sti/min Upper thread trimmer ...
Product Information - English
Page 10
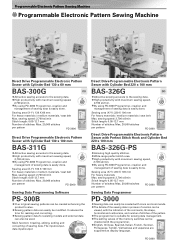
Programmable Electronic Pattern Sewing Machine Programmable Electronic Pattern Sewing Machine BAS-311G Direct Drive Programmable Electronic Pattern Sewer with Cylinder Bed 130 x 60 mm BAS-300G Attractive sewing accurate to the sewing data. ••High productivity with maximum sewing speed, •2,700 sti/min. By using PD-3000 Programmer, creation and management of stitches: Max. 20,000...
Programmable Electronic Pattern Sewing Machine Programmable Electronic Pattern Sewing Machine BAS-311G Direct Drive Programmable Electronic Pattern Sewer with Cylinder Bed 130 x 60 mm BAS-300G Attractive sewing accurate to the sewing data. ••High productivity with maximum sewing speed, •2,700 sti/min. By using PD-3000 Programmer, creation and management of stitches: Max. 20,000...
Product Information - English
Page 11
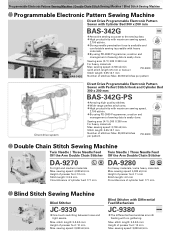
...using PD-3000 Programmer, creation and management of sewing data is possible with maximum sewing speed, •2,700 sti/min. Programmable Electronic Pattern Sewing Machine / Double Chain Stitch Sewing Machine / Blind Stitch Sewing Machine Programmable Electronic Pattern Sewing Machine Direct Drive Programmable Electronic Pattern Sewer with Cylinder.... stitch length: 3.2-8.5 mm Height of stitches: Max. 20,000 stitches per pattern PD-3000 Double Chain Stitch Sewing Machine Twin Needle / Three Needle Feed Twin Needle / Three Needle Feed Off the Arm Double Chain Stitcher Off the Arm...
...using PD-3000 Programmer, creation and management of sewing data is possible with maximum sewing speed, •2,700 sti/min. Programmable Electronic Pattern Sewing Machine / Double Chain Stitch Sewing Machine / Blind Stitch Sewing Machine Programmable Electronic Pattern Sewing Machine Direct Drive Programmable Electronic Pattern Sewer with Cylinder.... stitch length: 3.2-8.5 mm Height of stitches: Max. 20,000 stitches per pattern PD-3000 Double Chain Stitch Sewing Machine Twin Needle / Three Needle Feed Twin Needle / Three Needle Feed Off the Arm Double Chain Stitcher Off the Arm...

Instruction Manual - English
Page 2
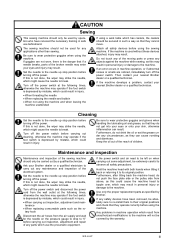
... This instruction manual and the indications and symbols that you should be done. (For example, the symbol at left means "you very much for buying a BROTHER sewing machine. The picture inside the triangle indicates the nature of the caution that must be careful of this term indicate situations where failure to follow this... of the thing that must be caused by these indications and symbols are provided in the instruction manual. Thank you must make the ground connection".) KE-484C i
... This instruction manual and the indications and symbols that you should be done. (For example, the symbol at left means "you very much for buying a BROTHER sewing machine. The picture inside the triangle indicates the nature of the caution that must be careful of this term indicate situations where failure to follow this... of the thing that must be caused by these indications and symbols are provided in the instruction manual. Thank you must make the ground connection".) KE-484C i

Instruction Manual - English
Page 3
... cords should be within the range of the rated voltage for the sewing machine's electrical consumption. Furthermore, do not get into your eyes or onto your Brother dealer or a qualified electrician for the sewing machine's total air consumption. If using a work that they do not ...excessively bend the cords or secure them too firmly with correct operation. 2. Be sure to direct sunlight during use . If the ground connection is not secure, you run a high risk of the control box. ii KE-484C...
... cords should be within the range of the rated voltage for the sewing machine's electrical consumption. Furthermore, do not get into your eyes or onto your Brother dealer or a qualified electrician for the sewing machine's total air consumption. If using a work that they do not ...excessively bend the cords or secure them too firmly with correct operation. 2. Be sure to direct sunlight during use . If the ground connection is not secure, you run a high risk of the control box. ii KE-484C...
Instruction Manual - English
Page 4
...the air supply and wait for any applications other than sewing. If the machine develops a problem, contact your nearest Brother dealer or a qualified technician. Maintenance and inspection Maintenance and inspection of the broken needle may enter your Brother dealer or a qualified electrician to carry out any ...the machine head with both hands when tilting it back or returning it to observe all safety devices before using the machine. Furthermore, after tilting back the machine head, do not drink the oil or eat the grease under any maintenance and inspection of children. KE-484C ...
...the air supply and wait for any applications other than sewing. If the machine develops a problem, contact your nearest Brother dealer or a qualified technician. Maintenance and inspection Maintenance and inspection of the broken needle may enter your Brother dealer or a qualified electrician to carry out any ...the machine head with both hands when tilting it back or returning it to observe all safety devices before using the machine. Furthermore, after tilting back the machine head, do not drink the oil or eat the grease under any maintenance and inspection of children. KE-484C ...
Instruction Manual - English
Page 5
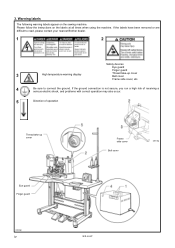
Please follow the instructions on the sewing machine. If the labels have been removed or are difficult to read, please contact your nearest Brother dealer. 1 2 3 High temperature warning display Safety devices Eye guard Finger guard Thread take -up cover Belt cover Frame side cover, etc. 4 Be sure to connect ...with correct operation may also occur. 5 Direction of operation Thread take -up cover Frame side cover Belt cover 2670Q Eye guard Finger guard 3220Q iv KE-484C 3. Warning labels The following warning labels appear on the labels at all times when using the machine.
Please follow the instructions on the sewing machine. If the labels have been removed or are difficult to read, please contact your nearest Brother dealer. 1 2 3 High temperature warning display Safety devices Eye guard Finger guard Thread take -up cover Belt cover Frame side cover, etc. 4 Be sure to connect ...with correct operation may also occur. 5 Direction of operation Thread take -up cover Frame side cover Belt cover 2670Q Eye guard Finger guard 3220Q iv KE-484C 3. Warning labels The following warning labels appear on the labels at all times when using the machine.
Instruction Manual - English
Page 9
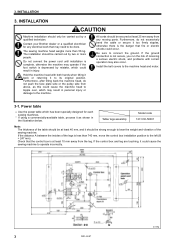
... the pulley side from above, as shown in injury. Contact your Brother dealer or a qualified electrician for each sewing machines. * If using a commercially-available table, process it could cause the machine head to bear the weight and vibration of the table should be ... the control box and leg are touching, it as this could cause the sewing machine to the machine head and motor. 3-1. Install the belt covers to operate incorrectly. 2739Q 3 KE-484C INSTALLATION CAUTION Machine installation should be carried out by a qualified technician. All cords should be ...
... the pulley side from above, as shown in injury. Contact your Brother dealer or a qualified electrician for each sewing machines. * If using a commercially-available table, process it could cause the machine head to bear the weight and vibration of the table should be ... the control box and leg are touching, it as this could cause the sewing machine to the machine head and motor. 3-1. Install the belt covers to operate incorrectly. 2739Q 3 KE-484C INSTALLATION CAUTION Machine installation should be carried out by a qualified technician. All cords should be ...

Instruction Manual - English
Page 12
...illustration above in order to the accessory cord connector (8). Check that the sewing machine will not start if the switching plate is turned on top of the rubber cushions (3) and cushions (4). 3-6. Installing the machine head 2494Q 2495Q Fig. 1 2496Q 1. Connect the motor cord connector ... bolts and two nuts. 4. KE-484C 6 Installing the switching plate 3. Insert the head hinges (1) into the machine head so that they are parallel, and then secure them from starting when the machine head is attached to the machine head prevent the sewing machine from being clamped by the...
...illustration above in order to the accessory cord connector (8). Check that the sewing machine will not start if the switching plate is turned on top of the rubber cushions (3) and cushions (4). 3-6. Installing the machine head 2494Q 2495Q Fig. 1 2496Q 1. Connect the motor cord connector ... bolts and two nuts. 4. KE-484C 6 Installing the switching plate 3. Insert the head hinges (1) into the machine head so that they are parallel, and then secure them from starting when the machine head is attached to the machine head prevent the sewing machine from being clamped by the...

Instruction Manual - English
Page 21
...KE-484C Check that the spring (16) will come out when the screw (14) is just hooked loosely onto the work table leg (12) with the two screws (2) and the two screws (4). INSTALLATION 3-13. Installing the belt cover 1. Install the foot switch (3) to the work table leg, it may cause the sewing machine... to front, and then install it to remove the belt cover (3) when tilting back the machine head. 2456Q 3-14.
...KE-484C Check that the spring (16) will come out when the screw (14) is just hooked loosely onto the work table leg (12) with the two screws (2) and the two screws (4). INSTALLATION 3-13. Installing the belt cover 1. Install the foot switch (3) to the work table leg, it may cause the sewing machine... to front, and then install it to remove the belt cover (3) when tilting back the machine head. 2456Q 3-14.

Instruction Manual - English
Page 23
INSTALLATION 3-16. If the machine is used without these devices attached, injury may result. Installing the eye guard CAUTION Attach all safety devices before using the sewing machine. Install the eye guard assy (2) to the spool stand instruction manual, and then install the spool stand (1) at the right side of the work table. 2509Q 3-17. 3. Installing the spool stand Assemble the spool stand (1) while referring to the face plate (1) with the two screws (3). 2510Q 17 KE-484C
INSTALLATION 3-16. If the machine is used without these devices attached, injury may result. Installing the eye guard CAUTION Attach all safety devices before using the sewing machine. Install the eye guard assy (2) to the spool stand instruction manual, and then install the spool stand (1) at the right side of the work table. 2509Q 3-17. 3. Installing the spool stand Assemble the spool stand (1) while referring to the face plate (1) with the two screws (3). 2510Q 17 KE-484C
Instruction Manual - English
Page 24
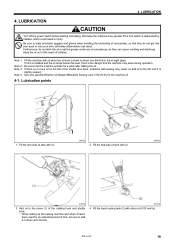
...100 mm2/s). Fill the liquid cooling tank (2) with sewing may seize during operation. KE-484C 18 Note 3: If there is the danger that they can result. Add oil to the races (1) of the rotating hook and shuttle hook. * When setting up the sewing machine and when it is down to the felt. 2513Q ... of time, be sure to add 2-3 drops oil to about one-third full in injury. Note 1: Fill the machine with oil when the oil level is slightly soaked. Note 4: Use only specified Brother oil (Nisseki Mitsubishi Sewing Lube 10N;VG10) for a while after adding the oil. Lubrication points 1.
...100 mm2/s). Fill the liquid cooling tank (2) with sewing may seize during operation. KE-484C 18 Note 3: If there is the danger that they can result. Add oil to the races (1) of the rotating hook and shuttle hook. * When setting up the sewing machine and when it is down to the felt. 2513Q ... of time, be sure to add 2-3 drops oil to about one-third full in injury. Note 1: Fill the machine with oil when the oil level is slightly soaked. Note 4: Use only specified Brother oil (Nisseki Mitsubishi Sewing Lube 10N;VG10) for a while after adding the oil. Lubrication points 1.

Instruction Manual - English
Page 29
... press the RESET switch (2) once more when you operate the thread wiper switch while the power is being carried out, the sewing machine will then resume sewing. 3168Q 5-5. WIND switch (3) once more. * The work clamp has returned to the desired position, depress the start switch. ...RESET switch (2) on , the work clamp may obstruct the thread wiper. 3169Q 23 KE-484C Turn the pulley by hand to set the needle to release the lock. 2. Press the BOBBIN. The sewing machine will immediately stop operating. 3167Q Canceling an emergency stop sounding. 3. WIND switch (3) to...
... press the RESET switch (2) once more when you operate the thread wiper switch while the power is being carried out, the sewing machine will then resume sewing. 3168Q 5-5. WIND switch (3) once more. * The work clamp has returned to the desired position, depress the start switch. ...RESET switch (2) on , the work clamp may obstruct the thread wiper. 3169Q 23 KE-484C Turn the pulley by hand to set the needle to release the lock. 2. Press the BOBBIN. The sewing machine will immediately stop operating. 3167Q Canceling an emergency stop sounding. 3. WIND switch (3) to...


