Users Manual - English and Spanish
Page 2
..., electrical or mechanical adjustment. • While the machine is required when sewing: • Always pay close attention to turn it off, then grasp the plug and pull it by any other part may fall, resulting in the instruction manual: • To unplug the machine, switch the machine to the symbol "O" position to the needle. Plug...
..., electrical or mechanical adjustment. • While the machine is required when sewing: • Always pay close attention to turn it off, then grasp the plug and pull it by any other part may fall, resulting in the instruction manual: • To unplug the machine, switch the machine to the symbol "O" position to the needle. Plug...
Users Manual - English and Spanish
Page 3
...brother.com SAVE THESE INSTRUCTIONS This machine is damaged, it to inspect and adjust the machine yourself. The machine may start unexpectedly and cause personal injury or damage to the machine. • Switch the machine to the symbol "O" position to turn on the machine...aged from all moving parts. Cleaning and user maintenance shall not be used by or near a space heater, iron, halogen lamp, or other parts to assure correct ...needle to break. • Do not push or pull the fabric when sewing, and follow careful instruction when freehand stitching so that they have been given ...
...brother.com SAVE THESE INSTRUCTIONS This machine is damaged, it to inspect and adjust the machine yourself. The machine may start unexpectedly and cause personal injury or damage to the machine. • Switch the machine to the symbol "O" position to turn on the machine...aged from all moving parts. Cleaning and user maintenance shall not be used by or near a space heater, iron, halogen lamp, or other parts to assure correct ...needle to break. • Do not push or pull the fabric when sewing, and follow careful instruction when freehand stitching so that they have been given ...
Users Manual - English and Spanish
Page 4
... 19 Please read before sewing 19 Starting sewing 19 Trial sewing 20 Changing the sewing direction 20 Sewing thick fabrics 20 Sewing thin fabrics 21 Sewing stretch fabrics 21 Stitching cylindrical pieces 21 Thread tension 21 3. KNOWING YOUR SEWING MACHINE 4 ACCESSORIES 4 Optional accessories 4 THE MAIN PARTS 5 Flat bed attachment 5 USING YOUR SEWING MACHINE 6 Connecting plugs 6 Main power and sewing light switch 7 Foot controller...
... 19 Please read before sewing 19 Starting sewing 19 Trial sewing 20 Changing the sewing direction 20 Sewing thick fabrics 20 Sewing thin fabrics 21 Sewing stretch fabrics 21 Stitching cylindrical pieces 21 Thread tension 21 3. KNOWING YOUR SEWING MACHINE 4 ACCESSORIES 4 Optional accessories 4 THE MAIN PARTS 5 Flat bed attachment 5 USING YOUR SEWING MACHINE 6 Connecting plugs 6 Main power and sewing light switch 7 Foot controller...
Users Manual - English and Spanish
Page 5
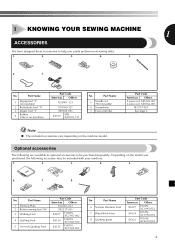
...: XE7064-001 XF3557-001 See page 5 Note ● The included accessories vary depending on machine) Part Code Americas Others XC4901-121 X59369-321 XE9369-001 SA156 SFB: XA5539-151 No. Depending on the model you easily perform most sewing tasks. 1. 2. 3. 4. 5. 6. 7. 1 KNOWING YOUR SEWING MACHINE 1 ACCESSORIES We have designed these accessories to be included with your...
...: XE7064-001 XF3557-001 See page 5 Note ● The included accessories vary depending on machine) Part Code Americas Others XC4901-121 X59369-321 XE9369-001 SA156 SFB: XA5539-151 No. Depending on the model you easily perform most sewing tasks. 1. 2. 3. 4. 5. 6. 7. 1 KNOWING YOUR SEWING MACHINE 1 ACCESSORIES We have designed these accessories to be included with your...
Users Manual - English and Spanish
Page 6
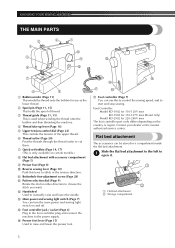
... foot lever (Page 15) Used to 1 open it. 1 2 1 Flat bed attachment 2 Storage compartment 5 KNOWING YOUR SEWING MACHINE THE MAIN PARTS 3 2 1 4 B 5 A C 6 0 7 8 9 1 Bobbin winder (Page 11) This winds the thread onto the bobbin for 220-240V area The foot controller part code differs depending on the country or region. F D G E G Foot controller (Page 7) You can use as...
... foot lever (Page 15) Used to 1 open it. 1 2 1 Flat bed attachment 2 Storage compartment 5 KNOWING YOUR SEWING MACHINE THE MAIN PARTS 3 2 1 4 B 5 A C 6 0 7 8 9 1 Bobbin winder (Page 11) This winds the thread onto the bobbin for 220-240V area The foot controller part code differs depending on the country or region. F D G E G Foot controller (Page 7) You can use as...
Users Manual - English and Spanish
Page 9
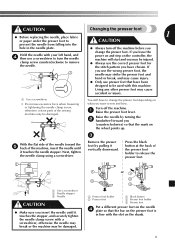
...; Do not use excessive force when loosening or tightening the needle clamp screw, otherwise certain parts of the sewing machine may be damaged. 3 Remove the presser | Press the black foot by turning the 2 handwheel toward the 5 back of the machine, insert the needle until it touches the stopper, and securely tighten the needle clamp...
...; Do not use excessive force when loosening or tightening the needle clamp screw, otherwise certain parts of the sewing machine may be damaged. 3 Remove the presser | Press the black foot by turning the 2 handwheel toward the 5 back of the machine, insert the needle until it touches the stopper, and securely tighten the needle clamp...
Users Manual - English and Spanish
Page 12
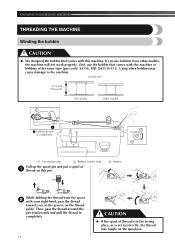
...If the spool of thread is in the groove on the spool pin. KNOWING YOUR SEWING MACHINE THREADING THE MACHINE Winding the bobbin CAUTION ● We designed the bobbin that comes with this machine or bobbins of the same type (part code: SA156, SFB: XA5539-151). If you use the bobbin that comes with ...your right hand, pass the thread toward you, in the wrong place, or is set incorrectly, the thread may cause damage to the machine. Only use bobbins...
...If the spool of thread is in the groove on the spool pin. KNOWING YOUR SEWING MACHINE THREADING THE MACHINE Winding the bobbin CAUTION ● We designed the bobbin that comes with this machine or bobbins of the same type (part code: SA156, SFB: XA5539-151). If you use the bobbin that comes with ...your right hand, pass the thread toward you, in the wrong place, or is set incorrectly, the thread may cause damage to the machine. Only use bobbins...
Users Manual - English and Spanish
Page 20
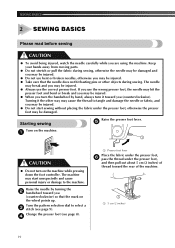
...damage the needle or fabric, and you may start sewing without placing the fabric under the presser foot, and then pull out about 5 cm (2 inches) of thread toward the rear of the machine. 1 1 5 cm (2 inches) 19 Keep your hands away from moving parts. ● Do not stretch or pull the ...fabric during sewing. The machine may be damaged. Change the presser foot (see page 9). If you use the correct presser...
...damage the needle or fabric, and you may start sewing without placing the fabric under the presser foot, and then pull out about 5 cm (2 inches) of thread toward the rear of the machine. 1 1 5 cm (2 inches) 19 Keep your hands away from moving parts. ● Do not stretch or pull the ...fabric during sewing. The machine may be damaged. Change the presser foot (see page 9). If you use the correct presser...
Users Manual - English and Spanish
Page 36
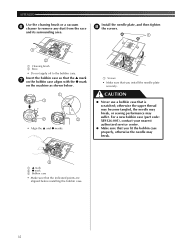
...case so that the ▲ mark 7 on the bobbin case aligns with the ● mark on the machine as shown below. 1 1 2 2 • Align the ▲ and ● marks. 1 Screws...8226; Make sure that is scratched; otherwise the upper thread may become tangled, the needle may break, or sewing performance may break. 3 1 ▲ mark 2 ● mark 3 Bobbin case • Make sure... that the indicated points are aligned before installing the bobbin case. 35 For a new bobbin case (part code: XE9326-001), contact your nearest authorized service center. ● Make sure that you install the...
...case so that the ▲ mark 7 on the bobbin case aligns with the ● mark on the machine as shown below. 1 1 2 2 • Align the ▲ and ● marks. 1 Screws...8226; Make sure that is scratched; otherwise the upper thread may become tangled, the needle may break, or sewing performance may break. 3 1 ▲ mark 2 ● mark 3 Bobbin case • Make sure... that the indicated points are aligned before installing the bobbin case. 35 For a new bobbin case (part code: XE9326-001), contact your nearest authorized service center. ● Make sure that you install the...


